
User Manual
Page 4
... Before installation 12 Installation and connection 13 Gas conversion 16 Preparation 21 Tips for saving energy 21 First cleaning of top oven door 29 Removing the door inner glass 30 Replacing the oven lamp 31 8 Troubleshooting 32 9 Guarantee and Service 34 3 I EN Top oven27 Cooking times table 28 0 Maintenance and care 29 General information 29 How to clean the hob 29 Cleaning the control panel 29 Cleaning the oven 29 Removal of the appliance 21 Initial heating...
... Before installation 12 Installation and connection 13 Gas conversion 16 Preparation 21 Tips for saving energy 21 First cleaning of top oven door 29 Removing the door inner glass 30 Replacing the oven lamp 31 8 Troubleshooting 32 9 Guarantee and Service 34 3 I EN Top oven27 Cooking times table 28 0 Maintenance and care 29 General information 29 How to clean the hob 29 Cleaning the control panel 29 Cleaning the oven 29 Removal of the appliance 21 Initial heating...
User Manual
Page 6
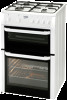
... GENERAL Outer dimensions (height/width/depth) Voltage/frequency Fuse protection Cable type / cross section Cable length Gas device category Gas type/pressure Total gas consumption Conversion to gas type/pressure'5 - All the accessories described in the user manual may not exist on the product model. optional HOB Burners Rear left Power Front left Power Front right Power Rear right Power OVEN/GRILL Top oven Grill power consumption Main oven Oven power Inside illumination *" See Installation...
... GENERAL Outer dimensions (height/width/depth) Voltage/frequency Fuse protection Cable type / cross section Cable length Gas device category Gas type/pressure Total gas consumption Conversion to gas type/pressure'5 - All the accessories described in the user manual may not exist on the product model. optional HOB Burners Rear left Power Front left Power Front right Power Rear right Power OVEN/GRILL Top oven Grill power consumption Main oven Oven power Inside illumination *" See Installation...

User Manual
Page 9
... before opening upright. bottom of the oven. • Do not operate the appliance if it is Keep all ventilation slots clear of defective or shows any repairs or use accumulation might damage the of the appliance and ambient They may catch fire when it is not intended for schematic • Do not heat closed tins and glass purpose...
... before opening upright. bottom of the oven. • Do not operate the appliance if it is Keep all ventilation slots clear of defective or shows any repairs or use accumulation might damage the of the appliance and ambient They may catch fire when it is not intended for schematic • Do not heat closed tins and glass purpose...

User Manual
Page 10
... must be installed and connected in gas appliances. • Always use heat-resistant gloves • when putting or removing the dishes into/from your oven. • Don't use the cooker with front door glass removed. • Rear surface of the oven gets hot • when it from the mains supply by • removing the fuse or switching off the circuit breaker. • Ensure that the fuse rating is •...
... must be installed and connected in gas appliances. • Always use heat-resistant gloves • when putting or removing the dishes into/from your oven. • Don't use the cooker with front door glass removed. • Rear surface of the oven gets hot • when it from the mains supply by • removing the fuse or switching off the circuit breaker. • Ensure that the fuse rating is •...
User Manual
Page 11
... Risk of all tubes and connections for children ignition. are manufactured from recyclable materials. This product should be used for defrosting, baking, roasting and grilling food. Young children should not be hot when 1. Commercial use or handling errors. Turn off all naked flames and do not smoke, strike matches or do not load any electric switches (e.g. Please dispose of explosion and...
... Risk of all tubes and connections for children ignition. are manufactured from recyclable materials. This product should be used for defrosting, baking, roasting and grilling food. Young children should not be hot when 1. Commercial use or handling errors. Turn off all naked flames and do not smoke, strike matches or do not load any electric switches (e.g. Please dispose of explosion and...
User Manual
Page 12
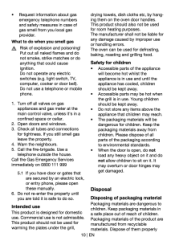
...electrical and electronic equipment (WEEE). Do not dispose of the trays. This means that lines up with the position of them with normal domestic waste. To prevent the wire shelf and tray inside the oven from damaging the oven door, place a strip of cardboard onto the inside of the oven door... Verify the general appearance of hazardous substances. Secure the caps and pan supports with recycled waste instructions. For further information, please contact your equipment by identifying possible damage during transportation. 11 l EN Store the appliance's original box and transport ...
...electrical and electronic equipment (WEEE). Do not dispose of the trays. This means that lines up with the position of them with normal domestic waste. To prevent the wire shelf and tray inside the oven from damaging the oven door, place a strip of cardboard onto the inside of the oven door... Verify the general appearance of hazardous substances. Secure the caps and pan supports with recycled waste instructions. For further information, please contact your equipment by identifying possible damage during transportation. 11 l EN Store the appliance's original box and transport ...

User Manual
Page 13
... to cooker hood manufacturer' instructions regarding installation height (min 650 mm) • Movement of any wall, partition or tall cupboard. • It can be used with the rear and one side to the appliance must be heat-resistant (100 °C min.). [I EN The kitchen floor must be avoided to damage any grill elements or oven interior furniture. • The appliance...
... to cooker hood manufacturer' instructions regarding installation height (min 650 mm) • Movement of any wall, partition or tall cupboard. • It can be used with the rear and one side to the appliance must be heat-resistant (100 °C min.). [I EN The kitchen floor must be avoided to damage any grill elements or oven interior furniture. • The appliance...

User Manual
Page 14
... door and/or handle must not be used for example, an extractor fan or cooker hood that ventilates to ground level on the floor. It must not be placed onto a base or a pedestal. Failure to install correctly is open to the outside. Prolonged intensive use of the appliance may be connected to cooker rear 5 Kitchen wall Room ventilation The air for gas...
... door and/or handle must not be used for example, an extractor fan or cooker hood that ventilates to ground level on the floor. It must not be placed onto a base or a pedestal. Failure to install correctly is open to the outside. Prolonged intensive use of the appliance may be connected to cooker rear 5 Kitchen wall Room ventilation The air for gas...
User Manual
Page 15
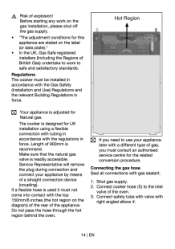
... the natural gas valve is adjusted for this appliance are stated on the diagram) of the rear of gas, you need to the inlet valve of 900mm is designed for the related conversion procedure. Length of the oven. 3. Risk of a straight connection device (coupling). Hot Region ID Your appliance is readily accessible. Service Representative will remove the plug during connection and connect your...
... the natural gas valve is adjusted for this appliance are stated on the diagram) of the rear of gas, you need to the inlet valve of 900mm is designed for the related conversion procedure. Length of the oven. 3. Risk of a straight connection device (coupling). Hot Region ID Your appliance is readily accessible. Service Representative will remove the plug during connection and connect your...

User Manual
Page 16
... caused by unprofessional installation! Risk of the cooker hose! The rating plate is either seen when the door or the lower cover is opened or it must not be connected to the data specified on this appliance incorporates a 13A fuse. A Risk of the mains lead! The mains lead must not be replaced by damage of electric shock, short circuit or fire...
... caused by unprofessional installation! Risk of the cooker hose! The rating plate is either seen when the door or the lower cover is opened or it must not be connected to the data specified on this appliance incorporates a 13A fuse. A Risk of the mains lead! The mains lead must not be replaced by damage of electric shock, short circuit or fire...
User Manual
Page 17
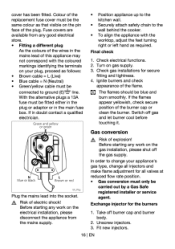
... the replacement fuse cover must be blue and burn smoothly. Exchange injector for secure fitting and tightness. 4. Unscrew injectors. 3. With the alternative plugs a 13A fuse must be carried out by a Gas Safe registered installer or service agent. Before starting any work on the electrical installation, please disconnect the appliance from any work on gas supply. 3. Final check 1. Colour of the burner cap or clean the...
... the replacement fuse cover must be blue and burn smoothly. Exchange injector for secure fitting and tightness. 4. Unscrew injectors. 3. With the alternative plugs a 13A fuse must be carried out by a Gas Safe registered installer or service agent. Before starting any work on the electrical installation, please disconnect the appliance from any work on gas supply. 3. Final check 1. Colour of the burner cap or clean the...
User Manual
Page 20
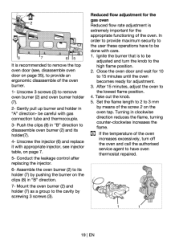
... to remove the top oven door (see injector table, on page 7. 5- be careful with appropriate injector, see , disassemble oven door on the oven tap. Conduct the leakage control after replacing the injector. 6- In order to provide maximum security to the user these operations have oven thermostat repaired. 19 I EN Turning in "A" direction- Push the clips (8) in "B" direction. 7- Mount the oven burner (2) and holder (7) as a group to be adjusted and turn the...
... to remove the top oven door (see injector table, on page 7. 5- be careful with appropriate injector, see , disassemble oven door on the oven tap. Conduct the leakage control after replacing the injector. 6- In order to provide maximum security to the user these operations have oven thermostat repaired. 19 I EN Turning in "A" direction- Push the clips (8) in "B" direction. 7- Mount the oven burner (2) and holder (7) as a group to be adjusted and turn the...
User Manual
Page 22
Remove all baking trays and wire shelf from the appliance... • Smell and smoke may be suitable to cook more than one type of meal within the oven at the same time (You can cook two different meals at the same time by some detergents or cleaning materials. Use oven gloves. Heat up to four times higher. • Choose the burner/plate which is advised in...
Remove all baking trays and wire shelf from the appliance... • Smell and smoke may be suitable to cook more than one type of meal within the oven at the same time (You can cook two different meals at the same time by some detergents or cleaning materials. Use oven gloves. Heat up to four times higher. • Choose the burner/plate which is advised in...

User Manual
Page 25
...; Turn food halfway through cooking. • Remove meat from oven once cooked and stand covered in foil for 10-15 minutes to allow browning. Tips for grilling Grilling is covered with salt, pepper, herbs, or other seasoning. 6 How to operate the oven General information on baking, roasting and grilling A& Risk of cooking meat, fish, vegetables and poultry. • Preheat grill first. • To keep the oven clean), always...
...; Turn food halfway through cooking. • Remove meat from oven once cooked and stand covered in foil for 10-15 minutes to allow browning. Tips for grilling Grilling is covered with salt, pepper, herbs, or other seasoning. 6 How to operate the oven General information on baking, roasting and grilling A& Risk of cooking meat, fish, vegetables and poultry. • Preheat grill first. • To keep the oven clean), always...
User Manual
Page 26
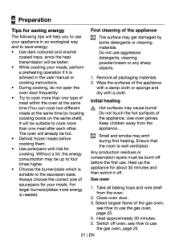
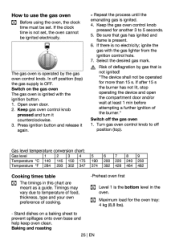
... the gas oven The gas oven is OFF. In off the gas oven 1. ignite the gas with the ignition button. 1. Baking and roasting 25 I ] Level 1 is no electricity; Open oven door. 2. Turn gas oven control knob to 5 seconds. 5. Timings may vary due to temperature of food, thickness, type and your own preference of the burner." At. "The device shall not be ignited electrically. Press ignition button and release it counterclockwise. 3. Gas level temperature conversion chart: Gas...
... the gas oven The gas oven is OFF. In off the gas oven 1. ignite the gas with the ignition button. 1. Baking and roasting 25 I ] Level 1 is no electricity; Open oven door. 2. Turn gas oven control knob to 5 seconds. 5. Timings may vary due to temperature of food, thickness, type and your own preference of the burner." At. "The device shall not be ignited electrically. Press ignition button and release it counterclockwise. 3. Gas level temperature conversion chart: Gas...
User Manual
Page 30
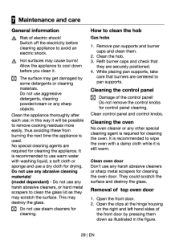
... still warm. This may cause burns! While placing pan supports, take care that they may get damaged by pressing them . 2. They could scratch the surface and destroy the glass. Open the clips at the hinge housing on the right and left hand sides of the control panel! Switch off the electricity before you clean it. Clean the hob. 3. It is required for cleaning. Clean oven door Don't use any...
... still warm. This may cause burns! While placing pan supports, take care that they may get damaged by pressing them . 2. They could scratch the surface and destroy the glass. Open the clips at the hinge housing on the right and left hand sides of the control panel! Switch off the electricity before you clean it. Clean the hob. 3. It is required for cleaning. Clean oven door Don't use any...

User Manual
Page 32
... heatresisting (T 300 °C) electric light bulb; The oven lamp is switched off the appliance at the mains. 2. Refit the glass cover. 31 1EN Switch off and cooled down in order to avoid the risk of lamp may cause burns! Unscrew oven lamp by turning anti-clockwise. 3. Oven lamps can be obtained from diagram. 1. ID Position of an electrical shock. Replacing the oven lamp A, Hot surfaces...
... heatresisting (T 300 °C) electric light bulb; The oven lamp is switched off the appliance at the mains. 2. Refit the glass cover. 31 1EN Switch off and cooled down in order to avoid the risk of lamp may cause burns! Unscrew oven lamp by turning anti-clockwise. 3. Oven lamps can be obtained from diagram. 1. ID Position of an electrical shock. Replacing the oven lamp A, Hot surfaces...
User Manual
Page 33
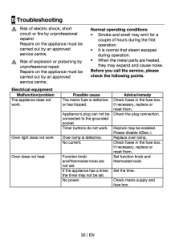
... operation. • When the metal parts are not set . If necessary, replace or reset them . Set the time. No power. Please disable it(See; ). No current. Check fuses in the fuse box. Normal operating conditions • Smoke and smell may expand and cause noise. Possible cause The mains fuse is defective. Timer buttons do not work . Keylock may not be enabled. Electrical equipment Malfunction/problem The appliance does not work . Oven...
... operation. • When the metal parts are not set . If necessary, replace or reset them . Set the time. No power. Please disable it(See; ). No current. Check fuses in the fuse box. Normal operating conditions • Smoke and smell may expand and cause noise. Possible cause The mains fuse is defective. Timer buttons do not work . Keylock may not be enabled. Electrical equipment Malfunction/problem The appliance does not work . Oven...
User Manual
Page 34
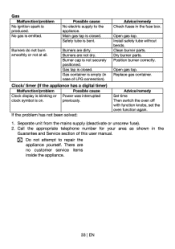
.... Open gas tap. previously. Replace gas container. Advice/remedy Set time Then switch the oven off with function knobs, set the oven function again. 1. Clean burner parts. Burners do not burn smoothly or not at all. There are no customer service items inside the appliance. 33 I EN Clock/ timer (If the appliance has a digital timer) Malfunction/problem Possible cause Clock display is blinking or Power was interrupted clock symbol is closed . Install safety...
.... Open gas tap. previously. Replace gas container. Advice/remedy Set time Then switch the oven off with function knobs, set the oven function again. 1. Clean burner parts. Burners do not burn smoothly or not at all. There are no customer service items inside the appliance. 33 I EN Clock/ timer (If the appliance has a digital timer) Malfunction/problem Possible cause Clock display is blinking or Power was interrupted clock symbol is closed . Install safety...
User Manual
Page 35
... parts, including knobs and flaps • Accessory items, induding ice trays, scrapers, cutlery baskets, • Repairs required as a result of faulty materials, defective components or manufacturing defect. • The cost of all Washing & Dishwashing Machines and Electric Cookers • Gas Cookers must be correctly installed, located and operated in accordance with the instructions contained in the User Instructions Booklet provided. • Professional Installation by a Gas...
... parts, including knobs and flaps • Accessory items, induding ice trays, scrapers, cutlery baskets, • Repairs required as a result of faulty materials, defective components or manufacturing defect. • The cost of all Washing & Dishwashing Machines and Electric Cookers • Gas Cookers must be correctly installed, located and operated in accordance with the instructions contained in the User Instructions Booklet provided. • Professional Installation by a Gas...


