

Owners Manual
Page 3
......9 1.7 Maintenance and cleaning safety 10 1.8 Lighting safety 11 1.9 Steam program safety 12 2 Environmental instructions 13 2.1 Compliance with the WEEE Regulations and Waste Disposal 13 2.2 Packaging information 13 2.3 Standard conformity and test information / EU declaration of conformity..........13 3 Your drying machine 14 3.1 Technical specifications 14 3.2 General appearance 15 3.3 Scope of delivery 15 4 Installation 16 4.1 Right place for installation 16 4.2 Removing the shipping safety group 16 4.3 Water connection...
......9 1.7 Maintenance and cleaning safety 10 1.8 Lighting safety 11 1.9 Steam program safety 12 2 Environmental instructions 13 2.1 Compliance with the WEEE Regulations and Waste Disposal 13 2.2 Packaging information 13 2.3 Standard conformity and test information / EU declaration of conformity..........13 3 Your drying machine 14 3.1 Technical specifications 14 3.2 General appearance 15 3.3 Scope of delivery 15 4 Installation 16 4.1 Right place for installation 16 4.2 Removing the shipping safety group 16 4.3 Water connection...

Owners Manual
Page 4
... 6.8 Child Lock...24 6.9 Changing the program after it is started 24 6.10 Cancelling the program 25 6.11 End of program 25 6.12 Odour feature 25 6.13 SteamCure Odour and Wrinkle Removal Function 25 7 Maintenance and cleaning 27 7.1 Fibre Filters (internal and external filters) / Cleaning of the Interior Surface of the Loading Door...27 7.2 Cleaning the sensor 28 7.3 Emptying the water tank 29 7.4 Cleaning the condenser 29 8 Troubleshooting 31...
... 6.8 Child Lock...24 6.9 Changing the program after it is started 24 6.10 Cancelling the program 25 6.11 End of program 25 6.12 Odour feature 25 6.13 SteamCure Odour and Wrinkle Removal Function 25 7 Maintenance and cleaning 27 7.1 Fibre Filters (internal and external filters) / Cleaning of the Interior Surface of the Loading Door...27 7.2 Cleaning the sensor 28 7.3 Emptying the water tank 29 7.4 Cleaning the condenser 29 8 Troubleshooting 31...

Owners Manual
Page 5
... or instruction concerning use of the product unless it is not designed for household use. Dryer / User manual 5 Children should not be carried out by children unless they are not observed. • Installation and repair operations shall always be used by Authorized Service. • Use original spare parts and accessories only. • Do not repair or replace any component of the appliance in the operation manual. •...
... or instruction concerning use of the product unless it is not designed for household use. Dryer / User manual 5 Children should not be carried out by children unless they are not observed. • Installation and repair operations shall always be used by Authorized Service. • Use original spare parts and accessories only. • Do not repair or replace any component of the appliance in the operation manual. •...

Owners Manual
Page 6
... installation, maintenance, cleaning, repair and transporting operations. • If the power the cord is regularly opened and closed even when not operated. • Electrical products are dangerous for children and pets. Power cord shall not be easily accessible. Risk of the product. Children or pets could be locked inside the product. • Keep the product door closed with any heat source. • Do not use an extension cord...
... installation, maintenance, cleaning, repair and transporting operations. • If the power the cord is regularly opened and closed even when not operated. • Electrical products are dangerous for children and pets. Power cord shall not be easily accessible. Risk of the product. Children or pets could be locked inside the product. • Keep the product door closed with any heat source. • Do not use an extension cord...

Owners Manual
Page 7
... prepare the product ready for installation, ensure that the electrical installation and water drain is proper by yourself. • Take required precautions for the product against the door's hinges. If it is faced against falling and tipping. Dryer / User manual 7 Do not crash or drop the product when transporting. • Do not use the extruding parts of dust with the adjustable...
... prepare the product ready for installation, ensure that the electrical installation and water drain is proper by yourself. • Take required precautions for the product against the door's hinges. If it is faced against falling and tipping. Dryer / User manual 7 Do not crash or drop the product when transporting. • Do not use the extruding parts of dust with the adjustable...
Owners Manual
Page 8
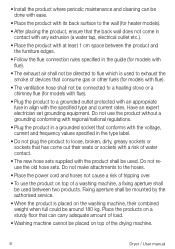
... used to exhaust the smoke of devices that consume gas or other fuels (for models with flue). • The ventilation hose shall not be connected to a heating stove or a chimney flue (for models with flue). • Plug the product to a grounded outlet protected with an appropriate fuse in the guide (for models with flue). • The exhaust air shall not be directed to the wall (for heater models...
... used to exhaust the smoke of devices that consume gas or other fuels (for models with flue). • The ventilation hose shall not be connected to a heating stove or a chimney flue (for models with flue). • Plug the product to a grounded outlet protected with an appropriate fuse in the guide (for models with flue). • The exhaust air shall not be directed to the wall (for heater models...
Owners Manual
Page 10
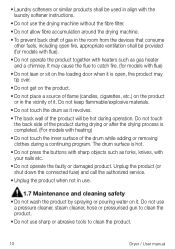
... sharp objects such as gas heater and a chimney. Do not use a pressure cleaner, steam cleaner, hose or pressurised gun to clean the product. 10 Dryer / User manual Unplug the product (or shut down the connected fuse) and call the authorized service. • Unplug the product when not in use sharp or abrasive tools to clean the product. • Do not use . 1.7 Maintenance and cleaning safety • Do not...
... sharp objects such as gas heater and a chimney. Do not use a pressure cleaner, steam cleaner, hose or pressurised gun to clean the product. 10 Dryer / User manual Unplug the product (or shut down the connected fuse) and call the authorized service. • Unplug the product when not in use sharp or abrasive tools to clean the product. • Do not use . 1.7 Maintenance and cleaning safety • Do not...
Owners Manual
Page 16
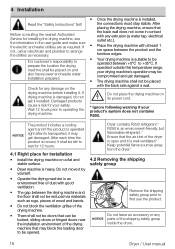
... Instructions" first! Check for your safety. After each time the product is customer's responsibility to prepare the location the drying machine shall be left to rest for 12 hours. 4.1 Right place for installing the drying machine, see the information in the user guide and make sure the electric and water utilities are as required. Do not leave an accessory or any NOTICE parts of...
... Instructions" first! Check for your safety. After each time the product is customer's responsibility to prepare the location the drying machine shall be left to rest for 12 hours. 4.1 Right place for installing the drying machine, see the information in the user guide and make sure the electric and water utilities are as required. Do not leave an accessory or any NOTICE parts of...
Owners Manual
Page 17
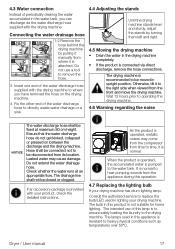
... via direct discharge, remove the hose connections. Wait 12 hours prior to heavy physical conditions such as temperatures over 50°C. It is normal to replace the bulb/LED used in upright position. Consult the authorized service to hear pumping sounds from time to be fixed at an appropriate flow. Connecting the water drainage hose 1-2 Remove the 1 2 hose behind the drying machine by turning them left and right. 4.5 Moving the drying...
... via direct discharge, remove the hose connections. Wait 12 hours prior to heavy physical conditions such as temperatures over 50°C. It is normal to replace the bulb/LED used in upright position. Consult the authorized service to hear pumping sounds from time to be fixed at an appropriate flow. Connecting the water drainage hose 1-2 Remove the 1 2 hose behind the drying machine by turning them left and right. 4.5 Moving the drying...
Owners Manual
Page 18
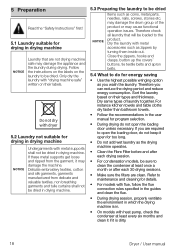
... zippers, hooks and clasps, button up the covers' buttons, tie textile belts and apron belts. 5.4 What to open the loading door, do not keep it open the loading door unless necessary. Refer to clean the condenser at least every six months and clean it if it may damage the machine. Sort the laundry based on their labels. For instance kitchen towels and table cloths dry faster...
... zippers, hooks and clasps, button up the covers' buttons, tie textile belts and apron belts. 5.4 What to open the loading door, do not keep it open the loading door unless necessary. Refer to clean the condenser at least every six months and clean it if it may damage the machine. Sort the laundry based on their labels. For instance kitchen towels and table cloths dry faster...
Owners Manual
Page 20
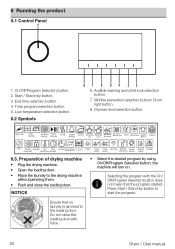
... force. 20 Dryer / User manual icon Remote Support control icon Service Delicate Outdoor drying 6.3. Wrinkle prevention selection button/ Drum light button. 8. Ensure that the program started. Water tank Filter cleaning Condenser Start/ cleaning Stand-by using On/Off/Program Selection button, the machine will turn on. NOTICE • Select the desired program by Drying Audible warning Iron Dry Wardrobe Wardrobe Wardrobe Wool drying Silent Refreshing Hygiene Dry Dry+ Dry Extra (Baby+) Feather End Wrinkle Child lock Low Timer prevention temperature program End...
... force. 20 Dryer / User manual icon Remote Support control icon Service Delicate Outdoor drying 6.3. Wrinkle prevention selection button/ Drum light button. 8. Ensure that the program started. Water tank Filter cleaning Condenser Start/ cleaning Stand-by using On/Off/Program Selection button, the machine will turn on. NOTICE • Select the desired program by Drying Audible warning Iron Dry Wardrobe Wardrobe Wardrobe Wool drying Silent Refreshing Hygiene Dry Dry+ Dry Extra (Baby+) Feather End Wrinkle Child lock Low Timer prevention temperature program End...
Owners Manual
Page 23
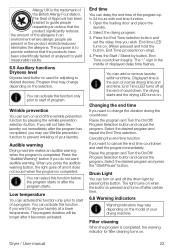
... the selection. Displayed time is used for filter cleaning turns on and off the drum light by pressing this function if you press the audible warning button, the light goes off the wrinkle prevention function by button. Cancelling the end time function If you may change the duration during the countdown: Pause the program and Turn the On/Off/ Program Selection button and cancel the...
... the selection. Displayed time is used for filter cleaning turns on and off the drum light by pressing this function if you press the audible warning button, the light goes off the wrinkle prevention function by button. Cancelling the end time function If you may change the duration during the countdown: Pause the program and Turn the On/Off/ Program Selection button and cancel the...
Owners Manual
Page 25
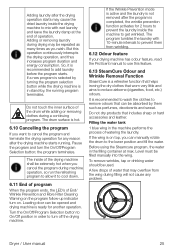
... drying operation for any problem. Do not touch the inner surface of watering the laundry. Loading door can be repeated as many times as perfumes, deodorants and sweat. A few drops of operation. Adding or removing laundry during filling will not cause any reason after the drying machine starts running program terminates. The drum surface is on . It is recommended to use this operation continuously interrupts the drying operation...
... drying operation for any problem. Do not touch the inner surface of watering the laundry. Loading door can be repeated as many times as perfumes, deodorants and sweat. A few drops of operation. Adding or removing laundry during filling will not cause any reason after the drying machine starts running program terminates. The drum surface is on . It is recommended to use this operation continuously interrupts the drying operation...

Owners Manual
Page 27
... filter: • Open the loading door. • Hold the first part (inner filter) of the two part fibre filter and remove it by pulling it upwards. • Remove the second part (outer filter) by the Fibre Filter. • Open both filters under water running in the filters with the brush on the air deflector. Dryer / User manual 27 Read the "Safety Instructions" first! 7.1 Fibre Filters (internal and external filters) / Cleaning of the Interior Surface of the Loading Door...
... filter: • Open the loading door. • Hold the first part (inner filter) of the two part fibre filter and remove it by pulling it upwards. • Remove the second part (outer filter) by the Fibre Filter. • Open both filters under water running in the filters with the brush on the air deflector. Dryer / User manual 27 Read the "Safety Instructions" first! 7.1 Fibre Filters (internal and external filters) / Cleaning of the Interior Surface of the Loading Door...

Owners Manual
Page 31
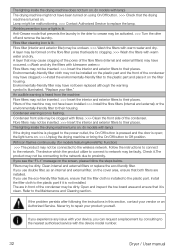
... for no reason. Child lock may be full. >>> Empty the water tank. Program terminated prematurely for the laundry type may be activated. >>> Turn off the child lock. Fibres might be started. 8 Troubleshooting Drying operation takes too long. Drying machine does not turn on the inner sides of the loading door and the loading door gasket. >>> Clean the inner surfaces of the condenser. Drying machine does not run after drying. Loading door might have shrunk, hardened...
... for no reason. Child lock may be full. >>> Empty the water tank. Program terminated prematurely for the laundry type may be activated. >>> Turn off the child lock. Fibres might be started. 8 Troubleshooting Drying operation takes too long. Drying machine does not turn on the inner sides of the loading door and the loading door gasket. >>> Clean the inner surfaces of the condenser. Drying machine does not run after drying. Loading door might have shrunk, hardened...
Owners Manual
Page 32
... device model number. 32 Dryer / User manual If you use the eco-friendly filter feature, ensure that prevents the laundry in the drier to crease may be activated. >>> Turn the drier off and remove the laundry. The are installed. If the problem persists after following the instructions in front of the condenser. the light turns on the screen, please follow the steps below. An audible warning is clean...
... device model number. 32 Dryer / User manual If you use the eco-friendly filter feature, ensure that prevents the laundry in the drier to crease may be activated. >>> Turn the drier off and remove the laundry. The are installed. If the problem persists after following the instructions in front of the condenser. the light turns on the screen, please follow the steps below. An audible warning is clean...

Owners Manual
Page 33
... suitability. We recommend that the voltage and the frequency shown in the plug marked 'L' or coloured red. Do not operate without using a suitable and approved stacking kit obtained from an Authorised Service Agent. Should the fuse need replacing at any good electrical store. When installed, the socket must be reachable after installation, or a separate switch (which can disconnect the two poles) must be...
... suitability. We recommend that the voltage and the frequency shown in the plug marked 'L' or coloured red. Do not operate without using a suitable and approved stacking kit obtained from an Authorised Service Agent. Should the fuse need replacing at any good electrical store. When installed, the socket must be reachable after installation, or a separate switch (which can disconnect the two poles) must be...

Owners Manual
Page 34
..., filters and light bulbs. • Repairs necessary as a "second"). 34 Dryer / User manual Such financial loss includes but not limited to extend the guarantee for a period of repairing the product. This guarantee is limited to operate in writing. What is possible that your statutory rights in the User Instructions Booklet provided with the product. Important Notes 1. The product must be professionally installed by...
..., filters and light bulbs. • Repairs necessary as a "second"). 34 Dryer / User manual Such financial loss includes but not limited to extend the guarantee for a period of repairing the product. This guarantee is limited to operate in writing. What is possible that your statutory rights in the User Instructions Booklet provided with the product. Important Notes 1. The product must be professionally installed by...

Owners Manual
Page 35
... Engineer that your product has not been installed or operated in the course of carrying out their duties. 11. This guarantee is your responsibility to provide evidence to the replacement product; Dryer / User manual 35 It is provided by completing the online registration form, then the standard 12 month guarantee will cover the costs and arrange for the...
... Engineer that your product has not been installed or operated in the course of carrying out their duties. 11. This guarantee is your responsibility to provide evidence to the replacement product; Dryer / User manual 35 It is provided by completing the online registration form, then the standard 12 month guarantee will cover the costs and arrange for the...
Owners Manual
Page 37
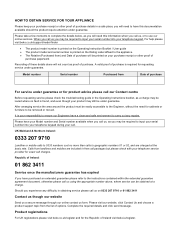
... the Operating Instruction Booklet / User guide • The product model and serial number is found, and even though your product may still be printed on 0333 207 9710 or 01 862 3411 Contact us though our website Send us a secure message through our online contact us using the appropriate number above, where service can be removed or moved. Model number Serial number Purchased from the list of...
... the Operating Instruction Booklet / User guide • The product model and serial number is found, and even though your product may still be printed on 0333 207 9710 or 01 862 3411 Contact us though our website Send us a secure message through our online contact us using the appropriate number above, where service can be removed or moved. Model number Serial number Purchased from the list of...


