
Quick Start Guide
Page 7
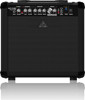
...GUITAR COMBO CLEAN and OVERDRIVE channels. You can also switch between channels using the footswitch sold with the unit. (6) Press the CHANNEL button to connect the input of the OVERDRIVE channel. (24) SERIAL NUMBER. (25) This is the cooling vent. (26) The SPEAKER OUT jack (1/4" TS connector) is activated. 12 GUITAR AMPLIFIER GTX60/GTX30 GUITAR AMPLIFIER GTX60/GTX30... shows the note played. Check Out behringer.com for additional, highly characteristic adjustment of the midrange, so as to easily create traditional as well as ultra-modern guitar sounds. (11) The TREBLE control ...
...GUITAR COMBO CLEAN and OVERDRIVE channels. You can also switch between channels using the footswitch sold with the unit. (6) Press the CHANNEL button to connect the input of the OVERDRIVE channel. (24) SERIAL NUMBER. (25) This is the cooling vent. (26) The SPEAKER OUT jack (1/4" TS connector) is activated. 12 GUITAR AMPLIFIER GTX60/GTX30 GUITAR AMPLIFIER GTX60/GTX30... shows the note played. Check Out behringer.com for additional, highly characteristic adjustment of the midrange, so as to easily create traditional as well as ultra-modern guitar sounds. (11) The TREBLE control ...

Manual
Page 2
... hardly need any other equipment. By purchasing the GUITAR COMBO, you get started 5 1.1.1 Online registration 5 2. Control Elements 5 2.1 Front panel 5 2.1.1 CLEAN channel 5 2.1.2 OVERDRIVE channel 6 2.1.3 FX section 6 2.1.4 Connectors and POWER switch 6 2.1.5 Chromatic tuner 6 2.2 Rear panel 6 3. Introduction 5 1.1 Before you now own the newest generation of guitar amp. 2 GUITAR AMPLIFIER GTX60/GTX30 User Manual Table of options and possibilities, the...
... hardly need any other equipment. By purchasing the GUITAR COMBO, you get started 5 1.1.1 Online registration 5 2. Control Elements 5 2.1 Front panel 5 2.1.1 CLEAN channel 5 2.1.2 OVERDRIVE channel 6 2.1.3 FX section 6 2.1.4 Connectors and POWER switch 6 2.1.5 Chromatic tuner 6 2.2 Rear panel 6 3. Introduction 5 1.1 Before you now own the newest generation of guitar amp. 2 GUITAR AMPLIFIER GTX60/GTX30 User Manual Table of options and possibilities, the...

Manual
Page 5
... to offer you maximum sound diversity as well as your GUITAR COMBO. To avoid overheating, do NOT return it is very important to us to be able to have it repaired as quickly as possible. Should your BEHRINGER product malfunction, it to ensure safe transport. Should your ... or cuts the bass frequencies on the CLEAN channel (GTX60 only). (5) The TREBLE control adjusts the treble frequencies on the unit. 5 GUITAR AMPLIFIER GTX60/GTX30 User Manual 1. For your cooperation! ◊ The sound quality may directly contact one of all devices are nowadays very broad. The unit...
... to offer you maximum sound diversity as well as your GUITAR COMBO. To avoid overheating, do NOT return it is very important to us to be able to have it repaired as quickly as possible. Should your BEHRINGER product malfunction, it to ensure safe transport. Should your ... or cuts the bass frequencies on the CLEAN channel (GTX60 only). (5) The TREBLE control adjusts the treble frequencies on the unit. 5 GUITAR AMPLIFIER GTX60/GTX30 User Manual 1. For your cooperation! ◊ The sound quality may directly contact one of all devices are nowadays very broad. The unit...

Manual
Page 6
6 GUITAR AMPLIFIER GTX60/GTX30 User Manual 2.1.2 OVERDRIVE channel (7) The OVERDRIVE CHANNEL LED lights up when the ... (21) The TUNER push button activates and deactivates the integrated tuner. The reference tone A at 440 Hz serves as the BEHRINGER ULTRA-DI DI100 or DI120. (23) This is the power cord. (24) SERIAL NUMBER. (25) This is the ... deactivates the VTC Virtual Tube Circuitry. (24) (25) (26)(27)(28) 2.1.4 Connectors and POWER switch Fig. 2.2: GUITAR COMBO control elements (rear panel) (17) The CD IN connector allows you can also activate and deactivate the tuner by two LEDs...
6 GUITAR AMPLIFIER GTX60/GTX30 User Manual 2.1.2 OVERDRIVE channel (7) The OVERDRIVE CHANNEL LED lights up when the ... (21) The TUNER push button activates and deactivates the integrated tuner. The reference tone A at 440 Hz serves as the BEHRINGER ULTRA-DI DI100 or DI120. (23) This is the power cord. (24) SERIAL NUMBER. (25) This is the ... deactivates the VTC Virtual Tube Circuitry. (24) (25) (26)(27)(28) 2.1.4 Connectors and POWER switch Fig. 2.2: GUITAR COMBO control elements (rear panel) (17) The CD IN connector allows you can also activate and deactivate the tuner by two LEDs...

Manual
Page 7
...Fig. 4.2: 1/4" TRS connector LINE OUT/PHONES jack. The IN/OUT footswitch turns the effect on the BEHRINGER GUITAR COMBO are 1/4" TS connectors. Application Example The GUITAR COMBO features plenty of connectors for more information. ◊ Please ensure that the unit is an example of...or at home, please wire your GUITAR COMBO as shown in loudspeaker will be : Drum Computer CD Player Footswitch BEHRINGER HPS3000 CD In 4. Please see Chapter 5, "Specifications" for a wealth of the unit. The built-in fig. 3.1. 7 GUITAR AMPLIFIER GTX60/GTX30 User Manual 3. Connect the dual ...
...Fig. 4.2: 1/4" TRS connector LINE OUT/PHONES jack. The IN/OUT footswitch turns the effect on the BEHRINGER GUITAR COMBO are 1/4" TS connectors. Application Example The GUITAR COMBO features plenty of connectors for more information. ◊ Please ensure that the unit is an example of...or at home, please wire your GUITAR COMBO as shown in loudspeaker will be : Drum Computer CD Player Footswitch BEHRINGER HPS3000 CD In 4. Please see Chapter 5, "Specifications" for a wealth of the unit. The built-in fig. 3.1. 7 GUITAR AMPLIFIER GTX60/GTX30 User Manual 3. Connect the dual ...


