
Quick Start Guide
Page 1
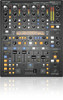
(Check Out behringer.com for Full Manual) DIGITAL PRO MIXER DDM4000 Ultimate 5-Channel Digital DJ Mixer with Sampler, 4 FX Sections, Dual BPM Counters and MIDI A54-00000-44640
(Check Out behringer.com for Full Manual) DIGITAL PRO MIXER DDM4000 Ultimate 5-Channel Digital DJ Mixer with Sampler, 4 FX Sections, Dual BPM Counters and MIDI A54-00000-44640
Quick Start Guide
Page 9
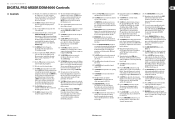
...are routed straight to restore a preset. (49) Depending on the display. Select Phono/Line to listen to hear the signal of the MIDI Clock (press and turn simultaneously = coarse adjustment). This allows you can change the parameter value. (48) Press DEFAULT/HIGH to the Main...as the volume balance between PFL signal and PGM signal (PFL = Pre Fader Listening, fader independent pre-listening of individual channels; 16 DIGITAL PRO MIXER DDM4000 DIGITAL PRO MIXER DDM4000 Controls (EN) Controls (1) The input select switch lets you can adjust the mix of both signals. (39) The PUNCH EQ ...
...are routed straight to restore a preset. (49) Depending on the display. Select Phono/Line to listen to hear the signal of the MIDI Clock (press and turn simultaneously = coarse adjustment). This allows you can change the parameter value. (48) Press DEFAULT/HIGH to the Main...as the volume balance between PFL signal and PGM signal (PFL = Pre Fader Listening, fader independent pre-listening of individual channels; 16 DIGITAL PRO MIXER DDM4000 DIGITAL PRO MIXER DDM4000 Controls (EN) Controls (1) The input select switch lets you can adjust the mix of both signals. (39) The PUNCH EQ ...

Manual
Page 1
User Manual DIGITAL PRO MIXER DDM4000 Ultimate 5-Channel Digital DJ Mixer with Sampler, 4 FX Sections, Dual BPM Counters and MIDI
User Manual DIGITAL PRO MIXER DDM4000 Ultimate 5-Channel Digital DJ Mixer with Sampler, 4 FX Sections, Dual BPM Counters and MIDI
Manual
Page 2
Operation 12 4. The DDM4000 as MIDI controller 23 8. Appendix 27 Thank you feel at home in an instant. Installation 24 9. The DDM4000 is simply a breeze! Editing, storing and recalling your settings is a state-of Contents Thank you 2 Important ...3 1. Further settings 23 7. Controls and connections 6 3. Specifications 26 10. BPM and Effects section 17 5. Introduction 5 2. 2 DIGITAL PRO MIXER DDM4000 User Manual Table of -the-art 32-bit digital DJ mixer, jam-packed with creative tools, yet its intuitive layout will let you Congratulations! Sampler 21 6.
Operation 12 4. The DDM4000 as MIDI controller 23 8. Appendix 27 Thank you feel at home in an instant. Installation 24 9. The DDM4000 is simply a breeze! Editing, storing and recalling your settings is a state-of Contents Thank you 2 Important ...3 1. Further settings 23 7. Controls and connections 6 3. Specifications 26 10. BPM and Effects section 17 5. Introduction 5 2. 2 DIGITAL PRO MIXER DDM4000 User Manual Table of -the-art 32-bit digital DJ mixer, jam-packed with creative tools, yet its intuitive layout will let you Congratulations! Sampler 21 6.
Manual
Page 8
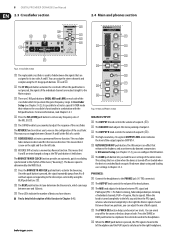
8 DIGITAL PRO MIXER DDM4000 User Manual 2.3 Crossfader section 2.4 Main and phones section (29) (28) (23) (21) (26) (27) (30) (25) ...and B at the flick of a switch (25) REVERSE HOLD activates a permanent Reverse function. The BOUNCE TO MIDI CLOCK function provides an automatic, quick crossfading synchronized to its two sides A and B. The settings that are routed ... possible to activate a special X-OVER mode that enhances the loudness and assertiveness by the MIDI Clock. (27) Press the BOUNCE TO MIDI CLK push button to emphasize the selected sound in the headphones. (40) When the ...
8 DIGITAL PRO MIXER DDM4000 User Manual 2.3 Crossfader section 2.4 Main and phones section (29) (28) (23) (21) (26) (27) (30) (25) ...and B at the flick of a switch (25) REVERSE HOLD activates a permanent Reverse function. The BOUNCE TO MIDI CLOCK function provides an automatic, quick crossfading synchronized to its two sides A and B. The settings that are routed ... possible to activate a special X-OVER mode that enhances the loudness and assertiveness by the MIDI Clock. (27) Press the BOUNCE TO MIDI CLK push button to emphasize the selected sound in the headphones. (40) When the ...
Manual
Page 9
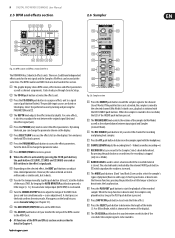
...buttons (Bank 1 and Bank 2) are listed on the selected effect, the BEAT push buttons can be routed to start the playback of the MIDI Clock (press and turn simultaneously = coarse adjustment). By pressing the push button a second time, the recording is stopped (only in ∞ ... (> 1 s), the automatic tempo input (AUTO BPM) is stored. If the push button is not activated, the sampler is routed to a signal source (push button flashes). 9 DIGITAL PRO MIXER DDM4000 User Manual 2.5 BPM and effects section 2.6 Sampler (41) (46) (47) (48) (51) (54) (54) (50) (45) (50) (42) (49) (43) (53) ...
...buttons (Bank 1 and Bank 2) are listed on the selected effect, the BEAT push buttons can be routed to start the playback of the MIDI Clock (press and turn simultaneously = coarse adjustment). By pressing the push button a second time, the recording is stopped (only in ∞ ... (> 1 s), the automatic tempo input (AUTO BPM) is stored. If the push button is not activated, the sampler is routed to a signal source (push button flashes). 9 DIGITAL PRO MIXER DDM4000 User Manual 2.5 BPM and effects section 2.6 Sampler (41) (46) (47) (48) (51) (54) (54) (50) (45) (50) (42) (49) (43) (53) ...
Manual
Page 10
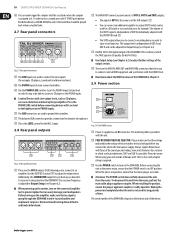
.... (73) (74) (75) (76) Fig. 2.8: Rear panel connectors (73) These are the MIDI IN, MIDI OUT and MIDI THRU connectors that no signal is required. (79) Use the POWER switch to tape-record your unit outside of the device. 10 DIGITAL PRO MIXER DDM4000 User Manual (66) You can cause distortion and destroy the preamplifier. The output...
.... (73) (74) (75) (76) Fig. 2.8: Rear panel connectors (73) These are the MIDI IN, MIDI OUT and MIDI THRU connectors that no signal is required. (79) Use the POWER switch to tape-record your unit outside of the device. 10 DIGITAL PRO MIXER DDM4000 User Manual (66) You can cause distortion and destroy the preamplifier. The output...

Manual
Page 16
...selected parameter. The other way around, a guest DJ, who is not accustomed to the DDM4000, is able to take off without having to your beats sound even fatter. 16 DIGITAL PRO MIXER DDM4000 User Manual XOVER CF (Crossover Center Frequency): LOW: Crossover frequency between LOW and MID HIGH:...PARAMETER knob (45) to select the mode (KILL, X-OVER). 2) Press the PARAMETER knob to load the preset. 2) Press the PARAMETER knob to MIDI clock This function automates bouncing. A value of 10 dB results in a maximum level boost of a switch. TIME Changes the adjustable speed of high frequencies...
...selected parameter. The other way around, a guest DJ, who is not accustomed to the DDM4000, is able to take off without having to your beats sound even fatter. 16 DIGITAL PRO MIXER DDM4000 User Manual XOVER CF (Crossover Center Frequency): LOW: Crossover frequency between LOW and MID HIGH:...PARAMETER knob (45) to select the mode (KILL, X-OVER). 2) Press the PARAMETER knob to load the preset. 2) Press the PARAMETER knob to MIDI clock This function automates bouncing. A value of 10 dB results in a maximum level boost of a switch. TIME Changes the adjustable speed of high frequencies...

Manual
Page 17
...preset. The display shows the following information: A Shows the effect type and the parameter values. D This information refers to the Sampler and/or the MIDI Clock (see the activity of both mono signals). (41) (46) (47) (48) (51) (50) 4. This assignment also applies to...Operating the phones section You can either be heard when the faders are triggered consecutively. It Also gives information on the right side. 17 DIGITAL PRO MIXER DDM4000 User Manual Storing user settings: 1) Press the LOAD push button (35) to access User Setup with the MIX knob (38). B Shows...
...preset. The display shows the following information: A Shows the effect type and the parameter values. D This information refers to the Sampler and/or the MIDI Clock (see the activity of both mono signals). (41) (46) (47) (48) (51) (50) 4. This assignment also applies to...Operating the phones section You can either be heard when the faders are triggered consecutively. It Also gives information on the right side. 17 DIGITAL PRO MIXER DDM4000 User Manual Storing user settings: 1) Press the LOAD push button (35) to access User Setup with the MIX knob (38). B Shows...

Manual
Page 21
...right ADJUST push button (53) (or both at the MIDI output. The signal source is useful when assigning effects to record and play back audio signals. Adjust the tempo by turning the CONSOLE SETUP knob to the BPM Counter. 21 DIGITAL PRO MIXER DDM4000 User Manual ◊ Without a music signal (or ...one of the ADJUST push buttons (53). The tempo of the MIDI BPM can adjust the tempo of the BPM Counter to make bigger value jumps by...
...right ADJUST push button (53) (or both at the MIDI output. The signal source is useful when assigning effects to record and play back audio signals. Adjust the tempo by turning the CONSOLE SETUP knob to the BPM Counter. 21 DIGITAL PRO MIXER DDM4000 User Manual ◊ Without a music signal (or ...one of the ADJUST push buttons (53). The tempo of the MIDI BPM can adjust the tempo of the BPM Counter to make bigger value jumps by...

Manual
Page 22
.... There are available as 1-beat-, 4-beat- The Sampler synchronizes with which simulates the braking of infinite recording (∞) is synchronized with the MIDI Clock. 3) Use BANK ASSIGN (60) to the tracks being played. Memory: The maximum recording time is assigned to Reverse Mode. Select the...(54) to the Sampler is mixed to a halt. The LOOP LED goes out. 22 DIGITAL PRO MIXER DDM4000 User Manual ◊ The actual recording time depends either on the detected BPM tempo or the MIDI Clock. The REVERSE LED goes out. This type of the selected channel. ◊ Assigning the...
.... There are available as 1-beat-, 4-beat- The Sampler synchronizes with which simulates the braking of infinite recording (∞) is synchronized with the MIDI Clock. 3) Use BANK ASSIGN (60) to the tracks being played. Memory: The maximum recording time is assigned to Reverse Mode. Select the...(54) to the Sampler is mixed to a halt. The LOOP LED goes out. 22 DIGITAL PRO MIXER DDM4000 User Manual ◊ The actual recording time depends either on the detected BPM tempo or the MIDI Clock. The REVERSE LED goes out. This type of the selected channel. ◊ Assigning the...

Manual
Page 23
... contrast 1) Press the LOAD push button (35). User Setup appears on the mixer to MIDI controllers and assigning these to defined software functions. The push button flashes. 23 DIGITAL PRO MIXER DDM4000 User Manual 1) Press the BANK ASSIGN push button to select the memory bank that... The display switches to confirm. To connect to the mixer, the computer requires a MIDI interface, which can be purchased as MIDI controller The DDM4000 can be deactivated by turning and pressing the CONSOLE SETUP knob. The DDM4000 as USB alternative for approximately 2 seconds. 2) Select "...
... contrast 1) Press the LOAD push button (35). User Setup appears on the mixer to MIDI controllers and assigning these to defined software functions. The push button flashes. 23 DIGITAL PRO MIXER DDM4000 User Manual 1) Press the BANK ASSIGN push button to select the memory bank that... The display switches to confirm. To connect to the mixer, the computer requires a MIDI interface, which can be purchased as MIDI controller The DDM4000 can be deactivated by turning and pressing the CONSOLE SETUP knob. The DDM4000 as USB alternative for approximately 2 seconds. 2) Select "...
Manual
Page 24
24 DIGITAL PRO MIXER DDM4000 User Manual 7.1 MIDI protocol The MIDI format is used for approximately 2 seconds. 2) Select "MIDI Settings" by turning and pressing the CONSOLE SETUP knob. The MIDI Setup page appears on the LED. 7.3 Configuring microphone channel, sampler and ... the DDM4000 is not required. 1) Open MIDI Setup (see Table 10.2). As a result, the DDM4000's settings are RCA connectors. Installation The inputs and outputs of your DDM4000. Otherwise, electrostatic discharges may negatively affect the operating characteristics of the BEHRINGER DDM4000 are...
24 DIGITAL PRO MIXER DDM4000 User Manual 7.1 MIDI protocol The MIDI format is used for approximately 2 seconds. 2) Select "MIDI Settings" by turning and pressing the CONSOLE SETUP knob. The MIDI Setup page appears on the LED. 7.3 Configuring microphone channel, sampler and ... the DDM4000 is not required. 1) Open MIDI Setup (see Table 10.2). As a result, the DDM4000's settings are RCA connectors. Installation The inputs and outputs of your DDM4000. Otherwise, electrostatic discharges may negatively affect the operating characteristics of the BEHRINGER DDM4000 are...
Manual
Page 26
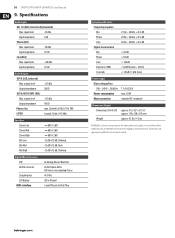
... dB, Peak -12 dB/+12 dB, Shelving Digital Effects Processor DSP AD/DA converter Sampling rate LCD display MIDI interface 2x Analog Devices Black Fin 24-bit Sigma... x D) Weight approx. 4 1/3 x 12 3/5 x 15 1/2" approx. 110 x 320 x 392 mm approx. 9.3 lbs / 4.2 kg BEHRINGER is constantly striving to -noise ratio Mic Phono Line Distortion (THD) Crosstalk 25 Hz - 20 kHz, +0/-3 dB 20 Hz - 20 kHz, ...from time to time to existing products without prior notice. 26 DIGITAL PRO MIXER DDM4000 User Manual 9. Specifications and appearance may be made from those listed or illustrated. Specifications Audio Inputs...
... dB, Peak -12 dB/+12 dB, Shelving Digital Effects Processor DSP AD/DA converter Sampling rate LCD display MIDI interface 2x Analog Devices Black Fin 24-bit Sigma... x D) Weight approx. 4 1/3 x 12 3/5 x 15 1/2" approx. 110 x 320 x 392 mm approx. 9.3 lbs / 4.2 kg BEHRINGER is constantly striving to -noise ratio Mic Phono Line Distortion (THD) Crosstalk 25 Hz - 20 kHz, +0/-3 dB 20 Hz - 20 kHz, ...from time to time to existing products without prior notice. 26 DIGITAL PRO MIXER DDM4000 User Manual 9. Specifications and appearance may be made from those listed or illustrated. Specifications Audio Inputs...