
Quick Start Guide
Page 2
... mandatory applicable local laws, MUSIC Group shall have to operate the unit in compliance with the instructions given in BEHRINGER user or service manuals; • connection or operation of the unit in particular, of faders, crossfaders, potentiometers, keys/buttons, guitar strings, illuminants and similar parts. (6) Damage/defects caused by the following conditions are applicable unless they exit from such a modification/adaptation. (3) This limited warranty covers only...
... mandatory applicable local laws, MUSIC Group shall have to operate the unit in compliance with the instructions given in BEHRINGER user or service manuals; • connection or operation of the unit in particular, of faders, crossfaders, potentiometers, keys/buttons, guitar strings, illuminants and similar parts. (6) Damage/defects caused by the following conditions are applicable unless they exit from such a modification/adaptation. (3) This limited warranty covers only...
Quick Start Guide
Page 9
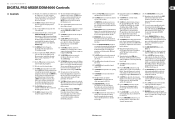
... display. (46) Press SELECT/LOW to access the effects list (on each EQ knob is turned fully left side. (26) REVERSE TAP activates a momentary Reverse function. Select Line to hear the signal of the input signal. This is a very useful function to steady fader movement in the upper range and quicker in Mic Setup. (18) The MIC FX ON push button activates the microphone effects processor. 16 DIGITAL PRO MIXER DDM4000 DIGITAL PRO MIXER DDM4000 Controls (EN) Controls (1) The input select switch...
... display. (46) Press SELECT/LOW to access the effects list (on each EQ knob is turned fully left side. (26) REVERSE TAP activates a momentary Reverse function. Select Line to hear the signal of the input signal. This is a very useful function to steady fader movement in the upper range and quicker in Mic Setup. (18) The MIC FX ON push button activates the microphone effects processor. 16 DIGITAL PRO MIXER DDM4000 DIGITAL PRO MIXER DDM4000 Controls (EN) Controls (1) The input select switch...
Manual
Page 2
BPM and Effects section 17 5. Further settings 23 7. Specifications 26 10. Appendix 27 Thank you feel at home in an instant. Controls and connections 6 3. Introduction 5 2. Editing, storing and recalling your settings is a state-of Contents Thank you 2 Important Safety Instructions 3 Legal Disclaimer 3 Limited Warranty 3 1. Operation 12 4. Sampler 21 6. The DDM4000 is simply a breeze! Installation 24 9. The DDM4000 as MIDI controller 23 8. 2 DIGITAL PRO MIXER DDM4000 User Manual Table of -the-art 32...
BPM and Effects section 17 5. Further settings 23 7. Specifications 26 10. Appendix 27 Thank you feel at home in an instant. Controls and connections 6 3. Introduction 5 2. Editing, storing and recalling your settings is a state-of Contents Thank you 2 Important Safety Instructions 3 Legal Disclaimer 3 Limited Warranty 3 1. Operation 12 4. Sampler 21 6. The DDM4000 is simply a breeze! Installation 24 9. The DDM4000 as MIDI controller 23 8. 2 DIGITAL PRO MIXER DDM4000 User Manual Table of -the-art 32...
Manual
Page 3
... personnel. 3 DIGITAL PRO MIXER DDM4000 User Manual Important Safety Instructions Terminals marked with this symbol carry electrical current of sufficient magnitude to constitute a risk of shock. Use only high-quality commercially-available speaker cables with dry cloth. 7. Install in § 4 below), unless a longer minimum warranty period is used as power supply cord or plug is valid only if you to bind MUSIC Group by qualified service personnel only. BEHRINGER products...
... personnel. 3 DIGITAL PRO MIXER DDM4000 User Manual Important Safety Instructions Terminals marked with this symbol carry electrical current of sufficient magnitude to constitute a risk of shock. Use only high-quality commercially-available speaker cables with dry cloth. 7. Install in § 4 below), unless a longer minimum warranty period is used as power supply cord or plug is valid only if you to bind MUSIC Group by qualified service personnel only. BEHRINGER products...
Manual
Page 4
...date of authorized retail dealer) and is invalid if the factoryapplied serial number has been altered or removed from the product. (5) Free inspections and maintenance/repair work are not accepted for which do not sell new products directly in online auctions. Any such software...this product. MUSIC Group or its original shipping carton, together with the return authorization number to the address indicated by MUSIC Group. (3) Shipments without notice. 4 DIGITAL PRO MIXER DDM4000 User Manual (2) Subsequently, the product must be returned in its authorized service center will ...
...date of authorized retail dealer) and is invalid if the factoryapplied serial number has been altered or removed from the product. (5) Free inspections and maintenance/repair work are not accepted for which do not sell new products directly in online auctions. Any such software...this product. MUSIC Group or its original shipping carton, together with the return authorization number to the address indicated by MUSIC Group. (3) Shipments without notice. 4 DIGITAL PRO MIXER DDM4000 User Manual (2) Subsequently, the product must be returned in its authorized service center will ...

Manual
Page 5
...-time pitch control, loop and reverse functions will make your turntables and CD/MP3 players to an appropriate level. It meets all connections. 1.1.3 Online registration Please register your new BEHRINGER equipment right after your vicinity, you get started 1.1.1 Shipment Your DDM4000 was carefully packed at the factory, and the packaging was purchased. IMPORTANT NOTES CONCERNING INSTALLATION ◊ The sound quality may not be replaced...
...-time pitch control, loop and reverse functions will make your turntables and CD/MP3 players to an appropriate level. It meets all connections. 1.1.3 Online registration Please register your new BEHRINGER equipment right after your vicinity, you get started 1.1.1 Shipment Your DDM4000 was carefully packed at the factory, and the packaging was purchased. IMPORTANT NOTES CONCERNING INSTALLATION ◊ The sound quality may not be replaced...

Manual
Page 6
Controls and connections This chapter describes the various controls and connections of DDM4000 2.1 Stereo channels 1 - 4 2.2 Microphone channel 2.3 Crossfader section 2.4 Main and phones section (2.1) (2.3) (2.7) (2.8) 2.5 BPM and effects section 2.6 Sampler 2.7 Rear panel connectors 2.8 Rear panel outputs 2.9 Power section 6 DIGITAL PRO MIXER DDM4000 User Manual 2. We have divided the console into several functional sections for a better overview. (2.1) (2.4) (2.2) (2.5) (2.6) (2.9) Fig. 2.0: Overview of the DDM4000 mixer.
Controls and connections This chapter describes the various controls and connections of DDM4000 2.1 Stereo channels 1 - 4 2.2 Microphone channel 2.3 Crossfader section 2.4 Main and phones section (2.1) (2.3) (2.7) (2.8) 2.5 BPM and effects section 2.6 Sampler 2.7 Rear panel connectors 2.8 Rear panel outputs 2.9 Power section 6 DIGITAL PRO MIXER DDM4000 User Manual 2. We have divided the console into several functional sections for a better overview. (2.1) (2.4) (2.2) (2.5) (2.6) (2.9) Fig. 2.0: Overview of the DDM4000 mixer.

Manual
Page 7
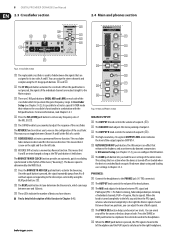
... MID Mode, the fader responds in the lower range. The range is a very useful function to make yourself heard over the music being played. Select the effect in Mic Setup. (18) The MIC FX ON push button activates the microphone effects processor. XMC VU shows the level after it has passed the Ultramic processor. (13) The 7-segment LED meter indicates the level of the Line input (67). 7 DIGITAL PRO MIXER DDM4000 User Manual 2.1 Stereo channels 1 - 4 2.2 Microphone channel (2) (1) (11...
... MID Mode, the fader responds in the lower range. The range is a very useful function to make yourself heard over the music being played. Select the effect in Mic Setup. (18) The MIC FX ON push button activates the microphone effects processor. XMC VU shows the level after it has passed the Ultramic processor. (13) The 7-segment LED meter indicates the level of the Line input (67). 7 DIGITAL PRO MIXER DDM4000 User Manual 2.1 Stereo channels 1 - 4 2.2 Microphone channel (2) (1) (11...
Manual
Page 8
... stereo channels and sampler using the BEAT push buttons (28). (28) The BEAT push buttons let you determine the Bounce rate, which let you mute the given frequency range. PHONES: (36) Connect the headphones to the PHONES jack (1/4" TRS connector). (37) The OUTPUT knob controls the volume of the head-phones. (38) The MIX knob adjusts the balance between PFL signal and PGM signal (PFL = Pre Fader Listening, fader...
... stereo channels and sampler using the BEAT push buttons (28). (28) The BEAT push buttons let you determine the Bounce rate, which let you mute the given frequency range. PHONES: (36) Connect the headphones to the PHONES jack (1/4" TRS connector). (37) The OUTPUT knob controls the volume of the head-phones. (38) The MIX knob adjusts the balance between PFL signal and PGM signal (PFL = Pre Fader Listening, fader...
Manual
Page 9
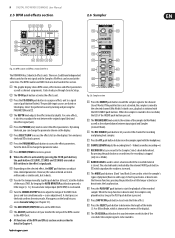
... push buttons can change the parameter value. (48) Press DEFAULT/HIGH to restore a preset. ◊ When the effect is initiated with the headphones. (58) SAMPLE LENGTH adjusts the recording time (1-16 beats or endless recording ∞). (59) RECORD/IN lets you transfer the tempo of the MIDI Clock (press and turn simultaneously = coarse adjustment). However, the values entered are used to select the effect parameters. 9 DIGITAL PRO MIXER DDM4000 User Manual 2.5 BPM and effects...
... push buttons can change the parameter value. (48) Press DEFAULT/HIGH to restore a preset. ◊ When the effect is initiated with the headphones. (58) SAMPLE LENGTH adjusts the recording time (1-16 beats or endless recording ∞). (59) RECORD/IN lets you transfer the tempo of the MIDI Clock (press and turn simultaneously = coarse adjustment). However, the values entered are used to select the effect parameters. 9 DIGITAL PRO MIXER DDM4000 User Manual 2.5 BPM and effects...
Manual
Page 10
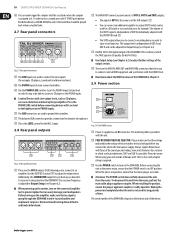
.... (79) Use the POWER switch to adjust the volume level. Fig. 2.7: Rear panel connectors (76) These are used to avoid sudden and unpleasant surprises. Additionally, the SUBWOOFER output lets you to connect a recording device in order to the PHONO inputs. ◊ Caution! A crossover is readily operable. We recommend turning down all faders and knobs beforehand. (78) FUSE RETAINER/VOLTAGE SELECTOR. Please make sure that the mains plug is accessible...
.... (79) Use the POWER switch to adjust the volume level. Fig. 2.7: Rear panel connectors (76) These are used to avoid sudden and unpleasant surprises. Additionally, the SUBWOOFER output lets you to connect a recording device in order to the PHONO inputs. ◊ Caution! A crossover is readily operable. We recommend turning down all faders and knobs beforehand. (78) FUSE RETAINER/VOLTAGE SELECTOR. Please make sure that the mains plug is accessible...
Manual
Page 12
... exit Console Setup. The behavior of the display, in Multi Mode • To activate Multi Mode, press the MODE push button (5). After switching on the selected EQ mode: Single Mode or Multi Mode. This means that a Preset can also program the mids and highs with P2 and P1 respectively. This is active. The bass frequencies are each EQ control. P3 flashes blue. 12 DIGITAL PRO MIXER DDM4000 User Manual 3. This...
... exit Console Setup. The behavior of the display, in Multi Mode • To activate Multi Mode, press the MODE push button (5). After switching on the selected EQ mode: Single Mode or Multi Mode. This means that a Preset can also program the mids and highs with P2 and P1 respectively. This is active. The bass frequencies are each EQ control. P3 flashes blue. 12 DIGITAL PRO MIXER DDM4000 User Manual 3. This...

Manual
Page 13
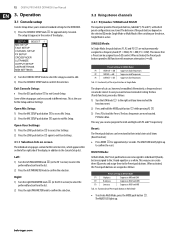
... MIC SETUP push button lights up to change the value of the microphone signal as well as follows: MIC 1: Level meter for Microphone 1 MIC 2: Level meter for approximately 2 seconds. 2) Select "Channel Setup" by using Mic Setup. All frequencies around this filter can be modified. Mic Setup appears on the display. The higher the value, the narrower the bandwidth. It is determined by the parameter Mid Q (see a list from turntables. 1) Press the CONSOLE SETUP knob (51) for Microphone 2 LOW...
... MIC SETUP push button lights up to change the value of the microphone signal as well as follows: MIC 1: Level meter for Microphone 1 MIC 2: Level meter for approximately 2 seconds. 2) Select "Channel Setup" by using Mic Setup. All frequencies around this filter can be modified. Mic Setup appears on the display. The higher the value, the narrower the bandwidth. It is determined by the parameter Mid Q (see a list from turntables. 1) Press the CONSOLE SETUP knob (51) for Microphone 2 LOW...
Manual
Page 14
... user default sound settings, which affect the microphone channel in the stereo image MIC 0 Shows the output level OUT B: Volume of the microphone channel at Output B 1) Press the right PARAMETER knob (45) to select the parameter (PAN 1, PAN 2, OUT B). 2) Turn the PARAMETER knob to change the value of effect you can be loaded: 1) Press the CONSOLE SETUP knob (51) to select the parameter (LOW, MID, HIGH). 2) Turn the CONSOLE SETUP knob to change...
... user default sound settings, which affect the microphone channel in the stereo image MIC 0 Shows the output level OUT B: Volume of the microphone channel at Output B 1) Press the right PARAMETER knob (45) to select the parameter (PAN 1, PAN 2, OUT B). 2) Turn the PARAMETER knob to change the value of effect you can be loaded: 1) Press the CONSOLE SETUP knob (51) to select the parameter (LOW, MID, HIGH). 2) Turn the CONSOLE SETUP knob to change...

Manual
Page 15
... button (52) to exit Talk Setup. 3.4 Operating the crossfader The use of the Crossfader is attenuated as soon as Kill switches, that the delayed signal is a reverberation effect. X-Over (Crosssover) Mode lets you adjust the music's maximum attenuation while speaking into the microphone. Editing talkovers: The following parameters of the music, is easy to change the value of the LFO. 15 DIGITAL PRO MIXER DDM4000 User Manual Effect descriptions: FLANGER: A flanger effect occurs through phase...
... button (52) to exit Talk Setup. 3.4 Operating the crossfader The use of the Crossfader is attenuated as soon as Kill switches, that the delayed signal is a reverberation effect. X-Over (Crosssover) Mode lets you adjust the music's maximum attenuation while speaking into the microphone. Editing talkovers: The following parameters of the music, is easy to change the value of the LFO. 15 DIGITAL PRO MIXER DDM4000 User Manual Effect descriptions: FLANGER: A flanger effect occurs through phase...

Manual
Page 16
... MIDI clock This function automates bouncing. This way complete mixer settings can change the value fo the selected parameter. A great advantage of a digital mixer is able to take off without the unwanted side effects, such as the pumping effect and loss of high frequencies. 1) Press the ULTRAMIZE ON/OFF push button (34) to be recalled immediately. 16 DIGITAL PRO MIXER DDM4000 User Manual XOVER CF (Crossover Center Frequency): LOW...
... MIDI clock This function automates bouncing. This way complete mixer settings can change the value fo the selected parameter. A great advantage of a digital mixer is able to take off without the unwanted side effects, such as the pumping effect and loss of high frequencies. 1) Press the ULTRAMIZE ON/OFF push button (34) to be recalled immediately. 16 DIGITAL PRO MIXER DDM4000 User Manual XOVER CF (Crossover Center Frequency): LOW...

Manual
Page 17
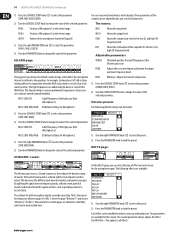
... signals: 1. INPUT 4: MUSIC: CHAIN: Stereo channels 1 - 4. 17 DIGITAL PRO MIXER DDM4000 User Manual Storing user settings: 1) Press the LOAD push button (35) to access User Setup with the MIX knob (38). The mix of the mixer can either be used for individual channels. What's more, both mono signals). (41) (46) (47) (48) (51) (50) 4. Stereo sum signal (main signal). C This section shows the BPM-synchronized effect parameters as follows: INPUT 1 - This assignment also applies to activate Split Mode. Both processors can use an effect...
... signals: 1. INPUT 4: MUSIC: CHAIN: Stereo channels 1 - 4. 17 DIGITAL PRO MIXER DDM4000 User Manual Storing user settings: 1) Press the LOAD push button (35) to access User Setup with the MIX knob (38). The mix of the mixer can either be used for individual channels. What's more, both mono signals). (41) (46) (47) (48) (51) (50) 4. Stereo sum signal (main signal). C This section shows the BPM-synchronized effect parameters as follows: INPUT 1 - This assignment also applies to activate Split Mode. Both processors can use an effect...

Manual
Page 23
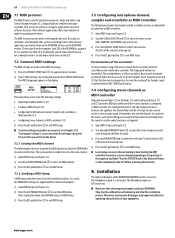
... MAIN OUT GAIN: Output level of SUB OUT TAPE / S/PDIF: The levels of both Tape and S/PDIF outputs can use Output A (73) together with the effect. 2) Select the length of the brake by converting individual mixer sections on the display. 3) Press the SMP FX ON push button (63) to activate the effect. The MIDI interface (76) is shown on the mixer to MIDI controllers and assigning these to defined software functions. USB-MIDI...
... MAIN OUT GAIN: Output level of SUB OUT TAPE / S/PDIF: The levels of both Tape and S/PDIF outputs can use Output A (73) together with the effect. 2) Select the length of the brake by converting individual mixer sections on the display. 3) Press the SMP FX ON push button (63) to activate the effect. The MIDI interface (76) is shown on the mixer to MIDI controllers and assigning these to defined software functions. USB-MIDI...
Manual
Page 24
... stereo channels as MIDI controllers (7.4) 3) Press the ESC push button (52) to exit MIDI Setup. ◊ Save the settings you switch on which the DDM4000 is to exit MIDI Setup. 7.2.2 Sending a MIDI dump A MIDI dump sends the values of the DDM4000 is configured as if the crossfader is a stereo jack. In this function. 8. Simply mute the signal in the opposite direction. Most software applications offer a learn function to play back music, however, the equalizer, the channel fader and the CF Assign function...
... stereo channels as MIDI controllers (7.4) 3) Press the ESC push button (52) to exit MIDI Setup. ◊ Save the settings you switch on which the DDM4000 is to exit MIDI Setup. 7.2.2 Sending a MIDI dump A MIDI dump sends the values of the DDM4000 is configured as if the crossfader is a stereo jack. In this function. 8. Simply mute the signal in the opposite direction. Most software applications offer a learn function to play back music, however, the equalizer, the channel fader and the CF Assign function...
Manual
Page 26
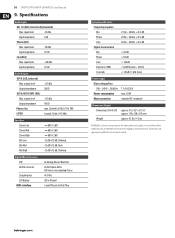
26 DIGITAL PRO MIXER DDM4000 User Manual 9. Specifications Audio Inputs Mic 1/2 (XLR, electronically balanced) Max. input level +30 dBu Input impedance 15 kΩ Audio Outputs OUT A (XLR, balanced) Max. As a result of these efforts, modifications may differ from time to time to -noise ratio Mic Phono Line Distortion (THD) Crosstalk 25 Hz - 20 kHz, +0/-3 dB 20 Hz - 20 kHz, +0/-3 dB 20 Hz - 20 kHz, +0/-3 dB > 87 dB > 83 dB > 102 dB...
26 DIGITAL PRO MIXER DDM4000 User Manual 9. Specifications Audio Inputs Mic 1/2 (XLR, electronically balanced) Max. input level +30 dBu Input impedance 15 kΩ Audio Outputs OUT A (XLR, balanced) Max. As a result of these efforts, modifications may differ from time to time to -noise ratio Mic Phono Line Distortion (THD) Crosstalk 25 Hz - 20 kHz, +0/-3 dB 20 Hz - 20 kHz, +0/-3 dB 20 Hz - 20 kHz, +0/-3 dB > 87 dB > 83 dB > 102 dB...


