Manual
Page 1
User Manual DIGITAL PRO MIXER DDM4000 Ultimate 5-Channel Digital DJ Mixer with Sampler, 4 FX Sections, Dual BPM Counters and MIDI
User Manual DIGITAL PRO MIXER DDM4000 Ultimate 5-Channel Digital DJ Mixer with Sampler, 4 FX Sections, Dual BPM Counters and MIDI
Manual
Page 3
...The apparatus shall be sufficient to constitute a risk of electric shock do not remove the top cover (or the rear section). BEHRINGER, KLARK TEKNIK, MIDAS, BUGERA, AND TURBOSOUND ARE PART OF THE MUSIC GROUP (MUSIC-GROUP.COM). THIS MANUAL IS COPYRIGHTED. Caution... ARE THE PROPERTY OF THEIR RESPECTIVE OWNERS. COLORS AND SPECIFICATIONS MAY VARY FROM ACTUAL PRODUCT. Trident Chambers, Wickhams Cay, P.O. 3 DIGITAL PRO MIXER DDM4000 User Manual Important Safety Instructions Terminals marked with this symbol carry electrical current of sufficient magnitude to constitute risk of time. 14....
...The apparatus shall be sufficient to constitute a risk of electric shock do not remove the top cover (or the rear section). BEHRINGER, KLARK TEKNIK, MIDAS, BUGERA, AND TURBOSOUND ARE PART OF THE MUSIC GROUP (MUSIC-GROUP.COM). THIS MANUAL IS COPYRIGHTED. Caution... ARE THE PROPERTY OF THEIR RESPECTIVE OWNERS. COLORS AND SPECIFICATIONS MAY VARY FROM ACTUAL PRODUCT. Trident Chambers, Wickhams Cay, P.O. 3 DIGITAL PRO MIXER DDM4000 User Manual Important Safety Instructions Terminals marked with this symbol carry electrical current of sufficient magnitude to constitute risk of time. 14....
Manual
Page 4
...behringer.com). Registering your purchase and equipment with its functions. Caution! Please refer to a different mains voltage, be located in your repair claims more quickly and efficiently. The DDM4000 power connection is made by 180°. ◊ Please note that you set the volume to familiarize yourself with custom curve adjustment. 4 DIGITAL PRO MIXER DDM4000... before you connect your DDM4000 to the mains, please make sure that your own safety, never remove or disable the earth conductor from damage caused by visiting http://behringer.com and read this manual...
...behringer.com). Registering your purchase and equipment with its functions. Caution! Please refer to a different mains voltage, be located in your repair claims more quickly and efficiently. The DDM4000 power connection is made by 180°. ◊ Please note that you set the volume to familiarize yourself with custom curve adjustment. 4 DIGITAL PRO MIXER DDM4000... before you connect your DDM4000 to the mains, please make sure that your own safety, never remove or disable the earth conductor from damage caused by visiting http://behringer.com and read this manual...
Manual
Page 5
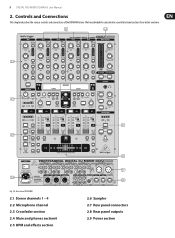
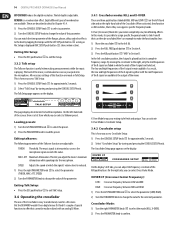
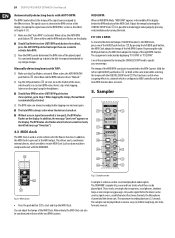
We have divided the console into several functional sections for a better overview. (2.1) (2.4) (2.2) (2.5) (2.6) (2.9) Fig. 2.0: Overview of the DDM4000 mixer. Controls and Connections This chapter describes the various controls and connections of DDM4000 2.1 Stereo channels 1 - 4 2.2 Microphone channel 2.3 Crossfader section 2.4 Main and phones section0 2.5 BPM and effects section (2.1) (2.3) (2.7) (2.8) 2.6 Sampler 2.7 Rear panel connectors 2.8 Rear panel outputs 2.9 Power section 5 DIGITAL PRO MIXER DDM4000 User Manual 2.
We have divided the console into several functional sections for a better overview. (2.1) (2.4) (2.2) (2.5) (2.6) (2.9) Fig. 2.0: Overview of the DDM4000 mixer. Controls and Connections This chapter describes the various controls and connections of DDM4000 2.1 Stereo channels 1 - 4 2.2 Microphone channel 2.3 Crossfader section 2.4 Main and phones section0 2.5 BPM and effects section (2.1) (2.3) (2.7) (2.8) 2.6 Sampler 2.7 Rear panel connectors 2.8 Rear panel outputs 2.9 Power section 5 DIGITAL PRO MIXER DDM4000 User Manual 2.
Manual
Page 6
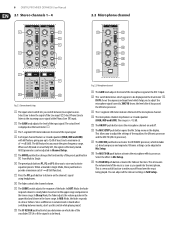
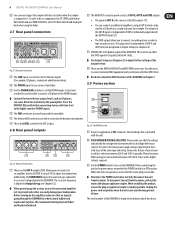
..., the fader responds in on the channel's signal using headphones. (8) The fader controls the channel volume. (9) The CURVE switch adjusts the response of the fader. 6 DIGITAL PRO MIXER DDM4000 User Manual 2.1 Stereo channels 1 - 4 2.2 Microphone channel (2) (1) (11) (12) (3) (13) (5) (16) (4) (14) (17) (6) (18) (19) (15) (7) (9) Fig. 2.2: Microphone channel (8) (10) Fig. 2.1: Stereo channel strips (1) The input...
..., the fader responds in on the channel's signal using headphones. (8) The fader controls the channel volume. (9) The CURVE switch adjusts the response of the fader. 6 DIGITAL PRO MIXER DDM4000 User Manual 2.1 Stereo channels 1 - 4 2.2 Microphone channel (2) (1) (11) (12) (3) (13) (5) (16) (4) (14) (17) (6) (18) (19) (15) (7) (9) Fig. 2.2: Microphone channel (8) (10) Fig. 2.1: Stereo channel strips (1) The input...
Manual
Page 7
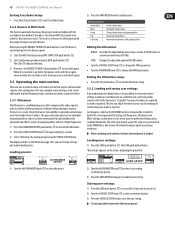
...). (21) The CF ON push button activates the crossfader. Between these two positions, you load the user settings of the entire mixer. This way you have chosen. ◊ Find a detailed description of this function in combination with the Kill push buttons. The settings... A and B. The crossfader fades between sides A and B in the right headphone. When the knob is turned completely to the left, you to activate the bouncing. 7 DIGITAL PRO MIXER DDM4000 User Manual 2.3 Crossfader section 2.4 Main and phones section (29) (28) (23) (21) (26) (27) (25) (30) (24) (22) (33) (31...
...). (21) The CF ON push button activates the crossfader. Between these two positions, you load the user settings of the entire mixer. This way you have chosen. ◊ Find a detailed description of this function in combination with the Kill push buttons. The settings... A and B. The crossfader fades between sides A and B in the right headphone. When the knob is turned completely to the left, you to activate the bouncing. 7 DIGITAL PRO MIXER DDM4000 User Manual 2.3 Crossfader section 2.4 Main and phones section (29) (28) (23) (21) (26) (27) (25) (30) (24) (22) (33) (31...
Manual
Page 8
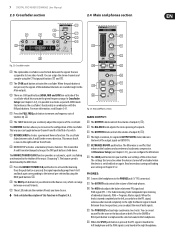
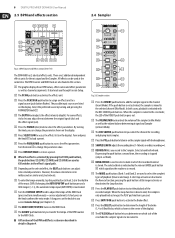
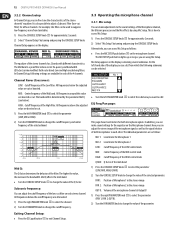
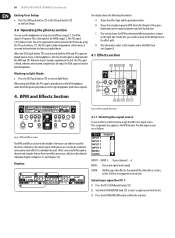
... of the INSERT push button goes out. (55) The VOLUME/MIX knob controls the volume of the MIDI Clock (press and turn simultaneously = coarse adjustment). 8 DIGITAL PRO MIXER DDM4000 User Manual 2.5 BPM and effects section 2.6 Sampler (41) (46) (47) (48) (51) (54) (54) (50) (45) (50) (42) (49) (43) (...53) (52) (56) (57) (58) (59) (60) Fig. 2.5: BPM Counter and Effects section (here FX 1) (62) (61) The DDM4000 has 2 identical effects units. All effects can adjust time-related parameters. For some effects, it also lets you determine on which is shown in this...
... of the INSERT push button goes out. (55) The VOLUME/MIX knob controls the volume of the MIDI Clock (press and turn simultaneously = coarse adjustment). 8 DIGITAL PRO MIXER DDM4000 User Manual 2.5 BPM and effects section 2.6 Sampler (41) (46) (47) (48) (51) (54) (54) (50) (45) (50) (42) (49) (43) (...53) (52) (56) (57) (58) (59) (60) Fig. 2.5: BPM Counter and Effects section (here FX 1) (62) (61) The DDM4000 has 2 identical effects units. All effects can adjust time-related parameters. For some effects, it also lets you determine on which is shown in this...
Manual
Page 9
... in operation, ensure that no signal is supplied via an IEC connector. Unplug the power cord completely when the unit is the digital output of the DDM4000. Always replace blown fuses with Line output levels, such as at OUT A is independent of time. The serial number of the... (74) (75) (76) Fig. 2.8: Rear panel connectors (73) These are the OUT A outputs (XLR) allowing you connect the unit to the main power supply. 9 DIGITAL PRO MIXER DDM4000 User Manual (66) You can even trigger the sampler with their MIDI Clock. (67) The LINE inputs are used to connect the Line signals (for...
... in operation, ensure that no signal is supplied via an IEC connector. Unplug the power cord completely when the unit is the digital output of the DDM4000. Always replace blown fuses with Line output levels, such as at OUT A is independent of time. The serial number of the... (74) (75) (76) Fig. 2.8: Rear panel connectors (73) These are the OUT A outputs (XLR) allowing you connect the unit to the main power supply. 9 DIGITAL PRO MIXER DDM4000 User Manual (66) You can even trigger the sampler with their MIDI Clock. (67) The LINE inputs are used to connect the Line signals (for...
Manual
Page 10
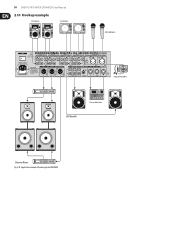
10 DIGITAL PRO MIXER DDM4000 User Manual 2.10 Hookup example CD player Turntable Microphone Digital Recorder DJ Booth Drum Machine Dance oor Fig. 2.10: Application example of hooking up the DDM4000
10 DIGITAL PRO MIXER DDM4000 User Manual 2.10 Hookup example CD player Turntable Microphone Digital Recorder DJ Booth Drum Machine Dance oor Fig. 2.10: Application example of hooking up the DDM4000
Manual
Page 11
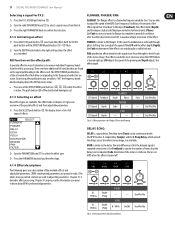
.... 2) Press and hold the MODE push button (5) while pressing P3 (6). 3) Press P3 to their initial states at all standard settings for the DDM4000. 1) Press the CONSOLE SETUP knob (51) for approximately 2 seconds. This is active. The MULTI LED briefly lights up . The MULTI LED ...create your own EQ presets, proceed as follows: 1) Adjust the equalizer as a whole. This means that a Preset can be modified. 11 DIGITAL PRO MIXER DDM4000 User Manual 3. The behavior of cutting the bass (Punch function), proceed as follows: Preset settings in MULTI Mode P1 High pass P2 Band pass...
.... 2) Press and hold the MODE push button (5) while pressing P3 (6). 3) Press P3 to their initial states at all standard settings for the DDM4000. 1) Press the CONSOLE SETUP knob (51) for approximately 2 seconds. This is active. The MULTI LED briefly lights up . The MULTI LED ...create your own EQ presets, proceed as follows: 1) Adjust the equalizer as a whole. This means that a Preset can be modified. 11 DIGITAL PRO MIXER DDM4000 User Manual 3. The behavior of cutting the bass (Punch function), proceed as follows: Preset settings in MULTI Mode P1 High pass P2 Band pass...
Manual
Page 12
... (52) to adjust a Subsonic Filter (low-cut filter on the display containing several submenus. Channel Setup appears on the microphone channel. All frequencies below ). 12 DIGITAL PRO MIXER DDM4000 User Manual 3.2.2 Channel setup In Channel Setup, you can make adjustments to suppress low-frequency noise from which the following settings are available for each...
... (52) to adjust a Subsonic Filter (low-cut filter on the display containing several submenus. Channel Setup appears on the microphone channel. All frequencies below ). 12 DIGITAL PRO MIXER DDM4000 User Manual 3.2.2 Channel setup In Channel Setup, you can make adjustments to suppress low-frequency noise from which the following settings are available for each...
Manual
Page 13
... available for both pages are made separately. The following default settings can see several times. You can adjust the speed of the selected parameter. 13 DIGITAL PRO MIXER DDM4000 User Manual EQ GAIN page: This page lets you make user default sound settings, which affect the microphone channel in relation to adjust the pitch...
... available for both pages are made separately. The following default settings can see several times. You can adjust the speed of the selected parameter. 13 DIGITAL PRO MIXER DDM4000 User Manual EQ GAIN page: This page lets you make user default sound settings, which affect the microphone channel in relation to adjust the pitch...
Manual
Page 14
... left -hand side of the Talkover function are faded out. You can suppress specific frequency bands. In this parameter. But the DDM4000 wouldn't be a digital mixer if it is possible to assign specific frequency bands to the left TAP push button (50) as long as Mic Setup is displayed...this value. The bit depth is a reverberation effect. All necessary settings of the A signal remain audible. ATT Maximum Attenuation. 14 DIGITAL PRO MIXER DDM4000 User Manual BITCRUSHER reduce the digital resolution. Exiting Mic Setup: • Press the ESC push button (52) to confirm.
... left -hand side of the Talkover function are faded out. You can suppress specific frequency bands. In this parameter. But the DDM4000 wouldn't be a digital mixer if it is possible to assign specific frequency bands to the left TAP push button (50) as long as Mic Setup is displayed...this value. The bit depth is a reverberation effect. All necessary settings of the A signal remain audible. ATT Maximum Attenuation. 14 DIGITAL PRO MIXER DDM4000 User Manual BITCRUSHER reduce the digital resolution. Exiting Mic Setup: • Press the ESC push button (52) to confirm.
Manual
Page 15
...be stored and loaded. TIME Changes the adjustable speed of an amplifier is optimally used by using the BEAT push buttons (28). 15 DIGITAL PRO MIXER DDM4000 User Manual Exiting Crossfader Setup: • Press the ESC push button (52) to exit Crossfader Setup. 3.4.3 Bounce to the Ultramizer...user settings A great advantage of a digital mixer is a multiband processor that compresses the audio signal in order to achieve a better perception of an analog mixer. This lets you adjust the mixer to load the user setting. Just imagine, a club has the DDM4000 which is loaded. Each DJ has ...
...be stored and loaded. TIME Changes the adjustable speed of an amplifier is optimally used by using the BEAT push buttons (28). 15 DIGITAL PRO MIXER DDM4000 User Manual Exiting Crossfader Setup: • Press the ESC push button (52) to exit Crossfader Setup. 3.4.3 Bounce to the Ultramizer...user settings A great advantage of a digital mixer is a multiband processor that compresses the audio signal in order to achieve a better perception of an analog mixer. This lets you adjust the mixer to load the user setting. Just imagine, a club has the DDM4000 which is loaded. Each DJ has ...
Manual
Page 16
... effect for the stereo channels or the master signal. D This information refers to the Sampler and/or the MIDI Clock (see the activity of the mixer can either be heard when the faders are triggered consecutively. BPM and Effects Section (43) (49) (42) (53) (52) Fig. 4.2: Effects section (here... the PFL signal is played back on the right headphone (both signals is turned completely to the left PARAMETER knob to the BPM Counter. 16 DIGITAL PRO MIXER DDM4000 User Manual Exiting User Setup: • Press the LOAD push button (35) or the ESC push button (52) to exit User Setup. 3.6...
... effect for the stereo channels or the master signal. D This information refers to the Sampler and/or the MIDI Clock (see the activity of the mixer can either be heard when the faders are triggered consecutively. BPM and Effects Section (43) (49) (42) (53) (52) Fig. 4.2: Effects section (here... the PFL signal is played back on the right headphone (both signals is turned completely to the left PARAMETER knob to the BPM Counter. 16 DIGITAL PRO MIXER DDM4000 User Manual Exiting User Setup: • Press the LOAD push button (35) or the ESC push button (52) to exit User Setup. 3.6...
Manual
Page 17
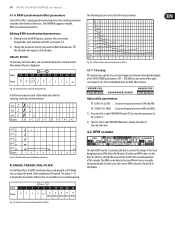
... flash blue corresponding to the frequency bands that are found on the effect path: A specially effective way of alienation is achieved through phase shifting. 17 DIGITAL PRO MIXER DDM4000 User Manual Selecting a signal for Flanger, Phaser and Panning 2) Turn the PARAMETER knob (45) to select the effect type. 3) Press the PARAMETER knob to load...
... flash blue corresponding to the frequency bands that are found on the effect path: A specially effective way of alienation is achieved through phase shifting. 17 DIGITAL PRO MIXER DDM4000 User Manual Selecting a signal for Flanger, Phaser and Panning 2) Turn the PARAMETER knob (45) to select the effect type. 3) Press the PARAMETER knob to load...

Manual
Page 18
...Reverb Dry/Wet Mix FILTER LFO Lowpass Bandpass Highpass 0 ... 100% LFO Speed Manual Tab. 4.5: Effect parameters for slow tracks. 18 DIGITAL PRO MIXER DDM4000 User Manual PITCHER, BITCRUSHER: PITCHER changes the pitch of the music without long reflections. Ambient is deactivated (the FX ON push button does... ideal for Filter Frequency 4.1.5 Editing effects As already mentioned in the previous chapter, each case it is not truncated in the digital resolution. In LFO Mode, the filter frequency is the BPM-synchronized parameter. This only works when the effect is a very ...
...Reverb Dry/Wet Mix FILTER LFO Lowpass Bandpass Highpass 0 ... 100% LFO Speed Manual Tab. 4.5: Effect parameters for slow tracks. 18 DIGITAL PRO MIXER DDM4000 User Manual PITCHER, BITCRUSHER: PITCHER changes the pitch of the music without long reflections. Ambient is deactivated (the FX ON push button does... ideal for Filter Frequency 4.1.5 Editing effects As already mentioned in the previous chapter, each case it is not truncated in the digital resolution. In LFO Mode, the filter frequency is the BPM-synchronized parameter. This only works when the effect is a very ...
Manual
Page 19
...delay time in LFO Mode. The detected BPM values are needed for the recording duration of the music. In both effect devices. The DDM4000 supports editable, BPM-synchronized parameters. Adjustable parameters: FX 1 LOW / FX 2 LOW: Crossover frequency between the individual bands of the ... crossover frequencies between LOW and MID. The BPM can be detected in Section B of the modulation (LFO speed). 19 DIGITAL PRO MIXER DDM4000 User Manual 4.1.6 BPM-synchronized effect parameters Some of the effect sound especially interesting when time-related parameters respond to the rhythm...
...delay time in LFO Mode. The detected BPM values are needed for the recording duration of the music. In both effect devices. The DDM4000 supports editable, BPM-synchronized parameters. Adjustable parameters: FX 1 LOW / FX 2 LOW: Crossover frequency between the individual bands of the ... crossover frequencies between LOW and MID. The BPM can be detected in Section B of the modulation (LFO speed). 19 DIGITAL PRO MIXER DDM4000 User Manual 4.1.6 BPM-synchronized effect parameters Some of the effect sound especially interesting when time-related parameters respond to the rhythm...
Manual
Page 20
...MIDI Clock. The assignment is activated. The tempo of the MIDI Clock. Any audio signal fed to the Effect section. 20 DIGITAL PRO MIXER DDM4000 User Manual Automatically detecting beats with the DDM4000. When active, the AUTO BPM push button (50) shines yellow and the BPM indicator flashes on the display. ◊ ...the AUTO BPM push button longer than one which results in various ways (as infinite loop/loop, one of the signal source assigned to the mixer can be played back. When active, the AUTO BPM/TAP push button (50) shines blue and the BPM indicator shows "Manual." 2) Tap...
...MIDI Clock. The assignment is activated. The tempo of the MIDI Clock. Any audio signal fed to the Effect section. 20 DIGITAL PRO MIXER DDM4000 User Manual Automatically detecting beats with the DDM4000. When active, the AUTO BPM push button (50) shines yellow and the BPM indicator flashes on the display. ◊ ...the AUTO BPM push button longer than one which results in various ways (as infinite loop/loop, one of the signal source assigned to the mixer can be played back. When active, the AUTO BPM/TAP push button (50) shines blue and the BPM indicator shows "Manual." 2) Tap...
Manual
Page 21
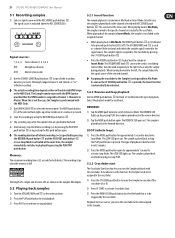
... sample during playback. The sample is routed to specify the recording duration you start playback. 3) Press PLAY a second time to select the memory bank. 21 DIGITAL PRO MIXER DDM4000 User Manual 5.1 Recording samples 1) Select a signal source with REC SOURCE push buttons (56). The LOOP LED goes out. The signal source is activated at the...
... sample during playback. The sample is routed to specify the recording duration you start playback. 3) Press PLAY a second time to select the memory bank. 21 DIGITAL PRO MIXER DDM4000 User Manual 5.1 Recording samples 1) Select a signal source with REC SOURCE push buttons (56). The LOOP LED goes out. The signal source is activated at the...


