
Parts and Accessories
Page 1
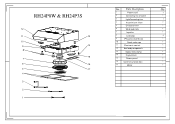
Parts Description Qty 1 Power cord 1 2 Connecting line of switch 1 3 LightConnecting line 1 4 Aluminium filter 2 5 Charcoal filter 1 6 Wind lead circle 1 7 Impeller 1 8 Led lamp 2 9 Plastic bellow 1 10 Check-valve cap 1 11 Electronic control 1 12 Box body components 1 13 Impose lines clamp 1 14 Capaciance 1 15 Power panel 1 16 Cover of junction box 1 17 Motor 1 RH24P0W & RH24P3S 12 11 13 10 9 14 8 15 7 6 16 5 17 4 3 2 1 No.
Parts Description Qty 1 Power cord 1 2 Connecting line of switch 1 3 LightConnecting line 1 4 Aluminium filter 2 5 Charcoal filter 1 6 Wind lead circle 1 7 Impeller 1 8 Led lamp 2 9 Plastic bellow 1 10 Check-valve cap 1 11 Electronic control 1 12 Box body components 1 13 Impose lines clamp 1 14 Capaciance 1 15 Power panel 1 16 Cover of junction box 1 17 Motor 1 RH24P0W & RH24P3S 12 11 13 10 9 14 8 15 7 6 16 5 17 4 3 2 1 No.
Door Reversal Instructions
Page 1
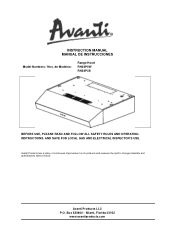
AND SAVE FOR LOCAL GAS AND ELECTRICAL INSPECTOR'S USE. Avanti Products LLC P.O. INSTRUCTION MANUAL MANUAL DE INSTRUCCIONES Model Numbers / Nos. Box 520604 - de Modelos: Range Hood RH24P0W RH24P3S BEFORE USE, PLEASE READ AND FOLLOW ALL SAFETY RULES AND OPERATING INSTRUCTIONS. Miami, Florida 33152 www.avantiproducts.com Avanti Products has a policy of continuous improvement on its products and reserves the right to change materials and specifications without notice.
AND SAVE FOR LOCAL GAS AND ELECTRICAL INSPECTOR'S USE. Avanti Products LLC P.O. INSTRUCTION MANUAL MANUAL DE INSTRUCCIONES Model Numbers / Nos. Box 520604 - de Modelos: Range Hood RH24P0W RH24P3S BEFORE USE, PLEASE READ AND FOLLOW ALL SAFETY RULES AND OPERATING INSTRUCTIONS. Miami, Florida 33152 www.avantiproducts.com Avanti Products has a policy of continuous improvement on its products and reserves the right to change materials and specifications without notice.
Door Reversal Instructions
Page 2
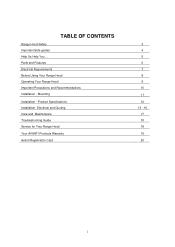
TABLE OF CONTENTS Range Hood Safety Important Safe guides Help Us Help You ... Electrical and Ducting Care and Maintenance Troubleshooting Guide Service for Your Range Hood Your AVANTI Products Warranty Avanti Registration Card 3 4 5 6 7 8 9 10 11 12 13 - 16 17 18 18 19 20 2 Mounting Installation - Product Specifications Installation- Parts and Features Electrical Requirements Before Using Your Range Hood Operating Your Range Hood Important Precautions and Recommendations Installation -
TABLE OF CONTENTS Range Hood Safety Important Safe guides Help Us Help You ... Electrical and Ducting Care and Maintenance Troubleshooting Guide Service for Your Range Hood Your AVANTI Products Warranty Avanti Registration Card 3 4 5 6 7 8 9 10 11 12 13 - 16 17 18 18 19 20 2 Mounting Installation - Product Specifications Installation- Parts and Features Electrical Requirements Before Using Your Range Hood Operating Your Range Hood Important Precautions and Recommendations Installation -
Door Reversal Instructions
Page 3
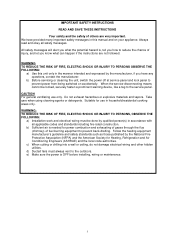
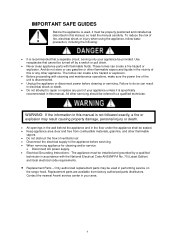
... person(s) in household/residential cooking areas only. CAUTION For general ventilating use in accordance with all safety messages. All safety messages will alert you what can happen if the instructions are very important. b) Before servicing or cleaning the unit, switch the power off at service panel and lock panel to the service panel. Take care when using cleaning agents or detergents. Suitable for power combustion and exhausting of...
... person(s) in household/residential cooking areas only. CAUTION For general ventilating use in accordance with all safety messages. All safety messages will alert you what can happen if the instructions are very important. b) Before servicing or cleaning the unit, switch the power off at service panel and lock panel to the service panel. Take care when using cleaning agents or detergents. Suitable for power combustion and exhausting of...
Door Reversal Instructions
Page 4
... the power line of ventilation air. • Disconnect the electrical supply to do not store or use gasoline or other flammable vapors and liquids in this manual is not followed exactly, a fire or explosion may be sealed. • Keep appliance area clear and free from factory authorized parts distributors. Contact the nearest Avanti service center in performing service on the range hood. Only authorized replacement parts...
... the power line of ventilation air. • Disconnect the electrical supply to do not store or use gasoline or other flammable vapors and liquids in this manual is not followed exactly, a fire or explosion may be sealed. • Keep appliance area clear and free from factory authorized parts distributors. Contact the nearest Avanti service center in performing service on the range hood. Only authorized replacement parts...
Door Reversal Instructions
Page 5
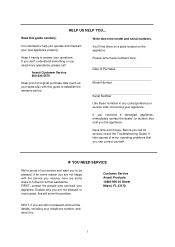
... most cases, this guide carefully. You'll find them on a plate located on the appliance. Explain why you to establish the warranty period. IF YOU NEED SERVICE We're proud of minor operating problems that sold you need more assistance, please call for service, check the Troubleshooting Guide. Read this will solve the problem. Write down the model and serial numbers. HELP US HELP...
... most cases, this guide carefully. You'll find them on a plate located on the appliance. Explain why you to establish the warranty period. IF YOU NEED SERVICE We're proud of minor operating problems that sold you need more assistance, please call for service, check the Troubleshooting Guide. Read this will solve the problem. Write down the model and serial numbers. HELP US HELP...

Door Reversal Instructions
Page 6
PARTS & FEATURES 1 Control Panel 2 LED Light Bulbs (2) 3 Removable / Cleanable Mesh Air Filters (2) CONTROL PANEL 1 Power ON/OFF Button (Red indicator Light) 2 Fan Speed Selector Button (Blue indicator light) Fan Speeds: OFF / High / Medium / Low 3 Light ON / OFF Selector Button (Blue indicator light) Light modes: OFF / High / Low 6
PARTS & FEATURES 1 Control Panel 2 LED Light Bulbs (2) 3 Removable / Cleanable Mesh Air Filters (2) CONTROL PANEL 1 Power ON/OFF Button (Red indicator Light) 2 Fan Speed Selector Button (Blue indicator light) Fan Speeds: OFF / High / Medium / Low 3 Light ON / OFF Selector Button (Blue indicator light) Light modes: OFF / High / Low 6

Door Reversal Instructions
Page 7
... circuit breaker or time delay fuse. ELECTRICAL REQUIREMENTS WARNING All electrical work must be a 2 wire with ground. DO NOT ground to the electrical diagram labeled on the product. Electrical supply: This appliance requires a 120V / 60 Hz electrical supply, connected to an individual properly grounded branch circuit, protected by local codes. Please refer to a gas pipe. For personal safety, remove house electrical fuse or open circuit breaker before beginning installation. Check with local requirements and codes, purchase and install...
... circuit breaker or time delay fuse. ELECTRICAL REQUIREMENTS WARNING All electrical work must be a 2 wire with ground. DO NOT ground to the electrical diagram labeled on the product. Electrical supply: This appliance requires a 120V / 60 Hz electrical supply, connected to an individual properly grounded branch circuit, protected by local codes. Please refer to a gas pipe. For personal safety, remove house electrical fuse or open circuit breaker before beginning installation. Check with local requirements and codes, purchase and install...
Door Reversal Instructions
Page 8
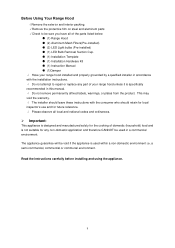
... cooking of your range hood installed and properly grounded by a qualified installer in accordance with the installation instructions. √ Do not attempt to be sure you have all of the parts listed below ● (1) Range Hood ● (2) Aluminum Mesh Filters(Pre-installed) ● (2) LED Light bulbs (Pre-installed) ● (1) LED Bulb Removal Suction Cup. ● (1) Installation Template ● (1) Installation Hardware Kit ● (1) Instruction Manual ● (1)Damper √ Have your range hood unless it is used...
... cooking of your range hood installed and properly grounded by a qualified installer in accordance with the installation instructions. √ Do not attempt to be sure you have all of the parts listed below ● (1) Range Hood ● (2) Aluminum Mesh Filters(Pre-installed) ● (2) LED Light bulbs (Pre-installed) ● (1) LED Bulb Removal Suction Cup. ● (1) Installation Template ● (1) Installation Hardware Kit ● (1) Instruction Manual ● (1)Damper √ Have your range hood unless it is used...

Door Reversal Instructions
Page 9
... indicator light will be seen above the button and a beep sound will be heard after each time the button is pressed. Selections range from: OFF: NO fan HIGH: High fan speed (One beep) MED: Medium fan speed (Two beeps) LOW: Low fan speed (Three beeps) 3 Light Mode selector button: After turning the power on , press this button to select the desired light mode. OPERATING YOUR RANGE HOOD GENERAL OPERATION 1 Power...
... indicator light will be seen above the button and a beep sound will be heard after each time the button is pressed. Selections range from: OFF: NO fan HIGH: High fan speed (One beep) MED: Medium fan speed (Two beeps) LOW: Low fan speed (Three beeps) 3 Light Mode selector button: After turning the power on , press this button to select the desired light mode. OPERATING YOUR RANGE HOOD GENERAL OPERATION 1 Power...
Door Reversal Instructions
Page 10
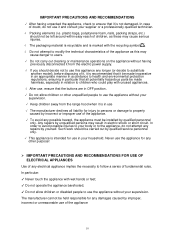
...! IMPORTANT PRECAUTIONS AND RECOMMENDATIONS FOR USE OF ELECTRICAL APPLIANCES Use of any other unqualified people to follow a series of fundamental rules. Such work should be installed by qualified personnel only. In particular: ✓ Never touch the appliance with unused appliances. √ After use the appliance without your supervision. Any repairs by qualified service personnel only. √ This appliance...
...! IMPORTANT PRECAUTIONS AND RECOMMENDATIONS FOR USE OF ELECTRICAL APPLIANCES Use of any other unqualified people to follow a series of fundamental rules. Such work should be installed by qualified personnel only. In particular: ✓ Never touch the appliance with unused appliances. √ After use the appliance without your supervision. Any repairs by qualified service personnel only. √ This appliance...

Door Reversal Instructions
Page 11
... range manufacturer's height clearance requirements and recommended hood mounting height above range. If turns or transitions are required; install as far away from opening and as far apart as possible. Never exhaust air or terminate duct work only. Fasten all connections with sheet metal screws and tape all joints with certified Silver Tape or Duct Tape. 11 Use single wall rigid metal duct work...
... range manufacturer's height clearance requirements and recommended hood mounting height above range. If turns or transitions are required; install as far away from opening and as far apart as possible. Never exhaust air or terminate duct work only. Fasten all connections with sheet metal screws and tape all joints with certified Silver Tape or Duct Tape. 11 Use single wall rigid metal duct work...

Door Reversal Instructions
Page 13
... on the top or the back panel). Remove the filters Step 2. Remove the cover from the junction box and access the electrical wiring. 3) If using hood in recirculating mode . 13 General - An air recirculating kit (optional ) must be used with the ducting kit, jump to final installation. If using a cable lock (not provided) pry open the desired electrical knockout (either on the top 10) Instal the recirculating grille 11) Put...
... on the top or the back panel). Remove the filters Step 2. Remove the cover from the junction box and access the electrical wiring. 3) If using hood in recirculating mode . 13 General - An air recirculating kit (optional ) must be used with the ducting kit, jump to final installation. If using a cable lock (not provided) pry open the desired electrical knockout (either on the top 10) Instal the recirculating grille 11) Put...

Door Reversal Instructions
Page 14
Install the recirculating kit louver using a Phillips head screwdriver. Step 10. Insert the charcoal filter into the clip. Step 7. Step 8. Step 9.Remove the 3 screws holding the recirculating panel. Then secure each clip to complete the installation. 14 Remove panel. Put the two mesh filters back to the safety grille using the screws removed in place. Step... filter assembly to the safety grille body by gently lifting the spring clips and twisting. The spring clip should cover the rim or lip of the filter assembly, and secure it over the safety grille body.
Install the recirculating kit louver using a Phillips head screwdriver. Step 10. Insert the charcoal filter into the clip. Step 7. Step 8. Step 9.Remove the 3 screws holding the recirculating panel. Then secure each clip to complete the installation. 14 Remove panel. Put the two mesh filters back to the safety grille using the screws removed in place. Step... filter assembly to the safety grille body by gently lifting the spring clips and twisting. The spring clip should cover the rim or lip of the filter assembly, and secure it over the safety grille body.
Door Reversal Instructions
Page 15
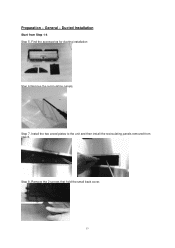
Find the accessories for ducting installation Step 6.Remove the recirculating panels. Remove the 2 screws that hold the small back cover. 15 General - Step 8. Install the two arced plates to the unit and then install the recirculating panels removed from Step 1-4 Step 5. Preparation - Ducted Installation Start from step 6. Step 7.
Find the accessories for ducting installation Step 6.Remove the recirculating panels. Remove the 2 screws that hold the small back cover. 15 General - Step 8. Install the two arced plates to the unit and then install the recirculating panels removed from Step 1-4 Step 5. Preparation - Ducted Installation Start from step 6. Step 7.

Door Reversal Instructions
Page 16
Final Installation. 16 Pry open the desired 3¼" x 10" ducting knock out (either on the top or the back panel), then attach the 3¼" x 10" starting collar with damper to the duct opening exposed. Step 10. Step 9. Insert the blocking plate and replace the cover.
Final Installation. 16 Pry open the desired 3¼" x 10" ducting knock out (either on the top or the back panel), then attach the 3¼" x 10" starting collar with damper to the duct opening exposed. Step 10. Step 9. Insert the blocking plate and replace the cover.
Door Reversal Instructions
Page 17
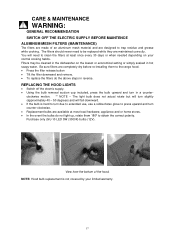
... lowest or economical setting or simply soaked in the dishwasher on your limited warranty. 17 REPLACING THE HOOD LIGHTS • Switch off the electric supply. • Using the bulb removal suction cup included, press the bulb upward and turn slightly (approximately 40 - 50 degrees) and will need to trap residue and grease while cooking. Be sure filters are designed to be cleaned in hot soapy water...
... lowest or economical setting or simply soaked in the dishwasher on your limited warranty. 17 REPLACING THE HOOD LIGHTS • Switch off the electric supply. • Using the bulb removal suction cup included, press the bulb upward and turn slightly (approximately 40 - 50 degrees) and will need to trap residue and grease while cooking. Be sure filters are designed to be cleaned in hot soapy water...
Door Reversal Instructions
Page 18
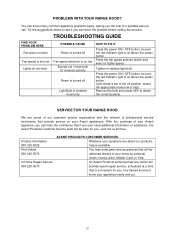
... the purchase of your Avanti appliances. PROBLEMS WITH YOUR RANGE HOOD? Press the power ON / OFF button, be sure the red indicator light is available. Tighten or replace light bulb. An Avanti Products authorized service center will be here for you ever need additional information or assistance, the Avanti Products Customer Service team will be delivered directly to the off Light Bulb is installed incorrectly HOW TO FIX IT...
... the purchase of your Avanti appliances. PROBLEMS WITH YOUR RANGE HOOD? Press the power ON / OFF button, be sure the red indicator light is available. Tighten or replace light bulb. An Avanti Products authorized service center will be here for you ever need additional information or assistance, the Avanti Products Customer Service team will be delivered directly to the off Light Bulb is installed incorrectly HOW TO FIX IT...
Door Reversal Instructions
Page 19
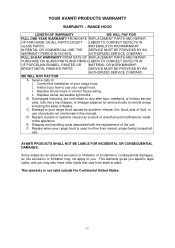
... OR WORKMANSHIP. Replace owner-accessible light bulbs. Damage to your range hood. 3. Repairs to the appliance. E. Shipping and handling costs associated with the replacement of unauthorized modifications made to parts or systems caused as a result of the unit. AVANTI PRODUCTS SHALL NOT BE LIABLE FOR INCIDENTAL OR CONSEQUENTIAL DAMAGES. This warranty gives you specific legal rights, and you how to use your range hood caused by...
... OR WORKMANSHIP. Replace owner-accessible light bulbs. Damage to your range hood. 3. Repairs to the appliance. E. Shipping and handling costs associated with the replacement of unauthorized modifications made to parts or systems caused as a result of the unit. AVANTI PRODUCTS SHALL NOT BE LIABLE FOR INCIDENTAL OR CONSEQUENTIAL DAMAGES. This warranty gives you specific legal rights, and you how to use your range hood caused by...
Door Reversal Instructions
Page 20
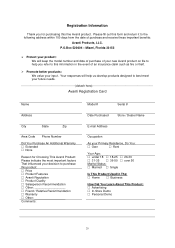
..., Florida 33152 Protect your product: We will help you for Choosing This Avanti Product: Please indicate the most important factors That influenced your decision to the following address within 100 days ... Area Code Phone Number Did You Purchase An Additional Warranty Extended None Reason for purchasing this product: Price Product Features Avanti Reputation Product Quality Salesperson Recommendation Other Friend / Relative Recommendation Warranty Other Comments: Model # Serial # Date...
..., Florida 33152 Protect your product: We will help you for Choosing This Avanti Product: Please indicate the most important factors That influenced your decision to the following address within 100 days ... Area Code Phone Number Did You Purchase An Additional Warranty Extended None Reason for purchasing this product: Price Product Features Avanti Reputation Product Quality Salesperson Recommendation Other Friend / Relative Recommendation Warranty Other Comments: Model # Serial # Date...


