
Install Manual
Page 1
Avanti has a policy of continuous improvement on its products and reserves the right to change materials and specifications without notice. Miami, Florida 33152 www.avantiproducts.com Telephone: 1-800-220-5570 1 Box 520604 - Avanti Products LLC P.O. DISHWASHER / LAVAPLATOS / LAVE-VAISSELLE INSTALLATION MANUAL / MANUAL DE INSTALACION MANUEL D'INSTALLATION Model Number Número de modelo Numéro de modèle DWF24V0W DWF24V1B DWF24V3S BEFORE USE, PLEASE READ AND FOLLOW ALL SAFETY RULES AND OPERATING INSTRUCTIONS.
Avanti has a policy of continuous improvement on its products and reserves the right to change materials and specifications without notice. Miami, Florida 33152 www.avantiproducts.com Telephone: 1-800-220-5570 1 Box 520604 - Avanti Products LLC P.O. DISHWASHER / LAVAPLATOS / LAVE-VAISSELLE INSTALLATION MANUAL / MANUAL DE INSTALACION MANUEL D'INSTALLATION Model Number Número de modelo Numéro de modèle DWF24V0W DWF24V1B DWF24V3S BEFORE USE, PLEASE READ AND FOLLOW ALL SAFETY RULES AND OPERATING INSTRUCTIONS.

Install Manual
Page 2
... well as machine damage read these instructions before installation and / or use. Contents Important Safety Instructions Tools Which May Be Needed Materials Which May Be Needed Materials Supplied Materials Supplied In Each Bag Dishwasher Specifications Enclosure Preparation Electrical Preparation Preparation for Installing Mounting Brackets Adjusting Height Preparing the Water Connection Steam Protection Foil Placement of Dishwasher into the opening Drain Hose Connection Adjusting the Customizable Toe Kick Installer Check List Final Instructions Self Help Hints Instrucciones en...
... well as machine damage read these instructions before installation and / or use. Contents Important Safety Instructions Tools Which May Be Needed Materials Which May Be Needed Materials Supplied Materials Supplied In Each Bag Dishwasher Specifications Enclosure Preparation Electrical Preparation Preparation for Installing Mounting Brackets Adjusting Height Preparing the Water Connection Steam Protection Foil Placement of Dishwasher into the opening Drain Hose Connection Adjusting the Customizable Toe Kick Installer Check List Final Instructions Self Help Hints Instrucciones en...
Install Manual
Page 3
... unsafe practices. When installing the dishwasher, follow basic precautions, including the following: •The dishwasher could only be converted from cord-connected to permanently connected by an authorized service representative. (If needed contact your time and effort and help to ensure optimum dishwasher performance. INTRODUCTION When using the dishwasher, follow them on to any future user. Save these instructions, the dishwasher shall be performed by...
... unsafe practices. When installing the dishwasher, follow basic precautions, including the following: •The dishwasher could only be converted from cord-connected to permanently connected by an authorized service representative. (If needed contact your time and effort and help to ensure optimum dishwasher performance. INTRODUCTION When using the dishwasher, follow them on to any future user. Save these instructions, the dishwasher shall be performed by...
Install Manual
Page 4
... dishwasher drain hose must be installed by an insured licensed plumber, contractor or trained installer. in a vacation home, cabin, etc.), you must ensure that can be a minimum of # 16 AWG copper wire rated at the time of installation. •Only connect the dishwasher to the power supply when all the water from service or discarding it has missing or broken parts. •Also follow the safety instructions...
... dishwasher drain hose must be installed by an insured licensed plumber, contractor or trained installer. in a vacation home, cabin, etc.), you must ensure that can be a minimum of # 16 AWG copper wire rated at the time of installation. •Only connect the dishwasher to the power supply when all the water from service or discarding it has missing or broken parts. •Also follow the safety instructions...
Install Manual
Page 5
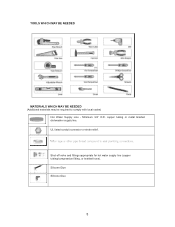
TOOLS WHICH MAY BE NEEDED MATERIALS WHICH MAY BE NEEDED (Additional materials may be required to comply with local codes) Hot Water Supply Line - UL listed conduit connector or strain relief. Shut-off valve and fittings appropriate for hot water supply line (copper tubing/compression fitting, or braided hose). Minimum 3/4" O.D. copper tubing or metal braided dishwasher supply line. Silicone Glue Silicone Glue 5
TOOLS WHICH MAY BE NEEDED MATERIALS WHICH MAY BE NEEDED (Additional materials may be required to comply with local codes) Hot Water Supply Line - UL listed conduit connector or strain relief. Shut-off valve and fittings appropriate for hot water supply line (copper tubing/compression fitting, or braided hose). Minimum 3/4" O.D. copper tubing or metal braided dishwasher supply line. Silicone Glue Silicone Glue 5
Install Manual
Page 6
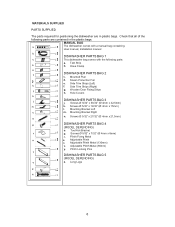
... l. Toe Kick Bracket p. Adjustable Plinth Metal (130mm) v. Plinth Locking Pins DISHWASHER PARTS BAG 5 (MODEL DEPENDING) z. Long Legs 6 MATERIALS SUPPLIED PARTS SUPPLIED The parts required for positioning the dishwasher are contained in plastic bags. Hose Clamp DISHWASHER PARTS BAG 2 c. MANUAL BAG The dishwasher comes with a manual bag containing: User manual, Installation manual DISHWASHER PARTS BAG 1 This dishwasher bag comes with the following parts are in the plastic bags. Mounting Bracket Left m. Mounting Bracket Right n. Adjustable Plinth t. Mounted Plan d.
... l. Toe Kick Bracket p. Adjustable Plinth Metal (130mm) v. Plinth Locking Pins DISHWASHER PARTS BAG 5 (MODEL DEPENDING) z. Long Legs 6 MATERIALS SUPPLIED PARTS SUPPLIED The parts required for positioning the dishwasher are contained in plastic bags. Hose Clamp DISHWASHER PARTS BAG 2 c. MANUAL BAG The dishwasher comes with a manual bag containing: User manual, Installation manual DISHWASHER PARTS BAG 1 This dishwasher bag comes with the following parts are in the plastic bags. Mounting Bracket Left m. Mounting Bracket Right n. Adjustable Plinth t. Mounted Plan d.
Install Manual
Page 7
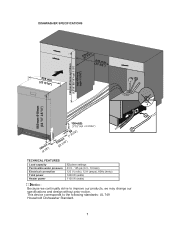
.../16") TECHNICAL FEATURES Load capacity Permissible water pressure Electrical connection Total power Heater power 12 place settings 43.5 - 145 psi (0.3 - 10 bars) 120 V (volts), 12 A (amps), 60Hz (hertz) 1400 W (watts) 1100 W (watts) Notice : Because we continually strive to the following standards: UL 749 Household Dishwasher Standard. 7 This device corresponds to improve our products, we may change our specifications and design without...
.../16") TECHNICAL FEATURES Load capacity Permissible water pressure Electrical connection Total power Heater power 12 place settings 43.5 - 145 psi (0.3 - 10 bars) 120 V (volts), 12 A (amps), 60Hz (hertz) 1400 W (watts) 1100 W (watts) Notice : Because we continually strive to the following standards: UL 749 Household Dishwasher Standard. 7 This device corresponds to improve our products, we may change our specifications and design without...
Install Manual
Page 8
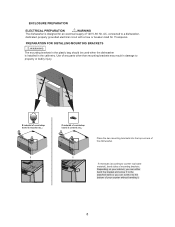
... to the attached walls or you can screw it . 8 Use of your counter without bending it to the bottom of any parts other than mounting brackets may result in damage to counter top board material), bend sides of the dishwasher. dedicated, properly grounded electrical circuit with a fuse or breaker rated for an electrical supply of 120 V, 60 Hz, AC, connected to a dishwasher-
... to the attached walls or you can screw it . 8 Use of your counter without bending it to the bottom of any parts other than mounting brackets may result in damage to counter top board material), bend sides of the dishwasher. dedicated, properly grounded electrical circuit with a fuse or breaker rated for an electrical supply of 120 V, 60 Hz, AC, connected to a dishwasher-
Install Manual
Page 9
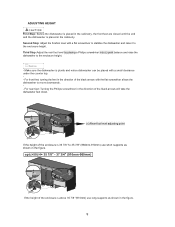
ADJUSTING HEIGHT First Step: Before the dishwasher is placed in the cabinetry, the front feet are closed until the end and the dishwasher is plumb and notice dishwasher can be placed with a flat screwdriver to stabilize the dishwasher ...dishwasher to 35 7/8" (860mm-910mm) use long supports as shown in the figure. 9 Make sure the dishwasher is placed in the cabinetry. Second Step: Adjust the forefoot level with a small clearance under the counter top. - turning the feet in the direction of the enclosure s above 35 7/8 "(910mm) use short supports as shown in the figure. Turning...
ADJUSTING HEIGHT First Step: Before the dishwasher is placed in the cabinetry, the front feet are closed until the end and the dishwasher is plumb and notice dishwasher can be placed with a flat screwdriver to stabilize the dishwasher ...dishwasher to 35 7/8" (860mm-910mm) use long supports as shown in the figure. 9 Make sure the dishwasher is placed in the cabinetry. Second Step: Adjust the forefoot level with a small clearance under the counter top. - turning the feet in the direction of the enclosure s above 35 7/8 "(910mm) use short supports as shown in the figure. Turning...

Install Manual
Page 10
... turn on the water supply to clear any foreign material. 10 With metal braided hose. - copper tubing or metal braided dishwasher supply line. •"Water Inlet valve of two ways: - Hot water supply line: Use minimum 3/4" O.D. Before connecting the copper water supply line to the dishwasher, flush it with indicated water inlet valve inlet coupling thread dimension (3/4"11.5NH) of your dishwasher, please choose the thread dimension of the inlet hose as compatible with hot water to check for leaks. WATER SUPPLY CONNECTION Water supply may restrict the water...
... turn on the water supply to clear any foreign material. 10 With metal braided hose. - copper tubing or metal braided dishwasher supply line. •"Water Inlet valve of two ways: - Hot water supply line: Use minimum 3/4" O.D. Before connecting the copper water supply line to the dishwasher, flush it with indicated water inlet valve inlet coupling thread dimension (3/4"11.5NH) of your dishwasher, please choose the thread dimension of the inlet hose as compatible with hot water to check for leaks. WATER SUPPLY CONNECTION Water supply may restrict the water...
Install Manual
Page 11
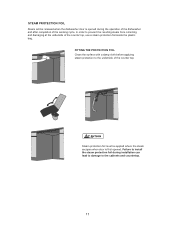
... the underside of the counter top, use a steam protection foil inside the plastic bag. In order to the underside of the working cycle. Steam protection foil must be released when the dishwasher door is first opened during installation can lead to damage to install the steam protection foil during the operation of the dishwasher and after completion of the counter top...
... the underside of the counter top, use a steam protection foil inside the plastic bag. In order to the underside of the working cycle. Steam protection foil must be released when the dishwasher door is first opened during installation can lead to damage to install the steam protection foil during the operation of the dishwasher and after completion of the counter top...
Install Manual
Page 12
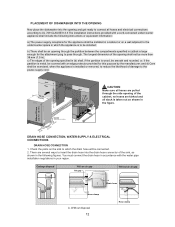
... CLAUSE 8.3.3 The installation instructions provided with the water pipe installation regulations in your region. You must connect the drain hose in accordance with a cord-connected undercounter appliance shall include the following figures. There are several ways to insert the drain hose into the opening shall not be connected. 2. Without disposal 12 Hose clamp The longest dimension of the opening and get ready to the power-supply cord. (253998/1m6m...
... CLAUSE 8.3.3 The installation instructions provided with the water pipe installation regulations in your region. You must connect the drain hose in accordance with a cord-connected undercounter appliance shall include the following figures. There are several ways to insert the drain hose into the opening shall not be connected. 2. Without disposal 12 Hose clamp The longest dimension of the opening and get ready to the power-supply cord. (253998/1m6m...
Install Manual
Page 13
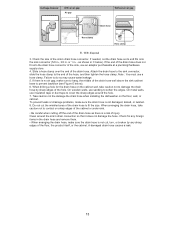
... no air gap, make sure to soften the edges. the middle of the drain hose to fit the size. Take caution not the damage the drain hose when installing the dishwasher on the cabinet wall, take caution not to the end of the sink, use a hose clamp. Do not cut the wrinkled area of the drain hose well above the sink cabinet base to damage the drain hose by...
... no air gap, make sure to soften the edges. the middle of the drain hose to fit the size. Take caution not the damage the drain hose when installing the dishwasher on the cabinet wall, take caution not to the end of the sink, use a hose clamp. Do not cut the wrinkled area of the drain hose well above the sink cabinet base to damage the drain hose by...

Install Manual
Page 14
Use hose clamp that shown at the Figure 4. D E 14 for drain hose assembly to the sink.
Use hose clamp that shown at the Figure 4. D E 14 for drain hose assembly to the sink.
Install Manual
Page 15
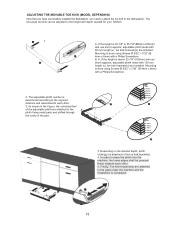
... be adjusted to the toe kick bracket(o). 4. adjustable plinth metal with a Philips Screwdriver. 2. Mounting is done using Screws Ø 5/32" x 7/32" (Ø 4mm x 6mm) with 130 mm length (v), toe kick brackets(o) are installed. B. Mounting is determined according to the required distance and assembled to 35 7/8"(860mm-910mm) and use short supports; A. ADJUSTING THE MOVABLE TOE KICK (MODEL DEPENDING) Now that you have successfully installed the dishwasher, you need to...
... be adjusted to the toe kick bracket(o). 4. adjustable plinth metal with a Philips Screwdriver. 2. Mounting is done using Screws Ø 5/32" x 7/32" (Ø 4mm x 6mm) with 130 mm length (v), toe kick brackets(o) are installed. B. Mounting is determined according to the required distance and assembled to 35 7/8"(860mm-910mm) and use short supports; A. ADJUSTING THE MOVABLE TOE KICK (MODEL DEPENDING) Now that you have successfully installed the dishwasher, you need to...
Install Manual
Page 16
... hot water shut- Notice : If your dishwasher is in the ON position. Notice : Please make sure that the Supply cord is turned on position. The rinse cycle has been run. • • screen after following : • The dishwasher is square and level. • The dishwasher is hooked up to a garbage disposal, the drain hopper plug must be removed. • The spray arms are free and rotate freely. INSTALLER CHECKLIST Your installer...
... hot water shut- Notice : If your dishwasher is in the ON position. Notice : Please make sure that the Supply cord is turned on position. The rinse cycle has been run. • • screen after following : • The dishwasher is square and level. • The dishwasher is hooked up to a garbage disposal, the drain hopper plug must be removed. • The spray arms are free and rotate freely. INSTALLER CHECKLIST Your installer...

Energy Guide Label
Page 1
... rates and use. Estimated energy cost based on four wash loads a week and a national average electricity cost of 13 cents per therm. U.S. Dishwasher Capacity: Standard Avanti Products LLC Models DWF24V0W DWF24V1B, DWF24V3S Estimated Yearly Energy Cost (when used with an electric water heater) $34 $26 $40 Cost Range of $1.05 per kWh and natural gas cost of Similar Models 260kWh Estimated Yearly Electricity Use $24 Estimated Yearly Energy...
... rates and use. Estimated energy cost based on four wash loads a week and a national average electricity cost of 13 cents per therm. U.S. Dishwasher Capacity: Standard Avanti Products LLC Models DWF24V0W DWF24V1B, DWF24V3S Estimated Yearly Energy Cost (when used with an electric water heater) $34 $26 $40 Cost Range of $1.05 per kWh and natural gas cost of Similar Models 260kWh Estimated Yearly Electricity Use $24 Estimated Yearly Energy...