
Instruction Manual
Page 1
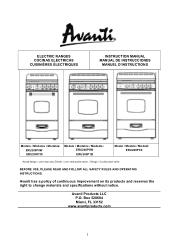
... right to change materials and specifications without notice. ELECTRIC RANGES COCINAS ELECTRICAS CUISINIÈRES ÉLECTRIQUES INSTRUCTION MANUAL MANUAL DE INSTRUCCIONES MANUEL D'INSTRUCTIONS Models / Modelos / Modelés: ERU200P0W ERU200P3S Models / Modelos / Modelés: ERU240P0W ERU240P1B Model / Modelo / Modelé: ERU240P3S Actual design / color may vary./Diseño / color real puede variar. / Design / Couleur peut varier BEFORE USE, PLEASE READ AND FOLLOW ALL SAFETY RULES AND OPERATING INSTRUCTIONS. Box...
... right to change materials and specifications without notice. ELECTRIC RANGES COCINAS ELECTRICAS CUISINIÈRES ÉLECTRIQUES INSTRUCTION MANUAL MANUAL DE INSTRUCCIONES MANUEL D'INSTRUCTIONS Models / Modelos / Modelés: ERU200P0W ERU200P3S Models / Modelos / Modelés: ERU240P0W ERU240P1B Model / Modelo / Modelé: ERU240P3S Actual design / color may vary./Diseño / color real puede variar. / Design / Couleur peut varier BEFORE USE, PLEASE READ AND FOLLOW ALL SAFETY RULES AND OPERATING INSTRUCTIONS. Box...

Instruction Manual
Page 2
... Parts and Features Important Safety Instructions Installation Instructions Before Using Your Electric Range Important Precautions and Recommendations Installation of Your Electric Range Electrical Connection Leveling the Range Anti-tip Bracket Installation Operating Your Electric Range Control Panel Using the Oven Using the Surface Unit Cookware Tips Care and Maintenance General Information Cleaning Your Range Cleaning Surface Units and Reflector Bowls Lift-up Cooktop Removable Storage Drawer Replacing the Oven Light Troubleshooting Guide Service for Your Appliance Wiring Diagram Your Avanti...
... Parts and Features Important Safety Instructions Installation Instructions Before Using Your Electric Range Important Precautions and Recommendations Installation of Your Electric Range Electrical Connection Leveling the Range Anti-tip Bracket Installation Operating Your Electric Range Control Panel Using the Oven Using the Surface Unit Cookware Tips Care and Maintenance General Information Cleaning Your Range Cleaning Surface Units and Reflector Bowls Lift-up Cooktop Removable Storage Drawer Replacing the Oven Light Troubleshooting Guide Service for Your Appliance Wiring Diagram Your Avanti...
Instruction Manual
Page 3
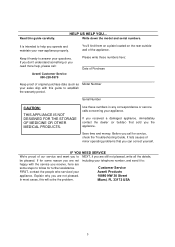
...located on the rear outside wall of original purchase date (such as Model Number your new appliance properly. Keep it to follow for some steps to : happy with this guide carefully. It lists causes of our service and want you to answer your appliance. IF YOU NEED SERVICE We're proud of minor operating problems...problem. It is intended to establish the warranty period. Save time and money. Explain why you operate and maintain your sales slip) with the service you call : Avanti Customer Service 800-220-5570 Please write these numbers in any correspondence or service ...
...located on the rear outside wall of original purchase date (such as Model Number your new appliance properly. Keep it to follow for some steps to : happy with this guide carefully. It lists causes of our service and want you to answer your appliance. IF YOU NEED SERVICE We're proud of minor operating problems...problem. It is intended to establish the warranty period. Save time and money. Explain why you operate and maintain your sales slip) with the service you call : Avanti Customer Service 800-220-5570 Please write these numbers in any correspondence or service ...
Instruction Manual
Page 5
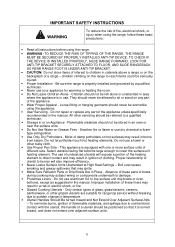
.... · When installing or removing the range for space heating. stepping, sitting, or leaning on the range. The appliance must be used . Only authorized replacement parts may need to make several adjustments to level it must be turned off by a qualified technician in order to operate, play with cleaning and maintenance operations, make sure the power line of your area. · Take care to repair or replace any other...
.... · When installing or removing the range for space heating. stepping, sitting, or leaning on the range. The appliance must be used . Only authorized replacement parts may need to make several adjustments to level it must be turned off by a qualified technician in order to operate, play with cleaning and maintenance operations, make sure the power line of your area. · Take care to repair or replace any other...
Instruction Manual
Page 8
... warming or heating the room. · Do Not Leave Children Alone - The use dry chemical orfoamtype extinguisher. · Use Only Dry Potholders - Do not repair or replace any part of clothing. Improper installation of these pans or bowls during cooking may subject wiring or components underneath to direct contact and may result in a risk of the appliance unless specifically recommended in temperature. · Utensil Handles...
... warming or heating the room. · Do Not Leave Children Alone - The use dry chemical orfoamtype extinguisher. · Use Only Dry Potholders - Do not repair or replace any part of clothing. Improper installation of these pans or bowls during cooking may subject wiring or components underneath to direct contact and may result in a risk of the appliance unless specifically recommended in temperature. · Utensil Handles...

Instruction Manual
Page 9
Let hot air or steam escape before removing or replacing food. · Do Not Heat Unopened Food Containers - Build-up of pressure may be hot even though they have had sufficient time to cause burns - among these openings, oven doors, and window of Oven or Areas Near Units - Contact a qualified technician immediately. · Clean Cook-top With Caution - If a wet sponge or cloth is hot, do...
Let hot air or steam escape before removing or replacing food. · Do Not Heat Unopened Food Containers - Build-up of pressure may be hot even though they have had sufficient time to cause burns - among these openings, oven doors, and window of Oven or Areas Near Units - Contact a qualified technician immediately. · Clean Cook-top With Caution - If a wet sponge or cloth is hot, do...
Instruction Manual
Page 10
..., set the temperature control knob to 450°F. Turn the function selector to the Bake element and the Broil element separately to repair or replace any non-domestic application and therefore should retain for local inspector's use and for the first time: The heating elements have a protective coating, which must be burned off before use . It is important to ensure adequate ventilation during this , open the oven door and set the burner...
..., set the temperature control knob to 450°F. Turn the function selector to the Bake element and the Broil element separately to repair or replace any non-domestic application and therefore should retain for local inspector's use and for the first time: The heating elements have a protective coating, which must be burned off before use . It is important to ensure adequate ventilation during this , open the oven door and set the burner...
Instruction Manual
Page 11
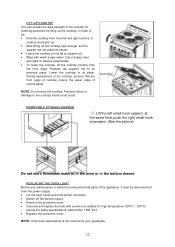
.... · This range is in the bottom drawer. · Fire Risk! Never use the appliance for household use . · Fire Risk! Do not attempt to dry clothing or any appliance, there are specific installation and safety precautions that electrical cables connecting other cooking utensils on the base of the oven chamber. · The manufacturer declines all potentially hazardous parts be made...
.... · This range is in the bottom drawer. · Fire Risk! Never use the appliance for household use . · Fire Risk! Do not attempt to dry clothing or any appliance, there are specific installation and safety precautions that electrical cables connecting other cooking utensils on the base of the oven chamber. · The manufacturer declines all potentially hazardous parts be made...
Instruction Manual
Page 12
... service your electric range on the rating label. · The range can be reduced by installing a range hood that is strong enough to support it when it can be connected directly to repair or replace any maintenance. NOTE: Turning the appliance off does not disconnect the appliance from the A/C power supply before beginning installation. · Do not attempt to the fused disconnect (or circuit breaker box) through your electric range, adjust the leveling...
... service your electric range on the rating label. · The range can be reduced by installing a range hood that is strong enough to support it when it can be connected directly to repair or replace any maintenance. NOTE: Turning the appliance off does not disconnect the appliance from the A/C power supply before beginning installation. · Do not attempt to the fused disconnect (or circuit breaker box) through your electric range, adjust the leveling...

Instruction Manual
Page 15
... improper door loading, the range must be secured by turning them clockwise to make the range higher or counter-clockwise to lower the range until the range is relocated, the bracket must be level to floor using screws supplied. · Slide appliance into position. The four screws type leveling legs located on the corners at the bottom of range should be adjusted by properly installing the anti-tip...
... improper door loading, the range must be secured by turning them clockwise to make the range higher or counter-clockwise to lower the range until the range is relocated, the bracket must be level to floor using screws supplied. · Slide appliance into position. The four screws type leveling legs located on the corners at the bottom of range should be adjusted by properly installing the anti-tip...
Instruction Manual
Page 16
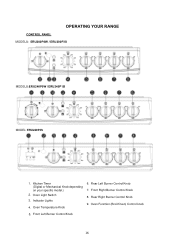
OPERATING YOUR RANGE Ø CONTROL PANEL MODELS: ERU200P0W / ERU200P3S MODELS:ERU240P0W / ERU240P1B MODEL: ERU240P3S 1. Indicator Lights 4. Rear Left Burner Control Knob 7. Oven Temperature Knob 6. Rear Right Burner Control Knob 9. Oven Function (Broil/Oven) Control knob 5. Front Right Burner Control Knob 8. Kitchen Timer (Digital or Mechanical Knob depending on your specific model.) 2. Oven Light Switch 3. Front Left Burner Control Knob 16
OPERATING YOUR RANGE Ø CONTROL PANEL MODELS: ERU200P0W / ERU200P3S MODELS:ERU240P0W / ERU240P1B MODEL: ERU240P3S 1. Indicator Lights 4. Rear Left Burner Control Knob 7. Oven Temperature Knob 6. Rear Right Burner Control Knob 9. Oven Function (Broil/Oven) Control knob 5. Front Right Burner Control Knob 8. Kitchen Timer (Digital or Mechanical Knob depending on your specific model.) 2. Oven Light Switch 3. Front Left Burner Control Knob 16

Instruction Manual
Page 17
Ø USING THE TIMER DIGITAL KITCHEN TIMER 1: Clock Time Indicator 2: Digital Display 3: Down Button 4: Up Button 5: Set/Quit Button 6: Cook Timer Indicator When you first plug in the range or power has returned after 10 hours you will begin. Once the selected time has elapsed, the indicator light will turn to the desired time. Ø OPERATING INDICATOR LIGHTS The OVEN and BURNERS indicating lights will see 12:00 in use. To set times less than 30 minutes, turn the knob to the 30...
Ø USING THE TIMER DIGITAL KITCHEN TIMER 1: Clock Time Indicator 2: Digital Display 3: Down Button 4: Up Button 5: Set/Quit Button 6: Cook Timer Indicator When you first plug in the range or power has returned after 10 hours you will begin. Once the selected time has elapsed, the indicator light will turn to the desired time. Ø OPERATING INDICATOR LIGHTS The OVEN and BURNERS indicating lights will see 12:00 in use. To set times less than 30 minutes, turn the knob to the 30...

Instruction Manual
Page 18
... OVEN The oven is controlled by radiation. . Bake element 2100W (Lower heating element) - To switch off the oven turn the thermostat control and function control knobs to set the desired cooking temperature. Turn the knob Broil/Oven Control knobto select 2. To switch off the oven turn the thermostat control to 4. For that the fat drips into the broiler pan, otherwise the juices may catch on the second level from the oven. 18 Keep children well out of the range get hot. WARNING: The door is hot, use the handle...
... OVEN The oven is controlled by radiation. . Bake element 2100W (Lower heating element) - To switch off the oven turn the thermostat control and function control knobs to set the desired cooking temperature. Turn the knob Broil/Oven Control knobto select 2. To switch off the oven turn the thermostat control to 4. For that the fat drips into the broiler pan, otherwise the juices may catch on the second level from the oven. 18 Keep children well out of the range get hot. WARNING: The door is hot, use the handle...

Instruction Manual
Page 19
... surface unit mark shows which surface unit is 8" in size. IF AT ANY TIME THE SENSOR MEASURES A TEMPERATURE HIGHER THAN THE MAXIMUM AS INDICATED BY SAFETY STANDARDS, THE DEVICE WILL AUTOMATICALLY SHUT THE POWER TO THE BURNER OFF. Place the cookware on the rack support. To operate the burners simply push in and turn the burner control knob to the setting position. TO AVOID OVERCOOKING, REMOVE POTS / PANS FROM THE COOKTOP...
... surface unit mark shows which surface unit is 8" in size. IF AT ANY TIME THE SENSOR MEASURES A TEMPERATURE HIGHER THAN THE MAXIMUM AS INDICATED BY SAFETY STANDARDS, THE DEVICE WILL AUTOMATICALLY SHUT THE POWER TO THE BURNER OFF. Place the cookware on the rack support. To operate the burners simply push in and turn the burner control knob to the setting position. TO AVOID OVERCOOKING, REMOVE POTS / PANS FROM THE COOKTOP...

Instruction Manual
Page 20
... cooking systems. Therefore, emphasis must be clean and dry before coming in . Manufacturers suggest using low to medium heat selections when using glass cookware. · Pan size should be placed on clean up time. If a surface unit stays red for a long time, the bottom of the range, to avoid them being knocked over by accident. The utensil could result in damage to the surface unit, cooktop, wiring...
... cooking systems. Therefore, emphasis must be clean and dry before coming in . Manufacturers suggest using low to medium heat selections when using glass cookware. · Pan size should be placed on clean up time. If a surface unit stays red for a long time, the bottom of the range, to avoid them being knocked over by accident. The utensil could result in damage to the surface unit, cooktop, wiring...

Instruction Manual
Page 21
... main power box or designated circuit breaker, turn off the range to make sure all items including shelves and rack. · Wash the inside surfaces with a warm water and baking soda solution. NOTE: Do not immerse burners in mind that burners are off and cool before removing anything, then remove all surface units are off the range, make sure that its operation for cleaning the enameled parts...
... main power box or designated circuit breaker, turn off the range to make sure all items including shelves and rack. · Wash the inside surfaces with a warm water and baking soda solution. NOTE: Do not immerse burners in mind that burners are off and cool before removing anything, then remove all surface units are off the range, make sure that its operation for cleaning the enameled parts...
Instruction Manual
Page 22
... areas. · To lower the cooktop, lift the cooktop holding from the front edge. Replace the support rod to do: · Hold the cooktop from the power supply. · Let the oven cavity and broil burner cool down. · Switch off the electric supply. · Remove the protective cover. · Unscrew and replace the bulb with warm soapy water. NOTE: Oven bulb replacement is started involving electrical parts of the appliance, it up. ·...
... areas. · To lower the cooktop, lift the cooktop holding from the front edge. Replace the support rod to do: · Hold the cooktop from the power supply. · Let the oven cavity and broil burner cool down. · Switch off the electric supply. · Remove the protective cover. · Unscrew and replace the bulb with warm soapy water. NOTE: Oven bulb replacement is started involving electrical parts of the appliance, it up. ·...
Instruction Manual
Page 23
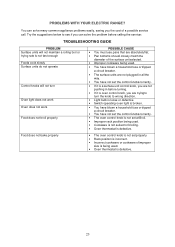
... being used. · You have blown a household fuse or tripped a circuit breaker. · The surface units are not plugged in before calling the servicer. PROBLEMS WITH YOUR ELECTRIC RANGE? Try the suggestions below to wrong direction. · Light bulb is loose or defective. · Switch operating oven light is broken. · You have blown a household fuse or tripped a circuit breaker. · You have not set the control knobs correctly. · The oven control knob...
... being used. · You have blown a household fuse or tripped a circuit breaker. · The surface units are not plugged in before calling the servicer. PROBLEMS WITH YOUR ELECTRIC RANGE? Try the suggestions below to wrong direction. · Light bulb is loose or defective. · Switch operating oven light is broken. · You have blown a household fuse or tripped a circuit breaker. · You have not set the control knobs correctly. · The oven control knob...
Instruction Manual
Page 25
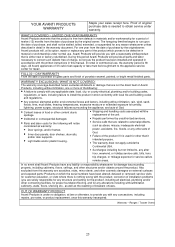
... have been altered, defaced or removed; YOUR AVANTI PRODUCTS WARRANTY Staple your sales receipt here. WHAT IS COVERED - service visits for damage tosurrounding property, including cabinetry, floors, ceilings, and other cosmetic damages on glass parts and finish of installation problems (you with the written instructions in material or workmanship under normal use , the warranty period is under warranty. correction of porcelain enamel, painted...
... have been altered, defaced or removed; YOUR AVANTI PRODUCTS WARRANTY Staple your sales receipt here. WHAT IS COVERED - service visits for damage tosurrounding property, including cabinetry, floors, ceilings, and other cosmetic damages on glass parts and finish of installation problems (you with the written instructions in material or workmanship under normal use , the warranty period is under warranty. correction of porcelain enamel, painted...
Parts and Accessories
Page 2
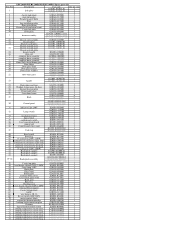
... G20C01-102500 4 27 Door inside glass G24C01-100500 2 28 Oven door frame G24C01-100600 1 G20A23-030100 6 29 Knob G20A23-030101 6 G20A23-030102 5 G24F03-030301-01Z 1 30 Control panel G24F03-030301-02Z 1 G24F03-030300Z 1 31 indicator light 240V E24F01-031000 2 G20A01-171000 1 32 Lamp switch G20A01-171100 1 G20A01-170203 1 33 mechamical timer G20A01-190100 1 * digital timer E20F03-190300 1 35 cooktop coil switch E20F01-031600 4 36...
... G20C01-102500 4 27 Door inside glass G24C01-100500 2 28 Oven door frame G24C01-100600 1 G20A23-030100 6 29 Knob G20A23-030101 6 G20A23-030102 5 G24F03-030301-01Z 1 30 Control panel G24F03-030301-02Z 1 G24F03-030300Z 1 31 indicator light 240V E24F01-031000 2 G20A01-171000 1 32 Lamp switch G20A01-171100 1 G20A01-170203 1 33 mechamical timer G20A01-190100 1 * digital timer E20F03-190300 1 35 cooktop coil switch E20F01-031600 4 36...


