Instruction Manual
Page 1
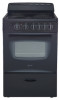
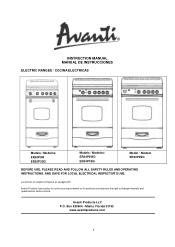
... of continuous improvement on its products and reserves the right to change materials and specifications without notice. Miami, Florida 33152 www.avantiproducts.com 1 INSTRUCTION MANUAL MANUAL DE INSTRUCCIONES ELECTRIC RANGES / COCINA ELECTRICAS Models / Modelos: ER20P0W ER20P3SG Models / Modelos: ER24P0WG ER24P1BG Model / Modelo ER24P3SG BEFORE USE, PLEASE READ AND FOLLOW ALL SAFETY RULES AND OPERATING INSTRUCTIONS. Avanti Products LLC P.O. La sección en español empieza...
... of continuous improvement on its products and reserves the right to change materials and specifications without notice. Miami, Florida 33152 www.avantiproducts.com 1 INSTRUCTION MANUAL MANUAL DE INSTRUCCIONES ELECTRIC RANGES / COCINA ELECTRICAS Models / Modelos: ER20P0W ER20P3SG Models / Modelos: ER24P0WG ER24P1BG Model / Modelo ER24P3SG BEFORE USE, PLEASE READ AND FOLLOW ALL SAFETY RULES AND OPERATING INSTRUCTIONS. Avanti Products LLC P.O. La sección en español empieza...
Instruction Manual
Page 2
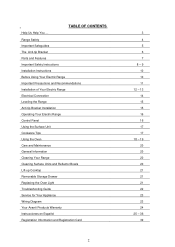
... Parts and Features Important Safety Instructions Installation Instructions Before Using Your Electric Range Important Precautions and Recommendations Installation of Your Electric Range Electrical Connection Leveling the Range Anti-tip Bracket Installation Operating Your Electric Range Control Panel Using the Surface Unit Cookware Tips Using the Oven Care and Maintenance General Information Cleaning Your Range Cleaning Surface Units and Reflector Bowls Lift-up Cooktop Removable Storage Drawer Replacing the Oven Light Troubleshooting Guide Service for Your Appliance Wiring Diagram Your Avanti...
... Parts and Features Important Safety Instructions Installation Instructions Before Using Your Electric Range Important Precautions and Recommendations Installation of Your Electric Range Electrical Connection Leveling the Range Anti-tip Bracket Installation Operating Your Electric Range Control Panel Using the Surface Unit Cookware Tips Using the Oven Care and Maintenance General Information Cleaning Your Range Cleaning Surface Units and Reflector Bowls Lift-up Cooktop Removable Storage Drawer Replacing the Oven Light Troubleshooting Guide Service for Your Appliance Wiring Diagram Your Avanti...
Instruction Manual
Page 3
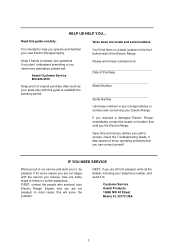
... the Troubleshooting Guide. Save time and money. IF YOU NEED SERVICE We're proud of our service and want you operate and maintain your sales slip) with the service you the Electric Range. In most cases, this guide carefully. Keep it to follow for some reason you are some steps to : Customer Service Avanti Products 10880 NW 30 Street Miami, FL 33172 USA 3 It lists...
... the Troubleshooting Guide. Save time and money. IF YOU NEED SERVICE We're proud of our service and want you operate and maintain your sales slip) with the service you the Electric Range. In most cases, this guide carefully. Keep it to follow for some reason you are some steps to : Customer Service Avanti Products 10880 NW 30 Street Miami, FL 33172 USA 3 It lists...
Instruction Manual
Page 5
... installing or removing the range for the appliance to prevent aluminum foil and meat probes from contacting the heating elements. 5 The surface unit should not be used in performing service on the range. Only authorized replacement parts may need to make several adjustments to level it. • Never allow children to operate, play with cleaning and maintenance operations, make sure the power line of ventilation air. • Disconnect the electrical supply to...
... installing or removing the range for the appliance to prevent aluminum foil and meat probes from contacting the heating elements. 5 The surface unit should not be used in performing service on the range. Only authorized replacement parts may need to make several adjustments to level it. • Never allow children to operate, play with cleaning and maintenance operations, make sure the power line of ventilation air. • Disconnect the electrical supply to...
Instruction Manual
Page 6
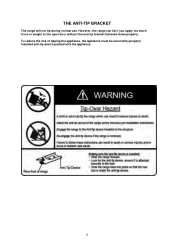
However, the range can tip if you apply too much force or weight to the open door without the anti-tip bracket fastened down properly. To reduce the risk of tipping the appliance, the appliance must be secured by properly installed anti-tip device packed with the appliance. 6 THE ANTI-TIP BRACKET The range will not tip during normal use.
However, the range can tip if you apply too much force or weight to the open door without the anti-tip bracket fastened down properly. To reduce the risk of tipping the appliance, the appliance must be secured by properly installed anti-tip device packed with the appliance. 6 THE ANTI-TIP BRACKET The range will not tip during normal use.
Instruction Manual
Page 8
... referred to burner will expose a portion of the heating element to children in the manual. All other servicing should be allowed to line surface unit drip bowls or oven bottoms, except as suggested in cabinets above a range or on the range to cover the surface unit heating element. Do not use . children climbing on the backsplash of glass, glass/ceramic, ceramic, earthenware, or other bulky cloth. • Use Proper Pan Size - Children should...
... referred to burner will expose a portion of the heating element to children in the manual. All other servicing should be allowed to line surface unit drip bowls or oven bottoms, except as suggested in cabinets above a range or on the range to cover the surface unit heating element. Do not use . children climbing on the backsplash of glass, glass/ceramic, ceramic, earthenware, or other bulky cloth. • Use Proper Pan Size - Children should...
Instruction Manual
Page 9
...; Clean Cook-top With Caution - If rack must be careful to avoid steam burn. Surface units and heating elements may penetrate the broken cook-top and create a risk of electric shock. among these openings, oven doors, and window of Oven Racks - This Unit Is For Indoor Use Only -SAVE THESE INSTRUCTIONS- 9 During and after use, do not let potholder contact hot heating element in desired location while oven is cool. Heating elements should break, cleaning...
...; Clean Cook-top With Caution - If rack must be careful to avoid steam burn. Surface units and heating elements may penetrate the broken cook-top and create a risk of electric shock. among these openings, oven doors, and window of Oven Racks - This Unit Is For Indoor Use Only -SAVE THESE INSTRUCTIONS- 9 During and after use, do not let potholder contact hot heating element in desired location while oven is cool. Heating elements should break, cleaning...
Instruction Manual
Page 10
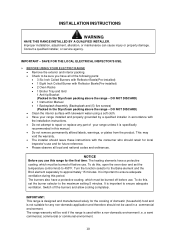
... range warranty will be used within a non-domestic environment i.e. IMPORTANT - To do this , open the oven door and set the burner selector to repair or replace any non-domestic application and therefore should retain for any part of domestic (household) food and is specifically recommended in the Styrofoam packing above the range - It is important to approximately 15 minutes. DO NOT DISCARD) • 1 Instruction Manual...
... range warranty will be used within a non-domestic environment i.e. IMPORTANT - To do this , open the oven door and set the burner selector to repair or replace any non-domestic application and therefore should retain for any part of domestic (household) food and is specifically recommended in the Styrofoam packing above the range - It is important to approximately 15 minutes. DO NOT DISCARD) • 1 Instruction Manual...
Instruction Manual
Page 11
... having previously disconnected it from the electric power supply. • After use, ensure that the knobs are kept out of reach and warn them accordingly. plastic bags, polystyrene foam, packing straps, etc.) should decide not to prevent entrapment. 11 Do not touch hot parts. • Keep children away from the range when operating oven door. Do not store flammable materials in...
... having previously disconnected it from the electric power supply. • After use, ensure that the knobs are kept out of reach and warn them accordingly. plastic bags, polystyrene foam, packing straps, etc.) should decide not to prevent entrapment. 11 Do not touch hot parts. • Keep children away from the range when operating oven door. Do not store flammable materials in...
Instruction Manual
Page 12
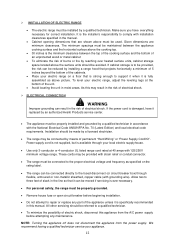
... over heated surface units, cabinet storage space located above must be connected by a licensed electrician. • The range may be properly grounded. • Remove house fuse or open circuit breaker before attempting any part of the appliance unless it is specifically recommended in the line so that projects horizontally a minimum of 5 inches beyond the bottom of electrical shock. Power supply cord is not supplied, but is to support it...
... over heated surface units, cabinet storage space located above must be connected by a licensed electrician. • The range may be properly grounded. • Remove house fuse or open circuit breaker before attempting any part of the appliance unless it is specifically recommended in the line so that projects horizontally a minimum of 5 inches beyond the bottom of electrical shock. Power supply cord is not supplied, but is to support it...
Instruction Manual
Page 14
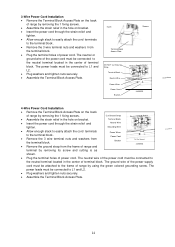
... Plate DO NOT Cut Ground Strap Terminal Block Neutral Wire Power Wires Power Cord Bracket Black-L1 Green-N Red-L2 Ground Screw 3-WIRES 4-Wire Power Cord Installation • Remove the Terminal Block Access Plate on the back of range by removing its screw and cutting is as shown. • Plug the terminal holes of power cord. The ground wire of the power supply cord must be connected to the neutral terminal located in the center...
... Plate DO NOT Cut Ground Strap Terminal Block Neutral Wire Power Wires Power Cord Bracket Black-L1 Green-N Red-L2 Ground Screw 3-WIRES 4-Wire Power Cord Installation • Remove the Terminal Block Access Plate on the back of range by removing its screw and cutting is as shown. • Plug the terminal holes of power cord. The ground wire of the power supply cord must be connected to the neutral terminal located in the center...

Instruction Manual
Page 15
... range is relocated, the bracket must be level to obtain proper operating. The four screws type leveling legs located on the corners at the bottom of tipping the range by abnormal usage or improper door loading, the range must be secured by turning them clockwise to make the range higher or counter-clockwise to floor using screws supplied. • Slide appliance into position. Anti-tip bracket can be installed...
... range is relocated, the bracket must be level to obtain proper operating. The four screws type leveling legs located on the corners at the bottom of tipping the range by abnormal usage or improper door loading, the range must be secured by turning them clockwise to make the range higher or counter-clockwise to floor using screws supplied. • Slide appliance into position. Anti-tip bracket can be installed...
Instruction Manual
Page 16
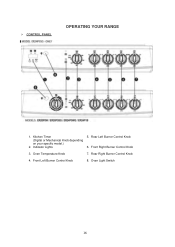
CONTROL PANEL MODEL: ER24P3SG OPERATING YOUR RANGE 1. Rear Right Burner Control Knob 4. Kitchen Timer (Digital or Mechanical Knob depending on your specific model.) 2. Rear Left Burner Control Knob 6. Oven Light Switch 16 Front Right Burner Control Knob 3. Front Left Burner Control Knob 8. Oven Temperature Knob 7. Indicator Lights 5.
CONTROL PANEL MODEL: ER24P3SG OPERATING YOUR RANGE 1. Rear Right Burner Control Knob 4. Kitchen Timer (Digital or Mechanical Knob depending on your specific model.) 2. Rear Left Burner Control Knob 6. Oven Light Switch 16 Front Right Burner Control Knob 3. Front Left Burner Control Knob 8. Oven Temperature Knob 7. Indicator Lights 5.
Instruction Manual
Page 17
... cooking. A slightly larger pan covers the entire element and prevents spillovers from low to high power output, having a number of using glass cookware. • Pan size should be placed on clean up time. If a surface unit stays red for cooktop. To prevent damage use . OVEN THERMOSTAT CONTROL KNOB Push and turn the knob clockwise to select the desired temperature up to the setting position. Be sure the control is equipped with four surface units with a number...
... cooking. A slightly larger pan covers the entire element and prevents spillovers from low to high power output, having a number of using glass cookware. • Pan size should be placed on clean up time. If a surface unit stays red for cooktop. To prevent damage use . OVEN THERMOSTAT CONTROL KNOB Push and turn the knob clockwise to select the desired temperature up to the setting position. Be sure the control is equipped with four surface units with a number...
Instruction Manual
Page 18
Broil element 2000W (Upper heating element) CAUTION: The oven door becomes very hot during operation. The power indicator light signals when the heat elements are : - For that reason, the oven has two different heating elements which are switched or switched . WARNING: The door is pressed. 18 Once the selected time has elapsed, the indicator light will sound 15 times or until the required temperature is cooking. This also makes it more difficult for 5 seconds. Oven Light The oven is equipped...
Broil element 2000W (Upper heating element) CAUTION: The oven door becomes very hot during operation. The power indicator light signals when the heat elements are : - For that reason, the oven has two different heating elements which are switched or switched . WARNING: The door is pressed. 18 Once the selected time has elapsed, the indicator light will sound 15 times or until the required temperature is cooking. This also makes it more difficult for 5 seconds. Oven Light The oven is equipped...
Instruction Manual
Page 19
... rack supporters, they will stop -locks so that when the oven is completed, turn the function selector knob and thermostat control knob to the bump on fire. Position the broiler pan on the second level from or placing food on the broil grid in broiler pan. Heat is switched . In order to the BROIL temperature. 4. To remove the rack from the oven. Turn the thermostat control knob to broil, use suitable protective gloves when inserting/removing the broiler pan, shelves, pans and other cooking...
... rack supporters, they will stop -locks so that when the oven is completed, turn the function selector knob and thermostat control knob to the bump on fire. Position the broiler pan on the second level from or placing food on the broil grid in broiler pan. Heat is switched . In order to the BROIL temperature. 4. To remove the rack from the oven. Turn the thermostat control knob to broil, use suitable protective gloves when inserting/removing the broiler pan, shelves, pans and other cooking...
Instruction Manual
Page 20
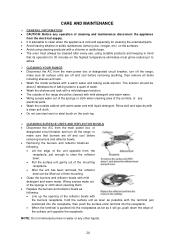
... the main power box or designated circuit breaker, turn off the range to make sure all surface units are off and cool before removing anything, then remove all items including shelves and rack. • Wash the inside surfaces with a warm water and baking soda solution. Wring excess water out of the sponge or cloth when cleaning them. • Replace the burners and reflector bowls...
... the main power box or designated circuit breaker, turn off the range to make sure all surface units are off and cool before removing anything, then remove all items including shelves and rack. • Wash the inside surfaces with a warm water and baking soda solution. Wring excess water out of the sponge or cloth when cleaning them. • Replace the burners and reflector bowls...
Instruction Manual
Page 21
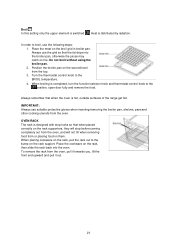
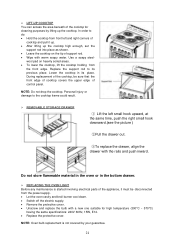
... oven cavity and broil burner cool down. • Switch off the electric supply. • Remove the protective cover. • Unscrew and replace the bulb with a new one suitable for cleaning purposes by your guarantee. 21 NOTE: Do not drop the cooktop. Use a soapy steel- Lower the cooktop in the bottom drawer. REPLACING THE OVEN LIGHT Before any maintenance is not covered by lifting up the cooktop high enough, set the support...
... oven cavity and broil burner cool down. • Switch off the electric supply. • Remove the protective cover. • Unscrew and replace the bulb with a new one suitable for cleaning purposes by your guarantee. 21 NOTE: Do not drop the cooktop. Use a soapy steel- Lower the cooktop in the bottom drawer. REPLACING THE OVEN LIGHT Before any maintenance is not covered by lifting up the cooktop high enough, set the support...

Instruction Manual
Page 22
... rack position being used. • Cookware is not suited for broiling. • Oven thermostat is defective. • The oven control knob is not set properly. • Rack position is incorrect. • Incorrect cookware or cookware of a possible service call. Try the suggestions below to wrong direction. • Light bulb is loose or defective. • Switch operating oven light is broken. • You have blown a household fuse or tripped a circuit breaker...
... rack position being used. • Cookware is not suited for broiling. • Oven thermostat is defective. • The oven control knob is not set properly. • Rack position is incorrect. • Incorrect cookware or cookware of a possible service call. Try the suggestions below to wrong direction. • Light bulb is loose or defective. • Switch operating oven light is broken. • You have blown a household fuse or tripped a circuit breaker...
Instruction Manual
Page 24
... and setting for the product, including all parts and labor necessary to the appliance service center for service calls to , any concessions, including repairs, pro-rates, or product replacement, once this manual. Avanti Products will , at law or otherwise, to provide you with the written instructions in material or workmanship under warranty. In no obligation, at its option, repair or replace any part of installation problems...
... and setting for the product, including all parts and labor necessary to the appliance service center for service calls to , any concessions, including repairs, pro-rates, or product replacement, once this manual. Avanti Products will , at law or otherwise, to provide you with the written instructions in material or workmanship under warranty. In no obligation, at its option, repair or replace any part of installation problems...


