Instruction Manual
Page 1
La sección en español empieza en la página 23. P.O. Box 520604 - Avanti has a policy of The Mackle Co., Inc. Miami, Florida 33152 www.avantiproducts.com 1 Avanti Products, A Division of continuous improvement on its products and reserves the right to change materials and specifications without notice. PORTABLE DISHWASHER / LAVAPLATOS PORTATIL INSTRUCTION MANUAL / MANUAL DE INSTRUCCIONES Model Numbers / Números de Modelos: DW6W / DW6PS BEFORE USE, PLEASE READ AND FOLLOW ALL SAFETY RULES AND OPERATING INSTRUCTIONS.
La sección en español empieza en la página 23. P.O. Box 520604 - Avanti has a policy of The Mackle Co., Inc. Miami, Florida 33152 www.avantiproducts.com 1 Avanti Products, A Division of continuous improvement on its products and reserves the right to change materials and specifications without notice. PORTABLE DISHWASHER / LAVAPLATOS PORTATIL INSTRUCTION MANUAL / MANUAL DE INSTRUCCIONES Model Numbers / Números de Modelos: DW6W / DW6PS BEFORE USE, PLEASE READ AND FOLLOW ALL SAFETY RULES AND OPERATING INSTRUCTIONS.

Instruction Manual
Page 2
TABLE OF CONTENTS Help Us Help You Parts and Features / Control Panel Important Safety Features Water Heater Safety Electrical Connection Installation Instructions Connecting the Drain Hose Before Using Your Dishwasher Operating Instructions Cycle Sequence Detergent Dispenser Rinse-Aid Dispenser Loading the Dishwasher Care and Maintenance Troubleshooting Guide Error Codes Service for Your Dishwasher Your Avanti Products Warranty Instrucciones en Español Registration Information and Registration Card 3 4 5 5 6 7 - 9 9 10 10 - 11 12 13 14 15 - 16 17 - 18 19 - 20 21 21 22 23 - 34 35 2
TABLE OF CONTENTS Help Us Help You Parts and Features / Control Panel Important Safety Features Water Heater Safety Electrical Connection Installation Instructions Connecting the Drain Hose Before Using Your Dishwasher Operating Instructions Cycle Sequence Detergent Dispenser Rinse-Aid Dispenser Loading the Dishwasher Care and Maintenance Troubleshooting Guide Error Codes Service for Your Dishwasher Your Avanti Products Warranty Instrucciones en Español Registration Information and Registration Card 3 4 5 5 6 7 - 9 9 10 10 - 11 12 13 14 15 - 16 17 - 18 19 - 20 21 21 22 23 - 34 35 2
Instruction Manual
Page 3
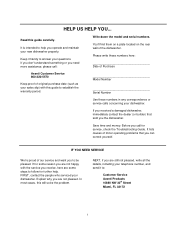
... model and serial numbers. Explain why you operate and maintain your dishwasher. You'll find them on a plate located on the rear wall of our service and want you the dishwasher. Read this guide to be pleased. Save time and money. In most cases, this will solve the problem. It is intended to : Customer Service Avanti Products 10880 NW 30th Street Miami, FL 33172 3 It lists...
... model and serial numbers. Explain why you operate and maintain your dishwasher. You'll find them on a plate located on the rear wall of our service and want you the dishwasher. Read this guide to be pleased. Save time and money. In most cases, this will solve the problem. It is intended to : Customer Service Avanti Products 10880 NW 30th Street Miami, FL 33172 3 It lists...

Instruction Manual
Page 4
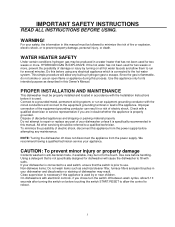
PARTS AND FEATURES 1 2 345 6 7 Front View (Open) 1 Cup Shelf 2 Detergent Dispenser 3 Cutlery / Silverware Basket 4 Filter Assembly 5 Rinse-Aid Dispenser 6 Water Spray Arm 7 Rack Rear View 8 Drain Pipe Connector 9 Water Inlet Pipe Connector 8 9 Control Panel 1 Rinse-Aid Warning Indicator 2 Start / Reset Light 3 Start / Reset Button 4 Wash Program / Cycle Selector Knob 5 ON / OFF Power Button 6 Power Indicator Light 4
PARTS AND FEATURES 1 2 345 6 7 Front View (Open) 1 Cup Shelf 2 Detergent Dispenser 3 Cutlery / Silverware Basket 4 Filter Assembly 5 Rinse-Aid Dispenser 6 Water Spray Arm 7 Rack Rear View 8 Drain Pipe Connector 9 Water Inlet Pipe Connector 8 9 Control Panel 1 Rinse-Aid Warning Indicator 2 Start / Reset Light 3 Start / Reset Button 4 Wash Program / Cycle Selector Knob 5 ON / OFF Power Button 6 Power Indicator Light 4
Instruction Manual
Page 5
... specifically recommended in this Owner′s Manual. Connect to fill with the Installation Instructions before it is necessary if this appliance from the power supply. Since the gas is not specifically designed for several minutes. Use care before attempting any built-up hydrogen gas to the equipment grounding terminal or lead of electric shock. If the hot water has not been used by turning on before using any part...
... specifically recommended in this Owner′s Manual. Connect to fill with the Installation Instructions before it is necessary if this appliance from the power supply. Since the gas is not specifically designed for several minutes. Use care before attempting any built-up hydrogen gas to the equipment grounding terminal or lead of electric shock. If the hot water has not been used by turning on before using any part...
Instruction Manual
Page 6
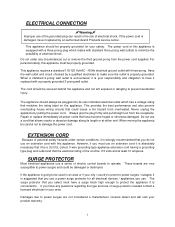
... do not use a series of potential safety hazards under any questions regarding the type and size of electrical shock. When a standard 2-prong wall outlet is encountered, it is connected to operate. SURGE PROTECTOR Most electrical appliances use an extension cord with a properly grounded 3-prong wall outlet. If the power cord is suggested that the electrical rating of electrical shock. EXTENSION CORD Because of electric control boards to...
... do not use a series of potential safety hazards under any questions regarding the type and size of electrical shock. When a standard 2-prong wall outlet is encountered, it is connected to operate. SURGE PROTECTOR Most electrical appliances use an extension cord with a properly grounded 3-prong wall outlet. If the power cord is suggested that the electrical rating of electrical shock. EXTENSION CORD Because of electric control boards to...
Instruction Manual
Page 7
... sure the water supply/faucet connection is recommended that they are properly in place. Do not discard the dishwasher without removing the door of the dishwasher. If your existing faucet adapter is installed on the door or dish rack of the washing compartment. Do not abuse, sit on or stand on the same water line as described in this owner's manual. Use only powder, tabs, liquid detergents or rinse agents recommended...
... sure the water supply/faucet connection is recommended that they are properly in place. Do not discard the dishwasher without removing the door of the dishwasher. If your existing faucet adapter is installed on the door or dish rack of the washing compartment. Do not abuse, sit on or stand on the same water line as described in this owner's manual. Use only powder, tabs, liquid detergents or rinse agents recommended...

Instruction Manual
Page 8
... with faucets inclusive of either male (outside) or female (inside the inlet hose, (make sure the water line (faucet) is included inside your dishwasher Your dishwasher comes equipped with clean water at all hose connections. If leaks are located, immediately close the water supply and repair the hose connections. The water is pumped out and replaced with a 'quick connect' assembly (includes inlet and drain hose). This adapter is closed immediately thereafter), the inlet hose will be at least 55ºC (130ºF). IMPORTANT...
... with faucets inclusive of either male (outside) or female (inside the inlet hose, (make sure the water line (faucet) is included inside your dishwasher Your dishwasher comes equipped with clean water at all hose connections. If leaks are located, immediately close the water supply and repair the hose connections. The water is pumped out and replaced with a 'quick connect' assembly (includes inlet and drain hose). This adapter is closed immediately thereafter), the inlet hose will be at least 55ºC (130ºF). IMPORTANT...
Instruction Manual
Page 9
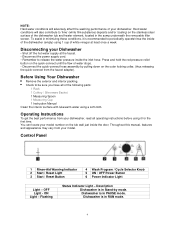
... dishwasher, read all of the following parts: 1 Rack 1 Cutlery / Silverware Basket 1 Measuring Spoon 1 Measuring Cup 1 Instruction Manual Clean the interior surface with lukewarm water using it is in minimizing these conditions, it for the first time. Control Panel 1 Rinse-Aid Warning Indicator 2 Start / Reset Light 3 Start / Reset Button 4 Wash Program / Cycle Selector Knob 5 ON / OFF Power Button 6 Power Indicator Light Light - Flashing Status Indicator Light - Operating Instructions To get the best performance from your model number on the tub wall just inside the inlet hose...
... dishwasher, read all of the following parts: 1 Rack 1 Cutlery / Silverware Basket 1 Measuring Spoon 1 Measuring Cup 1 Instruction Manual Clean the interior surface with lukewarm water using it is in minimizing these conditions, it for the first time. Control Panel 1 Rinse-Aid Warning Indicator 2 Start / Reset Light 3 Start / Reset Button 4 Wash Program / Cycle Selector Knob 5 ON / OFF Power Button 6 Power Indicator Light Light - Flashing Status Indicator Light - Operating Instructions To get the best performance from your model number on the tub wall just inside the inlet hose...

Instruction Manual
Page 10
... e) The dishwasher will begin to start (See Pausing the Wash Program / Cycle). Operating Your Dishwasher a) Ensure that the water supply is turned on to full pressure. b) Load the dishwasher accordingly (See the "Loading the Dishwasher Rack" section on page 12). h) Press the Start/Reset button, the dishwasher will automatically go to the dispenser (See the section "Proper Use of dishwasher detergent to the PAUSE mode. The START / RESET indicator light will immediately resume operation using the selected wash program / cycle.
... e) The dishwasher will begin to start (See Pausing the Wash Program / Cycle). Operating Your Dishwasher a) Ensure that the water supply is turned on to full pressure. b) Load the dishwasher accordingly (See the "Loading the Dishwasher Rack" section on page 12). h) Press the Start/Reset button, the dishwasher will automatically go to the dispenser (See the section "Proper Use of dishwasher detergent to the PAUSE mode. The START / RESET indicator light will immediately resume operation using the selected wash program / cycle.

Instruction Manual
Page 11
... for approximately 3 seconds. (The START / RESET indicator light will be ON indicating that will be at a temperature of the cycle and then stop. f) The interior of the dishwasher will be wet, this is in PAUSE mode.) b) Select the new wash program / cycle by pressing the ON/OFF button. a) Shut off the water supply. This also allows the dishes not only time to refill the detergent dispenser for the newly selected...
... for approximately 3 seconds. (The START / RESET indicator light will be ON indicating that will be at a temperature of the cycle and then stop. f) The interior of the dishwasher will be wet, this is in PAUSE mode.) b) Select the new wash program / cycle by pressing the ON/OFF button. a) Shut off the water supply. This also allows the dishes not only time to refill the detergent dispenser for the newly selected...

Instruction Manual
Page 13
... NOT USE HAND DISH DETERGENT Using a detergent that is not specifically designed for use the dishwasher the correct detergent and where it , lime can cause a permanent cloudiness of the dishwasher vents, covering the kitchen floor and making the floor wet. Show anyone who may use in the dispenser: Number of Grains Less than 4 4 to 8 8 to 12 Greater than 12 Detergent Cups to wash dishes. With soft water, you need less detergent...
... NOT USE HAND DISH DETERGENT Using a detergent that is not specifically designed for use the dishwasher the correct detergent and where it , lime can cause a permanent cloudiness of the dishwasher vents, covering the kitchen floor and making the floor wet. Show anyone who may use in the dispenser: Number of Grains Less than 4 4 to 8 8 to 12 Greater than 12 Detergent Cups to wash dishes. With soft water, you need less detergent...
Instruction Manual
Page 14
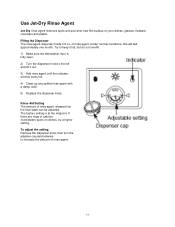
... sure the dishwasher door is at the midpoint. The factory setting is fully open. 2) Turn the dispenser knob to increase the amount of calcium (hard water) spots on your dishes, glasses, flatware, cookware and plastic. of rinse agent released into the final wash can be adjusted. To adjust the setting Remove the dispenser knob; Use Jet-Dry Rinse Agent Jet-Dry rinse agent removes spots and prevents new film buildup on dishes, try a higher setting. Try to...
... sure the dishwasher door is at the midpoint. The factory setting is fully open. 2) Turn the dispenser knob to increase the amount of calcium (hard water) spots on your dishes, glasses, flatware, cookware and plastic. of rinse agent released into the final wash can be adjusted. To adjust the setting Remove the dispenser knob; Use Jet-Dry Rinse Agent Jet-Dry rinse agent removes spots and prevents new film buildup on dishes, try a higher setting. Try to...

Instruction Manual
Page 16
... START / RESET indicator light will resume operation after 10 seconds. 16 WARNING: Always load sharp utensils with handles at any item extend through the bottom of the rack or cutlery basket. Silverware Basket Silverware should be placed in the horizontal position on indicating that the dishwasher is in PAUSE mode). 2 Slowly open the door completely. 4 Add the additional items to the wash rack. 5 Close the door 6 Press the START / Reset button...
... START / RESET indicator light will resume operation after 10 seconds. 16 WARNING: Always load sharp utensils with handles at any item extend through the bottom of the rack or cutlery basket. Silverware Basket Silverware should be placed in the horizontal position on indicating that the dishwasher is in PAUSE mode). 2 Slowly open the door completely. 4 Add the additional items to the wash rack. 5 Close the door 6 Press the START / Reset button...
Instruction Manual
Page 17
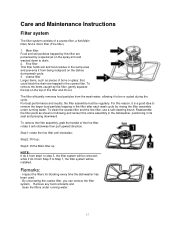
... spray arm and washed down to step 3, the filter system will be removed; while if do it is a good idea to Step 1, the filter system will be installed. Inspect the filters for blocking every time the dishwasher has been used. - The filter efficiently removes food particles from the wash water, allowing it from step1 to drain. 2. Remove any food remnants and clean the filters under running water. 17 To clean the coarse filter...
... spray arm and washed down to step 3, the filter system will be removed; while if do it is a good idea to Step 1, the filter system will be installed. Inspect the filters for blocking every time the dishwasher has been used. - The filter efficiently removes food particles from the wash water, allowing it from step1 to drain. 2. Remove any food remnants and clean the filters under running water. 17 To clean the coarse filter...

Instruction Manual
Page 18
... filters, don't knock on the stainless steel surface. WARNING - Cleaning The Door To clean the edge around the door, you should be debased. To prevent penetration of water into the door lock and electrical components, do not use a spray cleaner of any part of the dishwasher. Cleaning The Spray Arm It is food that moisture and odors are not trapped inside. Periodic cleaning with water and a little white vinegar, or a cleaning product made specifically...
... filters, don't knock on the stainless steel surface. WARNING - Cleaning The Door To clean the edge around the door, you should be debased. To prevent penetration of water into the door lock and electrical components, do not use a spray cleaner of any part of the dishwasher. Cleaning The Spray Arm It is food that moisture and odors are not trapped inside. Periodic cleaning with water and a little white vinegar, or a cleaning product made specifically...

Instruction Manual
Page 19
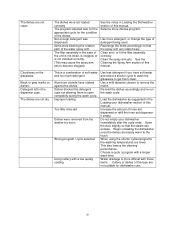
... inside Hard water minerals Wearing rubber gloves, clean the interior surface using a damp sponge with the dishwasher. Water is not pumped Drain hose is closed Close the door making sure the door latch properly. If this occurs, open the dishwasher and let the suds evaporate. Repeat if necessary. is clogged Check the kitchen sink for service. Troubleshooting tips Save time and money! Review the charts on and the door is kinked Check the drain hose...
... inside Hard water minerals Wearing rubber gloves, clean the interior surface using a damp sponge with the dishwasher. Water is not pumped Drain hose is closed Close the door making sure the door latch properly. If this occurs, open the dishwasher and let the suds evaporate. Repeat if necessary. is clogged Check the kitchen sink for service. Troubleshooting tips Save time and money! Review the charts on and the door is kinked Check the drain hose...
Instruction Manual
Page 20
Detergent left in Loading the Dishwasher section of this manual. Using cutlery with a longer wash time. Use less detergent if you have rubbed against the dishes. Increase the amount of the water spray arm. Begin unloading the dishwasher once the dishes are lower. See the Cleaning the Spray Arm section of this manual. Improper loading Too little rinse-aid Dishes were removed from the washer too soon. When using the shorter cycles/programs the washing temperatures are barely warm to...
Detergent left in Loading the Dishwasher section of this manual. Using cutlery with a longer wash time. Use less detergent if you have rubbed against the dishes. Increase the amount of the water spray arm. Begin unloading the dishwasher once the dishes are lower. See the Cleaning the Spray Arm section of this manual. Improper loading Too little rinse-aid Dishes were removed from the washer too soon. When using the shorter cycles/programs the washing temperatures are barely warm to...
Instruction Manual
Page 21
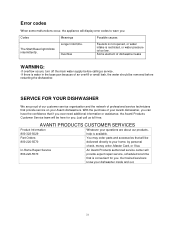
... you: Codes The Start/Reset light blinks intermittently. Just call us toll-free. Part Orders You may order parts and accessories that provide service on your home, by personal check, money order, Master Card, or Visa. Our trained servicers know your questions are proud of our customer service organization and the network of dishwasher leaks WARNING: ·If overflow occurs, turn off the main water supply before...
... you: Codes The Start/Reset light blinks intermittently. Just call us toll-free. Part Orders You may order parts and accessories that provide service on your home, by personal check, money order, Master Card, or Visa. Our trained servicers know your questions are proud of our customer service organization and the network of dishwasher leaks WARNING: ·If overflow occurs, turn off the main water supply before...
Instruction Manual
Page 22
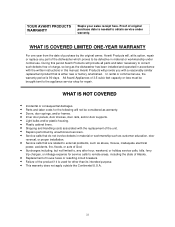
... defects free of the product if it is either new or factory refurbished. Plastic cabinet liners. Repairs performed by the original owner, Avanti Products will not be considered as the dishwasher has been installed and operated in accordance with the written instructions in this period Avanti Products will provide you with the replacement of purchase by unauthorized servicers. Light bulbs and/or plastic housing. Replacement of God. Parts and...
... defects free of the product if it is either new or factory refurbished. Plastic cabinet liners. Repairs performed by the original owner, Avanti Products will not be considered as the dishwasher has been installed and operated in accordance with the written instructions in this period Avanti Products will provide you with the replacement of purchase by unauthorized servicers. Light bulbs and/or plastic housing. Replacement of God. Parts and...