Instruction Manual
Page 2
... Power Supply Connections Backsplash Installation Water Faucet Installation And Water Line Connection Sink Strainer Installation And Water Drain Installation Of Your Refrigerator Installation Of Side Tray (Tray Sold Separately) Operating Your Compact Kitchen Operating Your Refrigerator Operating Your Burners Directions for Use of Electrical Connection Care And Maintenance Cleaning Your Compact Kitchen Cleaning Burners And Reflector Bowls Power Failure Vacation Time Moving Your Compact Kitchen Troubleshooting Guide Service For Your Compact Kitchen Your Avanti Products Warranty Wiring Diagram...
... Power Supply Connections Backsplash Installation Water Faucet Installation And Water Line Connection Sink Strainer Installation And Water Drain Installation Of Your Refrigerator Installation Of Side Tray (Tray Sold Separately) Operating Your Compact Kitchen Operating Your Refrigerator Operating Your Burners Directions for Use of Electrical Connection Care And Maintenance Cleaning Your Compact Kitchen Cleaning Burners And Reflector Bowls Power Failure Vacation Time Moving Your Compact Kitchen Troubleshooting Guide Service For Your Compact Kitchen Your Avanti Products Warranty Wiring Diagram...
Instruction Manual
Page 3
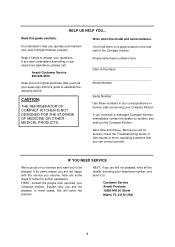
... answer your Compact kitchen. IF YOU NEED SERVICE We're proud of original purchase date (such as your telephone number, and send it handy to : Customer Service Avanti Products 10880 NW 30 Street Miami, FL 33172 USA 3 If for some steps to establish the warranty period. In most cases, this guide carefully. Read this will solve the problem. NEXT, if you...
... answer your Compact kitchen. IF YOU NEED SERVICE We're proud of original purchase date (such as your telephone number, and send it handy to : Customer Service Avanti Products 10880 NW 30 Street Miami, FL 33172 USA 3 If for some steps to establish the warranty period. In most cases, this guide carefully. Read this will solve the problem. NEXT, if you...
Instruction Manual
Page 4
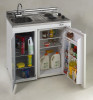
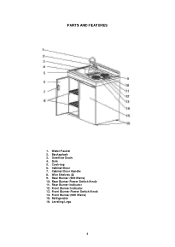
Front Burner (900 Watts) 15. Sink 5. Rear Burner Indicator 12. Refrigerator 16. Leveling Legs 4 Water Faucet 2. Cook-top 6. Wire Shelves (2) 9. Front Burner Power Switch Knob 14. Cabinet Door Handle 8. Rear Burner Power Switch Knob 11. Cabinet Door 7. Front Burner Indicator 13. PARTS AND FEATURES 1. Rear Burner (500 Watts) 10. Backsplash 3. Overflow Drain 4.
Front Burner (900 Watts) 15. Sink 5. Rear Burner Indicator 12. Refrigerator 16. Leveling Legs 4 Water Faucet 2. Cook-top 6. Wire Shelves (2) 9. Front Burner Power Switch Knob 14. Cabinet Door Handle 8. Rear Burner Power Switch Knob 11. Cabinet Door 7. Front Burner Indicator 13. PARTS AND FEATURES 1. Rear Burner (500 Watts) 10. Backsplash 3. Overflow Drain 4.
Instruction Manual
Page 5
... operate, play with, or crawl inside the Compact Kitchen. • Never clean Compact Kitchen parts with flammable fluids. Absence of these basic precautions: • Read all instructions before using the Compact Kitchen. • DANGER or WARNING: Risk of child entrapment. even if they will also improve efficiency. • Never Leave Surface Units Unattended at High Heat Settings - Do not repair or replace...
... operate, play with, or crawl inside the Compact Kitchen. • Never clean Compact Kitchen parts with flammable fluids. Absence of these basic precautions: • Read all instructions before using the Compact Kitchen. • DANGER or WARNING: Risk of child entrapment. even if they will also improve efficiency. • Never Leave Surface Units Unattended at High Heat Settings - Do not repair or replace...
Instruction Manual
Page 6
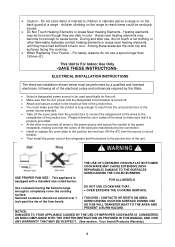
... THE COILED BURNERS. Among these areas are matched during the connection. • Install or replace the cover plate to the junction box and turn ON the A/C from the junction box to connect the stripped end of the wires to cool. USE PROPER PAN SIZE - ELECTRICAL INSTALLATION INSTRUCTIONS The electrical installation shown below must make sure that the A/C power and the designated circuit breaker is properly grounded. • At...
... THE COILED BURNERS. Among these areas are matched during the connection. • Install or replace the cover plate to the junction box and turn ON the A/C from the junction box to connect the stripped end of the wires to cool. USE PROPER PAN SIZE - ELECTRICAL INSTALLATION INSTRUCTIONS The electrical installation shown below must make sure that the A/C power and the designated circuit breaker is properly grounded. • At...
Instruction Manual
Page 7
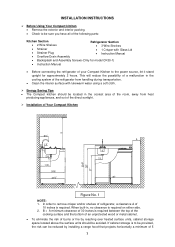
... projects horizontally a minimum of 5 7 INSTALLATION INSTRUCTIONS Before Using Your Compact kitchen • Remove the exterior and interior packing. • Check to be sure you have all of the following parts: Kitchen Section Refrigerator Section • 2 Wire Shelves • Strainer • Strainer Plug • Overflow Drain Assembly • 3 Wire Shelves • 1 Crisper with lukewarm water using a soft cloth. Energy Saving Tips • The Compact kitchen should be reduced by reaching...
... projects horizontally a minimum of 5 7 INSTALLATION INSTRUCTIONS Before Using Your Compact kitchen • Remove the exterior and interior packing. • Check to be sure you have all of the following parts: Kitchen Section Refrigerator Section • 2 Wire Shelves • Strainer • Strainer Plug • Overflow Drain Assembly • 3 Wire Shelves • 1 Crisper with lukewarm water using a soft cloth. Energy Saving Tips • The Compact kitchen should be reduced by reaching...
Instruction Manual
Page 8
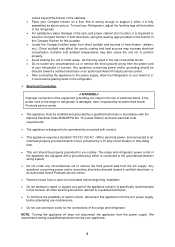
... local electrical code requirements. • The appliance is designed to cool down for this manual. Any questions concerning power and/or grounding should be directed toward a certified electrician or an authorized Avanti Products service center. • After connecting the appliance to the power supply, allow the Refrigerator to be permanently connected with a grounded plug which is fully assembled as above picture. All other servicing should...
... local electrical code requirements. • The appliance is designed to cool down for this manual. Any questions concerning power and/or grounding should be directed toward a certified electrician or an authorized Avanti Products service center. • After connecting the appliance to the power supply, allow the Refrigerator to be permanently connected with a grounded plug which is fully assembled as above picture. All other servicing should...

Instruction Manual
Page 9
..., following all of the electrical codes and ordinances required by a qualified electrician. • Remove junction box cover. Figure No. 2 Backsplash Installation Install the backsplash to the National Electrical Code and/or local codes and ordinances by the State. Power Supply Connections • Prepare the wiring in accordance to the kitchen cabinet as shown in . Figure No. 3 9 WARNING The electrical installation shown below must be...
..., following all of the electrical codes and ordinances required by a qualified electrician. • Remove junction box cover. Figure No. 2 Backsplash Installation Install the backsplash to the National Electrical Code and/or local codes and ordinances by the State. Power Supply Connections • Prepare the wiring in accordance to the kitchen cabinet as shown in . Figure No. 3 9 WARNING The electrical installation shown below must be...

Instruction Manual
Page 10
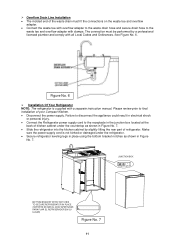
... IMPROPER WATER LINE CONNECTION MAY RESULT IN FLOODING YOU MUST USE A LICENSED PLUMBER REVIEW STATE AND LOCAL PLUMBING CODES BEFORE INSTALLATION Figure No. 4 • Turn off the water supply. • Install the water faucet as above picture. • Connect the water supply hoses to the water faucet by a professional licensed plumber and comply with a longer, highpressure hose. Sink Strainer Installation And Water Drain Connection to the water sink must...
... IMPROPER WATER LINE CONNECTION MAY RESULT IN FLOODING YOU MUST USE A LICENSED PLUMBER REVIEW STATE AND LOCAL PLUMBING CODES BEFORE INSTALLATION Figure No. 4 • Turn off the water supply. • Install the water faucet as above picture. • Connect the water supply hoses to the water faucet by a professional licensed plumber and comply with a longer, highpressure hose. Sink Strainer Installation And Water Drain Connection to the water sink must...
Instruction Manual
Page 11
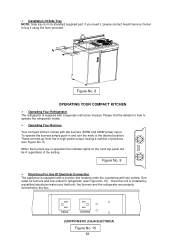
... located at the back of kitchen cabinet under the refrigerator. • Secure refrigerator leveling legs in place using the bottom bracket notches as shown in electrical shock or personal injury. • Connect the Refrigerator power supply cord to final installation of refrigerator. The connection must fit the connections on the waste tee and overflow adapter. • Connect the waste tee with overflow adapter to the waste drain...
... located at the back of kitchen cabinet under the refrigerator. • Secure refrigerator leveling legs in place using the bottom bracket notches as shown in electrical shock or personal injury. • Connect the Refrigerator power supply cord to final installation of refrigerator. The connection must fit the connections on the waste tee and overflow adapter. • Connect the waste tee with overflow adapter to the waste drain...
Instruction Manual
Page 12
... box located under the countertop with a separate instruction manual. If you need it, please contact Avanti Service Center to high power output, having a number of the setting. Please find the details for refrigerator (see Figure No. 9). One outlet for burners and one outlet for how to the desired position. To operate the burners simply push in operation the indicator lights on the cook top panel...
... box located under the countertop with a separate instruction manual. If you need it, please contact Avanti Service Center to high power output, having a number of the setting. Please find the details for refrigerator (see Figure No. 9). One outlet for burners and one outlet for how to the desired position. To operate the burners simply push in operation the indicator lights on the cook top panel...
Instruction Manual
Page 13
... the inside surfaces with a warm water and baking soda solution. CARE AND MAINTENANCE Cleaning Your Compact Kitchen • Disconnect the A/C from the main power box or designated circuit breaker, turn off the Compact Kitchen, make sure all surface units are off and cool before removing burners and reflector bowls. • Removing the burners and reflector bowls as following : • Line up the opening of...
... the inside surfaces with a warm water and baking soda solution. CARE AND MAINTENANCE Cleaning Your Compact Kitchen • Disconnect the A/C from the main power box or designated circuit breaker, turn off the Compact Kitchen, make sure all surface units are off and cool before removing burners and reflector bowls. • Removing the burners and reflector bowls as following : • Line up the opening of...

Instruction Manual
Page 14
... the door shut. • Be sure the Compact Kitchen and Refrigerator stay secure in the upright position during transportation. Also protect outside of the Compact Kitchen and move them separately. • Securely tape down all loose items (shelves and basket) inside your Compact Kitchen Compartment and Refrigerator. • Turn the adjustable feet up to the base to disconnect the water supply connections and water drain connection. • Remove all...
... the door shut. • Be sure the Compact Kitchen and Refrigerator stay secure in the upright position during transportation. Also protect outside of the Compact Kitchen and move them separately. • Securely tape down all loose items (shelves and basket) inside your Compact Kitchen Compartment and Refrigerator. • Turn the adjustable feet up to the base to disconnect the water supply connections and water drain connection. • Remove all...
Instruction Manual
Page 15
The Refrigerator does not operate The Refrigerator turns on and off frequently. Not connected to make too much noise. The temperature control knob is leveled. Check to assure that are absolutely flat. The power switch knobs are not plugged in before calling the servicer. Try the suggestions below to power supply. The refrigerator door will not turn POSSIBLE CAUSE Not connected to see if you can solve many common Compact Kitchen problems easily...
The Refrigerator does not operate The Refrigerator turns on and off frequently. Not connected to make too much noise. The temperature control knob is leveled. Check to assure that are absolutely flat. The power switch knobs are not plugged in before calling the servicer. Try the suggestions below to power supply. The refrigerator door will not turn POSSIBLE CAUSE Not connected to see if you can solve many common Compact Kitchen problems easily...
Instruction Manual
Page 16
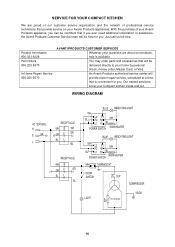
... Repair Service 800-220-5570 AVANTI PRODUCTS CUSTOMER SERVICES Whatever your Compact kitchen inside and out. You may order parts and accessories that will provide expert repair service, scheduled at a time that if you ever need additional information or assistance, the Avanti Products Customer Service team will be delivered directly to your Avanti Products appliances. An Avanti Products authorized service center will be here for you. WIRING DIAGRAM 16 SERVICE...
... Repair Service 800-220-5570 AVANTI PRODUCTS CUSTOMER SERVICES Whatever your Compact kitchen inside and out. You may order parts and accessories that will provide expert repair service, scheduled at a time that if you ever need additional information or assistance, the Avanti Products Customer Service team will be delivered directly to your Avanti Products appliances. An Avanti Products authorized service center will be here for you. WIRING DIAGRAM 16 SERVICE...
Instruction Manual
Page 17
...; Light bulbs and/or plastic housing. • Plastic cabinet liners. • Punctured evaporator that voids the warranty on the complete sealed system. • Repairs performed by unauthorized servicers. • Service calls that do not involve defects in material or workmanship such as customer education, door reversal, or proper installation. • Service calls that are related to external problems, such as abuse, misuse, inadequate electrical power...
...; Light bulbs and/or plastic housing. • Plastic cabinet liners. • Punctured evaporator that voids the warranty on the complete sealed system. • Repairs performed by unauthorized servicers. • Service calls that do not involve defects in material or workmanship such as customer education, door reversal, or proper installation. • Service calls that are related to external problems, such as abuse, misuse, inadequate electrical power...
Instruction Manual
Page 23
...;Personal Demo Other Comments 23 detach here Avanti Registration Form Name Model # Serial # Address Date Purchased Store/Dealer Name City State Zip Occupation Area Code Phone Number As Your Primary Residence, Do You: Own Rent Did You Purchase An Additional Warranty: Extended Food Loss None Reason For Choosing This Avanti Product: Please indicate...
...;Personal Demo Other Comments 23 detach here Avanti Registration Form Name Model # Serial # Address Date Purchased Store/Dealer Name City State Zip Occupation Area Code Phone Number As Your Primary Residence, Do You: Own Rent Did You Purchase An Additional Warranty: Extended Food Loss None Reason For Choosing This Avanti Product: Please indicate...

Parts & Accessories
Page 2
... CK36-19 CK36-20 CK36-21 CK36-22 CK36-23 CK36-24 CK36-25 CK36-26 CK36-27 CK36-28 CK36-29 CK36-30 Backsplash 500W burner 900W burner Faucet Reflector Bowl S/S countertop Knob Power Switch Indicating Light Meal Clip Connector Stainer Clamp Electrical Box Tray Water Drip Tray Power Supply Cord for burner Junction Box Door Countertop Holder Junction Box Receptacle Side Tray (accessory) Reinforcing Plate Bottom Cabinet Side Plate Bottom Supporting Plate Leg Magnetic Part Shelf Door Handle Parts List
... CK36-19 CK36-20 CK36-21 CK36-22 CK36-23 CK36-24 CK36-25 CK36-26 CK36-27 CK36-28 CK36-29 CK36-30 Backsplash 500W burner 900W burner Faucet Reflector Bowl S/S countertop Knob Power Switch Indicating Light Meal Clip Connector Stainer Clamp Electrical Box Tray Water Drip Tray Power Supply Cord for burner Junction Box Door Countertop Holder Junction Box Receptacle Side Tray (accessory) Reinforcing Plate Bottom Cabinet Side Plate Bottom Supporting Plate Leg Magnetic Part Shelf Door Handle Parts List


