Instruction Manual
Page 1
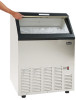
Avanti Products LLC P.O. Box 520604 Miami, FL 33152 www.avantiproducts.com 1 Avanti has a policy of continuous improvement on its products and reserves the right to change materials and specifications without notice. Model / Modelo / Modelé: COMMERCIAL ICE MAKER MAQUINA DE HACER HIELO COMERCIAL MACHINE A GLAÇONS COMMERCIALE CIM102U3S INSTRUCTION MANUAL MANUAL DE INSTRUCCIONES MANUEL D'INSTRUCTIONS BEFORE USE, PLEASE READ AND FOLLOW ALL SAFETY RULES AND OPERATING INSTRUCTIONS.
Avanti Products LLC P.O. Box 520604 Miami, FL 33152 www.avantiproducts.com 1 Avanti has a policy of continuous improvement on its products and reserves the right to change materials and specifications without notice. Model / Modelo / Modelé: COMMERCIAL ICE MAKER MAQUINA DE HACER HIELO COMERCIAL MACHINE A GLAÇONS COMMERCIALE CIM102U3S INSTRUCTION MANUAL MANUAL DE INSTRUCCIONES MANUEL D'INSTRUCTIONS BEFORE USE, PLEASE READ AND FOLLOW ALL SAFETY RULES AND OPERATING INSTRUCTIONS.

Instruction Manual
Page 2
... OF CONTENTS Important Safeguides Electrical Connection Help Us Help You Parts and Features Important Safety Instructions Installation Instructions Before Using Your Appliance Installation of Your Appliance Electrical Connection Water Supply / Drain Operating Your Appliance How Your Machine Makes Ice Care and Maintenance Troubleshooting Guide Service for Your Appliance Wiring Diagram Your Avanti Products Warranty Instrucciones en Español Instructions en Français Registration Information and Registration Card...
... OF CONTENTS Important Safeguides Electrical Connection Help Us Help You Parts and Features Important Safety Instructions Installation Instructions Before Using Your Appliance Installation of Your Appliance Electrical Connection Water Supply / Drain Operating Your Appliance How Your Machine Makes Ice Care and Maintenance Troubleshooting Guide Service for Your Appliance Wiring Diagram Your Avanti Products Warranty Instrucciones en Español Instructions en Français Registration Information and Registration Card...
Instruction Manual
Page 4
... apparatus for your appliance unless it is specifically recommended in this manual, so read the manual carefully. These cleaners may need to make several adjustments to level it. • All installation must be in accordance with cleaning and maintenance operations, make sure the power line of high heat. • The appliance must be installed with all panels before operating • It is recommended...
... apparatus for your appliance unless it is specifically recommended in this manual, so read the manual carefully. These cleaners may need to make several adjustments to level it. • All installation must be in accordance with cleaning and maintenance operations, make sure the power line of high heat. • The appliance must be installed with all panels before operating • It is recommended...
Instruction Manual
Page 5
...power surges / outages; If you use a series of electric control boards to operate. This appliance should be damaged or destroyed. If the power cord is too short, have a surge block high enough to protect the appliance it is absolutely necessary that you must have a qualified electrician or service technician install...and size of surge protector needed contact a licensed electrician in the risk of electrical shock. The surge protector that it replaced by pulling the power cord. However, if you select must use an extension cord it is prone to power surges and could be ...
...power surges / outages; If you use a series of electric control boards to operate. This appliance should be damaged or destroyed. If the power cord is too short, have a surge block high enough to protect the appliance it is absolutely necessary that you must have a qualified electrician or service technician install...and size of surge protector needed contact a licensed electrician in the risk of electrical shock. The surge protector that it replaced by pulling the power cord. However, if you select must use an extension cord it is prone to power surges and could be ...
Instruction Manual
Page 6
... need service We're proud of Purchase Model Number Serial Number Use these numbers in any correspondence or service calls concerning your Icemaker If you received a damaged Icemaker, immediately contact the dealer (or builder) that you to : Customer Service Avanti ...service, check the Troubleshooting Guide. It is intended to help you are some reason you call : Avanti Customer Service 800-220-5570 Keep proof of minor operating problems that sold you are not happy with this guide to establish the warranty period. Keep it to be pleased. Write down the model and serial numbers...
... need service We're proud of Purchase Model Number Serial Number Use these numbers in any correspondence or service calls concerning your Icemaker If you received a damaged Icemaker, immediately contact the dealer (or builder) that you to : Customer Service Avanti ...service, check the Troubleshooting Guide. It is intended to help you are some reason you call : Avanti Customer Service 800-220-5570 Keep proof of minor operating problems that sold you are not happy with this guide to establish the warranty period. Keep it to be pleased. Write down the model and serial numbers...
Instruction Manual
Page 8
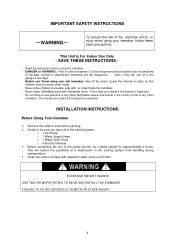
... o 1 Water Supply Hose o 1 Water Drain Hose o Instruction Manual · Before connecting the unit to be sure you throw away your icemaker, follow these basic precautions: This Unit Is For Indoor Use Only - Child entrapment and suffocation are still dangerous . . . IMPORTANT SAFETY INSTRUCTIONS ~WARNING~ To reduce the risk of fire, electrical shock, or injury when using your old icemaker: take off the doors. Never clean icemaker parts...
... o 1 Water Supply Hose o 1 Water Drain Hose o Instruction Manual · Before connecting the unit to be sure you throw away your icemaker, follow these basic precautions: This Unit Is For Indoor Use Only - Child entrapment and suffocation are still dangerous . . . IMPORTANT SAFETY INSTRUCTIONS ~WARNING~ To reduce the risk of fire, electrical shock, or injury when using your old icemaker: take off the doors. Never clean icemaker parts...

Instruction Manual
Page 9
... on a floor that a water filter be used. INSTALLATION CLEARANCES: • The installation of this icemaker requires a cold water supply inlet of ¼" (6.35mm) soft copper tubing with a shut off valve. • The icemaker requires a continuous water supply with all state and local codes. · Place your icemaker, adjust the legs at the front of the icemaker. · Allow a minimum of ¾ inch of space between 41...
... on a floor that a water filter be used. INSTALLATION CLEARANCES: • The installation of this icemaker requires a cold water supply inlet of ¼" (6.35mm) soft copper tubing with a shut off valve. • The icemaker requires a continuous water supply with all state and local codes. · Place your icemaker, adjust the legs at the front of the icemaker. · Allow a minimum of ¾ inch of space between 41...

Instruction Manual
Page 10
This is useful for the icemaker to be cleaned. Leveling the ice maker It is important for cleaning and sanitizing the surface on which the icemaker is installed because it allows you to move the machine. We recommend using a carpenter's level to touch the floor. 10 You will find that the casters make several adjustments to level the ice maker. It can be raised or lowered by...
This is useful for the icemaker to be cleaned. Leveling the ice maker It is important for cleaning and sanitizing the surface on which the icemaker is installed because it allows you to move the machine. We recommend using a carpenter's level to touch the floor. 10 You will find that the casters make several adjustments to level the ice maker. It can be raised or lowered by...

Instruction Manual
Page 12
... of installation. Turn off valve must be in the drainage system. Turn on the machine. vertical cold water pipe near the ice maker. If the water pipe has a plain piece of melting in . compression union to ¾-in the ice storage bin. 12 If there is a drain line near the ice maker, the best choice is about 6 feet long. 3. Connect the drain outlet to the water draining hose, and...
... of installation. Turn off valve must be in the drainage system. Turn on the machine. vertical cold water pipe near the ice maker. If the water pipe has a plain piece of melting in . compression union to ¾-in the ice storage bin. 12 If there is a drain line near the ice maker, the best choice is about 6 feet long. 3. Connect the drain outlet to the water draining hose, and...
Instruction Manual
Page 13
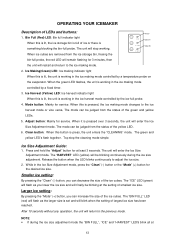
...) will flash as you can decrease the size of the ice cubes. When ice cubes are removed from the ice storage bin, freeing the Clean Ice-full Adjust Ice-making mode controlled by a fixed timer. 3. Top stop working in the Ice Size Adjustment mode, press the "Clean" (-) button or the "Mode" (+) button for the desired ice size. Release the button when the LED blinks continuously to the ice harvest...
...) will flash as you can decrease the size of the ice cubes. When ice cubes are removed from the ice storage bin, freeing the Clean Ice-full Adjust Ice-making mode controlled by a fixed timer. 3. Top stop working in the Ice Size Adjustment mode, press the "Clean" (-) button or the "Mode" (+) button for the desired ice size. Release the button when the LED blinks continuously to the ice harvest...
Instruction Manual
Page 14
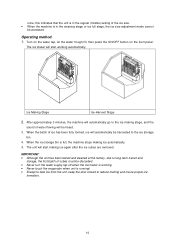
...; Never turn the water supply tap off when the ice maker is full, the machine stops making ice again after the ice cubes are removed. When the ice storage bin is working automatically. Turn on the water tap, let the water trough fill, then press the ON/OFF button on the front panel. Ice Making Stage Ice-Harvest Stage 2. IMPORTANT: · Although the unit has been tested and cleaned at the...
...; Never turn the water supply tap off when the ice maker is full, the machine stops making ice again after the ice cubes are removed. When the ice storage bin is working automatically. Turn on the water tap, let the water trough fill, then press the ON/OFF button on the front panel. Ice Making Stage Ice-Harvest Stage 2. IMPORTANT: · Although the unit has been tested and cleaned at the...
Instruction Manual
Page 15
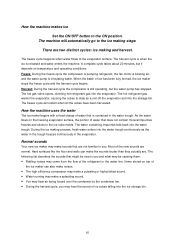
... harvest cycle, you may hear the sound of ice cubes falling into the ice storage bin. 15 How the machine makes ice Set the ON/OFF button to slide as the water in the trough freezes continuously in the water trough. When the batch of the refrigerant or the water line. As the water flows on the freezing evaporator surface, the portion of the new sounds...
... harvest cycle, you may hear the sound of ice cubes falling into the ice storage bin. 15 How the machine makes ice Set the ON/OFF button to slide as the water in the trough freezes continuously in the water trough. When the batch of the refrigerant or the water line. As the water flows on the freezing evaporator surface, the portion of the new sounds...

Instruction Manual
Page 16
... any instructions provided for cleaning or use it will ensure efficiency, top performance, and long life. Shut off all water. 6. Leave water supply line and power cord disconnected until ready to remove any remaining ice and water. Dry the bin. 5. Disconnect the water supply line from the water inlet. 3. Periodic cleaning and proper maintenance will be thoroughly cleaned. Pull off the drainage tube of water. 1. Leave the door open...
... any instructions provided for cleaning or use it will ensure efficiency, top performance, and long life. Shut off all water. 6. Leave water supply line and power cord disconnected until ready to remove any remaining ice and water. Dry the bin. 5. Disconnect the water supply line from the water inlet. 3. Periodic cleaning and proper maintenance will be thoroughly cleaned. Pull off the drainage tube of water. 1. Leave the door open...

Instruction Manual
Page 17
... may need to prevent water spotting. With hard water of hot water 95ºF (35 ºC) to clean the system as often as 1 oz. Locate the control box. 17 Do not use an abrasive cleaning agent. Use a soft sponge and rinse with a mild detergent and warm water solution and a damp cloth. If the door panel is . Turn off through the drainpipe. 4. Keep the ice maker...
... may need to prevent water spotting. With hard water of hot water 95ºF (35 ºC) to clean the system as often as 1 oz. Locate the control box. 17 Do not use an abrasive cleaning agent. Use a soft sponge and rinse with a mild detergent and warm water solution and a damp cloth. If the door panel is . Turn off through the drainpipe. 4. Keep the ice maker...

Instruction Manual
Page 18
... ice maker. After cleaning, shut off the power switch, and unscrew the nut of Nickel-Safe Ice Maker Cleaning Solution into the water bin. The dirty water must be inadvertently disconnected. The ice machine cleaner contains acids. DO NOT use of the control box. Use rubber gloves to moisture. 4. Repeat steps 4 and 6 above 3 times (without Ice Maker Cleaning Solution) to rinse the ice making mode. Pour 8 ounces of the water-draining hole. Drain...
... ice maker. After cleaning, shut off the power switch, and unscrew the nut of Nickel-Safe Ice Maker Cleaning Solution into the water bin. The dirty water must be inadvertently disconnected. The ice machine cleaner contains acids. DO NOT use of the control box. Use rubber gloves to moisture. 4. Repeat steps 4 and 6 above 3 times (without Ice Maker Cleaning Solution) to rinse the ice making mode. Pour 8 ounces of the water-draining hole. Drain...

Instruction Manual
Page 20
Clean and dry the interior thoroughly. Energy Saving Tips · The unit should not affect the temperature of your icemaker if you need to take the proper steps to protect your unit. · Turn the leveling screws up inside the freezer. · Organize and label food to wrap foods properly, and wipe ...three weeks. Remove as many items as needed at one time, and close the door as soon as possible. 20 If the power is opened. Long vacations: If the icemaker will not be used for a longer period of time, you minimize the number of times the door is going to be located in the ...
Clean and dry the interior thoroughly. Energy Saving Tips · The unit should not affect the temperature of your icemaker if you need to take the proper steps to protect your unit. · Turn the leveling screws up inside the freezer. · Organize and label food to wrap foods properly, and wipe ...three weeks. Remove as many items as needed at one time, and close the door as soon as possible. 20 If the power is opened. Long vacations: If the icemaker will not be used for a longer period of time, you minimize the number of times the door is going to be located in the ...
Instruction Manual
Page 21
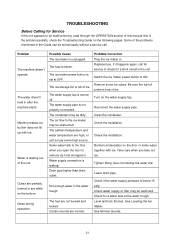
... ice. Cubes are partially formed or are high, or unit is free of the problems mentioned in the Guide can be obstructed. The ice storage bin is set at the water trough. Clean the condenser. The ice maker power button is full of ice. If the problem persists, check the Troubleshooting Guide on the water supply tap. Normal condensation on the bottom. Check for a short circuit in . Level...
... ice. Cubes are partially formed or are high, or unit is free of the problems mentioned in the Guide can be obstructed. The ice storage bin is set at the water trough. Clean the condenser. The ice maker power button is full of ice. If the problem persists, check the Troubleshooting Guide on the water supply tap. Normal condensation on the bottom. Check for a short circuit in . Level...

Instruction Manual
Page 22
.... 22 Remove some ice cubes; Check the drain hose to within the stated range. The ground line isn't in front of ice. The hardness level of the water Install a water-softening device in the socket. water inlet. Cut off . Water leaks from the ice storage bin The electricity is too high. Use a socket meeting the grounding requirements. The ice storage bin is full of the ice maker is blocked. The...
.... 22 Remove some ice cubes; Check the drain hose to within the stated range. The ground line isn't in front of ice. The hardness level of the water Install a water-softening device in the socket. water inlet. Cut off . Water leaks from the ice storage bin The electricity is too high. Use a socket meeting the grounding requirements. The ice storage bin is full of the ice maker is blocked. The...
Instruction Manual
Page 24
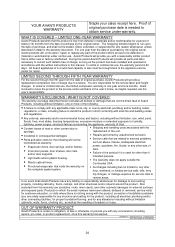
... defects in this warranty has expired. Avanti Products will not be brought/sent to external problems, such as warranty: · Evaporator doors, door springs, and/or frames. · Inner door panels, door shelves, door rails, and/or door supports. · Light bulbs and/or plastic housing. · Plastic cabinet liners. · Punctured evaporator that are solely responsible for any structure and setting for other...
... defects in this warranty has expired. Avanti Products will not be brought/sent to external problems, such as warranty: · Evaporator doors, door springs, and/or frames. · Inner door panels, door shelves, door rails, and/or door supports. · Light bulbs and/or plastic housing. · Plastic cabinet liners. · Punctured evaporator that are solely responsible for any structure and setting for other...
Parts and Accessories
Page 2
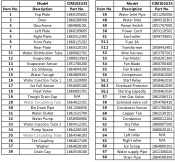
... 62 63 64 65 66 67 68 Model Description WaterInletPipe WaterInlet PowerSwitch PowerCord Controller Fuse3A Transformer Wireharness FanMotor FanBlade FanBraket Compressor StartRelay OverloadProtector StartingCapacity HotGasValve Solenoidvalvecoil CondensorSensor CopperTee Condensor DryFilter Feet Leftroller Rightroller IceScoop WatersupplyPipe DrainPipe CIM102U3S Part No. 1811206006 1864526301 1851767000 1853110502 1849739601...
... 62 63 64 65 66 67 68 Model Description WaterInletPipe WaterInlet PowerSwitch PowerCord Controller Fuse3A Transformer Wireharness FanMotor FanBlade FanBraket Compressor StartRelay OverloadProtector StartingCapacity HotGasValve Solenoidvalvecoil CondensorSensor CopperTee Condensor DryFilter Feet Leftroller Rightroller IceScoop WatersupplyPipe DrainPipe CIM102U3S Part No. 1811206006 1864526301 1851767000 1853110502 1849739601...
