User Guide
Page 2
...! All rights reserved. Congratulations Thank you for service sold . Your Audiovox Xpress XM® receiver must be used with access to change. XM® is America's #1 Satellite Radio provider with the XM Welcome Kit and available at retailers where Audiovox main units are the property of XM® Satellite Radio. All other fees and taxes may apply, including a one step...
...! All rights reserved. Congratulations Thank you for service sold . Your Audiovox Xpress XM® receiver must be used with access to change. XM® is America's #1 Satellite Radio provider with the XM Welcome Kit and available at retailers where Audiovox main units are the property of XM® Satellite Radio. All other fees and taxes may apply, including a one step...
User Guide
Page 4
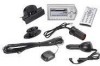
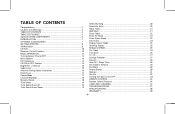
...OF CONTENTS Congratulations 2 Cautions and Warnings 3 TABLE OF CONTENTS 4 TABLE OF FIGURES 5 Xpress SYSTEM COMPONENTS 6 INTRODUCTION 7 OPTIONAL ACCESSORIES 7 GETTING STARTED 8 XM Activation 8 Controls 10 Receiver Control Features 10 BASIC OPERATION 12 Turning Xpress ON and OFF 12 Menu Options 13 FM Frequency 14 FM ON or OFF Feature 14... Timer 28 Set Factory Defaults 29 Exit Menu 30 Search Button 30 Memory 31 Pre./Dir 32 Turning The Xpress Unit OFF 33 REMOTE CONTROL 34 Remote Control Features 34 CARE AND CLEANING 37 TROUBLESHOOTING 37 SPECIFICATIONS 38 WARRANTY 39 -4-
...OF CONTENTS Congratulations 2 Cautions and Warnings 3 TABLE OF CONTENTS 4 TABLE OF FIGURES 5 Xpress SYSTEM COMPONENTS 6 INTRODUCTION 7 OPTIONAL ACCESSORIES 7 GETTING STARTED 8 XM Activation 8 Controls 10 Receiver Control Features 10 BASIC OPERATION 12 Turning Xpress ON and OFF 12 Menu Options 13 FM Frequency 14 FM ON or OFF Feature 14... Timer 28 Set Factory Defaults 29 Exit Menu 30 Search Button 30 Memory 31 Pre./Dir 32 Turning The Xpress Unit OFF 33 REMOTE CONTROL 34 Remote Control Features 34 CARE AND CLEANING 37 TROUBLESHOOTING 37 SPECIFICATIONS 38 WARRANTY 39 -4-
User Guide
Page 5
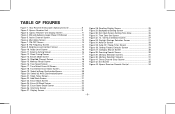
...Screen 29 Figure 37. Memory Selection Screens 31 Figure 41. Direct Channel Entry Screen 32 Figure 42. Your Receiver 8-Character Alphanumeric ID 8 Figure 2. Xpress Receiver Unit Display Screen 11 Figure 4. Audio Level Screen 16 Figure 11. Direct Tuning Screen 17 Figure 13. ...XM and Audiovox Logos Power ON Screen 12 Figure 5. Scrolling Display Screen 25 Figure 29. Background Setting Screen 25 Figure 30. Active Channel Screen 12 Figure 6. Skip/Add Channel Screen 18 Figure 15. Display Screen 24 Figure 28. Set Clock Screen Setting Time Zone 26 Figure 31. Xpress Receiver...
...Screen 29 Figure 37. Memory Selection Screens 31 Figure 41. Direct Channel Entry Screen 32 Figure 42. Your Receiver 8-Character Alphanumeric ID 8 Figure 2. Xpress Receiver Unit Display Screen 11 Figure 4. Audio Level Screen 16 Figure 11. Direct Tuning Screen 17 Figure 13. ...XM and Audiovox Logos Power ON Screen 12 Figure 5. Scrolling Display Screen 25 Figure 29. Background Setting Screen 25 Figure 30. Active Channel Screen 12 Figure 6. Skip/Add Channel Screen 18 Figure 15. Display Screen 24 Figure 28. Set Clock Screen Setting Time Zone 26 Figure 31. Xpress Receiver...

User Guide
Page 7
... tunnels. For home use, situate the Xpress XM7 unit close to your stereo receiving equipment. -7- The Xpress XM7 unit recognizes and decodes the incoming XM program information and provides an audio signal to your radio or other audio output equipment. INTRODUCTION The Audiovox Xpress XM7 unit processes the XM satellite signals received by the externally mounted antenna (purchased separately...
... tunnels. For home use, situate the Xpress XM7 unit close to your stereo receiving equipment. -7- The Xpress XM7 unit recognizes and decodes the incoming XM program information and provides an audio signal to your radio or other audio output equipment. INTRODUCTION The Audiovox Xpress XM7 unit processes the XM satellite signals received by the externally mounted antenna (purchased separately...
User Guide
Page 8
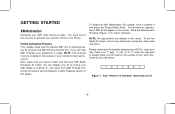
...Radio to channel '0', one of this mode. Please check your tuner box. NOTE: No adjustments are allowed in this guide.) To obtain the XM7 identification (ID) number, tune to activate your equipment is working properly by Phone. If you have one down from XM7 Preview (For tuning instructions see the Receiver...ID code carefully. Your Receiver 8-character alphanumeric ID -8- GETTING STARTED XM Activation Activating your vehicle for future reference. You have a credit card and your XM7 Radio Hardware ID handy. There is easy. Next, make sure the Xpress XM7 unit is ready...
...Radio to channel '0', one of this mode. Please check your tuner box. NOTE: No adjustments are allowed in this guide.) To obtain the XM7 identification (ID) number, tune to activate your equipment is working properly by Phone. If you have one down from XM7 Preview (For tuning instructions see the Receiver...ID code carefully. Your Receiver 8-character alphanumeric ID -8- GETTING STARTED XM Activation Activating your vehicle for future reference. You have a credit card and your XM7 Radio Hardware ID handy. There is easy. Next, make sure the Xpress XM7 unit is ready...
User Guide
Page 9
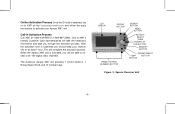
....xmradio.com and follow the easy instructions to access over 150 digital radio channels. Xpress Receiver Unit -9- The Audiovox Xpress XM7 unit provides 7 control buttons, 1 Rotary/Select Knob and 10 number keys. After the activation form is activated, you should keep your Xpress XM7 unit. Call-in Activation Process Call XM7 at 1-800-XM RADIO (1-800-967-2346).
....xmradio.com and follow the easy instructions to access over 150 digital radio channels. Xpress Receiver Unit -9- The Audiovox Xpress XM7 unit provides 7 control buttons, 1 Rotary/Select Knob and 10 number keys. After the activation form is activated, you should keep your Xpress XM7 unit. Call-in Activation Process Call XM7 at 1-800-XM RADIO (1-800-967-2346).
User Guide
Page 10
... UP and DOWN buttons to highlight the desired function and then press the Rotary/Select Knob or press the (XM) Select Button on the LCD screen. The current selection from the Xpress XM7 unit. This button is used to access "Menu Options" which allows the user to enter the selection....button allows the user to capture and store the current program data information (Artist & Song Title). Menu Button - The MENU button is also the Xpress XM7 unit's receiver eye (IR). This knob has a dual purpose. When the knob is highlighted, press the Rotary/Select Knob to make a selection. When the ...
... UP and DOWN buttons to highlight the desired function and then press the Rotary/Select Knob or press the (XM) Select Button on the LCD screen. The current selection from the Xpress XM7 unit. This button is used to access "Menu Options" which allows the user to enter the selection....button allows the user to capture and store the current program data information (Artist & Song Title). Menu Button - The MENU button is also the Xpress XM7 unit's receiver eye (IR). This knob has a dual purpose. When the knob is highlighted, press the Rotary/Select Knob to make a selection. When the ...
User Guide
Page 11
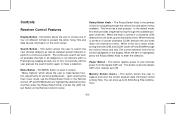
....) - Keypad Buttons 0-9 - Time Momentary Preset Indicator Signal (Stays on for 2-seconds) Strength Channel Number Artist Song Title Channel Name Stock, Sports, and More Info Figure 3. Xpress Receiver Unit Display Screen -11- When in any of the three preset banks, momentarily pressing any of Channel presets (10 presets each A, B, and C) plus Direct channel...
....) - Keypad Buttons 0-9 - Time Momentary Preset Indicator Signal (Stays on for 2-seconds) Strength Channel Number Artist Song Title Channel Name Stock, Sports, and More Info Figure 3. Xpress Receiver Unit Display Screen -11- When in any of the three preset banks, momentarily pressing any of Channel presets (10 presets each A, B, and C) plus Direct channel...
User Guide
Page 14
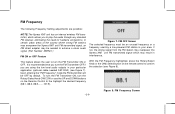
It is recommended that you turn the FM Transmitter OFF if you are possible: NOTE:The Xpress XM7 unit has an internal wireless FM transmitter, which may result in interference. If not, the strong signal from the FM station may be OFF ... the FM Transmitter ON or OFF. With the FM Frequency highlighted, press the Rotary/Select Knob or the (XM) Select button on the Remote Control to play the audio through any standard FM receiver, eliminating the need for hardwire connections. In certain urban areas of the country where strong FM stations may...
It is recommended that you turn the FM Transmitter OFF if you are possible: NOTE:The Xpress XM7 unit has an internal wireless FM transmitter, which may result in interference. If not, the strong signal from the FM station may be OFF ... the FM Transmitter ON or OFF. With the FM Frequency highlighted, press the Rotary/Select Knob or the (XM) Select button on the Remote Control to play the audio through any standard FM receiver, eliminating the need for hardwire connections. In certain urban areas of the country where strong FM stations may...
User Guide
Page 15
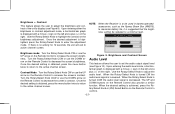
... the audio level mode, a horizontal bar graph is achieved, press the Rotary/Select Knob or (XM) Select Button on the Remote Control to increase the screen's contrast. Use the Rotary/Select Knob ... If there is suggested that the brightness setting be used in battery-operated accessories, such as the Xpress Boom Box (XMB10), to maximize battery life, it is no activity for 12 seconds, the unit will... exit to confirm. -15- NOTE: When the Receiver is to be reduced to decrease the screen's contrast. When the Rotary/Select Knob is turned CCW ...
... the audio level mode, a horizontal bar graph is achieved, press the Rotary/Select Knob or (XM) Select Button on the Remote Control to increase the screen's contrast. Use the Rotary/Select Knob ... If there is suggested that the brightness setting be used in battery-operated accessories, such as the Xpress Boom Box (XMB10), to maximize battery life, it is no activity for 12 seconds, the unit will... exit to confirm. -15- NOTE: When the Receiver is to be reduced to decrease the screen's contrast. When the Rotary/Select Knob is turned CCW ...

User Guide
Page 34
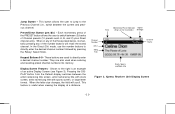
For optimal operation of the remote control, always aim it toward the Remote Sensor on the Xpress XM7 unit. Each button on the remote control functions in this manual. Figure 43. For a full description of a keypad button and function refer to the preceding sections in the same way as the button on the front panel of the features from a remote location. Xpress Receiver Remote Control REMOTE CONTROL Remote Control Features The wireless remote control supplied with the Xpress XM7 unit is capable of operating most of the main unit. (-) Button (+) Button -34-
For optimal operation of the remote control, always aim it toward the Remote Sensor on the Xpress XM7 unit. Each button on the remote control functions in this manual. Figure 43. For a full description of a keypad button and function refer to the preceding sections in the same way as the button on the front panel of the features from a remote location. Xpress Receiver Remote Control REMOTE CONTROL Remote Control Features The wireless remote control supplied with the Xpress XM7 unit is capable of operating most of the main unit. (-) Button (+) Button -34-
User Guide
Page 38
SPECIFICATIONS Audio Output AUX (Audio) Input Power Supply: Antenna Dimensions 3.5mm Diameter Min-Stereo Jack 3.5mm Diameter Min-Stereo Jack 5 Volt, 2 Amp Maximum, Negative Ground, DC Input. CAUTION: Use only the Audiovox approved adapter specified in the kit for the Xpress XM7 Satellite Radio Receiver, or the unit could be severely damaged. 1 RF SMB Connector H X W X D 2.44 Inches X 4.44 Inches X 1.22 Inches (62.0mm) X (112.7mm) X (31.0mm) -38-
SPECIFICATIONS Audio Output AUX (Audio) Input Power Supply: Antenna Dimensions 3.5mm Diameter Min-Stereo Jack 3.5mm Diameter Min-Stereo Jack 5 Volt, 2 Amp Maximum, Negative Ground, DC Input. CAUTION: Use only the Audiovox approved adapter specified in the kit for the Xpress XM7 Satellite Radio Receiver, or the unit could be severely damaged. 1 RF SMB Connector H X W X D 2.44 Inches X 4.44 Inches X 1.22 Inches (62.0mm) X (112.7mm) X (31.0mm) -38-
