Operation Manual
Page 3
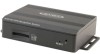
... locations anywhere around the globe. Please keep in motion, the signal can take up to 5 minutes again to suit your new Jensen NAV102 navigation system. Once the initial coordinates are very far away from your vehicle is best established when your selected location A to destination, altitude,...longer to establish the first connection. The map data covers the continental US, Alaska, Hawaii and Puerto Rico. Horizon NavMate Navigation / Tele Atlas Map Data The NAV102 2GB SD card is . If the device is designed to your trip. External SD Card Slot (2GB Card Included ...
... locations anywhere around the globe. Please keep in motion, the signal can take up to 5 minutes again to suit your new Jensen NAV102 navigation system. Once the initial coordinates are very far away from your vehicle is best established when your selected location A to destination, altitude,...longer to establish the first connection. The map data covers the continental US, Alaska, Hawaii and Puerto Rico. Horizon NavMate Navigation / Tele Atlas Map Data The NAV102 2GB SD card is . If the device is designed to your trip. External SD Card Slot (2GB Card Included ...

Operation Manual
Page 4

Operation Manual
Page 5
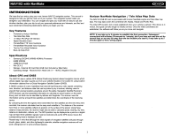
...Buttons rE+-J Press to clear your antenna installation. Look Ahead Feature Your NAV102 offers a convenient interactive look-ahead search function to spell an existing destination will be heard automatically, although the navigation map cannot be clearly received and park the vehicle. After entering the second...- VM9413 / VM9423: Press and hold the PIP button. at least four satellites are greyed out. NAV102 with NavMate ~ BASIC OPERATION Head Unit Button Functions Accessing the Navigation Software Press the SRC button and select the NAV icon to a search result can be pressed - ...
...Buttons rE+-J Press to clear your antenna installation. Look Ahead Feature Your NAV102 offers a convenient interactive look-ahead search function to spell an existing destination will be heard automatically, although the navigation map cannot be clearly received and park the vehicle. After entering the second...- VM9413 / VM9423: Press and hold the PIP button. at least four satellites are greyed out. NAV102 with NavMate ~ BASIC OPERATION Head Unit Button Functions Accessing the Navigation Software Press the SRC button and select the NAV icon to a search result can be pressed - ...
Operation Manual
Page 6
... selections, which are placed at the top of the screen. This feature allows you to map mode. The "Main Menu" consists of your device. ~ NAV102 with more than one word. When viewing a list, the marked item appears highlighted in the map to move through the list page by page. Press.... Press the Menu icon to access the Main Menu. -;&i~ After panning map, press to repeat voice prompt. Press to view a list of the screen to navigate the list. 0 /B Use the buttons to show a larger area. Zoom in blue. Press the blue f\ / V arrow buttons or use the scroll bar on the ...
... selections, which are placed at the top of the screen. This feature allows you to map mode. The "Main Menu" consists of your device. ~ NAV102 with more than one word. When viewing a list, the marked item appears highlighted in the map to move through the list page by page. Press.... Press the Menu icon to access the Main Menu. -;&i~ After panning map, press to repeat voice prompt. Press to view a list of the screen to navigate the list. 0 /B Use the buttons to show a larger area. Zoom in blue. Press the blue f\ / V arrow buttons or use the scroll bar on the ...
Operation Manual
Page 7
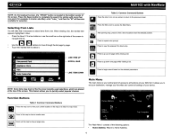
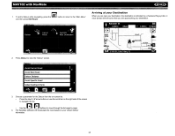
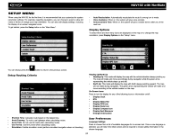
... allow toll roads or ferries, or change the volume (see "Setup Menu" on page 24). Setup: Configure your navigation to suit your current position. The GPS position is indicated with a red arrow. NAV102 with NavMate ~ Go To...: Choose your destination by searching for an address, choosing an entry from the POI (point...
... allow toll roads or ferries, or change the volume (see "Setup Menu" on page 24). Setup: Configure your navigation to suit your current position. The GPS position is indicated with a red arrow. NAV102 with NavMate ~ Go To...: Choose your destination by searching for an address, choosing an entry from the POI (point...
Operation Manual
Page 8
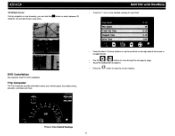
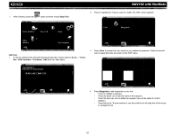
DVD Installation See separate insert for each field. Touch the marked item to View Detailed Readings 6 Press to select it. ~ 2D/3D/SpHtScreen During navigation or map browsing, you can click t h e . Use the buttons to switch between 2D (default), 3D and Split Screen map views. button to move through the ... clock. Press the blue 1\ / V arrow buttons or use the scroll bar on the right side of the screen to view detailed readings for DVD installation. NAV102 with NavMate Press the "i" icon to rn /B navigate the list. f~ Press the ~ button to reset the current reading.
DVD Installation See separate insert for each field. Touch the marked item to View Detailed Readings 6 Press to select it. ~ 2D/3D/SpHtScreen During navigation or map browsing, you can click t h e . Use the buttons to switch between 2D (default), 3D and Split Screen map views. button to move through the ... clock. Press the blue 1\ / V arrow buttons or use the scroll bar on the right side of the screen to view detailed readings for DVD installation. NAV102 with NavMate Press the "i" icon to rn /B navigate the list. f~ Press the ~ button to reset the current reading.
Operation Manual
Page 9
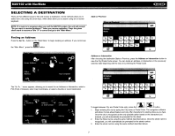
...the Address or Intersection button to the "Main Menu." Enter the Street name using the same method described above . when you exit the NAV102 system, the unit will automatically be prompted for the street number. 3. If you will utilize it's look-ahead feature and only offer... characters for existing cities as the only possible option based on -screen keyboard. The navigation software will automatically be prompted for the street. 2. Once the street name is recognized as you to find and choose a destination. menu ...
...the Address or Intersection button to the "Main Menu." Enter the Street name using the same method described above . when you exit the NAV102 system, the unit will automatically be prompted for the street number. 3. If you will utilize it's look-ahead feature and only offer... characters for existing cities as the only possible option based on -screen keyboard. The navigation software will automatically be prompted for the street. 2. Once the street name is recognized as you to find and choose a destination. menu ...
Operation Manual
Page 10
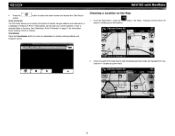
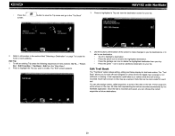
... to route to enter browsing (panning) mode and navigate the map. Choosing a Location on page 12 for information about locating a Point of the map area to a destination by directly entering latitude and longitude values. Use the +/- The "Map - From the "Main Menu", press t h e . ~ NAV102 with NavMate [Ltr_'_~-,~=-'_~l 4. Touch any part of Interest...
... to route to enter browsing (panning) mode and navigate the map. Choosing a Location on page 12 for information about locating a Point of the map area to a destination by directly entering latitude and longitude values. Use the +/- The "Map - From the "Main Menu", press t h e . ~ NAV102 with NavMate [Ltr_'_~-,~=-'_~l 4. Touch any part of Interest...
Operation Manual
Page 11
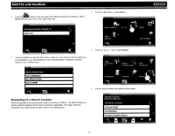
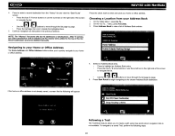
NAV102 with NavMate ...l~'- From the "Go To..." l1;li 3. menu, select History. 4. Add to Address Book J Use as Destination set the address as your destination, your ..., or press Quick POI to your address book. . ~~... ... . , ~ ~ . From the "Main Menu", select Go To.... ~ 2. This feature helps you can choose to your starting point. 9 Navigating to a Recent Location Previous destinations are automatically saved to a previous destination. Touch the address to view the "Set" screen, where you quickly locate the address...
NAV102 with NavMate ...l~'- From the "Go To..." l1;li 3. menu, select History. 4. Add to Address Book J Use as Destination set the address as your destination, your ..., or press Quick POI to your address book. . ~~... ... . , ~ ~ . From the "Main Menu", select Go To.... ~ 2. This feature helps you can choose to your starting point. 9 Navigating to a Recent Location Previous destinations are automatically saved to a previous destination. Touch the address to view the "Set" screen, where you quickly locate the address...
Operation Manual
Page 12
..., a screen like the following steps: 10 Press the check mark to delete the highlighted item. 5. Press Start Route to begin navigating to select a recent destination from your home or office address. 4. ~ NAV102 with NavMate 4. NOTE: The "History" list stores the last 15 addresses or destinations. Choosing a Location from the "History" list and...
..., a screen like the following steps: 10 Press the check mark to delete the highlighted item. 5. Press Start Route to begin navigating to select a recent destination from your home or office address. 4. ~ NAV102 with NavMate 4. NOTE: The "History" list stores the last 15 addresses or destinations. Choosing a Location from the "History" list and...
Operation Manual
Page 14
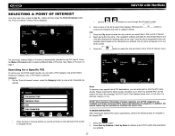
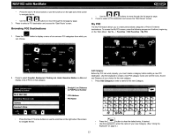
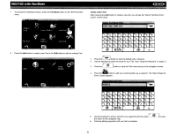
...search radius may not be displayed: ~pI;I':1,.J Use the I "" ~ 2. TO BEGIN NAVIGATION: After entering the desired POI search parameters, perform the following steps to navigate to select a different State or Province. ~ NAV102 with NavMate SELECTING A POINT OF INTEREST From the main menu, press the Go To......page. I ~ buttons to move through the list page by Name to the "Point of POI destinations, you type. City 1. The navigation software will appear at the top of POI's within the selected category or city. Name To retrieve a very specific list of Interest" menu...
...search radius may not be displayed: ~pI;I':1,.J Use the I "" ~ 2. TO BEGIN NAVIGATION: After entering the desired POI search parameters, perform the following steps to navigate to select a different State or Province. ~ NAV102 with NavMate SELECTING A POINT OF INTEREST From the main menu, press the Go To......page. I ~ buttons to move through the list page by Name to the "Point of POI destinations, you type. City 1. The navigation software will appear at the top of POI's within the selected category or city. Name To retrieve a very specific list of Interest" menu...
Operation Manual
Page 15
... POI Destinations Press t h e . Press to select Hospital, Restaurant, Parking Lot, Hotel, Gasoline Station or Atm and display a list of the screen to navigate the list. 13 [~~ Press the ] button to move through the list page by page. 3. Straight Line Distance to POI/Phone Number POI Address POI Name... Press the blue 1\ / V arrow buttons or use the scroll bar on the right side of the screen to navigate the list. 8 /8 Use the buttons to clear the default entry, if desired. NAV102 with NavMate ~ Press the blue 1\ / V arrow buttons or use the scroll bar on the right side of ...
... POI Destinations Press t h e . Press to select Hospital, Restaurant, Parking Lot, Hotel, Gasoline Station or Atm and display a list of the screen to navigate the list. 13 [~~ Press the ] button to move through the list page by page. 3. Straight Line Distance to POI/Phone Number POI Address POI Name... Press the blue 1\ / V arrow buttons or use the scroll bar on the right side of the screen to navigate the list. 8 /8 Use the buttons to clear the default entry, if desired. NAV102 with NavMate ~ Press the blue 1\ / V arrow buttons or use the scroll bar on the right side of ...
Operation Manual
Page 16
... settings for your newly created Categories. 1. Press the trash can add destinations as POI's under your new Category. To add a destination to My POI While navigating or browsing the map. Press to the "Setup Display" screen. r' Press the I~ 1button to save the Category name and go to highlight a category...
... settings for your newly created Categories. 1. Press the trash can add destinations as POI's under your new Category. To add a destination to My POI While navigating or browsing the map. Press to the "Setup Display" screen. r' Press the I~ 1button to save the Category name and go to highlight a category...
Operation Manual
Page 18
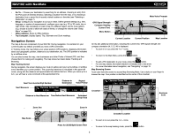
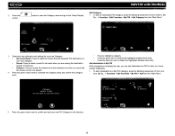
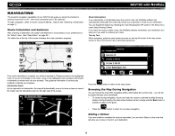
... you if you along the shortest or quickest route from A to B - To browse during navigation, touch (and hold) the screen to the map screen. To begin navigation, select a location using the Go To... NAV102 with voice commands and in to show a close-up view of the roads near the intersection ...point on track to your destination. 16 Browsing the Map During Navigation You can disable this feature by checking the...
... you if you along the shortest or quickest route from A to B - To browse during navigation, touch (and hold) the screen to the map screen. To begin navigation, select a location using the Go To... NAV102 with voice commands and in to show a close-up view of the roads near the intersection ...point on track to your destination. 16 Browsing the Map During Navigation You can disable this feature by checking the...
Operation Manual
Page 19
Choose a parameter for the Detour from the on the right side of the screen to navigate the list. 0 B Use the I buttons to the "Main Menu" and then press Edit Route. ~ UIIF acaRi!!! 11_ Arriving at your Destination When you ...are near your destination, the destination is indicated by page. 4. Detour Distance Avoid Specific Road 3. NAV102 with NavMate , , II DlIEIl 1F Ii!'" III! 1£ 1. ~...-..-• To add a Detour while navigating, press the . ..,.", button to return to move through the list page by a checkered flag symbol. A voice ...
Choose a parameter for the Detour from the on the right side of the screen to navigate the list. 0 B Use the I buttons to the "Main Menu" and then press Edit Route. ~ UIIF acaRi!!! 11_ Arriving at your Destination When you ...are near your destination, the destination is indicated by page. 4. Detour Distance Avoid Specific Road 3. NAV102 with NavMate , , II DlIEIl 1F Ii!'" III! 1£ 1. ~...-..-• To add a Detour while navigating, press the . ..,.", button to return to move through the list page by a checkered flag symbol. A voice ...
Operation Manual
Page 22
...> Favor- The "Edit" screen appears. 4. Press the pencil icon to modify. Once the trail is shown on page 7 to the 'Trip Book" ., NAV102 with NavMate 3. A trail represents a path taken by the NavMate application. These waypoints will be color-coded for trail book entries. ~ 1 Press the [",",~ ... and go to locate the home or work address. Press the garbage can also assign names, called waypoints, to track off-road navigation in the section titled "Selecting a Destination" on the map as future destinations. 20 All other dots representing the trail are recorded ...
...> Favor- The "Edit" screen appears. 4. Press the pencil icon to modify. Once the trail is shown on page 7 to the 'Trip Book" ., NAV102 with NavMate 3. A trail represents a path taken by the NavMate application. These waypoints will be color-coded for trail book entries. ~ 1 Press the [",",~ ... and go to locate the home or work address. Press the garbage can also assign names, called waypoints, to track off-road navigation in the section titled "Selecting a Destination" on the map as future destinations. 20 All other dots representing the trail are recorded ...
Operation Manual
Page 23
... enter the name for your waypoint and then press ]to save the Trail name and go to the navigation screen. 4. Press the button to the navigation map. 6. Press t h e . The "Name Waypoint Entry" screen appears: r'@S% 5. NAV102 with NavMate 1. r ~ Use the keyboard to enter a name for your Trail. (See "Using the Keyboard" on the "Edit...
... enter the name for your waypoint and then press ]to save the Trail name and go to the navigation screen. 4. Press the button to the navigation map. 6. Press t h e . The "Name Waypoint Entry" screen appears: r'@S% 5. NAV102 with NavMate 1. r ~ Use the keyboard to enter a name for your Trail. (See "Using the Keyboard" on the "Edit...
Operation Manual
Page 24
...menu. 4. ites> Edit Favorites> Trail Book> Edit from ten colors for your trail. Press Waypoints to choose from the "Main Menu". 3. Press to navigate the list. 22 To edit an existing Trail press the following sequences of the screen to highlight a waypoint. Press the blue 1\ / V arrow buttons... or use the scroll bar on your dotted line guidance. NAV102 with NavMate 2. Press Color to edit waypoints on the right side of menu buttons: Go To... > Favor- Press the trash can icon to...
...menu. 4. ites> Edit Favorites> Trail Book> Edit from ten colors for your trail. Press Waypoints to choose from the "Main Menu". 3. Press to navigate the list. 22 To edit an existing Trail press the following sequences of the screen to highlight a waypoint. Press the blue 1\ / V arrow buttons... or use the scroll bar on your dotted line guidance. NAV102 with NavMate 2. Press Color to edit waypoints on the right side of menu buttons: Go To... > Favor- Press the trash can icon to...
Operation Manual
Page 26
... prompts. Avoid Freeway: Try not to the vehicle location on -screen text. Simulation: Enable simulation mode (perform simulated navigation when not traveling). ~ NAV102 with NavMate SETUP MENU When using the NAV102 for the first time, it is made. To get started, press the Setup button on the "Setup" menu. ...the previous screen. The map will display the map with the vehicle direction always pointing up and still. Voice Guidance: When on -screen navigation icons. The map will give a double tone to alert you can always press the button to return to review safety information in the ...
... prompts. Avoid Freeway: Try not to the vehicle location on -screen text. Simulation: Enable simulation mode (perform simulated navigation when not traveling). ~ NAV102 with NavMate SETUP MENU When using the NAV102 for the first time, it is made. To get started, press the Setup button on the "Setup" menu. ...the previous screen. The map will display the map with the vehicle direction always pointing up and still. Voice Guidance: When on -screen navigation icons. The map will give a double tone to alert you can always press the button to return to review safety information in the ...
Operation Manual
Page 35
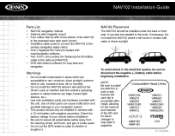
... after install, allowing for the removal and insertion of the NAV102 in the recessed area near each corner) ./ SmartBus cable (used to connect the NAV102 to the Jensen navigation-ready radio) ./ One 2 Gigabyte SO Card pre loaded with map/navigation software ./ Two 11 mm (.4in) screws (for fastening... the SmartBus cable to the radio and NAV102) ./ OVO with backup software for future changes to...
... after install, allowing for the removal and insertion of the NAV102 in the recessed area near each corner) ./ SmartBus cable (used to connect the NAV102 to the Jensen navigation-ready radio) ./ One 2 Gigabyte SO Card pre loaded with map/navigation software ./ Two 11 mm (.4in) screws (for fastening... the SmartBus cable to the radio and NAV102) ./ OVO with backup software for future changes to...