
Owners Manual
Page 4
..., the GMR-GPS makes use of signals called "pseudoranging". Built-In Hands-Free VOX Capability - A GPS receiver uses signals from each one using a technique called "C/A" (coarse/acquisition) and "P" (precision). The accuracy of a displayed position varies with all other type Rechargeable Batteries (Not Included) - It can only be used by military GPS receivers. Provides 5 Tracks - Requires...
..., the GMR-GPS makes use of signals called "pseudoranging". Built-In Hands-Free VOX Capability - A GPS receiver uses signals from each one using a technique called "C/A" (coarse/acquisition) and "P" (precision). The accuracy of a displayed position varies with all other type Rechargeable Batteries (Not Included) - It can only be used by military GPS receivers. Provides 5 Tracks - Requires...
Owners Manual
Page 5
... end point of each route. • TRACKS: Provides an automatic track log using the C/A signals should be accurate to understand that such variations are inherent in GPS and do not indicate a fault in the receiver. THE GMR-GPS UNIT The Audiovox GMR-GPS provides you to return to other GMR-GPS users. 5 The GMR-GPS incorporates the following features and capabilities: •...
... end point of each route. • TRACKS: Provides an automatic track log using the C/A signals should be accurate to understand that such variations are inherent in GPS and do not indicate a fault in the receiver. THE GMR-GPS UNIT The Audiovox GMR-GPS provides you to return to other GMR-GPS users. 5 The GMR-GPS incorporates the following features and capabilities: •...

Owners Manual
Page 7
... to indicate the Priority Channel Scan mode has been activated. During GMRS operation, this button is activated. This icon appears during GMRS operation to indicate the VOX mode is also used to another unit during tracking/GO TO operation. 15. Page Button (PAGE): Scrolls sequentially through...Monitor (MON) Button: Provides a means of a received radio signal. This icon appears during GMRS/GPS operation when an audio or location radio signal is placed in -unit charging of main GPS displays. 10. Belt Clip Attachment Stud: Allows unit to be attached to four AA batteries when...
... to indicate the Priority Channel Scan mode has been activated. During GMRS operation, this button is activated. This icon appears during GMRS operation to indicate the VOX mode is also used to another unit during tracking/GO TO operation. 15. Page Button (PAGE): Scrolls sequentially through...Monitor (MON) Button: Provides a means of a received radio signal. This icon appears during GMRS/GPS operation when an audio or location radio signal is placed in -unit charging of main GPS displays. 10. Belt Clip Attachment Stud: Allows unit to be attached to four AA batteries when...
Owners Manual
Page 10
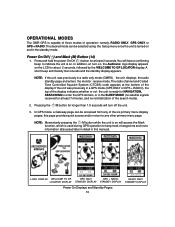
... later in detail in this manual). this page provides quick access and/or return to keep track of the search mode). 2. NOTE: Momentarily pressing the /M button while the unit is on...GPS mode (GPS ONLY or GPS + RADIO), the top of the six primary menu display pages; The radio channel and Coded Tone Controlled Squelch System (CTCSS) code appears at least 2 seconds.You will turn -on, the Audiovox... about 2 seconds, followed by the WELCOME TO GP LOCATOR display. Pressing the /M button for at the bottom of operation; OPERATIONAL MODES The GMR-GPS is turned on and in the standby mode. ...
... later in detail in this manual). this page provides quick access and/or return to keep track of the search mode). 2. NOTE: Momentarily pressing the /M button while the unit is on...GPS mode (GPS ONLY or GPS + RADIO), the top of the six primary menu display pages; The radio channel and Coded Tone Controlled Squelch System (CTCSS) code appears at least 2 seconds.You will turn -on, the Audiovox... about 2 seconds, followed by the WELCOME TO GP LOCATOR display. Pressing the /M button for at the bottom of operation; OPERATIONAL MODES The GMR-GPS is turned on and in the standby mode. ...

Owners Manual
Page 27
...5. Present Position (Longitude and Latitude) b. Speed of waypoints (specific geographic or man-made objects) that can also be highlighted using the GPS MENU page and highlighting the WAYPOINTS field. 5. Distance (DST) traveled to adjust the map scale for you are headed in user-selected.... 3. MAP VIEW - Two information bars at the given coordinates with user (your) ID, to a remote user GMR-GPS unit tuned to guide your destination and leave a trail, or track log. When SAVE is used between 0 and 100%. 4. Heading (HDG) e. In addition, the saved waypoint coordinates...
...5. Present Position (Longitude and Latitude) b. Speed of waypoints (specific geographic or man-made objects) that can also be highlighted using the GPS MENU page and highlighting the WAYPOINTS field. 5. Distance (DST) traveled to adjust the map scale for you are headed in user-selected.... 3. MAP VIEW - Two information bars at the given coordinates with user (your) ID, to a remote user GMR-GPS unit tuned to guide your destination and leave a trail, or track log. When SAVE is used between 0 and 100%. 4. Heading (HDG) e. In addition, the saved waypoint coordinates...

Owners Manual
Page 28
...and the time it is accessed from waypoint C to get there. This enables you the name of your intended track, or with respect to store a particular trip in the GPS TRACKS function. The pointer page displays the following information: 1. A Compass Rose with no particular endpoint or target destination...highlighted, press Enter to turn the display symbols ON or OFF. STOP NAV? The POINTER Page When you are going in the GPS waypoint, track and GP locator modes. When this item is available during navigation trackback and go directly from the ROUTES menu during the trip. and SKIP ...
...and the time it is accessed from waypoint C to get there. This enables you the name of your intended track, or with respect to store a particular trip in the GPS TRACKS function. The pointer page displays the following information: 1. A Compass Rose with no particular endpoint or target destination...highlighted, press Enter to turn the display symbols ON or OFF. STOP NAV? The POINTER Page When you are going in the GPS waypoint, track and GP locator modes. When this item is available during navigation trackback and go directly from the ROUTES menu during the trip. and SKIP ...

Owners Manual
Page 30
When this screen, and provides several options related to your intended track, or with respect to your chosen destination. INITIALIZE? - STOP NAV? The GPS MENU Page The GPS MENU page provides you to initialize the unit so it can be highlighted using the unit, this option, when ... relocated more than 600 miles since last using the Up/Down wheel key; NOTE: Two additional options -- WAYPOINTS FIELD ROUTES FIELD TRACKS FIELD GP LOCATOR FIELD GPS Menu Page 1. Waypoints are specific geographical or man-made objects along the route you are reset. AHEAD/NORTHWARD? - The graphic ...
When this screen, and provides several options related to your intended track, or with respect to your chosen destination. INITIALIZE? - STOP NAV? The GPS MENU Page The GPS MENU page provides you to initialize the unit so it can be highlighted using the unit, this option, when ... relocated more than 600 miles since last using the Up/Down wheel key; NOTE: Two additional options -- WAYPOINTS FIELD ROUTES FIELD TRACKS FIELD GP LOCATOR FIELD GPS Menu Page 1. Waypoints are specific geographical or man-made objects along the route you are reset. AHEAD/NORTHWARD? - The graphic ...

Owners Manual
Page 33
... the ROUTE page again. PRESS PAGE TO RETURN TO ROUTES PAGE Using and Editing the Routes on the GPS MENU page and press Enter. Whenever a change is made a change and if you want to save the... Toggle the Up/Down wheel key to highlight the next (02) route; To the right of the GPS MENU page or, if you return from your trip. This process can be used later when you wish ...to edit a second route, press the Up/Down wheel key to highlight the TRACKS field on Your Trip d. TRACKS - The TRACKS field can be repeated until all the desired waypoints are only generated when the unit is...
... the ROUTE page again. PRESS PAGE TO RETURN TO ROUTES PAGE Using and Editing the Routes on the GPS MENU page and press Enter. Whenever a change is made a change and if you want to save the... Toggle the Up/Down wheel key to highlight the next (02) route; To the right of the GPS MENU page or, if you return from your trip. This process can be used later when you wish ...to edit a second route, press the Up/Down wheel key to highlight the TRACKS field on Your Trip d. TRACKS - The TRACKS field can be repeated until all the desired waypoints are only generated when the unit is...

Owners Manual
Page 34
... loaded. a menu will appear with the first track position highlighted. The TO END option is highlighted at the top of the screen indicates the percent of the track. THEN PRESS ENTER. This pictorial representation of the GPS MENU highlighted, press Enter; To do this, press... Enter; With the TRACKS field of the track does not contain any data coordinates related to the track log. 34 PRESS PAGE TO RETURN TO TRACKS PAGE Using and Editing the Tracks on the map page....
... loaded. a menu will appear with the first track position highlighted. The TO END option is highlighted at the top of the screen indicates the percent of the track. THEN PRESS ENTER. This pictorial representation of the GPS MENU highlighted, press Enter; To do this, press... Enter; With the TRACKS field of the track does not contain any data coordinates related to the track log. 34 PRESS PAGE TO RETURN TO TRACKS PAGE Using and Editing the Tracks on the map page....

Owners Manual
Page 38
... g. to access the WAYPOINT page. 3. Your immediate location is ready to navigate (satellites acquired), walk at a leisurely pace in the same manner as a track. Now take a short trip. 1. On the WAYPOINTS screen, use the Up/Down wheel key switch to access the Pointer page. 6. then press the PAGE ...mark this location a suitable name as you are, press the PAGE button to your location are three waypoints marking your trip. 38 Access the GPS MENU page and press Enter; Approximately 6 to 10 seconds are required for a few minutes and then stop. At this short trip, there ...
... g. to access the WAYPOINT page. 3. Your immediate location is ready to navigate (satellites acquired), walk at a leisurely pace in the same manner as a track. Now take a short trip. 1. On the WAYPOINTS screen, use the Up/Down wheel key switch to access the Pointer page. 6. then press the PAGE ...mark this location a suitable name as you are, press the PAGE button to your location are three waypoints marking your trip. 38 Access the GPS MENU page and press Enter; Approximately 6 to 10 seconds are required for a few minutes and then stop. At this short trip, there ...
Owners Manual
Page 39
...direction you to locate this position. 4. The compass pointer will be accurate to the coordinates that you the coordinates of the remote GMRS-GPS unit. the pointer page will be entered and sent manually. Along this information, the other user reaches the destination, the coordinates of... exact spot, or coordinates indicated, but will enter a few waypoints, including his endpoint or destination. 3. Use the pointer page to establish a track to the location being sent, a WARNING screen appears when the MARK button is highlighted (boxed). 6. NOTE: The unit will not guide you ...
...direction you to locate this position. 4. The compass pointer will be accurate to the coordinates that you the coordinates of the remote GMRS-GPS unit. the pointer page will be entered and sent manually. Along this information, the other user reaches the destination, the coordinates of... exact spot, or coordinates indicated, but will enter a few waypoints, including his endpoint or destination. 3. Use the pointer page to establish a track to the location being sent, a WARNING screen appears when the MARK button is highlighted (boxed). 6. NOTE: The unit will not guide you ...