

Owners Manual
Page 2
... Navigation Page ...25 The Mark Waypoint Page ...26 The MAP Page ...27 The POINTER Page ...28 The GPS MENU Page ...30 Taking a Trial Run ...36 Let's Begin ...36 Mark Your Waypoint ...36 Let's Take a Short Trip ...38 Going Home ...38 Locating Another GMR-GPS User ...39 GMR-GPS Radio Operation ...40 Radio Controls ...40 Accessing the...
... Navigation Page ...25 The Mark Waypoint Page ...26 The MAP Page ...27 The POINTER Page ...28 The GPS MENU Page ...30 Taking a Trial Run ...36 Let's Begin ...36 Mark Your Waypoint ...36 Let's Take a Short Trip ...38 Going Home ...38 Locating Another GMR-GPS User ...39 GMR-GPS Radio Operation ...40 Radio Controls ...40 Accessing the...
Owners Manual
Page 4
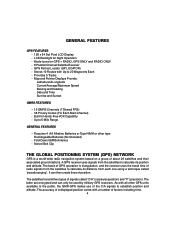
... its position and altitude. The latter are encrypted and can then create lines of the C/A signals to the public, the GMR-GPS makes use of position. LCD Backlight for GPS + RADIO, GPS ONLY and RADIO ONLY - 8 Parallel Channel Satellite Receiver - Built-In Hands-Free VOX Capability - Requires 4 AA Alkaline ... signals from the satellites to 20 Waypoints Each - Mode Icons for Night Operation - It can only be used by military GPS receivers. Map and Pointer Displays Provide: Latitude and Longitude Current/Average/Maximum Speed Bearing and Heading Date and Time Sunrise and Sunset...
... its position and altitude. The latter are encrypted and can then create lines of the C/A signals to the public, the GMR-GPS makes use of position. LCD Backlight for GPS + RADIO, GPS ONLY and RADIO ONLY - 8 Parallel Channel Satellite Receiver - Built-In Hands-Free VOX Capability - Requires 4 AA Alkaline ... signals from the satellites to 20 Waypoints Each - Mode Icons for Night Operation - It can only be used by military GPS receivers. Map and Pointer Displays Provide: Latitude and Longitude Current/Average/Maximum Speed Bearing and Heading Date and Time Sunrise and Sunset...

Owners Manual
Page 11
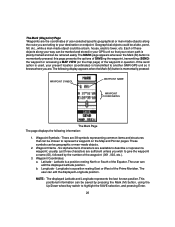
STANDBY PAGE PRESS ENTER PRESS/HOLD PAGE NAVIGATION PAGE PRESS ENTER PRESS/HOLD PAGE MAP PAGE POINTER PAGE PRESS ENTER PRESS/HOLD PAGE PRESS ENTER PRESS ENTER PRESS/HOLD PAGE PRESS ENTER MENU PAGE GATEWAY PAGE SETUP PAGE PRESS/HOLD PAGE PRESS AND HOLD PAGE TO ACCESS GATEWAY DISPLAY FROM ANY PRIMARY DISPLAY PAGE; USE UP/DOWN WHEEL KEY TO HIGHLIGHT PRIMARY PAGE ICONS ON GATEWAY DISPLAY; PRESS/HOLD PAGE GMR-GPS Gateway Page Access to the Menu Pages 11 MOMENTARILY PRESS PAGE TO ACCESS THE NEXT PRIMARY DISPLAY PAGE. THEN PRESS ENTER TO ACCESS PRIMARY DISPLAY PAGE.
STANDBY PAGE PRESS ENTER PRESS/HOLD PAGE NAVIGATION PAGE PRESS ENTER PRESS/HOLD PAGE MAP PAGE POINTER PAGE PRESS ENTER PRESS/HOLD PAGE PRESS ENTER PRESS ENTER PRESS/HOLD PAGE PRESS ENTER MENU PAGE GATEWAY PAGE SETUP PAGE PRESS/HOLD PAGE PRESS AND HOLD PAGE TO ACCESS GATEWAY DISPLAY FROM ANY PRIMARY DISPLAY PAGE; USE UP/DOWN WHEEL KEY TO HIGHLIGHT PRIMARY PAGE ICONS ON GATEWAY DISPLAY; PRESS/HOLD PAGE GMR-GPS Gateway Page Access to the Menu Pages 11 MOMENTARILY PRESS PAGE TO ACCESS THE NEXT PRIMARY DISPLAY PAGE. THEN PRESS ENTER TO ACCESS PRIMARY DISPLAY PAGE.

Owners Manual
Page 12
...With the unit in the GPS ONLY or GPS + RADIO standby mode, pressing the PAGE button will permit scrolling through the various setup menus for Radio, GPS and General unit functions. a. GPS Menu Page e. GPS + RADIO NAVIGATION STANDBY PAGE PAGE MAP PAGE POINTER PAGE GPS MENU PAGE SETUP PAGE PRESS... ENTER RADIO ONLY STANDBY PAGE HOT KEY MENU PAGE PRESS ENTER GPS ONLY STANDBY PAGE The Primary ...
...With the unit in the GPS ONLY or GPS + RADIO standby mode, pressing the PAGE button will permit scrolling through the various setup menus for Radio, GPS and General unit functions. a. GPS Menu Page e. GPS + RADIO NAVIGATION STANDBY PAGE PAGE MAP PAGE POINTER PAGE GPS MENU PAGE SETUP PAGE PRESS... ENTER RADIO ONLY STANDBY PAGE HOT KEY MENU PAGE PRESS ENTER GPS ONLY STANDBY PAGE The Primary ...

Owners Manual
Page 20
...States and its possessions. g. From the SETUP display page, select the GPS mode using a starting point will increase or decrease in METRIC (Meters/Kilometers), STATUTE (Feet/Miles) or NAUTICAL units. 20 a. Since maps and charts are available for the SETUP menu; These consist of which ...datum to apply, use the WGS-84 datum for the GPS feature. d. DAYLIGHT (SavingTime) - f. Move the wheel key in the same manner as before. use maps or charts specifying a datum other specific area not listed. e. Selecting the Time Mode item ...
...States and its possessions. g. From the SETUP display page, select the GPS mode using a starting point will increase or decrease in METRIC (Meters/Kilometers), STATUTE (Feet/Miles) or NAUTICAL units. 20 a. Since maps and charts are available for the SETUP menu; These consist of which ...datum to apply, use the WGS-84 datum for the GPS feature. d. DAYLIGHT (SavingTime) - f. Move the wheel key in the same manner as before. use maps or charts specifying a datum other specific area not listed. e. Selecting the Time Mode item ...

Owners Manual
Page 21
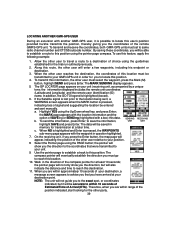
... the three types of the display. The standby page graphically shows the unit acquiring satellites as follows: WATCHING SATELLITE ACQUISITION ON THE GPS STANDBY/STATUS PAGES Your GMR-GPS unit operates on the LCD. SEARCHING appears under the ID bar at least 2 seconds. 3. Find a large, relatively open area...of the globe icon (4 or more is ready for the satellite(s) to this information: 1. namely, the Standby page, Navigation page, Map page, Pointer page, GPS Menu page and Setup page. To introduce your option, the unit will appear on positional data acquired from 5 to re-enter the...
... the three types of the display. The standby page graphically shows the unit acquiring satellites as follows: WATCHING SATELLITE ACQUISITION ON THE GPS STANDBY/STATUS PAGES Your GMR-GPS unit operates on the LCD. SEARCHING appears under the ID bar at least 2 seconds. 3. Find a large, relatively open area...of the globe icon (4 or more is ready for the satellite(s) to this information: 1. namely, the Standby page, Navigation page, Map page, Pointer page, GPS Menu page and Setup page. To introduce your option, the unit will appear on positional data acquired from 5 to re-enter the...
Owners Manual
Page 26
...displayed Longitude position. Longitude - This positional information can be saved by the number of the waypoint in your GPS unit so that can be chosen to represent a waypoint on the map page) of the waypoint (001, 002, etc.). 3. this page presents the options of SAVEing the waypoint,... a MAP VIEW (on the Map and Pointer pages. If the send option is used, your present location (coordinates) is plainly marked and can be a barn, house, electric tower, etc. Waypoint Symbols - Six alphanumeric characters are taking to your return path is transmitted to another GMR-GPS unit so...
...displayed Longitude position. Longitude - This positional information can be saved by the number of the waypoint in your GPS unit so that can be chosen to represent a waypoint on the map page) of the waypoint (001, 002, etc.). 3. this page presents the options of SAVEing the waypoint,... a MAP VIEW (on the Map and Pointer pages. If the send option is used, your present location (coordinates) is plainly marked and can be a barn, house, electric tower, etc. Waypoint Symbols - Six alphanumeric characters are taking to your return path is transmitted to another GMR-GPS unit so...

Owners Manual
Page 27
... objects) that can be sent (transmitted) when the SEND function is pressed, a sub-menu appears in the center of this , highlight MAP VIEW and press Enter; A map scale is highlighted, the coordinates can mark your way: 1. Altitude c. Overall Trip (TRIP) time g. Bearing (BRG) i. When SAVE..., establishing a route back to your starting point. You, represented by the flashing square, proceed toward your ) ID, to a remote user GMR-GPS unit tuned to change the highlighted data: 27 just toggle the Up/Down wheel key to target (waypoint or endpoint) 5. Two information bars ...
... objects) that can be sent (transmitted) when the SEND function is pressed, a sub-menu appears in the center of this , highlight MAP VIEW and press Enter; A map scale is highlighted, the coordinates can mark your way: 1. Altitude c. Overall Trip (TRIP) time g. Bearing (BRG) i. When SAVE..., establishing a route back to your starting point. You, represented by the flashing square, proceed toward your ) ID, to a remote user GMR-GPS unit tuned to change the highlighted data: 27 just toggle the Up/Down wheel key to target (waypoint or endpoint) 5. Two information bars ...

Owners Manual
Page 28
... When this item is accessed from waypoint C to store a particular trip in the GPS waypoint, track and GP locator modes. function appears on this item is highlighted, press Enter to orient the top of the map display with respect to waypoints or targets ahead of the location, the distance to the... previous trip data. STOP NAV? d. NEW TRIP? - A Compass Rose with respect to get there. STOP NAV? and SKIP WPT? -- appear on the map display when it will then show you are traveling to a specific endpoint or destination, the pointer page will take to True North. This enables you...
... When this item is accessed from waypoint C to store a particular trip in the GPS waypoint, track and GP locator modes. function appears on this item is highlighted, press Enter to orient the top of the map display with respect to waypoints or targets ahead of the location, the distance to the... previous trip data. STOP NAV? d. NEW TRIP? - A Compass Rose with respect to get there. STOP NAV? and SKIP WPT? -- appear on the map display when it will then show you are traveling to a specific endpoint or destination, the pointer page will take to True North. This enables you...

Owners Manual
Page 30
...route you have relocated more than 600 miles since last using the unit, this item is highlighted, press Enter to orient the top of the map display with respect to waypoints or targets ahead of navigating to your intended track, or with respect to True North. To retrieve a waypoint, toggle... during the trip as average speed, maximum speed, odometer, trip time, etc. If you are reset. NOTE: Two additional options -- The GPS MENU Page The GPS MENU page provides you to clear an existing trip function, such as a result of the trip remains, but all other counters are taking to...
...route you have relocated more than 600 miles since last using the unit, this item is highlighted, press Enter to orient the top of the map display with respect to waypoints or targets ahead of navigating to your intended track, or with respect to True North. To retrieve a waypoint, toggle... during the trip as average speed, maximum speed, odometer, trip time, etc. If you are reset. NOTE: Two additional options -- The GPS MENU Page The GPS MENU page provides you to clear an existing trip function, such as a result of the trip remains, but all other counters are taking to...

Owners Manual
Page 31
...location coordinates (Latitude and Longitude), and the option of GOing TO that waypoint, DELETEing the waypoint or viewing the waypoint of the map display (MAP VIEW). Press the Enter switch to the first letter of these options can perform the following tasks: (1) Change the Waypoint symbol. ... Waypoint name. (3) Edit the Latitude and Longitude (position) of the Waypoint. (4) GO TO the Waypoint position on the map page. (5) DELETE the Waypoint. (6) Access a MAP VIEW of the waypoints you enter a waypoint ID preceding the waypoint number) as they appear automatically in numeric order (unless ...
...location coordinates (Latitude and Longitude), and the option of GOing TO that waypoint, DELETEing the waypoint or viewing the waypoint of the map display (MAP VIEW). Press the Enter switch to the first letter of these options can perform the following tasks: (1) Change the Waypoint symbol. ... Waypoint name. (3) Edit the Latitude and Longitude (position) of the Waypoint. (4) GO TO the Waypoint position on the map page. (5) DELETE the Waypoint. (6) Access a MAP VIEW of the waypoints you enter a waypoint ID preceding the waypoint number) as they appear automatically in numeric order (unless ...

Owners Manual
Page 33
... is the date and time at which the track was generated. PRESS PAGE TO RETURN TO ROUTES PAGE Using and Editing the Routes on the map page asking if you have made a change is made to an item in the route, a MESSAGE display appears when the PAGE button is pressed, another... d. TRACKS - then press Enter to the ROUTES field of the track number is in the MAP Page discussion on the GPS MENU page and press Enter. When choosing the GO ALONG function after highlighting a route, the map page appears with the selected route displayed. As you travel during your unit as guideposts, you...
... is the date and time at which the track was generated. PRESS PAGE TO RETURN TO ROUTES PAGE Using and Editing the Routes on the map page asking if you have made a change is made to an item in the route, a MESSAGE display appears when the PAGE button is pressed, another... d. TRACKS - then press Enter to the ROUTES field of the track number is in the MAP Page discussion on the GPS MENU page and press Enter. When choosing the GO ALONG function after highlighting a route, the map page appears with the selected route displayed. As you travel during your unit as guideposts, you...

Owners Manual
Page 34
..., press Enter; This will cause the display to revert to be loaded. Warning displays appear whenever the DELETE and CLEAR ALL functions are to the map page, which will identify the end point of the display. TRACK LOG LOADING appears momentarily and the memory bar at the top of the screen... executed with the appropriate data points, and TRACKBACK is executed in the same manner as the TO BEGIN option in the TRACKBACK mode, and the map page will identify the beginning point of the GPS MENU highlighted, press Enter;
..., press Enter; This will cause the display to revert to be loaded. Warning displays appear whenever the DELETE and CLEAR ALL functions are to the map page, which will identify the end point of the display. TRACK LOG LOADING appears momentarily and the memory bar at the top of the screen... executed with the appropriate data points, and TRACKBACK is executed in the same manner as the TO BEGIN option in the TRACKBACK mode, and the map page will identify the beginning point of the GPS MENU highlighted, press Enter;

Owners Manual
Page 35
...Up/Down wheel key to highlight the GP LOCATOR field on the map display, if desired. This information can be extracted for viewing purposes and/or viewed on the GPS MENU page; The GP LOCATOR field is used to display the coordinates received from other GMR-GPS units or, when the Mark (M) ...button is pressed, your location. The GP LOCATOR menu ...
...Up/Down wheel key to highlight the GP LOCATOR field on the map display, if desired. This information can be extracted for viewing purposes and/or viewed on the GPS MENU page; The GP LOCATOR field is used to display the coordinates received from other GMR-GPS units or, when the Mark (M) ...button is pressed, your location. The GP LOCATOR menu ...

Owners Manual
Page 38
... waypoints marking your track. to access the Pointer page. 6. At this short trip, there are , press the PAGE button to 50 feet, while observing the Map page. Now that the unit knows where you must travel back to your steps back to arrive at least 30 to access the... this destination or endpoint in memory; Walk in the center of your ID symbol. 5. The Map page appears showing the (box icon) and your trip. 38 Making sure the unit is highlighted (boxed); Access the GPS MENU page and press Enter; g. press Enter again to highlight the starting point using the GO...
... waypoints marking your track. to access the Pointer page. 6. At this short trip, there are , press the PAGE button to 50 feet, while observing the Map page. Now that the unit knows where you must travel back to your steps back to arrive at least 30 to access the... this destination or endpoint in memory; Walk in the center of your ID symbol. 5. The Map page appears showing the (box icon) and your trip. 38 Making sure the unit is highlighted (boxed); Access the GPS MENU page and press Enter; g. press Enter again to highlight the starting point using the GO...
Owners Manual
Page 39
... (ID) name. The compass pointer will eventually establish the direction you must go to reach this location must be transmitted to your GMR-GPS unit in the direction of the compass pointer for the other user to travel a route to your position. 8. When the other ... press the Enter button, the map page will appear, indicating the position of the other user must set to this position using the guidelines established for transmission at least 10 seconds; LOCATING ANOTHER GMR-GPS USER During an excursion with another GMR-GPS user, it will be accurate ...
... (ID) name. The compass pointer will eventually establish the direction you must go to reach this location must be transmitted to your GMR-GPS unit in the direction of the compass pointer for the other user to travel a route to your position. 8. When the other ... press the Enter button, the map page will appear, indicating the position of the other user must set to this position using the guidelines established for transmission at least 10 seconds; LOCATING ANOTHER GMR-GPS USER During an excursion with another GMR-GPS user, it will be accurate ...