
User Guide
Page 6
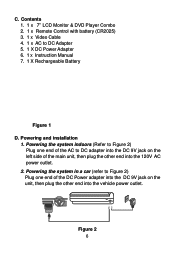
... Figure 2) Plug one end of the main unit, then plug the other end into the 120V AC power outlet. 2. Contents 1. 1 x 7'' LCD Monitor & DVD Player Combo 2. 1 x Remote Control with battery (CR2025) 3. 1 x Video Cable 4. 1 x AC to DC adapter into the DC 9V jack on the unit, then plug the other end into the vehicle...
... Figure 2) Plug one end of the main unit, then plug the other end into the 120V AC power outlet. 2. Contents 1. 1 x 7'' LCD Monitor & DVD Player Combo 2. 1 x Remote Control with battery (CR2025) 3. 1 x Video Cable 4. 1 x AC to DC adapter into the DC 9V jack on the unit, then plug the other end into the vehicle...
User Guide
Page 7
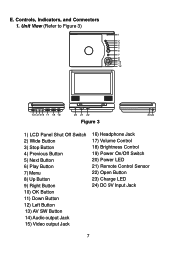
Unit View (Refer to Figure 3) Figure 3 1) LCD Panel Shut Off Switch 2) Wide Button 3) Stop Button 4) Previous Button 5) Next Button 6) Play Button 7) Menu 8) Up Button 9) Right Button 10) OK Button 11) Down Button 12) Left Button 13) AV SW Button 14) Audio output Jack 15) Video output Jack 16) Headphone Jack 17) Volume Control 18) Brightness Control 19) Power On/Off Switch 20) Power LED 21) Remote Control Sensor 22) Open Button 23) Charge LED 24) DC 9V Input Jack 7 Controls, Indicators, and Connectors 1. E.
Unit View (Refer to Figure 3) Figure 3 1) LCD Panel Shut Off Switch 2) Wide Button 3) Stop Button 4) Previous Button 5) Next Button 6) Play Button 7) Menu 8) Up Button 9) Right Button 10) OK Button 11) Down Button 12) Left Button 13) AV SW Button 14) Audio output Jack 15) Video output Jack 16) Headphone Jack 17) Volume Control 18) Brightness Control 19) Power On/Off Switch 20) Power LED 21) Remote Control Sensor 22) Open Button 23) Charge LED 24) DC 9V Input Jack 7 Controls, Indicators, and Connectors 1. E.
User Guide
Page 8
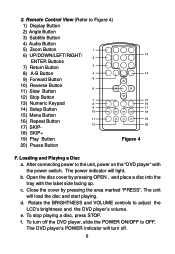
...cover by pressing OPEN , and place a disc into the tray with the power switch. e. To stop playing a disc, press STOP. Rotate the BRIGHTNESS and VOLUME controls to Figure 4) 1) Display Button 2) Angle Button 3) Subtitle Button 4) Audio Button 5) Zoom Button 6) UP/DOWN/LEFT/RIGHT/ ENTER Buttons 7) Return Button 8) ... turn off the DVD player, slide the POWER ON/OFF to the unit, power on the "DVD player" with the label side facing up. Remote Control View (Refer to adjust the LCD's brightness and the DVD player's volume. b. f. After connecting power to OFF. d. Open the disc cover...
...cover by pressing OPEN , and place a disc into the tray with the power switch. e. To stop playing a disc, press STOP. Rotate the BRIGHTNESS and VOLUME controls to Figure 4) 1) Display Button 2) Angle Button 3) Subtitle Button 4) Audio Button 5) Zoom Button 6) UP/DOWN/LEFT/RIGHT/ ENTER Buttons 7) Return Button 8) ... turn off the DVD player, slide the POWER ON/OFF to the unit, power on the "DVD player" with the label side facing up. Remote Control View (Refer to adjust the LCD's brightness and the DVD player's volume. b. f. After connecting power to OFF. d. Open the disc cover...
User Guide
Page 36
If the regional codes don't match, the disc can't be controlled. • Insert a disc with the label side facing up. • Check the type of the component to dry out. Allow player to be played. This ... disc tray. Clean it. • Condensation has formed. Troubleshooting (Cont) PROBLEM IR sensor inoperative Disc won't play SOLUTION • Verify that the batteries in the remote are coded by region. Play starts, but then stops immediately • Both the unit and the disc are fresh. • Verify that the...
If the regional codes don't match, the disc can't be controlled. • Insert a disc with the label side facing up. • Check the type of the component to dry out. Allow player to be played. This ... disc tray. Clean it. • Condensation has formed. Troubleshooting (Cont) PROBLEM IR sensor inoperative Disc won't play SOLUTION • Verify that the batteries in the remote are coded by region. Play starts, but then stops immediately • Both the unit and the disc are fresh. • Verify that the...