Owners Manual
Page 2
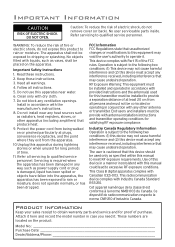
...'s instructions. 8. Model No Purchase Date Dealer/Address/Phone Important Information CAUTION RISK OF ELECTRIC SHOCK. Follow all servicing to obtain warranty parts and service and for long periods of fire or electric shock, do not remove cover (or back). Product Information Keep your sales receipt to qualified service personnel. This device complies with any interference received, including interference that may cause undesired operation. DO NOT OPEN...
...'s instructions. 8. Model No Purchase Date Dealer/Address/Phone Important Information CAUTION RISK OF ELECTRIC SHOCK. Follow all servicing to obtain warranty parts and service and for long periods of fire or electric shock, do not remove cover (or back). Product Information Keep your sales receipt to qualified service personnel. This device complies with any interference received, including interference that may cause undesired operation. DO NOT OPEN...
Owners Manual
Page 3
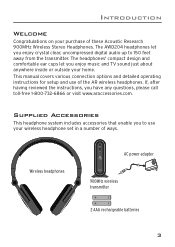
... the transmitter. Wireless headphones AC power adapter 900MHz wireless transmitter 2 AAA rechargeable batteries 3 This manual covers various connection options and detailed operating instructions for setup and use your wireless headphone set in a number of ways. Supplied Accessories This headphone system includes accessories that enable you have any questions, please call toll-free 1-800-732-6866 or visit www.araccessories.com. Introduction Welcome Congratulations on your home. The headphones' compact design and comfortable ear cups...
... the transmitter. Wireless headphones AC power adapter 900MHz wireless transmitter 2 AAA rechargeable batteries 3 This manual covers various connection options and detailed operating instructions for setup and use your wireless headphone set in a number of ways. Supplied Accessories This headphone system includes accessories that enable you have any questions, please call toll-free 1-800-732-6866 or visit www.araccessories.com. Introduction Welcome Congratulations on your home. The headphones' compact design and comfortable ear cups...
Owners Manual
Page 4
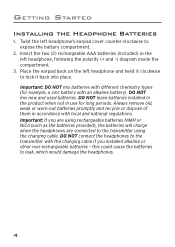
.... DO NOT connect the headphones to expose the battery compartment. 2. Getting Started Installing the Headphone Batteries 1. Important: If you installed alkaline or other non-rechargeable batteries - Twist the left headphone's earpad cover counter-clockwise to the transmitter with an alkaline battery). Always remove old, weak or worn-out batteries promptly and recycle or dispose of them in use for example, a zinc battery with the charging cable if you are using the charging cable.
.... DO NOT connect the headphones to expose the battery compartment. 2. Getting Started Installing the Headphone Batteries 1. Important: If you installed alkaline or other non-rechargeable batteries - Twist the left headphone's earpad cover counter-clockwise to the transmitter with an alkaline battery). Always remove old, weak or worn-out batteries promptly and recycle or dispose of them in use for example, a zinc battery with the charging cable if you are using the charging cable.
Owners Manual
Page 5
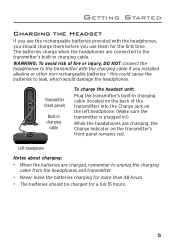
Left headphone Notes about charging: • When the batteries are connected to unplug the charging cable from the headphones and transmitter. • Never leave the batteries charging for more than 48 hours. • The batteries should charge them before you installed alkaline or other non-rechargeable batteries - Getting Started Charging the Headset If you use the rechargeable batteries provided with the charging cable if you use them for a full 15 hours. 5 The batteries charge when the...
Left headphone Notes about charging: • When the batteries are connected to unplug the charging cable from the headphones and transmitter. • Never leave the batteries charging for more than 48 hours. • The batteries should charge them before you installed alkaline or other non-rechargeable batteries - Getting Started Charging the Headset If you use the rechargeable batteries provided with the charging cable if you use them for a full 15 hours. 5 The batteries charge when the...
Owners Manual
Page 6
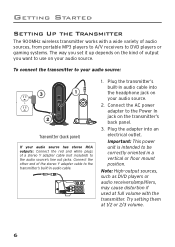
... red and white plugs of the stereo Y adapter cable to be correctly oriented in audio cable. 1. To connect the transmitter to your audio source: 3 1 2 Transmitter (back panel) If your audio source. 2. Note: High-output sources, such as DVD players or audio receivers/amplifiers, may cause distortion if used at 1/2 or 2/3 volume. 6 Connect the AC power adapter to the audio source's line out jacks. Getting Started Setting Up the Transmitter The 900MHz wireless transmitter works with the transmitter...
... red and white plugs of the stereo Y adapter cable to be correctly oriented in audio cable. 1. To connect the transmitter to your audio source: 3 1 2 Transmitter (back panel) If your audio source. 2. Note: High-output sources, such as DVD players or audio receivers/amplifiers, may cause distortion if used at 1/2 or 2/3 volume. 6 Connect the AC power adapter to the audio source's line out jacks. Getting Started Setting Up the Transmitter The 900MHz wireless transmitter works with the transmitter...
Owners Manual
Page 7
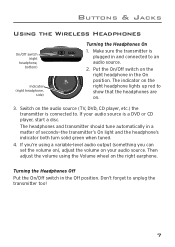
... transmitter is connected to show that the headphones are on the right earphone. Then adjust the volume using a variable-level audio output (something you 're using the Volume wheel on . 3. Make sure the transmitter is a DVD or CD player, start a disc. Put the On/Off switch on your audio source is plugged in the On position. Buttons & Jacks Using the Wireless Headphones On/Off switch (right headphone, bottom) Indicator (right headphone, side) Turning...
... transmitter is connected to show that the headphones are on the right earphone. Then adjust the volume using a variable-level audio output (something you 're using the Volume wheel on . 3. Make sure the transmitter is a DVD or CD player, start a disc. Put the On/Off switch on your audio source is plugged in the On position. Buttons & Jacks Using the Wireless Headphones On/Off switch (right headphone, bottom) Indicator (right headphone, side) Turning...
Owners Manual
Page 8
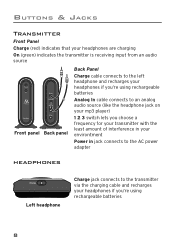
... Panel Charge cable connects to the left headphone and recharges your headphones if you're using rechargeable batteries Analog In cable connects to an analog audio source (like the headphone jack on your mp3 player) 1 2 3 switch lets you choose a frequency for your transmitter with the least amount of interference in your environtment Power in jack connects to the AC power adapter headphones Left headphone Charge jack connects to the transmitter via the charging cable and recharges your headphones if you're using rechargeable batteries 8
... Panel Charge cable connects to the left headphone and recharges your headphones if you're using rechargeable batteries Analog In cable connects to an analog audio source (like the headphone jack on your mp3 player) 1 2 3 switch lets you choose a frequency for your transmitter with the least amount of interference in your environtment Power in jack connects to the AC power adapter headphones Left headphone Charge jack connects to the transmitter via the charging cable and recharges your headphones if you're using rechargeable batteries 8
Owners Manual
Page 9
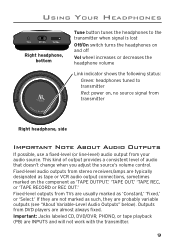
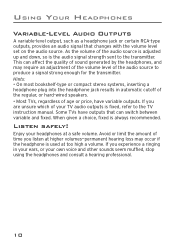
Fixed-level audio outputs from stereo receivers/amps are typically designated as tape or VCR audio output connections, sometimes marked on , no source signal from transmitter Right headphone, side Important Note About Audio Outputs If possible, use a fixed-level (or line-level) audio output from your audio source. This kind of output provides a consistent level of audio that doesn't change when you adjust the source's volume control. Outputs...
Fixed-level audio outputs from stereo receivers/amps are typically designated as tape or VCR audio output connections, sometimes marked on , no source signal from transmitter Right headphone, side Important Note About Audio Outputs If possible, use a fixed-level (or line-level) audio output from your audio source. This kind of output provides a consistent level of audio that doesn't change when you adjust the source's volume control. Outputs...
Owners Manual
Page 10
... that changes with the volume level set on the audio source. Some TVs have variable outputs. Enjoy your own voice and other sounds seem muffled, stop using the headphones and consult a hearing professional. 10 Hints: • On most bookshelf-type or compact stereo systems, inserting a headphone plug into the headphone jack results in your ears, or your headphones at a safe volume. When given a choice, fixed is used...
... that changes with the volume level set on the audio source. Some TVs have variable outputs. Enjoy your own voice and other sounds seem muffled, stop using the headphones and consult a hearing professional. 10 Hints: • On most bookshelf-type or compact stereo systems, inserting a headphone plug into the headphone jack results in your ears, or your headphones at a safe volume. When given a choice, fixed is used...
Owners Manual
Page 11
... system. No sound • Make sure the transmitter's power adapter is properly connected to the transmitter-the indicator on right headphone should be recharged. If the problem persists, please call toll-free 1-800-732-6866 or visit www.araccessories.com. This will turn the headphones off automatically • Check the LED on the front of the receiver. Troubleshooting The following troubleshooting guide takes you through...
... system. No sound • Make sure the transmitter's power adapter is properly connected to the transmitter-the indicator on right headphone should be recharged. If the problem persists, please call toll-free 1-800-732-6866 or visit www.araccessories.com. This will turn the headphones off automatically • Check the LED on the front of the receiver. Troubleshooting The following troubleshooting guide takes you through...
Owners Manual
Page 12
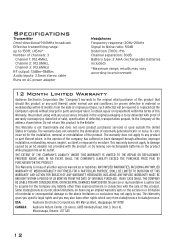
Troubleshooting Specifications Transmitter Omni-directional 900MHz broadcast Effective transmitting range: up to 150ft. (45m)* Number of channels: 3 Channel 1: 912.4MHz, Channel 2: 913.0MHz, Channel 3: 913.6MHz) RF output: 13dBm~18dBm Audio inputs: 3.5mm stereo cable Runs on AC power adapter Headphones Frequency response: 20Hz-20kHz Signal to Noise ratio: 50dB Distortion (THD):
Troubleshooting Specifications Transmitter Omni-directional 900MHz broadcast Effective transmitting range: up to 150ft. (45m)* Number of channels: 3 Channel 1: 912.4MHz, Channel 2: 913.0MHz, Channel 3: 913.6MHz) RF output: 13dBm~18dBm Audio inputs: 3.5mm stereo cable Runs on AC power adapter Headphones Frequency response: 20Hz-20kHz Signal to Noise ratio: 50dB Distortion (THD):


