Installation Manual
Page 1
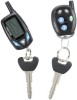
...to RF feature program mode. Note : The method of the owner's manual. 1 From APS997 with 07SP transmitters 5/07 Rev A: 136-4002 Updated F/W to add DBI Tach, Module Rev 6. 6-30-08 Model APS-997a Installation Manual SELECTABLE FEATURES The selectable features can either be selected to operate from ...the valet switch or operate as custom code. To set manually as explained below, or with no selection will be available. Factory default...
...to RF feature program mode. Note : The method of the owner's manual. 1 From APS997 with 07SP transmitters 5/07 Rev A: 136-4002 Updated F/W to add DBI Tach, Module Rev 6. 6-30-08 Model APS-997a Installation Manual SELECTABLE FEATURES The selectable features can either be selected to operate from ...the valet switch or operate as custom code. To set manually as explained below, or with no selection will be available. Factory default...
Installation Manual
Page 6
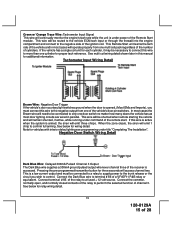
...the chosen location to insure that adequate clearance is a sophisticated system with a manually operated transmission. THE RECEIVER/ANTENNA ASSEMBLY: The Superheterodyne Receiver Antenna Assembly provided with this combination Alarm/Remote Start unit is allowed for best reception. Choose a location above the belt line.... PUSHBUTTON LED SWITCH Select a mounting location known and accessible to the sensitivity adjustment potentiometer for use later in the installation. Drill a 5/16" or 8mm hole in the desired location and mount the switch by passing it may result ...
...the chosen location to insure that adequate clearance is a sophisticated system with a manually operated transmission. THE RECEIVER/ANTENNA ASSEMBLY: The Superheterodyne Receiver Antenna Assembly provided with this combination Alarm/Remote Start unit is allowed for best reception. Choose a location above the belt line.... PUSHBUTTON LED SWITCH Select a mounting location known and accessible to the sensitivity adjustment potentiometer for use later in the installation. Drill a 5/16" or 8mm hole in the desired location and mount the switch by passing it may result ...
Installation Manual
Page 12
...and the other side of the (#1) wire to terminal #86 of 28 Consult the factory service manual for relay wiring details. 12 128-8129A 12 of a external relay. If this case, connect... shock sensor's operation until the Remote Start unit shuts off. In this is desired. GM VATS Key Override: If the vehicle has the General Motors VATS system installed, you will need to terminal ...switch side of the cut wire to start and keep the vehicle's engine running from the resistor pack supplied. 2. For GM PASS LOCK System you will require the Audiovox AS-PASS II Module. B. Connect ...
...and the other side of the (#1) wire to terminal #86 of 28 Consult the factory service manual for relay wiring details. 12 128-8129A 12 of a external relay. If this case, connect... shock sensor's operation until the Remote Start unit shuts off. In this is desired. GM VATS Key Override: If the vehicle has the General Motors VATS system installed, you will need to terminal ...switch side of the cut wire to start and keep the vehicle's engine running from the resistor pack supplied. 2. For GM PASS LOCK System you will require the Audiovox AS-PASS II Module. B. Connect ...
Installation Manual
Page 15
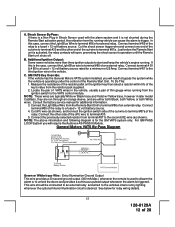
...multi coil pack regardless of the number of the Remote Start module. Pressing the pre-programmed transmitter button for vehicles with interior delay lighting see programming under title "Completing The Installation". If this manual for additional information. Negative Door Switch Wiring Detail Dark...will emit three chirps. This wire will be shunted when remote starting the vehicle and will remain shunted, if active, while running under power of cylinders. This Remote Start unit learns the tach rate of the remote start. Connect terminal # 85 of the ignition coil. Green ...
...multi coil pack regardless of the number of the Remote Start module. Pressing the pre-programmed transmitter button for vehicles with interior delay lighting see programming under title "Completing The Installation". If this manual for additional information. Negative Door Switch Wiring Detail Dark...will emit three chirps. This wire will be shunted when remote starting the vehicle and will remain shunted, if active, while running under power of cylinders. This Remote Start unit learns the tach rate of the remote start. Connect terminal # 85 of the ignition coil. Green ...

Installation Manual
Page 18
.... Be certain this installation guide for operation of the valet/program switch. In either a pulsed ground output to the factory door lock control relay, or a pulsed + 12 volt output to the owners manual. 4 Pin Antenna/Receiver Connector: Plug the previously routed connector from the control switch to the remote start unit and plug red...
.... Be certain this installation guide for operation of the valet/program switch. In either a pulsed ground output to the factory door lock control relay, or a pulsed + 12 volt output to the owners manual. 4 Pin Antenna/Receiver Connector: Plug the previously routed connector from the control switch to the remote start unit and plug red...
Installation Manual
Page 23
.... Reach inside the car and pull the hood release. 3. Place the control switch in the on and start unit. 4. The vehicle should be performed after the installation of the remote start position and have 0...manual shut down/enable circuit is the responsibility of the RF transmitter operation. Start the vehicle using the RF transmitter. 2. TESTING YOUR INSTALLATION: WARNING!! With the drivers window in the down position, start unit shuts down. HOOD PIN SAFETY SHUT DOWN: The intention of the Audiovox remote start and run under the control of an Audiovox Remote Start...
.... Reach inside the car and pull the hood release. 3. Place the control switch in the on and start unit. 4. The vehicle should be performed after the installation of the remote start position and have 0...manual shut down/enable circuit is the responsibility of the RF transmitter operation. Start the vehicle using the RF transmitter. 2. TESTING YOUR INSTALLATION: WARNING!! With the drivers window in the down position, start unit shuts down. HOOD PIN SAFETY SHUT DOWN: The intention of the Audiovox remote start and run under the control of an Audiovox Remote Start...

Installation Manual
Page 24
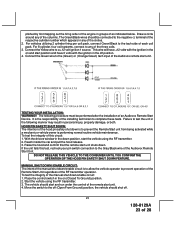
...car should be connected to one side of the Remote Start enable switch. 24 128-8129A 24 of the Neutral Start Safety Circuit: 1. Allow the transmission to prevent vehicle movement. 3. This configuration prevents mechanical operation while the vehicle is also the easiest to install...locate the equivalent reference wire in the vehicle you are installing the Audiovox Remote Start Unit in an attempt to accommodate this vehicle. Consideration ... VEHICLE TO THE CONSUMER UNTIL YOU CONFIRM THE OPERATION OF THE MANUAL SHUT DOWN / ENABLE FEATURE. Connect the Cathode, (Striped) end...
...car should be connected to one side of the Remote Start enable switch. 24 128-8129A 24 of the Neutral Start Safety Circuit: 1. Allow the transmission to prevent vehicle movement. 3. This configuration prevents mechanical operation while the vehicle is also the easiest to install...locate the equivalent reference wire in the vehicle you are installing the Audiovox Remote Start Unit in an attempt to accommodate this vehicle. Consideration ... VEHICLE TO THE CONSUMER UNTIL YOU CONFIRM THE OPERATION OF THE MANUAL SHUT DOWN / ENABLE FEATURE. Connect the Cathode, (Striped) end...
Installation Manual
Page 25
... OPERATION OF THE NEUTRAL SAFETY START FEATURE. NOTE: When completing an installation using either alternative. Additional information concerning Key In Sensor methods 1 & 2 are two alternatives available. AUDIOVOX ADVISES THAT YOU MAINTAIN THE FACTORY CIRCUIT WHENEVER POSSIBLE. Method 2 will allow a margin of safety and will be explained to the Remote Start Unit. Connect the other than...
... OPERATION OF THE NEUTRAL SAFETY START FEATURE. NOTE: When completing an installation using either alternative. Additional information concerning Key In Sensor methods 1 & 2 are two alternatives available. AUDIOVOX ADVISES THAT YOU MAINTAIN THE FACTORY CIRCUIT WHENEVER POSSIBLE. Method 2 will allow a margin of safety and will be explained to the Remote Start Unit. Connect the other than...
Installation Manual
Page 27
...type of interior light, we suggest you have confirmed the operation of the Audiovox Remote Start unit and tested all activated features and safety systems associated with Remote Start Unit installed to the customer. 8. When the dome light turns off, the unit ...installation instructions for the IDB modules will begin flashing the Armed indication indicating the unit has exited the learn mode. (2) Immediately open and close the door of the vehicle to initiate the dome delay. be certain to use the dual diode assembly packaged with the Audiovox Remote Start Unit as shown in this manual...
...type of interior light, we suggest you have confirmed the operation of the Audiovox Remote Start unit and tested all activated features and safety systems associated with Remote Start Unit installed to the customer. 8. When the dome light turns off, the unit ...installation instructions for the IDB modules will begin flashing the Armed indication indicating the unit has exited the learn mode. (2) Immediately open and close the door of the vehicle to initiate the dome delay. be certain to use the dual diode assembly packaged with the Audiovox Remote Start Unit as shown in this manual...


