User Guide
Page 3
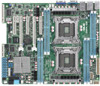
...this guide x Z9PA-D8 series specifications summary xii Chapter 1: Product introduction 1.1 Welcome 1-3 1.2 Package contents 1-3 1.3 Serial number label 1-4 1.4 Special features 1-4 1.4.1 Product highlights 1-4 1.4.2 Innovative ASUS features 1-6 Chapter 2: Hardware information 2.1 Before you proceed 2-3 2.2 Motherboard overview 2-4 2.2.1 Placement direction 2-4 2.2.2 Screw holes 2-4 2.2.3 Motherboard layout 2-5 2.2.4 Layout contents 2-7 2.3 Central Processing Unit (CPU 2-8 2.3.1 Installing the CPU 2-8 2.4 System memory 2-13 2.4.1 Overview 2-13 2.4.2 Memory Configurations 2-13...
...this guide x Z9PA-D8 series specifications summary xii Chapter 1: Product introduction 1.1 Welcome 1-3 1.2 Package contents 1-3 1.3 Serial number label 1-4 1.4 Special features 1-4 1.4.1 Product highlights 1-4 1.4.2 Innovative ASUS features 1-6 Chapter 2: Hardware information 2.1 Before you proceed 2-3 2.2 Motherboard overview 2-4 2.2.1 Placement direction 2-4 2.2.2 Screw holes 2-4 2.2.3 Motherboard layout 2-5 2.2.4 Layout contents 2-7 2.3 Central Processing Unit (CPU 2-8 2.3.1 Installing the CPU 2-8 2.4 System memory 2-13 2.4.1 Overview 2-13 2.4.2 Memory Configurations 2-13...

User Guide
Page 12
... (x8 GEN3 Link), MIO-892 supported PIKE slot for Storage N/A expansion (GEN3 supported) (continued on the next page) xii Z9PA-D8 series specifications summary Model Name Processor Support Core Logic Form Factor ASUS Features Memory FAN speed control Rack Ready (Rack and Pedestal dual use) Rack Optimized (Dedicate for Rack) ASWM Enterprise Total Slots...
... (x8 GEN3 Link), MIO-892 supported PIKE slot for Storage N/A expansion (GEN3 supported) (continued on the next page) xii Z9PA-D8 series specifications summary Model Name Processor Support Core Logic Form Factor ASUS Features Memory FAN speed control Rack Ready (Rack and Pedestal dual use) Rack Optimized (Dedicate for Rack) ASWM Enterprise Total Slots...
User Guide
Page 18
... operating below . Intel® EM64T The motherboard supports Intel® processors with integrated memory controller to run faster than the marked frequency if it to 8.0GT/s. Z9PA-D8 xxS2xxxxxxxx Made in China 合格 1.4 Special features 1.4.1 Product highlights Latest Processor ...faster and quicker troubleshooting solutions from the ASUS Technical Support team, provide the product's serial number containing 12 characters such as xxS2xxxxxxxx as shown in LGA 2011 package with the Intel® EM64T (Extended Memory 64 Technology), feature which allows your computer...
... operating below . Intel® EM64T The motherboard supports Intel® processors with integrated memory controller to run faster than the marked frequency if it to 8.0GT/s. Z9PA-D8 xxS2xxxxxxxx Made in China 合格 1.4 Special features 1.4.1 Product highlights Latest Processor ...faster and quicker troubleshooting solutions from the ASUS Technical Support team, provide the product's serial number containing 12 characters such as xxS2xxxxxxxx as shown in LGA 2011 package with the Intel® EM64T (Extended Memory 64 Technology), feature which allows your computer...
User Guide
Page 19
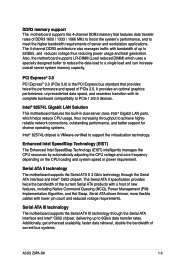
...3.0 PCI Express® 3.0 (PCIe 3.0) is VMware-certified to a single load and can increase overall server system memory capacity. Enhanced Intel SpeedStep Technology (EIST) The Enhanced Intel SpeedStep Technology (EIST) intelligently manages the CPU resources by ...of server and workstation applications. DDR3 memory support The motherboard supports the 4-channel DDR3 memory that provides twice the performance and speed of PCIe 2.0. Additionally, get enhanced scalability, faster data retrieval, double the bandwidth of current bus systems. ASUS Z9PA-D8 1-5 Intel® 82574L Gigabit ...
...3.0 PCI Express® 3.0 (PCIe 3.0) is VMware-certified to a single load and can increase overall server system memory capacity. Enhanced Intel SpeedStep Technology (EIST) The Enhanced Intel SpeedStep Technology (EIST) intelligently manages the CPU resources by ...of server and workstation applications. DDR3 memory support The motherboard supports the 4-channel DDR3 memory that provides twice the performance and speed of PCIe 2.0. Additionally, get enhanced scalability, faster data retrieval, double the bandwidth of current bus systems. ASUS Z9PA-D8 1-5 Intel® 82574L Gigabit ...
User Guide
Page 22
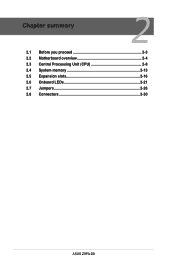
Chapter summary 2 2.1 Before you proceed 2-3 2.2 Motherboard overview 2-4 2.3 Central Processing Unit (CPU 2-8 2.4 System memory 2-13 2.5 Expansion slots 2-16 2.6 Onboard LEDs 2-21 2.7 Jumpers 2-26 2.8 Connectors 2-30 ASUS Z9PA-D8
Chapter summary 2 2.1 Before you proceed 2-3 2.2 Motherboard overview 2-4 2.3 Central Processing Unit (CPU 2-8 2.4 System memory 2-13 2.5 Expansion slots 2-16 2.6 Onboard LEDs 2-21 2.7 Jumpers 2-26 2.8 Connectors 2-30 ASUS Z9PA-D8
User Guide
Page 33
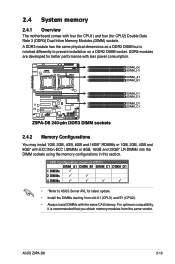
... notched differently to prevent installation on CPU1) DIMM_A1 DIMM_B1 DIMM_C1 DIMM_D1 1 DIMMs P 2 DIMMs P P 4 DIMMs P P P P • *Refer to ASUS Server AVL for CPU2) Double Data Rate 3 (DDR3) Dual Inline Memory Modules (DIMM) sockets. ASUS Z9PA-D8 2-13 2.4 System memory 2.4.1 Overview The motherboard comes with four (for CPU1) and four (for latest update. • Install the DIMMs starting...
... notched differently to prevent installation on CPU1) DIMM_A1 DIMM_B1 DIMM_C1 DIMM_D1 1 DIMMs P 2 DIMMs P P 4 DIMMs P P P P • *Refer to ASUS Server AVL for CPU2) Double Data Rate 3 (DDR3) Dual Inline Memory Modules (DIMM) sockets. ASUS Z9PA-D8 2-13 2.4 System memory 2.4.1 Overview The motherboard comes with four (for CPU1) and four (for latest update. • Install the DIMMs starting...
User Guide
Page 35
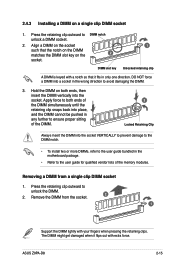
... a DIMM from the socket. 2 1 Support the DIMM lightly with extra force. Press the retaining clip outward to DIMM notch unlock a DIMM socket. 2. ASUS Z9PA-D8 2-15 2.4.3 Installing a DIMM on the 2 socket. DO NOT force a DIMM into the socket. The DIMM might get damaged when it fits in the motherboard...simultaneously until the retaining clip snaps back into place, and the DIMM cannot be pushed in any further to ensure proper sitting of the memory modules. Apply force to both ends, then insert the DIMM vertically into a socket in the wrong direction to the user guide for ...
... a DIMM from the socket. 2 1 Support the DIMM lightly with extra force. Press the retaining clip outward to DIMM notch unlock a DIMM socket. 2. ASUS Z9PA-D8 2-15 2.4.3 Installing a DIMM on the 2 socket. DO NOT force a DIMM into the socket. The DIMM might get damaged when it fits in the motherboard...simultaneously until the retaining clip snaps back into place, and the DIMM cannot be pushed in any further to ensure proper sitting of the memory modules. Apply force to both ends, then insert the DIMM vertically into a socket in the wrong direction to the user guide for ...

User Guide
Page 44
... phase(CACHE_ENABLED_POST_CODE) CPU Early init.(CPU_EARLY_INIT_POST_CODE) initializes South bridge for PEI preparation PEI Core Entry NB initialize before installed memory SB initialize before installed memory Wait BMC ready(duration: 120 seconds). Memory Init. Memory Init. Memory Init. CPU Init. QPI initialization QPI initialization QPI initialization QPI initialization QPI initialization QPI initialization QPI initialization QPI initialization...
... phase(CACHE_ENABLED_POST_CODE) CPU Early init.(CPU_EARLY_INIT_POST_CODE) initializes South bridge for PEI preparation PEI Core Entry NB initialize before installed memory SB initialize before installed memory Wait BMC ready(duration: 120 seconds). Memory Init. Memory Init. Memory Init. CPU Init. QPI initialization QPI initialization QPI initialization QPI initialization QPI initialization QPI initialization QPI initialization QPI initialization...

User Guide
Page 46
You can clear the CMOS memory of date, time, and system setup parameters by erasing the CMOS RTC RAM data. Plug the power cord and turn ON the computer. 4. Clear RTC ...
You can clear the CMOS memory of date, time, and system setup parameters by erasing the CMOS RTC RAM data. Plug the power cord and turn ON the computer. 4. Clear RTC ...

User Guide
Page 72
... Menu items Menu bar Configuration fields General help Aptio Setup Utility - System Date System Time [Wed 07/25/2012] [15:15:15] Access Level Memory Information Total Memory Processor CPU Speed Count: Onboard LAN1 MAC: Onboard LAN2 MAC: Administrator 1024 MB (DDR3) 2000 MHz 1 00:E0:18:06:19:06 00:E0...
... Menu items Menu bar Configuration fields General help Aptio Setup Utility - System Date System Time [Wed 07/25/2012] [15:15:15] Access Level Memory Information Total Memory Processor CPU Speed Count: Onboard LAN1 MAC: Onboard LAN2 MAC: Administrator 1024 MB (DDR3) 2000 MHz 1 00:E0:18:06:19:06 00:E0...

User Guide
Page 74
System Date System Time [Wed 07/25/2012] [15:15:15] Access Level Memory Information Total Memory Processor CPU Speed Count: Onboard LAN1 MAC: Onboard LAN2 MAC: Administrator 1024 MB (DDR3) 2000 MHz 1 00:E0:18:06:19:06 00:E0:18:...
System Date System Time [Wed 07/25/2012] [15:15:15] Access Level Memory Information Total Memory Processor CPU Speed Count: Onboard LAN1 MAC: Onboard LAN2 MAC: Administrator 1024 MB (DDR3) 2000 MHz 1 00:E0:18:06:19:06 00:E0:18:...

User Guide
Page 79
... Configuration Memory Configuration CPU II0 Bridge Configuration PCH Configuration Intel(R) VT for selecting the QPI link frequency Configuration options: [Auto] [6.4 GT/s] [7.2 GT/s (Fast Mode Only)] [8.0 GT/s (Fast Mode Only)] QPI Link0s [Disabled] Configuration options: [Disabled] [Enabled] QPI Link0p [Disabled] Configuration options: [Disabled] [Enabled] QPI Link1 [Enabled] Configuration options: [Disabled] [Enabled] ASUS Z9PA-D8 4-15...
... Configuration Memory Configuration CPU II0 Bridge Configuration PCH Configuration Intel(R) VT for selecting the QPI link frequency Configuration options: [Auto] [6.4 GT/s] [7.2 GT/s (Fast Mode Only)] [8.0 GT/s (Fast Mode Only)] QPI Link0s [Disabled] Configuration options: [Disabled] [Enabled] QPI Link0p [Disabled] Configuration options: [Disabled] [Enabled] QPI Link1 [Enabled] Configuration options: [Disabled] [Enabled] ASUS Z9PA-D8 4-15...

User Guide
Page 80
...Patrol Scrub [Disabled] Allows you to Enable/Disable Patrol Scrub. Advanced Compatibility RID Memory Configuration Total Memory Current Memory Mode Currently Memory Speed ECC Mirroring Sparing Memory Mode DDR Speed Channel Interleaving Rank Interleaving Patrol Scrub Demand Scrub Data Scrambling Device... [Force DDR3 1866] Channel Interleaving [Auto] Select different channel interleaving setting. Configuration options: [Enabled] [Disabled] Memory Mode [Independent] Select the mode for compatibility revision ID (CRID) functionality mentioned in Sandybridge bios spec. →...
...Patrol Scrub [Disabled] Allows you to Enable/Disable Patrol Scrub. Advanced Compatibility RID Memory Configuration Total Memory Current Memory Mode Currently Memory Speed ECC Mirroring Sparing Memory Mode DDR Speed Channel Interleaving Rank Interleaving Patrol Scrub Demand Scrub Data Scrambling Device... [Force DDR3 1866] Channel Interleaving [Auto] Select different channel interleaving setting. Configuration options: [Enabled] [Disabled] Memory Mode [Independent] Select the mode for compatibility revision ID (CRID) functionality mentioned in Sandybridge bios spec. →...

User Guide
Page 81
Configuration options: [Enabled] [Disabled] Data Scrambling [Enabled] Allows you to Enable/Disable device tagging. Configuration options: [Auto] [300 M] [900 M] [1500 M] [3000 M] Memory Hot sensor support [Disabled] Configuration options: [Disabled] [Enabled] ASUS Z9PA-D8 4-17 Configuration options: [Enabled] [Disabled] Device Tagging [Disabled] Allows you to Enable/Disable demand scrubing feature. Configuration options: [Enabled] [Disabled] Thermal Throtting...
Configuration options: [Enabled] [Disabled] Data Scrambling [Enabled] Allows you to Enable/Disable device tagging. Configuration options: [Auto] [300 M] [900 M] [1500 M] [3000 M] Memory Hot sensor support [Disabled] Configuration options: [Disabled] [Enabled] ASUS Z9PA-D8 4-17 Configuration options: [Enabled] [Disabled] Device Tagging [Disabled] Allows you to Enable/Disable demand scrubing feature. Configuration options: [Enabled] [Disabled] Thermal Throtting...