User Guide
Page 2
... DAMAGES ARISING FROM ANY DEFECT OR ERROR IN THIS MANUAL OR PRODUCT. SPECIFICATIONS AND INFORMATION CONTAINED IN THIS MANUAL ARE FURNISHED FOR INFORMATIONAL USE ONLY, AND ARE SUBJECT TO CHANGE AT ANY TIME WITHOUT NOTICE, AND SHOULD NOT BE CONSTRUED AS A COMMITMENT BY ASUS. ASUSTeK is valid to duly provide complete source code as required under the same...
... DAMAGES ARISING FROM ANY DEFECT OR ERROR IN THIS MANUAL OR PRODUCT. SPECIFICATIONS AND INFORMATION CONTAINED IN THIS MANUAL ARE FURNISHED FOR INFORMATIONAL USE ONLY, AND ARE SUBJECT TO CHANGE AT ANY TIME WITHOUT NOTICE, AND SHOULD NOT BE CONSTRUED AS A COMMITMENT BY ASUS. ASUSTeK is valid to duly provide complete source code as required under the same...

User Guide
Page 8
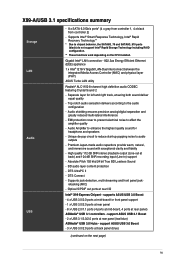
... mode, compatible with PCIe x1 and x4 devices) 2 x PCI Express 2.0 x1 slot*** (compatible with PCIe x1 and x4 devices) * The PCIe x16_4 slot shares bandwidth with 2 x SATA 6.0 Gb/s ports) (continued on the CPU types. Supports NVIDIA® 3-WAY/Quad GPU SLI™ Technology (with 2 PCIe x16 graphics card) Supports AMD® 3-WAY/Quad-GPU CrossFireX™ Technology New Intel® Core™ i7 processors - 1 x M.2 x4 Socket 3 with vertical M Key design, 2242/2260/2280/22110 storage devices support (supports PCIe SSD only) Intel® X99 Express Chipset with RAID...
... mode, compatible with PCIe x1 and x4 devices) 2 x PCI Express 2.0 x1 slot*** (compatible with PCIe x1 and x4 devices) * The PCIe x16_4 slot shares bandwidth with 2 x SATA 6.0 Gb/s ports) (continued on the CPU types. Supports NVIDIA® 3-WAY/Quad GPU SLI™ Technology (with 2 PCIe x16 graphics card) Supports AMD® 3-WAY/Quad-GPU CrossFireX™ Technology New Intel® Core™ i7 processors - 1 x M.2 x4 Socket 3 with vertical M Key design, 2242/2260/2280/22110 storage devices support (supports PCIe SSD only) Intel® X99 Express Chipset with RAID...
User Guide
Page 9
...Intel® X99 Express Chipset - support ASUS USB 3.0 Boost - 3 x USB 3.0/2.0 ports at back panel (blue) (continued on the CPU installed. Gigabit Intel® LAN connection - 802.3az Energy Efficient Ethernet (EEE) appliance 1 x Intel® I218-V Gigabit LAN-Dual interconnect between the integrated Media Access Controller (MAC) and physical layer (PHY) ASUS Turbo LAN utility Realtek® ALC1150 8-channel high definition audio CODEC featuring Crystal Sound 2 - X99-A/USB 3.1 specifications summary Storage LAN Audio USB - 8 x SATA 6.0 Gb/s ports* (4 x gray from controller 1, 4 x black...
...Intel® X99 Express Chipset - support ASUS USB 3.0 Boost - 3 x USB 3.0/2.0 ports at back panel (blue) (continued on the CPU installed. Gigabit Intel® LAN connection - 802.3az Energy Efficient Ethernet (EEE) appliance 1 x Intel® I218-V Gigabit LAN-Dual interconnect between the integrated Media Access Controller (MAC) and physical layer (PHY) ASUS Turbo LAN utility Realtek® ALC1150 8-channel high definition audio CODEC featuring Crystal Sound 2 - X99-A/USB 3.1 specifications summary Storage LAN Audio USB - 8 x SATA 6.0 Gb/s ports* (4 x gray from controller 1, 4 x black...
User Guide
Page 13
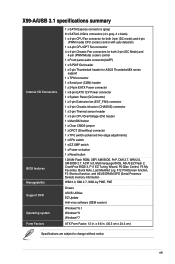
... Internal I/O Connectors BIOS features Manageability Support DVD Operating system Form Factors 1 x SATA Express connectors (gray) 8 x SATA 6.0 Gb/s connectors (4 x gray, 4 x black) 1 x 4-pin CPU Fan connector for both 3-pin (DC mode) and 4-pin (PWM mode) CPU coolers control with auto detection 1 x 4-pin CPU OPT Fan connector 4 x 4-pin Chassis Fan connectors for both 3-pin (DC Mode) and 4-pin (PWM Mode) coolers control 1 x Front panel audio connector(AAFP) 1 x S/PDIF Out header 1 x 5-pin Thunderbolt header for ASUS ThunderboltEX series support 1 x TPM connector 1 x Serial port (COM) header...
... Internal I/O Connectors BIOS features Manageability Support DVD Operating system Form Factors 1 x SATA Express connectors (gray) 8 x SATA 6.0 Gb/s connectors (4 x gray, 4 x black) 1 x 4-pin CPU Fan connector for both 3-pin (DC mode) and 4-pin (PWM mode) CPU coolers control with auto detection 1 x 4-pin CPU OPT Fan connector 4 x 4-pin Chassis Fan connectors for both 3-pin (DC Mode) and 4-pin (PWM Mode) coolers control 1 x Front panel audio connector(AAFP) 1 x S/PDIF Out header 1 x 5-pin Thunderbolt header for ASUS ThunderboltEX series support 1 x TPM connector 1 x Serial port (COM) header...
User Guide
Page 35
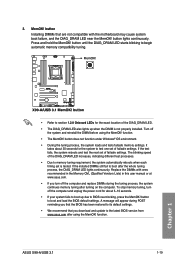
....asus.com after using the MemOK! If the installed DIMMs still fail to its default settings. • We recommend that are not compatible with the motherboard may cause system boot failure, and the DIAG_DRAM LED near the MemOK! Turn off the system and reinstall the DIMM before using the MemOK! Replace the DIMMs with ones recommended in the Memory QVL (Qualified Vendors Lists) in this user manual...
....asus.com after using the MemOK! If the installed DIMMs still fail to its default settings. • We recommend that are not compatible with the motherboard may cause system boot failure, and the DIAG_DRAM LED near the MemOK! Turn off the system and reinstall the DIMM before using the MemOK! Replace the DIMMs with ones recommended in the Memory QVL (Qualified Vendors Lists) in this user manual...

User Guide
Page 39
... passwords. You must turn ON the computer. 4. ASUS X99-A/USB 3.1 1-23 Chapter 1 You can automatically reset parameter settings to default values. • Due to the chipset behavior, AC power off and on the power supply or unplug and plug the power cord before rebooting the system. Move the jumper cap from pins 1-2 (default) to overclocking. The onboard button cell battery powers the RAM data in CMOS. Plug the power cord and turn off is required to overclocking, use the C.P.R. (CPU...
... passwords. You must turn ON the computer. 4. ASUS X99-A/USB 3.1 1-23 Chapter 1 You can automatically reset parameter settings to default values. • Due to the chipset behavior, AC power off and on the power supply or unplug and plug the power cord before rebooting the system. Move the jumper cap from pins 1-2 (default) to overclocking. The onboard button cell battery powers the RAM data in CMOS. Plug the power cord and turn off is required to overclocking, use the C.P.R. (CPU...
User Guide
Page 45
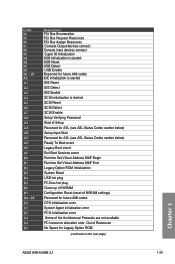
... started IDE Reset IDE Detect IDE Enable SCSI initialization is started SCSI Reset SCSI Detect SCSI Enable Setup Verifying Password Start of Setup Reserved for ASL (see ASL Status Codes section below) Setup Input Wait Reserved for ASL (see ASL Status Codes section below) Ready To Boot event Legacy Boot event Exit Boot Services event Runtime Set Virtual Address MAP Begin Runtime Set Virtual Address MAP End Legacy Option ROM Initialization System Reset USB hot plug PCI bus hot plug Clean-up of NVRAM Configuration Reset (reset...
... started IDE Reset IDE Detect IDE Enable SCSI initialization is started SCSI Reset SCSI Detect SCSI Enable Setup Verifying Password Start of Setup Reserved for ASL (see ASL Status Codes section below) Setup Input Wait Reserved for ASL (see ASL Status Codes section below) Ready To Boot event Legacy Boot event Exit Boot Services event Runtime Set Virtual Address MAP Begin Runtime Set Virtual Address MAP End Legacy Option ROM Initialization System Reset USB hot plug PCI bus hot plug Clean-up of NVRAM Configuration Reset (reset...

User Guide
Page 47
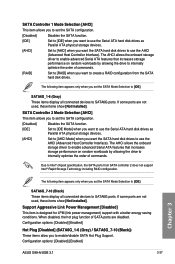
... SATA Express device or two SATA devices. • Due to the manual bundled in the BIOS to [RAID Mode]. Refer to section 3.6.3 PCH Storage Configuration for details. • Before creating a RAID set, refer to chipset behavior, the SATA6G_78 and SATA6G_910 ports (black) do not support Intel® Rapid Storage Technology and RAID configuration. Intel® X99 Serial ATA 6 Gb/s connectors (7-pin SATA6G_12, SATA6G_34, SATA6G_5, SATA6G_6/SATAEXPRESS, SATA6G_78, SATA6G_910) These connectors connect to [AHCI Mode] by default. If you installed Serial ATA hard disk drives...
... SATA Express device or two SATA devices. • Due to the manual bundled in the BIOS to [RAID Mode]. Refer to section 3.6.3 PCH Storage Configuration for details. • Before creating a RAID set, refer to chipset behavior, the SATA6G_78 and SATA6G_910 ports (black) do not support Intel® Rapid Storage Technology and RAID configuration. Intel® X99 Serial ATA 6 Gb/s connectors (7-pin SATA6G_12, SATA6G_34, SATA6G_5, SATA6G_6/SATAEXPRESS, SATA6G_78, SATA6G_910) These connectors connect to [AHCI Mode] by default. If you installed Serial ATA hard disk drives...
User Guide
Page 49
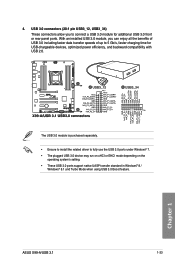
... driver to connect a USB 3.0 module for USB-chargeable devices, optimized power efficiency, and backward compatibility with USB 2.0. ASUS X99-A/USB 3.1 1-33 Chapter 1 USB 3.0 connectors (20-1 pin USB3_12, USB3_34) These connectors allow you can enjoy all the benefits of USB 3.0 including faster data transfer speeds of up to 5 Gb/s, faster charging time for additional USB 3.0 front or rear panel ports. With an installed USB 3.0 module, you to fully use the USB 3.0 ports under Windows® 7. • The plugged USB 3.0 device...
... driver to connect a USB 3.0 module for USB-chargeable devices, optimized power efficiency, and backward compatibility with USB 2.0. ASUS X99-A/USB 3.1 1-33 Chapter 1 USB 3.0 connectors (20-1 pin USB3_12, USB3_34) These connectors allow you can enjoy all the benefits of USB 3.0 including faster data transfer speeds of up to 5 Gb/s, faster charging time for additional USB 3.0 front or rear panel ports. With an installed USB 3.0 module, you to fully use the USB 3.0 ports under Windows® 7. • The plugged USB 3.0 device...
User Guide
Page 79
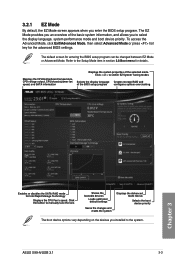
... CPU/motherboard temperature, CPU voltage output, CPU/chassis/power fan speed, and SATA information Displays the system properties of the basic system information, and allows you enter the BIOS setup program. ASUS X99-A/USB 3.1 3-3 Click the button to manually tune the fans Shows the bootable devices Loads optimized default settings Saves the changes and resets the system Displays the Advanced mode menus Selects the boot device priority The boot device options vary depending on the devices you installed to the Setup Mode item in section 3.8 Boot menu for details. To access...
... CPU/motherboard temperature, CPU voltage output, CPU/chassis/power fan speed, and SATA information Displays the system properties of the basic system information, and allows you enter the BIOS setup program. ASUS X99-A/USB 3.1 3-3 Click the button to manually tune the fans Shows the bootable devices Loads optimized default settings Saves the changes and resets the system Displays the Advanced mode menus Selects the boot device priority The boot device options vary depending on the devices you installed to the Setup Mode item in section 3.8 Boot menu for details. To access...

User Guide
Page 88
...: • Items with submenu options • User-managed items such as language and boot order • Configuration items such as favorite from the BIOS screen to save as Memory SPD Information, system time and date. 4. On the Setup Tree Map screen, select the BIOS items that you want to My Favorites To add BIOS items: 1. Main menu panel Submenu panel Selected shortcut items 3. from the...
...: • Items with submenu options • User-managed items such as language and boot order • Configuration items such as favorite from the BIOS screen to save as Memory SPD Information, system time and date. 4. On the Setup Tree Map screen, select the BIOS items that you want to My Favorites To add BIOS items: 1. Main menu panel Submenu panel Selected shortcut items 3. from the...

User Guide
Page 100
... set a DRAM clock period. CPU Load-line Calibration [Auto] Load-line is defined by Intel® specification and affects CPU power voltage. Chapter 3 3-24 Chapter 3: BIOS setup The values range from 0% to optimize the memory control. Higher load-line calibration could get higher voltage and good overclocking performance, but increases the CPU and VRM thermal conditions. Use the or to increase boot speed. MISC DRAM Eventual Voltage (CHA/CHB/CHC/CHD) [Auto] Use or to increase boot speed. Configuration options: [Auto] [Enabled] [Disabled...
... set a DRAM clock period. CPU Load-line Calibration [Auto] Load-line is defined by Intel® specification and affects CPU power voltage. Chapter 3 3-24 Chapter 3: BIOS setup The values range from 0% to optimize the memory control. Higher load-line calibration could get higher voltage and good overclocking performance, but increases the CPU and VRM thermal conditions. Use the or to increase boot speed. MISC DRAM Eventual Voltage (CHA/CHB/CHC/CHD) [Auto] Use or to increase boot speed. Configuration options: [Auto] [Enabled] [Disabled...
User Guide
Page 113
... power management) support with a better energy saving conditions. If some ports are not used , these items show [Not Installed]. Due to internally optimize the order of commands. Configuration options: [Disabled] [Enabled] ASUS X99-A/USB 3.1 3-37 The following item appears only when you want to create a RAID configuration from SATA controller 2 does not support Intel® Rapid Storage Technology including RAID configuration. SATA Controller 2 Mode Selection [AHCI] This item allows you to set the SATA configuration. [Disabled] Disables the SATA function. [IDE] Set to...
... power management) support with a better energy saving conditions. If some ports are not used , these items show [Not Installed]. Due to internally optimize the order of commands. Configuration options: [Disabled] [Enabled] ASUS X99-A/USB 3.1 3-37 The following item appears only when you want to create a RAID configuration from SATA controller 2 does not support Intel® Rapid Storage Technology including RAID configuration. SATA Controller 2 Mode Selection [AHCI] This item allows you to set the SATA configuration. [Disabled] Disables the SATA function. [IDE] Set to...
User Guide
Page 115
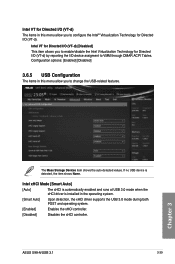
... DMAR ACPI Tables. Configuration options: [Enabled] [Disabled] 3.6.5 USB Configuration The items in the operating system. [Smart Auto] Upon detection, the xHCI driver supports the USB 3.0 mode during both POST and operating system. [Enabled] Enables the xHCI controller. [Disabled] Disables the xHCI controller. Chapter 3 The Mass Storage Devices item shows the auto-detected values. ASUS X99-A/USB 3.1 3-39 If no USB device is installed in this menu allow you to change the USB-related features. Intel xHCI Mode [Smart Auto] [Auto] The xHCI is automatically enabled and...
... DMAR ACPI Tables. Configuration options: [Enabled] [Disabled] 3.6.5 USB Configuration The items in the operating system. [Smart Auto] Upon detection, the xHCI driver supports the USB 3.0 mode during both POST and operating system. [Enabled] Enables the xHCI controller. [Disabled] Disables the xHCI controller. Chapter 3 The Mass Storage Devices item shows the auto-detected values. ASUS X99-A/USB 3.1 3-39 If no USB device is installed in this menu allow you to change the USB-related features. Intel xHCI Mode [Smart Auto] [Auto] The xHCI is automatically enabled and...

User Guide
Page 125
... Mode, PWM Mode, or disable these extension Q-Fan controls from 40°C to assign detailed fan speed control parameters. The values range from your motherboard. Chapter 3 ASUS X99-A/USB 3.1 3-49 Configuration options: [Ignore] [200 RPM] [300 RPM] [400 RPM] [500 RPM] [600 RPM] EXT Fan 1/3 Profile [Standard] This item allows you to [PWM Mode] or [DC Mode]. The values may differ via Qfan tuning. EXT Fan 1/3 Max. Configuration options: [Disabled] [Enabled] EXT Fan 1/3 Q-Fan Control [DC Mode...
... Mode, PWM Mode, or disable these extension Q-Fan controls from 40°C to assign detailed fan speed control parameters. The values range from your motherboard. Chapter 3 ASUS X99-A/USB 3.1 3-49 Configuration options: [Ignore] [200 RPM] [300 RPM] [400 RPM] [500 RPM] [600 RPM] EXT Fan 1/3 Profile [Standard] This item allows you to [PWM Mode] or [DC Mode]. The values may differ via Qfan tuning. EXT Fan 1/3 Max. Configuration options: [Disabled] [Enabled] EXT Fan 1/3 Q-Fan Control [DC Mode...
User Guide
Page 129
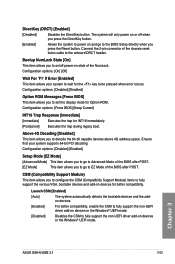
... Connect the 2-pin connector of the BIOS after POST. [EZ Mode] This item allows you press the Reset button. Chapter 3 ASUS X99-A/USB 3.1 3-53 Configuration options: [Force BIOS] [Keep Current] INT19 Trap Response [Immediate] [Immediate] Executes the trap for Option ROM. DirectKey (DRCT) [Enabled] [Disabled] Disables the DirectKey button. The system will only power on or off power-on devices for the key to set the display mode for INT19 immediately. [Postponed] Executes the trap during legacy boot. Configuration options: [Disabled] [Enabled] Setup Mode [EZ Mode...
... Connect the 2-pin connector of the BIOS after POST. [EZ Mode] This item allows you press the Reset button. Chapter 3 ASUS X99-A/USB 3.1 3-53 Configuration options: [Force BIOS] [Keep Current] INT19 Trap Response [Immediate] [Immediate] Executes the trap for Option ROM. DirectKey (DRCT) [Enabled] [Disabled] Disables the DirectKey button. The system will only power on or off power-on devices for the key to set the display mode for INT19 immediately. [Postponed] Executes the trap during legacy boot. Configuration options: [Disabled] [Enabled] Setup Mode [EZ Mode...

User Guide
Page 133
... run ASUS EZ Flash 2. ASUS X99-A/USB 3.1 3-57 Chapter 3 It also shows the recommended number of graphics card to install to your motherboard for special functions. For more details, refer to display the submenu. Use the left/right arrow key to select between [Yes] or [No], then press to confirm your motherboard. 3.9 Tool menu The Tool menu items allow you to configure options for best performance. 3.9.1 ASUS EZ Flash 2 Utility...
... run ASUS EZ Flash 2. ASUS X99-A/USB 3.1 3-57 Chapter 3 It also shows the recommended number of graphics card to install to your motherboard for special functions. For more details, refer to display the submenu. Use the left/right arrow key to select between [Yes] or [No], then press to confirm your motherboard. 3.9 Tool menu The Tool menu items allow you to configure options for best performance. 3.9.1 ASUS EZ Flash 2 Utility...

User Guide
Page 137
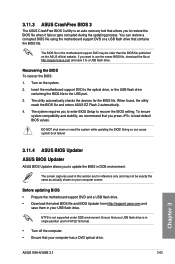
...the BIOS in Windows® environment. • ASUS EZ Flash 2: Updates the BIOS using a USB flash drive. • ASUS CrashFree BIOS 3: Restores the BIOS using the motherboard support DVD or a USB flash drive when the BIOS file fails or gets corrupted. • ASUS BIOS Updater: Updates the BIOS in DOS environment using the motherboard support DVD and a USB flash disk drive. 3.11.1 EZ Update The EZ Update is a utility that comes with the support DVD. 3.11.2 ASUS EZ Flash 2 ASUS EZ Flash 2 allows you start using this motherboard. Enter the Advanced Mode of BIOS, DO NOT manually update...
...the BIOS in Windows® environment. • ASUS EZ Flash 2: Updates the BIOS using a USB flash drive. • ASUS CrashFree BIOS 3: Restores the BIOS using the motherboard support DVD or a USB flash drive when the BIOS file fails or gets corrupted. • ASUS BIOS Updater: Updates the BIOS in DOS environment using the motherboard support DVD and a USB flash disk drive. 3.11.1 EZ Update The EZ Update is a utility that comes with the support DVD. 3.11.2 ASUS EZ Flash 2 ASUS EZ Flash 2 allows you start using this motherboard. Enter the Advanced Mode of BIOS, DO NOT manually update...
User Guide
Page 139
.... ASUS X99-A/USB 3.1 3-63 Chapter 3 When found, the utility reads the BIOS file and enters ASUS EZ Flash 2 automatically. 4. Doing so can restore a corrupted BIOS file using the motherboard support DVD or a USB flash drive that allows you want to load default BIOS values. Insert the motherboard support DVD to the optical drive, or the USB flash drive containing the BIOS file to recover the BIOS setting. To ensure system compatibility and stability, we recommend that your computer screen. Before updating BIOS • Prepare the motherboard support DVD and a USB flash...
.... ASUS X99-A/USB 3.1 3-63 Chapter 3 When found, the utility reads the BIOS file and enters ASUS EZ Flash 2 automatically. 4. Doing so can restore a corrupted BIOS file using the motherboard support DVD or a USB flash drive that allows you want to load default BIOS values. Insert the motherboard support DVD to the optical drive, or the USB flash drive containing the BIOS file to recover the BIOS setting. To ensure system compatibility and stability, we recommend that your computer screen. Before updating BIOS • Prepare the motherboard support DVD and a USB flash...
User Guide
Page 140
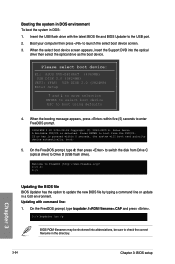
.... Welcome to boot using defaults 4. C:/> d: D:/> Updating the BIOS file BIOS Updater has the option to update the new BIOS file by typing a command line or update in DOS: 1. On the FreeDOS prompt, type bupdater /i.CAP and press . When the select boot device screen appears, insert the Support DVD into abbreviations, be shortened into the optical drive then select the optical drive as the boot device. Please select boot device: E1: ASUS DVD-E818A6T (4069MB) USB DISK 2.0 (3824MB) UEFI: (FAT) USB DISK 2.0 (3824MB) Enter Setup ...
.... Welcome to boot using defaults 4. C:/> d: D:/> Updating the BIOS file BIOS Updater has the option to update the new BIOS file by typing a command line or update in DOS: 1. On the FreeDOS prompt, type bupdater /i.CAP and press . When the select boot device screen appears, insert the Support DVD into abbreviations, be shortened into the optical drive then select the optical drive as the boot device. Please select boot device: E1: ASUS DVD-E818A6T (4069MB) USB DISK 2.0 (3824MB) UEFI: (FAT) USB DISK 2.0 (3824MB) Enter Setup ...


