
User Manual
Page 2
... Function Introduction 3-2 3.2 Specifications 3-7 3.3 Troubleshooting (FAQ 3-8 3.4 Supported Timing List 3-9 Copyright © 2011 ASUSTeK COMPUTER INC. IN NO EVENT SHALL ASUS, ITS DIRECTORS, OFFICERS, EMPLOYEES OR AGENTS BE LIABLE FOR ANY INDIRECT, SPECIAL, INCIDENTAL, OR CONSEQUENTIAL DAMAGES (INCLUDING DAMAGES FOR LOSS OF PROFITS, LOSS ...ONLY, AND ARE SUBJECT TO CHANGE AT ANY TIME WITHOUT NOTICE, AND SHOULD NOT BE CONSTRUED AS A COMMITMENT BY ASUS. ASUS ASSUMES NO RESPONSIBILITY OR LIABILITY FOR ANY ERRORS OR INACCURACIES THAT MAY APPEAR IN THIS MANUAL, INCLUDING THE PRODUCTS AND SOFTWARE...
... Function Introduction 3-2 3.2 Specifications 3-7 3.3 Troubleshooting (FAQ 3-8 3.4 Supported Timing List 3-9 Copyright © 2011 ASUSTeK COMPUTER INC. IN NO EVENT SHALL ASUS, ITS DIRECTORS, OFFICERS, EMPLOYEES OR AGENTS BE LIABLE FOR ANY INDIRECT, SPECIAL, INCIDENTAL, OR CONSEQUENTIAL DAMAGES (INCLUDING DAMAGES FOR LOSS OF PROFITS, LOSS ...ONLY, AND ARE SUBJECT TO CHANGE AT ANY TIME WITHOUT NOTICE, AND SHOULD NOT BE CONSTRUED AS A COMMITMENT BY ASUS. ASUS ASSUMES NO RESPONSIBILITY OR LIABILITY FOR ANY ERRORS OR INACCURACIES THAT MAY APPEAR IN THIS MANUAL, INCLUDING THE PRODUCTS AND SOFTWARE...

User Manual
Page 3
This equipment generates, uses and can be determined by turning the equipment off and on, the user is no guarantee that may cause harmful interference to Part 15 of Communications Statement This digital apparatus does not exceed the Class B limits for help. If this product meets the Energy Star® guidelines for a Class B digital device, pursuant to radio communications. Canadian Department of the FCC Rules. However, there is encouraged to try to correct the interference by one or more of the following two conditions: • This device may not cause harmful ...
This equipment generates, uses and can be determined by turning the equipment off and on, the user is no guarantee that may cause harmful interference to Part 15 of Communications Statement This digital apparatus does not exceed the Class B limits for help. If this product meets the Energy Star® guidelines for a Class B digital device, pursuant to radio communications. Canadian Department of the FCC Rules. However, there is encouraged to try to correct the interference by one or more of the following two conditions: • This device may not cause harmful ...

User Manual
Page 4
Contact a qualified service technician or your retailer. • Before using the product, make sure all the documentation that came with the package. • To prevent fire or shock hazard, never expose the monitor to rain or moisture. • Never try to power surges. • Never push objects or spill liquid of any damage, contact your dealer immediately. • Slots and openings on a stable surface. • Unplug the unit during a lightning storm or if it will protect the monitor from the type of time. Do not place the monitor in fire or electric shock. • Avoid dust,...
Contact a qualified service technician or your retailer. • Before using the product, make sure all the documentation that came with the package. • To prevent fire or shock hazard, never expose the monitor to rain or moisture. • Never try to power surges. • Never push objects or spill liquid of any damage, contact your dealer immediately. • Slots and openings on a stable surface. • Unplug the unit during a lightning storm or if it will protect the monitor from the type of time. Do not place the monitor in fire or electric shock. • Avoid dust,...

User Manual
Page 5
Use a cleaner intended for use with a lint-free, non-abrasive cloth. NOTE: Tips and additional information to aid in this guide WARNING: Information to prevent injury to yourself when trying to complete a task. Follow the correct lifting techniques when positioning the monitor. Do not lift the display by yourself! Clean the monitor surface with the LED. Stubborn stains may be removed with a cloth dampened with the monitor: • The screen may find slightly uneven brightness on the screen depending on the screen, as it . The screen will recover slowly or you MUST follow to ...
Use a cleaner intended for use with a lint-free, non-abrasive cloth. NOTE: Tips and additional information to aid in this guide WARNING: Information to prevent injury to yourself when trying to complete a task. Follow the correct lifting techniques when positioning the monitor. Do not lift the display by yourself! Clean the monitor surface with the LED. Stubborn stains may be removed with a cloth dampened with the monitor: • The screen may find slightly uneven brightness on the screen depending on the screen, as it . The screen will recover slowly or you MUST follow to ...

User Manual
Page 6
Optional documentation Your product package may include optional documentation that may have been added by your dealer. These documents are not part of the standard package. vi Refer to the following sources for additional information and for product and software updates. 1. ASUS websites The ASUS websites worldwide provide updated information on ASUS hardware and software products. Where to find more information Refer to http://www.asus.com 2.
Optional documentation Your product package may include optional documentation that may have been added by your dealer. These documents are not part of the standard package. vi Refer to the following sources for additional information and for product and software updates. 1. ASUS websites The ASUS websites worldwide provide updated information on ASUS hardware and software products. Where to find more information Refer to http://www.asus.com 2.

User Manual
Page 7
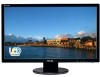
... Monitor base Quick start guide Warranty card 1 x Power cord 1 x VGA cable 1 x DVI cable 1 x Audio cable 1 x DisplayPort cable (optional for purchasing the ASUS® VE258H/VE258Q Series LED monitor! ASUS LED Monitor VE258H/VE258Q Series 1-1 1.1 Welcome! The latest widescreen LED monitor from ASUS provides a crisper, broader, and brighter display, plus a host of features that the VE258H...
... Monitor base Quick start guide Warranty card 1 x Power cord 1 x VGA cable 1 x DVI cable 1 x Audio cable 1 x DisplayPort cable (optional for purchasing the ASUS® VE258H/VE258Q Series LED monitor! ASUS LED Monitor VE258H/VE258Q Series 1-1 1.1 Welcome! The latest widescreen LED monitor from ASUS provides a crisper, broader, and brighter display, plus a host of features that the VE258H...

User Manual
Page 8
Adjust the monitor to the arm tightly. 1.4 Connect cables To connect cables: Connect the cables you need based on chapter 1.5.2, page1-5. 1-2 Chapter 1: Product Introduction 1.3 Assembling the monitor base To assemble the monitor base: 1. You can easily tighten the screw by fingers. 2. We recommend that you . Attach the base to the arm and fix with soft cloth to prevent damage to the monitor. 2 1 Make sure to screw the base to the angle that is most comfortable for you cover the table surface with the screw to join them tightly.
Adjust the monitor to the arm tightly. 1.4 Connect cables To connect cables: Connect the cables you need based on chapter 1.5.2, page1-5. 1-2 Chapter 1: Product Introduction 1.3 Assembling the monitor base To assemble the monitor base: 1. You can easily tighten the screw by fingers. 2. We recommend that you . Attach the base to the arm and fix with soft cloth to prevent damage to the monitor. 2 1 Make sure to screw the base to the angle that is most comfortable for you cover the table surface with the screw to join them tightly.
User Manual
Page 9
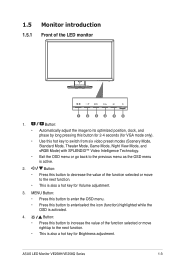
... to its optimized position, clock, and phase by long pressing this hot key to the next function. This is also a hot key for Volume adjustment. 3. ASUS LED Monitor VE258H/VE258Q Series 1-3
... to its optimized position, clock, and phase by long pressing this hot key to the next function. This is also a hot key for Volume adjustment. 3. ASUS LED Monitor VE258H/VE258Q Series 1-3

User Manual
Page 10
Power Button/Power Indicator: • Press this hot key to switch from VGA, DVI, HDMI and DisplayPort input signal (only available for model VE258Q). Status Blue Amber OFF Description ON Standby mode OFF 1-4 Chapter 1: Product Introduction Input Select Button: • Use this button to display HDMI signals after you connect HDMI cable with the monitor. 6. 5. Press (Input Select button) to turn the monitor on/off. • The color definition of the power indicator is as the below table.
Power Button/Power Indicator: • Press this hot key to switch from VGA, DVI, HDMI and DisplayPort input signal (only available for model VE258Q). Status Blue Amber OFF Description ON Standby mode OFF 1-4 Chapter 1: Product Introduction Input Select Button: • Use this button to display HDMI signals after you connect HDMI cable with the monitor. 6. 5. Press (Input Select button) to turn the monitor on/off. • The color definition of the power indicator is as the below table.

User Manual
Page 11
1.5.2 Rear of the LED monitor Screw Holes for VESA Wall Mount 7 1 23 4 5 6 1 AC-IN port 2 DisplayPort (only available for model VE258Q) 3 HDMI-IN port 4 DVI port 5 VGA port 6 Audio Line-in port 7 Earphone-out port ASUS LED Monitor VE258H/VE258Q Series 1-5
1.5.2 Rear of the LED monitor Screw Holes for VESA Wall Mount 7 1 23 4 5 6 1 AC-IN port 2 DisplayPort (only available for model VE258Q) 3 HDMI-IN port 4 DVI port 5 VGA port 6 Audio Line-in port 7 Earphone-out port ASUS LED Monitor VE258H/VE258Q Series 1-5

User Manual
Page 12
... the screws. • The VESA wall mount kit ( 100 x 100 mm) is specially designed for VESA wall mount. Carefully put the front of the VE258H/VE258Q Series LED monitor is purchased separately. • Use only the UL Listed Wall Mount Bracket with soft cloth to prevent damage to the monitor. 3. Disconnect...
... the screws. • The VESA wall mount kit ( 100 x 100 mm) is specially designed for VESA wall mount. Carefully put the front of the VE258H/VE258Q Series LED monitor is purchased separately. • Use only the UL Listed Wall Mount Bracket with soft cloth to prevent damage to the monitor. 3. Disconnect...

User Manual
Page 13
2.2 Adjusting the monitor • For optimal viewing, we recommend that you look at the full face of the monitor, then adjust the monitor to the angle that is most comfortable for you. • Hold the stand to prevent the monitor from falling while changing its angle. • You can adjust the monitor's angle from -5˚ to 20˚. -5 ~ 20 ASUS LED Monitor VE258H/VE258Q Series 2-2
2.2 Adjusting the monitor • For optimal viewing, we recommend that you look at the full face of the monitor, then adjust the monitor to the angle that is most comfortable for you. • Hold the stand to prevent the monitor from falling while changing its angle. • You can adjust the monitor's angle from -5˚ to 20˚. -5 ~ 20 ASUS LED Monitor VE258H/VE258Q Series 2-2

User Manual
Page 14
If the function selected has a sub-menu, press and again to navigate through the sub-menu functions. Highlight and activate the desired sub-menu function by pressing the MENU button. Press the MENU button to adjust any other function. 3-1 Chapter 3: General Instruction To exit the OSD menu, press the button. Repeat step 2 and step 3 to activate the OSD menu. 2. Highlight and activate the desired function by pressing the MENU button. 3. Press and to reconfigure VE258 Splendid Color Image Sound Input Select System Setup Scenery Mode ...
If the function selected has a sub-menu, press and again to navigate through the sub-menu functions. Highlight and activate the desired sub-menu function by pressing the MENU button. Press the MENU button to adjust any other function. 3-1 Chapter 3: General Instruction To exit the OSD menu, press the button. Repeat step 2 and step 3 to activate the OSD menu. 2. Highlight and activate the desired function by pressing the MENU button. 3. Press and to reconfigure VE258 Splendid Color Image Sound Input Select System Setup Scenery Mode ...

User Manual
Page 15
3.1.2 OSD Function Introduction 1. ASUS LED Monitor VE258H/VE258Q Series 3-2 Each mode has the Reset selection, allowing you can select for viewing photos and graphics from PCs. • In the Standard Mode, the Saturation, ...
3.1.2 OSD Function Introduction 1. ASUS LED Monitor VE258H/VE258Q Series 3-2 Each mode has the Reset selection, allowing you can select for viewing photos and graphics from PCs. • In the Standard Mode, the Saturation, ...

User Manual
Page 16
Color Select the image color you like from 0 ~ 100. 3-3 Chapter 3: General Instruction The button is also a hot key to activate this function. 2. the adjusting range is from 0 to 100. Skin Tone 100 80 90 User Mode Natural Move Menu Exit • Brightness: The adjusting range is from this function. • Contrast: The adjusting range is from 0 to 100. • Saturation: The adjusting range is from 0 to 100. • Color Temp.: Contain three preset color modes (Cool, Normal, Warm) and one User Mode. • Skin Tone: Contain three color modes including Reddish, ...
Color Select the image color you like from 0 ~ 100. 3-3 Chapter 3: General Instruction The button is also a hot key to activate this function. 2. the adjusting range is from 0 to 100. Skin Tone 100 80 90 User Mode Natural Move Menu Exit • Brightness: The adjusting range is from this function. • Contrast: The adjusting range is from 0 to 100. • Saturation: The adjusting range is from 0 to 100. • Color Temp.: Contain three preset color modes (Cool, Normal, Warm) and one User Mode. • Skin Tone: Contain three color modes including Reddish, ...

User Manual
Page 17
... range is from 0 to 100 (only available for VGA input). • Focus: Reduce Horizontal-line noise and Vertical-line noise of the image. ASUS LED Monitor VE258H/VE258Q Series 3-4 The adjusting range is from this main function. Image You can adjust the image Sharpness, Trace Free, Aspect Control, Position (VGA only), and...
... range is from 0 to 100 (only available for VGA input). • Focus: Reduce Horizontal-line noise and Vertical-line noise of the image. ASUS LED Monitor VE258H/VE258Q Series 3-4 The adjusting range is from this main function. Image You can adjust the image Sharpness, Trace Free, Aspect Control, Position (VGA only), and...

User Manual
Page 18
...). 5. button is also a hot key • Mute: Mute the output volume. • Source: Adjust audio source to "Line In" or "DisplayPort" (only available for model VE258Q) Adjust the sound settings to activate this function. VE258 Splendid Color Image Sound Input Select System Setup VGA DVI HDMI DisplayPort Move Menu Exit 3-5 Chapter...
...). 5. button is also a hot key • Mute: Mute the output volume. • Source: Adjust audio source to "Line In" or "DisplayPort" (only available for model VE258Q) Adjust the sound settings to activate this function. VE258 Splendid Color Image Sound Input Select System Setup VGA DVI HDMI DisplayPort Move Menu Exit 3-5 Chapter...

User Manual
Page 19
... Setup: Adjust the horizontal position (H-Position), vertical position (V-Position), OSD Timeout, DDD/CI, and Transparency of the OSD screen. • Language: Select OSD language. ASUS LED Monitor VE258H/VE258Q Series 3-6 The selections are English, French, German, Spanish, Italian, Dutch, Russian, Traditional Chinese, Simplified Chinese, and Japanese. • Information: Display the monitor information...
... Setup: Adjust the horizontal position (H-Position), vertical position (V-Position), OSD Timeout, DDD/CI, and Transparency of the OSD screen. • Language: Select OSD language. ASUS LED Monitor VE258H/VE258Q Series 3-6 The selections are English, French, German, Spanish, Italian, Dutch, Russian, Traditional Chinese, Simplified Chinese, and Japanese. • Information: Display the monitor information...
User Manual
Page 20
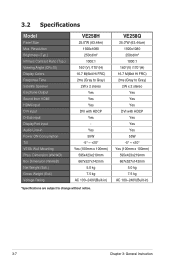
... Speaker Earphone Output Sound from HDMI HDMI input DVI input D-Sub input DisplayPort input Audio Line-in ) 3-7 Chapter 3: General Instruction 3.2 Specifications Model Panel Size Max. VE258Q 25.0"W (63.44cm) 1920x1080 250cd/m2 1000:1 160°(V) /170°(H) 16.7 M(6bit Hi FRC) 2ms (Gray to Gray) 2W x 2 stereo Yes Yes Yes DVI...
... Speaker Earphone Output Sound from HDMI HDMI input DVI input D-Sub input DisplayPort input Audio Line-in ) 3-7 Chapter 3: General Instruction 3.2 Specifications Model Panel Size Max. VE258Q 25.0"W (63.44cm) 1920x1080 250cd/m2 1000:1 160°(V) /170°(H) 16.7 M(6bit Hi FRC) 2ms (Gray to Gray) 2W x 2 stereo Yes Yes Yes DVI...

User Manual
Page 21
... none of the pins are bent. • Perform Reset via OSD. • Adjust the R/G/B color settings or select the Color Temperature via OSD. ASUS LED Monitor VE258H/VE258Q Series 3-8 Screen image is too light or dark • Adjust the Contrast and Brightness settings via OSD. Screen image has color defects (white does...
... none of the pins are bent. • Perform Reset via OSD. • Adjust the R/G/B color settings or select the Color Temperature via OSD. ASUS LED Monitor VE258H/VE258Q Series 3-8 Screen image is too light or dark • Adjust the Contrast and Brightness settings via OSD. Screen image has color defects (white does...
