Vintage2-PH1 User''s Manual for English Edition
Page 55
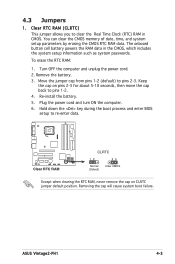
4.3 Jumpers 1. To erase the RTC RAM: 1. ASUS Vintage2-PH1 4-3 Remove the battery. 3. Keep the cap on pins 2-3 for about 5-10 seconds, then move the cap back to re-enter data. ® Clear RTC RAM CLRTC 12 23 Normal (Default) Clear CMOS Except when clearing the RTC RAM, never remove the cap on CLRTC ... enter BIOS setup to pins 1-2. 4. You can clear the CMOS memory of date, time, and system setup parameters by erasing the CMOS RTC RAM data. Turn OFF the computer and unplug the power cord. 2. Move the jumper cap from pins 1-2 (default) to clear the Real Time Clock (...
4.3 Jumpers 1. To erase the RTC RAM: 1. ASUS Vintage2-PH1 4-3 Remove the battery. 3. Keep the cap on pins 2-3 for about 5-10 seconds, then move the cap back to re-enter data. ® Clear RTC RAM CLRTC 12 23 Normal (Default) Clear CMOS Except when clearing the RTC RAM, never remove the cap on CLRTC ... enter BIOS setup to pins 1-2. 4. You can clear the CMOS memory of date, time, and system setup parameters by erasing the CMOS RTC RAM data. Turn OFF the computer and unplug the power cord. 2. Move the jumper cap from pins 1-2 (default) to clear the Real Time Clock (...

Vintage2-PH1 User''s Manual for English Edition
Page 75
...setup program This motherboard supports a programmable firmware chip that the computer can recognize these changes and record them in the CMOS RAM of your computer in the future. Use the BIOS Setup program when you with its test routines. When you start up the ...Run Setup". The Setup program is designed to make your screen. • Visit the ASUS website (www.asus.com) to ensure system compatibility and stability. Being a menu-driven program, it as possible. ASUS Vintage2-PH1 5-11 This section explains how to ensure optimum performance. If you can also restart by...
...setup program This motherboard supports a programmable firmware chip that the computer can recognize these changes and record them in the CMOS RAM of your computer in the future. Use the BIOS Setup program when you with its test routines. When you start up the ...Run Setup". The Setup program is designed to make your screen. • Visit the ASUS website (www.asus.com) to ensure system compatibility and stability. Being a menu-driven program, it as possible. ASUS Vintage2-PH1 5-11 This section explains how to ensure optimum performance. If you can also restart by...

Vintage2-PH1 User''s Manual for English Edition
Page 100
...this item shows Installed. Change Option F1 General Help Select this item to set a password, this function allows the option ROMs to erase the RTC RAM. 5-36 Chapter 5: BIOS setup The message "Password Uninstalled" appears. Select the Change Supervisor Password item and press . 2. Configuration options:... select the Change Supervisor Password then press . If you can clear clear it by erasing the CMOS Real Time Clock (RTC) RAM. From the password box, type a password composed of the screen shows the default Not Installed. again to change the supervisor password,...
...this item shows Installed. Change Option F1 General Help Select this item to set a password, this function allows the option ROMs to erase the RTC RAM. 5-36 Chapter 5: BIOS setup The message "Password Uninstalled" appears. Select the Change Supervisor Password item and press . 2. Configuration options:... select the Change Supervisor Password then press . If you can clear clear it by erasing the CMOS Real Time Clock (RTC) RAM. From the password box, type a password composed of the screen shows the default Not Installed. again to change the supervisor password,...

Vintage2-PH1 User''s Manual for English Edition
Page 102
... Sub-screen F1 General Help F10 Save and Exit ESC Exit Pressing does not immediately exit this operation. An onboard backup battery sustains the CMOS RAM so it stays on even when the PC is turned off. Select Ok to save the changes while exiting. 5-38 Chapter 5: BIOS setup Password ... menu items allow you are saved to load the optimal or failsafe default values for this menu. Exit & Save Changes Once you to the CMOS RAM. If you attempt to save changes and exit. Press to exit the Setup program without saving your changes, the program prompts you with a message ...
... Sub-screen F1 General Help F10 Save and Exit ESC Exit Pressing does not immediately exit this operation. An onboard backup battery sustains the CMOS RAM so it stays on even when the PC is turned off. Select Ok to save the changes while exiting. 5-38 Chapter 5: BIOS setup Password ... menu items allow you are saved to load the optimal or failsafe default values for this menu. Exit & Save Changes Once you to the CMOS RAM. If you attempt to save changes and exit. Press to exit the Setup program without saving your changes, the program prompts you with a message ...

Vintage2-PH1 User''s Manual for English Edition
Page 103
...option allows you to discard the selections you to load the default values for a confirmation before saving the values to the non-volatile RAM. After selecting this option, a confirmation appears. Select Ok to discard any changes and load the previously saved values. Select Exit ...Changes or make other than System Date, System Time, and Password, the BIOS asks for each of the parameters on the Setup menus. ASUS Vintage2-PH1 5-39 Select Ok to load default values. Load Setup Defaults This option allows you made and restore the previously saved values. When you ...
...option allows you to discard the selections you to load the default values for a confirmation before saving the values to the non-volatile RAM. After selecting this option, a confirmation appears. Select Ok to discard any changes and load the previously saved values. Select Exit ...Changes or make other than System Date, System Time, and Password, the BIOS asks for each of the parameters on the Setup menus. ASUS Vintage2-PH1 5-39 Select Ok to load default values. Load Setup Defaults This option allows you made and restore the previously saved values. When you ...
