AiMesh Setup guide in English
Page 3
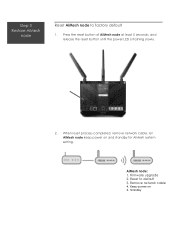
Step 3 Restore AiMesh node Reset AiMesh node to default 3. Firmware upgrade 2. Remove network cable 4. Keep power on and standby for AiMesh system setting. Standby AiMesh node: 1. Reset to factory default 1. When reset process completed, remove network cable, let AiMesh node keep power on 5. Press the reset button of AiMesh node at least 5 seconds, and release the reset button until the power LED is flashing slowly. 2.
Step 3 Restore AiMesh node Reset AiMesh node to default 3. Firmware upgrade 2. Remove network cable 4. Keep power on and standby for AiMesh system setting. Standby AiMesh node: 1. Reset to factory default 1. When reset process completed, remove network cable, let AiMesh node keep power on 5. Press the reset button of AiMesh node at least 5 seconds, and release the reset button until the power LED is flashing slowly. 2.

AiMesh Setup guide in English
Page 6
... closed to add it into AiMesh system. b). d). You can find any AiMesh node nearby or synchronization fails, please check followings and try again. It is reset to place all routers in close proximity when synchronizing for the first time in case of interference. Your AiMesh node is best to default. 5. 4. a). If...
... closed to add it into AiMesh system. b). d). You can find any AiMesh node nearby or synchronization fails, please check followings and try again. It is reset to place all routers in close proximity when synchronizing for the first time in case of interference. Your AiMesh node is best to default. 5. 4. a). If...
AiMesh Setup guide in English
Page 8
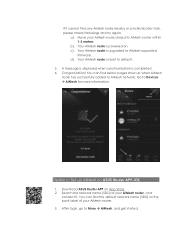
...5. Congratulation! Option c: Set up when AiMesh node has successfully added to AiMesh router within 1-3 meters. If it . b). Your AiMesh node is reset to AiMesh-supported firmware. d). You can find below pages show up AiMesh on . Your AiMesh node is completed. 6. A message is displayed when ...synchronization is powered on ASUS Router APP-iOS . 1. After login, go to Devices AiMesh for more information. Go to More AiMesh, and get started....
...5. Congratulation! Option c: Set up when AiMesh node has successfully added to AiMesh router within 1-3 meters. If it . b). Your AiMesh node is reset to AiMesh-supported firmware. d). You can find below pages show up AiMesh on . Your AiMesh node is completed. 6. A message is displayed when ...synchronization is powered on ASUS Router APP-iOS . 1. After login, go to Devices AiMesh for more information. Go to More AiMesh, and get started....
AiMesh Setup guide in English
Page 10
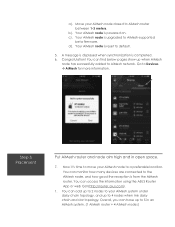
... d). Go to 4 nodes when mix daisy chain and star topology. Your AiMesh node is upgraded to the AiMesh node, and how good the reception is reset to 5 in open space. 7. You can add up to 2 nodes to your AiMesh node closed to AiMesh router between 1-3 meters. You can have up... Put AiMesh router and node aim high and in an AiMesh system. (1 AiMesh router + 4 AiMesh nodes) Overall, you can access the information using the ASUS Router App or web GUI (http://router.asus.com). 1. a). c). Move your AiMesh system under daisy chain topology, and up to default. 5.
... d). Go to 4 nodes when mix daisy chain and star topology. Your AiMesh node is upgraded to the AiMesh node, and how good the reception is reset to 5 in open space. 7. You can add up to 2 nodes to your AiMesh node closed to AiMesh router between 1-3 meters. You can have up... Put AiMesh router and node aim high and in an AiMesh system. (1 AiMesh router + 4 AiMesh nodes) Overall, you can access the information using the ASUS Router App or web GUI (http://router.asus.com). 1. a). c). Move your AiMesh system under daisy chain topology, and up to default. 5.

users manual
Page 8
.... 8 Power button Press this button to power on the panel. 13 LAN 1 ~ 4 ports Connect network cables into these ports to establish LAN connection. 14 Reset button This button resets or restores the system to a power source. 10 USB 3.0 / 2.0 ports Insert USB 3.0 / 2.0 devices such as USB hard disks or USB flash drives into...
.... 8 Power button Press this button to power on the panel. 13 LAN 1 ~ 4 ports Connect network cables into these ports to establish LAN connection. 14 Reset button This button resets or restores the system to a power source. 10 USB 3.0 / 2.0 ports Insert USB 3.0 / 2.0 devices such as USB hard disks or USB flash drives into...

users manual
Page 15
... network name (SSID) and security key. NOTES: • By default, the login username and password for the first time, press the Reset button on changing your wireless router's login username and password, refer to your wireless router's Web GUI to its factory default settings. For ...details on your wireless router to reset it to configure your wireless router's settings. 2.2 Quick Internet Setup (QIS) with auto-detection: 1. To use QIS with Autodetection The Quick ...
... network name (SSID) and security key. NOTES: • By default, the login username and password for the first time, press the Reset button on changing your wireless router's login username and password, refer to your wireless router's Web GUI to its factory default settings. For ...details on your wireless router to reset it to configure your wireless router's settings. 2.2 Quick Internet Setup (QIS) with auto-detection: 1. To use QIS with Autodetection The Quick ...
users manual
Page 17
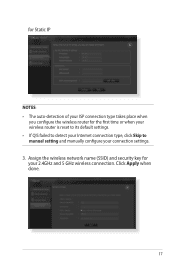
Click Apply when done. 17 for Static IP NOTES: • The auto-detection of your ISP connection type takes place when you configure the wireless router for your connection settings. 3. Assign the wireless network name (SSID) and security key for the first time or when your wireless router is reset to its default settings. • If QIS failed to detect your Internet connection type, click Skip to manual setting and manually configure your 2.4GHz and 5 GHz wireless connection.
Click Apply when done. 17 for Static IP NOTES: • The auto-detection of your ISP connection type takes place when you configure the wireless router for your connection settings. 3. Assign the wireless network name (SSID) and security key for the first time or when your wireless router is reset to its default settings. • If QIS failed to detect your Internet connection type, click Skip to manual setting and manually configure your 2.4GHz and 5 GHz wireless connection.

users manual
Page 84
From the navigation panel, go to Advanced Settings > System Log. 2. You can view your recorded network activities. NOTE: System log resets when the router is rebooted or powered off. 4.8 System Log System Log contains your network activities in any of these tabs: • General Log • DHCP Leases • Wireless Log • Port Forwarding • Routing Table 84 To view your system log: 1.
From the navigation panel, go to Advanced Settings > System Log. 2. You can view your recorded network activities. NOTE: System log resets when the router is rebooted or powered off. 4.8 System Log System Log contains your network activities in any of these tabs: • General Log • DHCP Leases • Wireless Log • Port Forwarding • Routing Table 84 To view your system log: 1.

users manual
Page 86
IMPORTANT: Launch the rescue mode on an ASUS Wireless Router that failed during its firmware upgrading process. It uploads the firmware that the wireless router is in the rescue mode. 86 Unplug the wireless router from the power source. 2. Hold the Reset button at the front panel flashes slowly, ...which indicates that you specify. The process takes about three to four minutes. Release the Reset button when the Power LED at the rear panel and simultaneously replug the wireless router into the power source. 5.2 Firmware Restoration Firmware...
IMPORTANT: Launch the rescue mode on an ASUS Wireless Router that failed during its firmware upgrading process. It uploads the firmware that the wireless router is in the rescue mode. 86 Unplug the wireless router from the power source. 2. Hold the Reset button at the front panel flashes slowly, ...which indicates that you specify. The process takes about three to four minutes. Release the Reset button when the Power LED at the rear panel and simultaneously replug the wireless router into the power source. 5.2 Firmware Restoration Firmware...

users manual
Page 104
... available in your router to the router wirelessly, you still cannot connect to factory default settings. • SSID has been hidden. If your device can reset your country/area. In the router GUI,click Administration > Restore/Save/Upload Setting and click Restore. 104
... available in your router to the router wirelessly, you still cannot connect to factory default settings. • SSID has been hidden. If your device can reset your country/area. In the router GUI,click Administration > Restore/Save/Upload Setting and click Restore. 104
users manual
Page 106
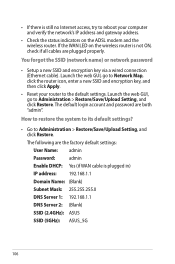
... (Ethernet cable). Launch the web GUI, go to Network Map, click the router icon, enter a new SSID and encryption key, and then click Apply. • Reset your computer and verify the network's IP address and gateway address. • Check the status indicators on the wireless router is still no Internet access... cable is plugged in) IP address: 192.168.1.1 Domain Name: (Blank) Subnet Mask: 255.255.255.0 DNS Server 1: 192.168.1.1 DNS Server 2: (Blank) SSID (2.4GHz): ASUS SSID (5GHz): ASUS_5G 106
... (Ethernet cable). Launch the web GUI, go to Network Map, click the router icon, enter a new SSID and encryption key, and then click Apply. • Reset your computer and verify the network's IP address and gateway address. • Check the status indicators on the wireless router is still no Internet access... cable is plugged in) IP address: 192.168.1.1 Domain Name: (Blank) Subnet Mask: 255.255.255.0 DNS Server 1: 192.168.1.1 DNS Server 2: (Blank) SSID (2.4GHz): ASUS SSID (5GHz): ASUS_5G 106