Asus RS200-E9-PS2 Support and Manuals
Get Help and Manuals for this Asus item
View All Support Options Below
Free Asus RS200-E9-PS2 manuals!
Problems with Asus RS200-E9-PS2?
Ask a Question
Free Asus RS200-E9-PS2 manuals!
Problems with Asus RS200-E9-PS2?
Ask a Question
Popular Asus RS200-E9-PS2 Manual Pages
RS200-E9 series User Guide - Page 6
... RAID driver 7-2 7.1.2 Installing the RAID controller driver 7-2
7.2 Management applications and utilities installation 7-5 7.3 Running the Support DVD 7-5 7.4 Installing the Intel® Chipset device Software driver 7-8 7.5 Installing the Intel® I210 Gigabit Adapters driver 7-11 7.6 Installing the VGA driver 7-13
Appendix P10S-C/4L/SYS block diagram A-2 ASUS contact information...
RS200-E9 series User Guide - Page 10
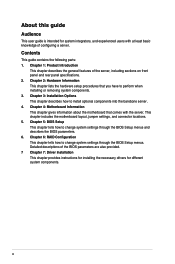
... the general features of configuring a server. Chapter 5: BIOS Setup This chapter tells how to change system settings through the BIOS Setup menus. Chapter 3: Installation Options This chapter describes how to perform when installing or removing system components. 3. Contents
This guide contains the following parts: 1. Chapter 6: RAID Configuration This chapter tells how to...
RS200-E9 series User Guide - Page 11
... and software updates. 1.
Keys enclosed in brackets. Used to set up and use the proprietary ASUS server management utility. 2. If you complete a task. Conventions
To ensure that you must press the enclosed key.
NOTE: Tips and additional information to the following symbols used throughout this manual. ASUS Server Web-based Management (ASWM) user guide
This manual tells...
RS200-E9 series User Guide - Page 14
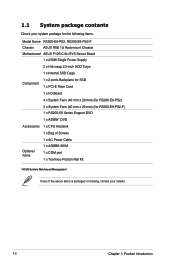
... Card
1 x I/O Board
4 x System Fans (40 mm x 28 mm) (for RS200-E9-PS2)
3 x System Fans (40 mm x 28 mm) (for RS200-E9-PS2-F) 1 x RS200-E9 Series Support DVD
1 x ASWM* DVD
Accessories 1 x CPU Heatsink
1 x Bag of Screws
Optional Items
1 x AC Power Cable 1 x ASMB8-iKVM 1 x COM port 1 x Tool-less Friction Rail Kit
*ASUS System Web-based Management
If any of the above items...
RS200-E9 series User Guide - Page 15
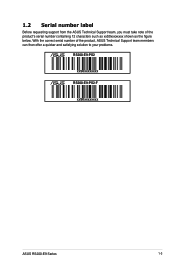
1.2 Serial number label
Before requesting support from the ASUS Technical Support team, you must take note of the product, ASUS Technical Support team members can then offer a quicker and satisfying solution to your problems.
RS200-E9-PS2
xxS0xxxxxxxx
RS200-E9-PS2-F
xxS0xxxxxxxx
ASUS RS200-E9 Series
1-3 With the correct serial number of the product's serial number containing 12 characters ...
RS200-E9 series User Guide - Page 16
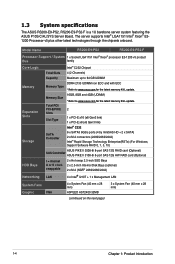
... 1: Product Introduction 1.3 System specifications
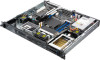
The ASUS RS200-E9-PS2, RS200-E9-PS2-F is a 1U barebone server system featuring the ASUS P10S-C/4L/SYS Server Board. Model Name
RS200-E9-PS2
RS200-E9-PS2-F
Processor Support / System 1 x Socket ...and with ECC Memory Type
* Refer to www.asus.com for the latest memory AVL update. The server supports Intel® LGA1151 Intel® Xeon®...
RS200-E9 series User Guide - Page 17

...Support
RS200-E9-PS2
RS200-E9-PS2-F
1 x External Serial Port (optional)
4 x RJ-45 GbE port
1 x RJ-45 management port (for updates. Model Name Onboard I
Operating temperature: 10°C - 35°C
Environment
Non operation temperature: -40°C - 70°C
Non operation humidity: 20% - 90% (Non condensing)
*Specifications are subject to www.asus.../ LED
1 x Q-Code / Port 80 LED ...
RS200-E9 series User Guide - Page 18
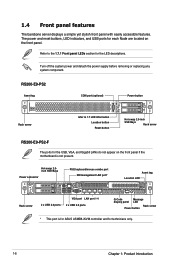
...
Rack screw
RS200-E9-PS2-F
1
2
3
4
Q-Code
The ports for the LED descriptions.
Turn off the system power and detach the power supply before removing or replacing any system component.
The power and reset buttons, LED indicators, and USB ports for each Node are located on the front panel if the motherboard is for ASUS ASMB8-iKVM...
RS200-E9 series User Guide - Page 43
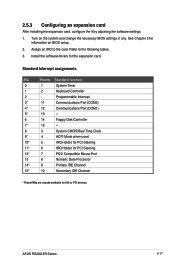
...After installing the expansion card, configure the it by adjusting the software settings.
1.
Standard Interrupt assignments
IRQ
Priority Standard function
0
1
System Timer
1
2
Keyboard Controller
2
- Turn on BIOS setup.... the necessary BIOS settings, if any. Assign an IRQ to the following tables.
3. ASUS RS200-E9 Series
2-17 Install the software drivers for the expansion card.
RS200-E9 series User Guide - Page 48
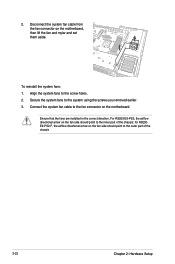
For RS200-E9-PS2, the airflow directional arrow on the fan side should point to the inner part of the chassis
2-22
Chapter 2: Hardware Setup Disconnect the system fan cable from the fan connector on the motherboard.
Secure the system fans to the screw holes. 2. Connect the system fan cable to the outer part of the chassis...
RS200-E9 series User Guide - Page 103
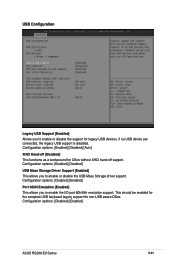
.../64 Emulation [Enabled]
This allows you to enable or disable the USB Mass Storage driver support. Configuration options: [Disabled] [Enabled]
ASUS RS200-E9 Series
5-21 Configuration options: [Enabled] [Disabled]
USB Mass Storage Driver Support [Enabled]
This allows you to enable or disable the support for legacy USB devices. This should be enabled for the complete USB keyboard legacy...
RS200-E9 series User Guide - Page 133
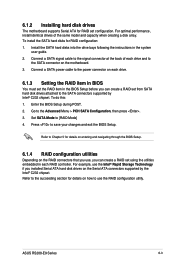
.... Enter the BIOS Setup during POST. 2. For optimal performance, install identical drives of each drive and to the SATA connectors supported by the Intel® C232 chipset. Connect a SATA power cable to the power connector on how to use , you can create a RAID set the RAID item in the system
user guide. 2. ASUS RS200-E9 Series
6-3 Refer to...
RS200-E9 series User Guide - Page 152
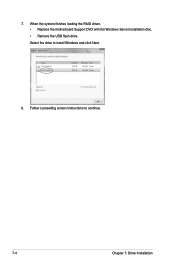
Follow succeeding screen instructions to install Windows and click Next.
8. 7. Select the drive to continue.
7-4
Chapter 7: Driver Installation When the system finishes loading the RAID driver, • Replace the motherboard Support DVD with the Windows Server installation disc. • Remove the USB flash drive.
RS200-E9 series User Guide - Page 154
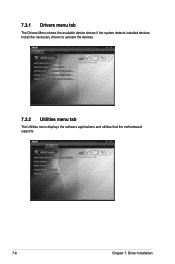
7.3.1 Drivers menu tab
The Drivers Menu shows the available device drivers if the system detects installed devices. Install the necessary drivers to activate the devices.
7.3.2 Utilities menu tab
The Utilities menu displays the software applications and utilities that the motherboard supports.
7-6
Chapter 7: Driver Installation
RS200-E9 series User Guide - Page 161
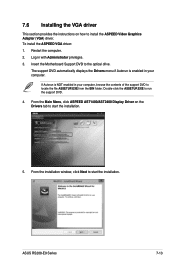
...the installation. 7.6 Installing the VGA driver
This section provides the instructions on the Drivers tab to install the ASPEED Video Graphics Adapter (VGA) driver. ASUS RS200-E9 Series
7-13 Restart the computer. 2. Double-click the ASSETUP.EXE to the optical drive. If Autorun is enabled in with Administrator privileges. 3. Log in your computer, browse the contents of the support...
Asus RS200-E9-PS2 Reviews
We have not received any reviews for Asus yet.