

User Guide
Page 16
...) DDR4 DIMM_A2 (64bit, 288-pin module) DDR4 DIMM_B1 (64bit, 288-pin module) DDR4 DIMM_B2 (64bit, 288-pin module) EATXPWR HDMI DVI LANGuard 30.5cm(12in) 1 LGA1151 LAN_USB3_56 SATA6G_6 SATA6G_5 SATA6G_4 SATA6G_3 SATA6G_2 SATA6G_1 USB3_12 PCIE SATA IRST X4 V X AUDIO AIO_PUMP 6 2280 2260 2242 M.2_1(SOCKET3) PCIEX1_1 3 Intel I219V PCIEX16_1 Super I/O PCIEX1_2...
...) DDR4 DIMM_A2 (64bit, 288-pin module) DDR4 DIMM_B1 (64bit, 288-pin module) DDR4 DIMM_B2 (64bit, 288-pin module) EATXPWR HDMI DVI LANGuard 30.5cm(12in) 1 LGA1151 LAN_USB3_56 SATA6G_6 SATA6G_5 SATA6G_4 SATA6G_3 SATA6G_2 SATA6G_1 USB3_12 PCIE SATA IRST X4 V X AUDIO AIO_PUMP 6 2280 2260 2242 M.2_1(SOCKET3) PCIEX1_1 3 Intel I219V PCIEX16_1 Super I/O PCIEX1_2...
User Guide
Page 17
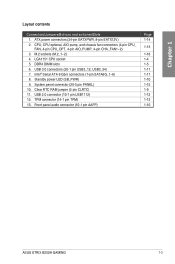
...20-5 pin PANEL) 10, Clear RTC RAM jumper (2-pin CLRTC) 11. TPM connector (14-1 pin TPM) 13. USB 2.0 connector (10-1 pin USB1112) 12. LGA1151 CPU socket 5. CPU, CPU optional, AIO pump, and chassis fan connectors (4-pin CPU_ FAN, 4-pin CPU_OPT, 4-pin AIO_PUMP, 4-pin CHA_FAN1~2) 3. Standby power LED... (7-pin SATA6G_1~6) 8. Front panel audio connector (10-1 pin AAFP) Page 1-14 1-13 1-16 1-4 1-5 1-11 1-11 1-10 1-15 1-9 1-12 1-12 1-10 ASUS STRIX B250H GAMING 1-3 Chapter 1 Layout contents Connectors/Jumpers/Buttons and switches/Slots 1. M.2 sockets (M.2_1~2) 4. DDR4 DIMM slots 6.
...20-5 pin PANEL) 10, Clear RTC RAM jumper (2-pin CLRTC) 11. TPM connector (14-1 pin TPM) 13. USB 2.0 connector (10-1 pin USB1112) 12. LGA1151 CPU socket 5. CPU, CPU optional, AIO pump, and chassis fan connectors (4-pin CPU_ FAN, 4-pin CPU_OPT, 4-pin AIO_PUMP, 4-pin CHA_FAN1~2) 3. Standby power LED... (7-pin SATA6G_1~6) 8. Front panel audio connector (10-1 pin AAFP) Page 1-14 1-13 1-16 1-4 1-5 1-11 1-11 1-10 1-15 1-9 1-12 1-12 1-10 ASUS STRIX B250H GAMING 1-3 Chapter 1 Layout contents Connectors/Jumpers/Buttons and switches/Slots 1. M.2 sockets (M.2_1~2) 4. DDR4 DIMM slots 6.
User Guide
Page 18
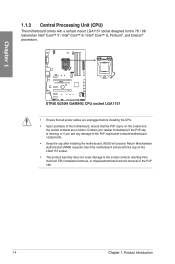
STRIX B250H GAMING CPU socket LGA1151 • Ensure that all power cables are unplugged before installing ...loss/incorrect removal of the PnP cap. 1-4 Chapter 1: Product Introduction ASUS will process Return Merchandise Authorization (RMA) requests only if the motherboard comes with a surface mount LGA1151 socket designed for the 7th / 6th Generation Intel® Core™... the socket contacts are not bent. Contact your retailer immediately if the PnP cap is on the LGA1151 socket. • The product warranty does not cover damage to the PnP cap/socket contacts/motherboard components...
STRIX B250H GAMING CPU socket LGA1151 • Ensure that all power cables are unplugged before installing ...loss/incorrect removal of the PnP cap. 1-4 Chapter 1: Product Introduction ASUS will process Return Merchandise Authorization (RMA) requests only if the motherboard comes with a surface mount LGA1151 socket designed for the 7th / 6th Generation Intel® Core™... the socket contacts are not bent. Contact your retailer immediately if the PnP cap is on the LGA1151 socket. • The product warranty does not cover damage to the PnP cap/socket contacts/motherboard components...
User Guide
Page 33
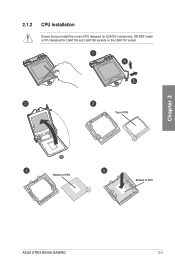
DO NOT install a CPU designed for LGA1151 socket only. 2.1.2 CPU installation Ensure that you install the correct CPU designed for LGA1155 and LGA1156 sockets on the LGA1151 socket. Chapter 2 Top of CPU Bottom of CPU Bottom of CPU ASUS STRIX B250H GAMING 2-3
DO NOT install a CPU designed for LGA1151 socket only. 2.1.2 CPU installation Ensure that you install the correct CPU designed for LGA1155 and LGA1156 sockets on the LGA1151 socket. Chapter 2 Top of CPU Bottom of CPU Bottom of CPU ASUS STRIX B250H GAMING 2-3

User Guide
Page 34
... Tool. • Always firmly hold both sides of CPU Chapter 2 • The CPU Installation Tool is only compatible on ASUS motherboards with Intel® LGA1151 socket. • Ensure that the CPU is firmly clicked into place before installing it onto the CPU socket on the motherboard..... • Ensure to use a soft stable surface when installing the CPU to the CPU Installation Tool to prevent CPU damage. • ASUS will not cover damages resulting from incorrect CPU installation/removal, incorrect CPU orientation/placement, or other damages resulting from negligence by the user. 2-4...
... Tool. • Always firmly hold both sides of CPU Chapter 2 • The CPU Installation Tool is only compatible on ASUS motherboards with Intel® LGA1151 socket. • Ensure that the CPU is firmly clicked into place before installing it onto the CPU socket on the motherboard..... • Ensure to use a soft stable surface when installing the CPU to the CPU Installation Tool to prevent CPU damage. • ASUS will not cover damages resulting from incorrect CPU installation/removal, incorrect CPU orientation/placement, or other damages resulting from negligence by the user. 2-4...