
User Guide
Page 3
... introduction 1.1 Welcome 1-1 1.2 Package contents 1-1 1.3 Monitor introduction 1-2 1.3.1 Front view 1-2 1.3.2 Back view 1-3 1.3.3 QuickFit Plus Function 1-4 1.3.4 Other Function(s 1-6 Chapter 2: Setup 2.1 Adjusting the monitor 2-1 2.2 Connecting the cables 2-2 2.3 Turning on the monitor 2-4 2.4 Touch Operation 2-4 Chapter 3: General instructions 3.1 OSD (On-Screen Display) menu 3-1 3.1.1 How to reconfigure 3-1 3.1.2 OSD function introduction 3-2 3.2 Specifications Summary 3-12 3.3 Outline dimensions 3-14 3.4 Troubleshooting (FAQ 3-15 3.5 Supported operating modes 3-16 iii
... introduction 1.1 Welcome 1-1 1.2 Package contents 1-1 1.3 Monitor introduction 1-2 1.3.1 Front view 1-2 1.3.2 Back view 1-3 1.3.3 QuickFit Plus Function 1-4 1.3.4 Other Function(s 1-6 Chapter 2: Setup 2.1 Adjusting the monitor 2-1 2.2 Connecting the cables 2-2 2.3 Turning on the monitor 2-4 2.4 Touch Operation 2-4 Chapter 3: General instructions 3.1 OSD (On-Screen Display) menu 3-1 3.1.1 How to reconfigure 3-1 3.1.2 OSD function introduction 3-2 3.2 Specifications Summary 3-12 3.3 Outline dimensions 3-14 3.4 Troubleshooting (FAQ 3-15 3.5 Supported operating modes 3-16 iii

User Guide
Page 4
...digital apparatus complies with manufacturer's instructions, may cause harmful interference to Part 15 of the following two conditions: • This device may cause undesired operation. This equipment generates, uses and can be determined by turning the equipment off and on, the user is connected... Communications Commission Statement This device complies with Part 15 of the Canadian Interference - Changes or modifications to which can radiate radio frequency energy and, if not installed and used in a particular installation. Canadian Department of Communications. However, there...
...digital apparatus complies with manufacturer's instructions, may cause harmful interference to Part 15 of the following two conditions: • This device may cause undesired operation. This equipment generates, uses and can be determined by turning the equipment off and on, the user is connected... Communications Commission Statement This device complies with Part 15 of the Canadian Interference - Changes or modifications to which can radiate radio frequency energy and, if not installed and used in a particular installation. Canadian Department of Communications. However, there...
User Guide
Page 5
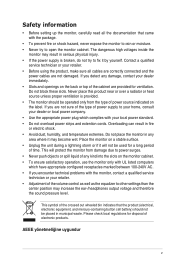
... not be used for disposal of the volume control as well as the equalizer to other settings than the center position may increase the ear-/headphones output voltage and therefore the sound pressure level. Contact a qualified service technician or your retailer. • Adjustment of electronic products. Never place this product near or over a radiator or heat source unless proper...
... not be used for disposal of the volume control as well as the equalizer to other settings than the center position may increase the ear-/headphones output voltage and therefore the sound pressure level. Contact a qualified service technician or your retailer. • Adjustment of electronic products. Never place this product near or over a radiator or heat source unless proper...

User Guide
Page 6
... find slightly uneven brightness on the screen depending on the screen, as it may drip inside the monitor and cause an electric shock. Turn your monitor off the Power Switch for hours. • When the screen becomes black or flashes, or cannot work anymore, contact your monitor, it is displayed for use . • When the same image is better to disconnect the cables and power cord. vi Stubborn stains...
... find slightly uneven brightness on the screen depending on the screen, as it may drip inside the monitor and cause an electric shock. Turn your monitor off the Power Switch for hours. • When the screen becomes black or flashes, or cannot work anymore, contact your monitor, it is displayed for use . • When the same image is better to disconnect the cables and power cord. vi Stubborn stains...
User Guide
Page 11
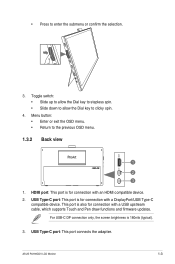
... for connection with an HDMI compatible device. 2. • Press to the previous OSD menu. 1.3.2 Back view 1 2 3 1. HDMI port: This port is 180nits (typical). 3. Menu button: • Enter or exit the OSD menu. • Return to enter the submenu or confirm the selection. 3. USB Type-C port: This port is also for connection with a USB upstream cable, which supports Touch and Pen draw functions and firmware updates. This port is for connection with a DisplayPort/USB Type-C compatible device. ASUS PA169CDV LCD Monitor 1-3 Toggle switch...
... for connection with an HDMI compatible device. 2. • Press to the previous OSD menu. 1.3.2 Back view 1 2 3 1. HDMI port: This port is 180nits (typical). 3. Menu button: • Enter or exit the OSD menu. • Return to enter the submenu or confirm the selection. 3. USB Type-C port: This port is also for connection with a USB upstream cable, which supports Touch and Pen draw functions and firmware updates. This port is for connection with a DisplayPort/USB Type-C compatible device. ASUS PA169CDV LCD Monitor 1-3 Toggle switch...

User Guide
Page 16
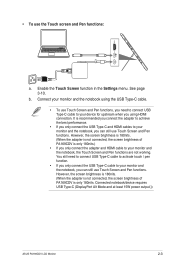
... monitor's USB Type-C port, and connect the 3-pin receptacle of the adapter to your device's HDMI/USB Type-C port. b. Connect the other end of USB Type-C cable from the Input Select item in the OSD menu. • To connect USB Type-C cable only: Connect the other end of the HDMI/USB Type-C cable to 4A) cable. It is installed with the latest Windows 10/11 operating system. Plug one end of the HDMI/USB Type-C* cable to the power cord...
... monitor's USB Type-C port, and connect the 3-pin receptacle of the adapter to your device's HDMI/USB Type-C port. b. Connect the other end of USB Type-C cable from the Input Select item in the OSD menu. • To connect USB Type-C cable only: Connect the other end of the HDMI/USB Type-C cable to 4A) cable. It is installed with the latest Windows 10/11 operating system. Plug one end of the HDMI/USB Type-C* cable to the power cord...
User Guide
Page 17
... you connect the adapter to achieve the best performance. • If you only connect the USB Type-C and HDMI cables to your monitor and the notebook, you only connect the adapter and HDMI cable to your monitor and the notebook, the Touch Screen and Pen functions are not working. Connected notebook/device requires USB Type-C (DisplayPort Alt Mode and at least 15W power output.)) ASUS PA169CDV LCD Monitor 2-3 Enable the Touch Screen function in the Settings menu. See...
... you connect the adapter to achieve the best performance. • If you only connect the USB Type-C and HDMI cables to your monitor and the notebook, you only connect the adapter and HDMI cable to your monitor and the notebook, the Touch Screen and Pen functions are not working. Connected notebook/device requires USB Type-C (DisplayPort Alt Mode and at least 15W power output.)) ASUS PA169CDV LCD Monitor 2-3 Enable the Touch Screen function in the Settings menu. See...
User Guide
Page 19
The gestures allow you to launch programs and access the setting of your computer. • You do not need to connect the display with the USB Type-C cable to your device. • The functions can be activated by using the hand gestures to install any other touch driver. • This device offers you need to this device. ASUS PA169CDV LCD Monitor 2-5 • To activate touch functionality, you groovy touch gestures like tap, grab, pinch, rotate, zoom, swipe, etc.
The gestures allow you to launch programs and access the setting of your computer. • You do not need to connect the display with the USB Type-C cable to your device. • The functions can be activated by using the hand gestures to install any other touch driver. • This device offers you need to this device. ASUS PA169CDV LCD Monitor 2-5 • To activate touch functionality, you groovy touch gestures like tap, grab, pinch, rotate, zoom, swipe, etc.
User Guide
Page 20
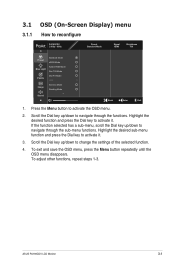
... to change the settings of the selected function. 4. Chapter 3: General instructions 3.1 OSD (On-Screen Display) menu 3.1.1 How to activate the OSD menu. 2. ASUS PA169CDV LCD Monitor 3-1 To adjust other functions, repeat steps 1-3. Scroll the Dial key up /down to navigate through the functions. Press the Menu button to reconfigure PA169CDV 2160p 60Hz Preset Standard Mode Signal HDMI Brightness 100 Preset Blue Light Palette Image Standard Mode sRGB Mode Adobe RGB Mode Rec.709 Mode DCI-P3 Mode HDR Scenery Mode Reading Mode Sound...
... to change the settings of the selected function. 4. Chapter 3: General instructions 3.1 OSD (On-Screen Display) menu 3.1.1 How to activate the OSD menu. 2. ASUS PA169CDV LCD Monitor 3-1 To adjust other functions, repeat steps 1-3. Scroll the Dial key up /down to navigate through the functions. Press the Menu button to reconfigure PA169CDV 2160p 60Hz Preset Standard Mode Signal HDMI Brightness 100 Preset Blue Light Palette Image Standard Mode sRGB Mode Adobe RGB Mode Rec.709 Mode DCI-P3 Mode HDR Scenery Mode Reading Mode Sound...
User Guide
Page 21
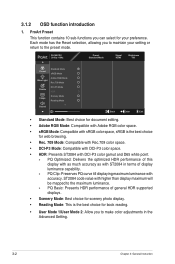
.... PA169CDV 2160p 60Hz Preset Standard Mode Signal HDMI Brightness 100 Preset Standard Mode sRGB Mode Blue Light Adobe RGB Mode Rec.709 Mode Palette DCI-P3 Mode HDR Image Scenery Mode Reading Mode Sound Back Enter Exit • Standard Mode: Best choice for document editing. • Adobe RGB Mode: Compatible with Adobe RGB color space. • sRGB Mode: Compatible with sRGB color space, sRGB is the best choice for your setting or return to the preset mode. Each mode has the Reset...
.... PA169CDV 2160p 60Hz Preset Standard Mode Signal HDMI Brightness 100 Preset Standard Mode sRGB Mode Blue Light Adobe RGB Mode Rec.709 Mode Palette DCI-P3 Mode HDR Image Scenery Mode Reading Mode Sound Back Enter Exit • Standard Mode: Best choice for document editing. • Adobe RGB Mode: Compatible with Adobe RGB color space. • sRGB Mode: Compatible with sRGB color space, sRGB is the best choice for your setting or return to the preset mode. Each mode has the Reset...
User Guide
Page 22
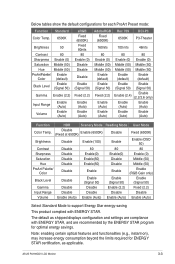
...the default configurations for optimal energy savings. Disable (Fixed at 6500K) Enable (6500K) Disable Fixed (6500K) Brightness Disable Enable (100) Enable Enable (OSD 50) Contrast Disable 80 80 80 Sharpness Disable Enable(0) Enable(0) Enable (0) Saturation Disable Enable(50) Disable Middle (50) Hue Disable Enable(50) Disable Middle (50) ProArt Palette/ Color Disable Enable Enable Enable (RGB Gain only) Black Level Disable Enable (Signal 50) Enable (Signal 50) Enable (Signal 50) Gamma Disable Disable Enable (2.2) Fixed (2.2) Input Range Disable...
...the default configurations for optimal energy savings. Disable (Fixed at 6500K) Enable (6500K) Disable Fixed (6500K) Brightness Disable Enable (100) Enable Enable (OSD 50) Contrast Disable 80 80 80 Sharpness Disable Enable(0) Enable(0) Enable (0) Saturation Disable Enable(50) Disable Middle (50) Hue Disable Enable(50) Disable Middle (50) ProArt Palette/ Color Disable Enable Enable Enable (RGB Gain only) Black Level Disable Enable (Signal 50) Enable (Signal 50) Enable (Signal 50) Gamma Disable Disable Enable (2.2) Fixed (2.2) Input Range Disable...
User Guide
Page 23
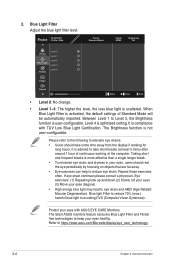
....) harmful blue light to keep your eyes with TUV Low Blue Light Certification. The latest ASUS monitors feature exclusive Blue Light Filter and Flicker free technologies to avoiding CVS (Computer Vision Syndrome). PA169CDV 2160p 60Hz Preset Standard Mode Signal HDMI Brightness 100 Preset Blue Light Palette Level 0 Level 1 Level 2 Level 3 Level 4 Image Sound Back Enter Exit • Level 0: No change. • Level 1~4: The higher the level, the less blue light is optimized setting. Between Level...
....) harmful blue light to keep your eyes with TUV Low Blue Light Certification. The latest ASUS monitors feature exclusive Blue Light Filter and Flicker free technologies to avoiding CVS (Computer Vision Syndrome). PA169CDV 2160p 60Hz Preset Standard Mode Signal HDMI Brightness 100 Preset Blue Light Palette Level 0 Level 1 Level 2 Level 3 Level 4 Image Sound Back Enter Exit • Level 0: No change. • Level 1~4: The higher the level, the less blue light is optimized setting. Between Level...
User Guide
Page 24
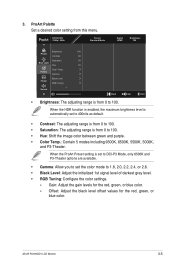
ASUS PA169CDV LCD Monitor 3-5 Gamma Image Black Level RGB Tuning Sound Back Enter Exit • Brightness: The adjusting range is set to DCI-P3 Mode, only 6500K and P3-Theater options are available. • Gamma: Allow you to set to 400nits as default. • Contrast: The adjusting range is from 0 to 100. When the ProArt Preset setting is from 0 to 100. • Saturation: The adjusting range is from this menu. ProArt Palette Set a desired color setting from 0 to...
ASUS PA169CDV LCD Monitor 3-5 Gamma Image Black Level RGB Tuning Sound Back Enter Exit • Brightness: The adjusting range is set to DCI-P3 Mode, only 6500K and P3-Theater options are available. • Gamma: Allow you to set to 400nits as default. • Contrast: The adjusting range is from 0 to 100. When the ProArt Preset setting is from 0 to 100. • Saturation: The adjusting range is from this menu. ProArt Palette Set a desired color setting from 0 to...

User Guide
Page 25
...; To activate this menu. Image Set the image related setting from 0 to 100. • Trace Free: Adjust the response time of all color modes to Auto, Full, or Limited 16-235. 3-6 Chapter 3: General Instruction PA169CDV 2160p 60Hz Preset Standard Mode Signal HDMI Brightness 100 Sharpness 0 Preset Trace Free 60 Blue Light Aspect Control Input Range Palette Image Sound Back Enter Exit • Sharpness: The adjusting range is only available for the HDMI input source. • Input Range: Adjust the input range to the factory default value. 4.
...; To activate this menu. Image Set the image related setting from 0 to 100. • Trace Free: Adjust the response time of all color modes to Auto, Full, or Limited 16-235. 3-6 Chapter 3: General Instruction PA169CDV 2160p 60Hz Preset Standard Mode Signal HDMI Brightness 100 Sharpness 0 Preset Trace Free 60 Blue Light Aspect Control Input Range Palette Image Sound Back Enter Exit • Sharpness: The adjusting range is only available for the HDMI input source. • Input Range: Adjust the input range to the factory default value. 4.

User Guide
Page 26
5. To activate this function, you need to enable the PIP/PBP mode. ASUS PA169CDV LCD Monitor 3-7 PA169CDV 2160p 60Hz Preset Standard Mode Signal HDMI Brightness 100 Volume 50 Preset Mute Source Blue Light Palette Image Sound Back Enter Exit • Volume: Adjust the output volume level. • Mute: Enable or disable the mute function. • Source: Specify the monitor sound comes from which source. Sound Configure the sound settings.
5. To activate this function, you need to enable the PIP/PBP mode. ASUS PA169CDV LCD Monitor 3-7 PA169CDV 2160p 60Hz Preset Standard Mode Signal HDMI Brightness 100 Volume 50 Preset Mute Source Blue Light Palette Image Sound Back Enter Exit • Volume: Adjust the output volume level. • Mute: Enable or disable the mute function. • Source: Specify the monitor sound comes from which source. Sound Configure the sound settings.

User Guide
Page 27
... monitor displays up another sub-window connected from another video source besides the main-window from different video sources. 6. PA169CDV 2160p 60Hz PIP/PBP PIP/PBP Mode PIP/PBP Source PIP Size QuickFit Plus Signal Settings Preset Standard Mode Signal HDMI Brightness 100 Back Enter Exit • PIP/PBP Mode: Select PIP, PBP, or turn it off. • PIP/PBP Source: Select the video input source between HDMI and USB Type-C. • PIP Size: Adjust the PIP size to disable the...
... monitor displays up another sub-window connected from another video source besides the main-window from different video sources. 6. PA169CDV 2160p 60Hz PIP/PBP PIP/PBP Mode PIP/PBP Source PIP Size QuickFit Plus Signal Settings Preset Standard Mode Signal HDMI Brightness 100 Back Enter Exit • PIP/PBP Mode: Select PIP, PBP, or turn it off. • PIP/PBP Source: Select the video input source between HDMI and USB Type-C. • PIP Size: Adjust the PIP size to disable the...

User Guide
Page 28
... Plus Allow users to switch the measurements between metric and imperial. The selections are : 1:1, Action Safe, Title Safe, or 3 x 3. • Center Marker: Select the center marker type. ASUS PA169CDV LCD Monitor 3-9 7. Then press the Power button to view the frame size and to disable the PIP/PBP mode. To activate this function, you need to switch the measurements between the horizontal (width) and vertical (height) setting, press the...
... Plus Allow users to switch the measurements between metric and imperial. The selections are : 1:1, Action Safe, Title Safe, or 3 x 3. • Center Marker: Select the center marker type. ASUS PA169CDV LCD Monitor 3-9 7. Then press the Power button to view the frame size and to disable the PIP/PBP mode. To activate this function, you need to switch the measurements between the horizontal (width) and vertical (height) setting, press the...

User Guide
Page 29
..." to adjust the system. To cancel the Key Lock function, press the Menu button for more than five seconds. • Power Indicator: Turn the power LED indicator on/off. • Language: Select the OSD menu language. 3-10 Chapter 3: General Instruction Signal In this function, you to disable the Power and Menu buttons. Settings Allow you can select your desired input source. PA169CDV 2160p 60Hz Preset Standard Mode Signal HDMI Brightness 100 PIP/PBP HDMI USB Type-C QuickFit Plus Signal Settings 9. 8.
..." to adjust the system. To cancel the Key Lock function, press the Menu button for more than five seconds. • Power Indicator: Turn the power LED indicator on/off. • Language: Select the OSD menu language. 3-10 Chapter 3: General Instruction Signal In this function, you to disable the Power and Menu buttons. Settings Allow you can select your desired input source. PA169CDV 2160p 60Hz Preset Standard Mode Signal HDMI Brightness 100 PIP/PBP HDMI USB Type-C QuickFit Plus Signal Settings 9. 8.

User Guide
Page 31
Resolution Pixel Pitch Brightness Contrast Ratio Viewing Angle (H/V) CR>10 Display Colors Response Time ProArt Preset Selection Color Temperature Selection ASUS ProArt Pen Touch Auto Rotation Digital Input Power LED Tilt AC input voltage Power consumption Temperature (Operating) Temperature (Non-operating) Phys. 3.2 Specifications Summary Panel Type Panel Size Max. Dimension with Stand (W x H x D) Box Dimension (W x H x D) Net Weight (Esti.) Gross Weight (Esti.) Multi-languages Accessories IPS LCD Panel 15.6" 3840 x 2160 0.09 (H) x 0.09 (V) mm 450 cd/m2 (typ.) / VESA DisplayHDR 400 1200...
Resolution Pixel Pitch Brightness Contrast Ratio Viewing Angle (H/V) CR>10 Display Colors Response Time ProArt Preset Selection Color Temperature Selection ASUS ProArt Pen Touch Auto Rotation Digital Input Power LED Tilt AC input voltage Power consumption Temperature (Operating) Temperature (Non-operating) Phys. 3.2 Specifications Summary Panel Type Panel Size Max. Dimension with Stand (W x H x D) Box Dimension (W x H x D) Net Weight (Esti.) Gross Weight (Esti.) Multi-languages Accessories IPS LCD Panel 15.6" 3840 x 2160 0.09 (H) x 0.09 (V) mm 450 cd/m2 (typ.) / VESA DisplayHDR 400 1200...

User Guide
Page 34
... monitor to pattern is too light or dark • Adjust the Contrast and Brightness settings via OSD. • Ensure that the computer graphic card driver is properly working. Screen image is present in the ON mode. • Check if the power cable and adapter are bent. • Perform All Reset via OSD. • Adjust the RGB Tuning settings or select the Color Temperature (Color Temp.) via OSD. Screen image bounces or a wave • Make sure the signal cable is properly connected...
... monitor to pattern is too light or dark • Adjust the Contrast and Brightness settings via OSD. • Ensure that the computer graphic card driver is properly working. Screen image is present in the ON mode. • Check if the power cable and adapter are bent. • Perform All Reset via OSD. • Adjust the RGB Tuning settings or select the Color Temperature (Color Temp.) via OSD. Screen image bounces or a wave • Make sure the signal cable is properly connected...

