
User Manual
Page 24
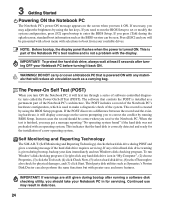
..., backup your available drives. IMPORTANT! The POST includes a record of the Notebook PC's hardware configuration, which is given during the splash screen, standard boot information such as a permanent part of software-controlled diagnostic tests called the Power-On Self Test (POST). When the test ...with greater ease and more features. 3 Getting Started Powering ON the Notebook PC The Notebook PC's power-ON message appears on the screen prompting you to correct the conflict by running a software disk checking utility, you should be correct when you receive the Notebook PC....
..., backup your available drives. IMPORTANT! The POST includes a record of the Notebook PC's hardware configuration, which is given during the splash screen, standard boot information such as a permanent part of software-controlled diagnostic tests called the Power-On Self Test (POST). When the test ...with greater ease and more features. 3 Getting Started Powering ON the Notebook PC The Notebook PC's power-ON message appears on the screen prompting you to correct the conflict by running a software disk checking utility, you should be correct when you receive the Notebook PC....
User Manual
Page 25
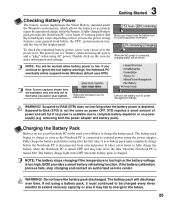
... use your system. It takes a few hours of charge left in your Notebook PC on the road, you continue to charge the battery pack. Note: Screen captures shown here are examples only and may not reflect what you see in the battery. WARNING! 3 Getting Started Checking Battery Power The battery system...
... use your system. It takes a few hours of charge left in your Notebook PC on the road, you continue to charge the battery pack. Note: Screen captures shown here are examples only and may not reflect what you see in the battery. WARNING! 3 Getting Started Checking Battery Power The battery system...
User Manual
Page 26
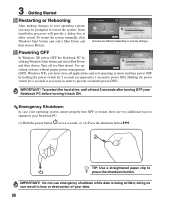
.... TIP: Use a straightened paper clip to allow restart. To restart the system manually, click Windows Start button and select Shut Down and then choose Restart. (Screens are two additional ways to shutdown your Notebook PC before turning it back ON. To protect the hard drive, wait at least 5 seconds after turning...
.... TIP: Use a straightened paper clip to allow restart. To restart the system manually, click Windows Start button and select Shut Down and then choose Restart. (Screens are two additional ways to shutdown your Notebook PC before turning it back ON. To protect the hard drive, wait at least 5 seconds after turning...
User Manual
Page 27
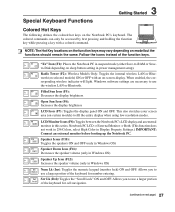
...booting up the Notebook PC. When enabled, the corresponding wireless indicator will light. Allows you to use the wireless LAN or Bluetooth. The ASUS F5 ENTERTAINMENT SYSTEM colored commands can only be accessed by first pressing and holding the function key while pressing a key with an on ...Icon (F7): Toggles the display panel ON and OFF. Radio Tower (F2): Wireless Models Only: Toggles the internal wireless LAN or Bluetooth (on -screen-display. NOTE: The Hot Key locations on the function keys may vary depending on the Notebook PC's keyboard. Allows you to use a larger portion...
...booting up the Notebook PC. When enabled, the corresponding wireless indicator will light. Allows you to use the wireless LAN or Bluetooth. The ASUS F5 ENTERTAINMENT SYSTEM colored commands can only be accessed by first pressing and holding the function key while pressing a key with an on ...Icon (F7): Toggles the display panel ON and OFF. Radio Tower (F2): Wireless Models Only: Toggles the internal wireless LAN or Bluetooth (on -screen-display. NOTE: The Hot Key locations on the function keys may vary depending on the Notebook PC's keyboard. Allows you to use a larger portion...
User Manual
Page 28
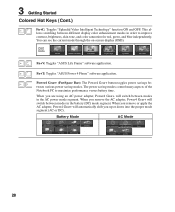
When you up or down into the proper mode segment (AC or DC). You can see the current mode through the on-screen display (OSD). 3 Getting Started Colored Hot Keys (Cont.) Fn+C: Toggles "Splendid Video Intelligent Technology" function ON and OFF. When you ... switch between modes in order to maximize performance versus battery time. This allows switching between various power saving modes. OSD Icons Fn+V: Toggles "ASUS Life Frame" software application. The power saving modes control many aspects of the Notebook PC to improve contrast, brightness, skin tone, and color...
When you up or down into the proper mode segment (AC or DC). You can see the current mode through the on-screen display (OSD). 3 Getting Started Colored Hot Keys (Cont.) Fn+C: Toggles "Splendid Video Intelligent Technology" function ON and OFF. When you ... switch between modes in order to maximize performance versus battery time. This allows switching between various power saving modes. OSD Icons Fn+V: Toggles "ASUS Life Frame" software application. The power saving modes control many aspects of the Notebook PC to improve contrast, brightness, skin tone, and color...
User Manual
Page 31
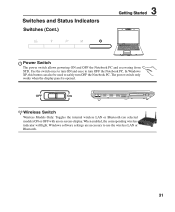
... Switch Wireless Models Only: Toggles the internal wireless LAN or Bluetooth (on selected models) ON or OFF with an on-screen-display. Switches and Status Indicators Switches (Cont.) 3 Getting Started ASUS F5 ENTERTAINMENT SYSTEM Power Switch The power switch allows powering ON and OFF the Notebook PC and recovering from STD. The...
... Switch Wireless Models Only: Toggles the internal wireless LAN or Bluetooth (on selected models) ON or OFF with an on-screen-display. Switches and Status Indicators Switches (Cont.) 3 Getting Started ASUS F5 ENTERTAINMENT SYSTEM Power Switch The power switch allows powering ON and OFF the Notebook PC and recovering from STD. The...
User Manual
Page 37
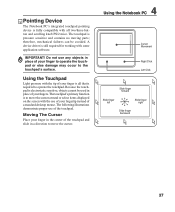
... Slide finger backward 37 The following illustrations demonstrate proper use any objects in a direction to move the cursor around or select items displayed on the screen with the use of your finger to operate the touchpad or else damage may occur to the touchpad's surface. Using the Touchpad Light pressure with...
... Slide finger backward 37 The following illustrations demonstrate proper use any objects in a direction to move the cursor around or select items displayed on the screen with the use of your finger to operate the touchpad or else damage may occur to the touchpad's surface. Using the Touchpad Light pressure with...

User Manual
Page 39
... allow comfortable clicking and tapping. NOTE: The touchpad responds to movement not to light pressure. 39 Or, you wish. Caring for , it anywhere on the screen you can be easily damaged. The touchpad responds best to force. The following precautions. • Make sure the touchpad does not come into contact with...
... allow comfortable clicking and tapping. NOTE: The touchpad responds to movement not to light pressure. 39 Or, you wish. Caring for , it anywhere on the screen you can be easily damaged. The touchpad responds best to force. The following precautions. • Make sure the touchpad does not come into contact with...


