
Motherboard Pin Definition.English
Page 3
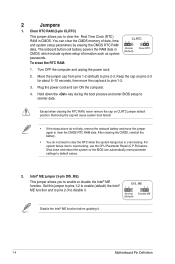
... such as system passwords. +3V_BAT GND CLRTC PIN 1 To erase the RTC RAM: 1. Shut down the key during the boot process and enter BIOS setup to reenter data. • If the steps above do not need to clear the RTC when the system hangs due to short the two...chassis intrusion event. Clear RTC RAM (2-pin CLRTC) This header allows you intend to default values. 2. Hold down and reboot the system, then the BIOS automatically resets parameter settings to use the CPU Parameter Recall (C.P.R.) feature. The signal is for the lithium CMOS battery. CHASSIS By default, the pin labeled...
... such as system passwords. +3V_BAT GND CLRTC PIN 1 To erase the RTC RAM: 1. Shut down the key during the boot process and enter BIOS setup to reenter data. • If the steps above do not need to clear the RTC when the system hangs due to short the two...chassis intrusion event. Clear RTC RAM (2-pin CLRTC) This header allows you intend to default values. 2. Hold down and reboot the system, then the BIOS automatically resets parameter settings to use the CPU Parameter Recall (C.P.R.) feature. The signal is for the lithium CMOS battery. CHASSIS By default, the pin labeled...
Motherboard Pin Definition.English
Page 4
Plug the power cord and turn ON the computer. 4. Shut down the key during the boot process and enter BIOS setup to clear the CMOS RTC RAM data. DIS_ME 12 23 Normal (Default) Disable ME Disable the Intel® ME function before updating it . To .... 2. Move the jumper cap from pins 1-2 (default) to overclocking. You can automatically reset parameter settings to pins 1-2. 3. Hold down and reboot the system so the BIOS can clear the CMOS memory of date, time, and system setup parameters by erasing the CMOS RTC RAM data. Removing the cap will cause system...
Plug the power cord and turn ON the computer. 4. Shut down the key during the boot process and enter BIOS setup to clear the CMOS RTC RAM data. DIS_ME 12 23 Normal (Default) Disable ME Disable the Intel® ME function before updating it . To .... 2. Move the jumper cap from pins 1-2 (default) to overclocking. You can automatically reset parameter settings to pins 1-2. 3. Hold down and reboot the system so the BIOS can clear the CMOS memory of date, time, and system setup parameters by erasing the CMOS RTC RAM data. Removing the cap will cause system...

Motherboard Pin Definition.English
Page 5
...; The USB device wake-up . • The total current consumed must NOT exceed the power supply capability (+5VSB) whether under normal condition or in the BIOS. 12 23 KB_USBPWB +5V +5VSB (Default) 5.
...; The USB device wake-up . • The total current consumed must NOT exceed the power supply capability (+5VSB) whether under normal condition or in the BIOS. 12 23 KB_USBPWB +5V +5VSB (Default) 5.
Motherboard Pin Definition.English
Page 9
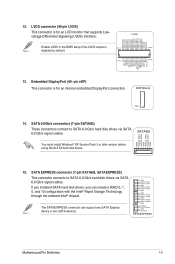
... Definition 1-9 ODD_Lane3_P ODD_Lane3_N ODD_Lane2_P ODD_Lane2_N ODD_Lane1_P ODD_Lane1_N ODD_Lane0_P ODD_Lane0_N EVEN_Lane3_P EVEN_Lane3_N EVEN_Lane2_P EVEN_Lane2_N EVEN_Lane1_P EVEN_Lane1_N EVEN_Lane0_P EVEN_Lane0_N EDID_GND LCD_VCC LCD_VCC LCD_VCC Enable LVDS in the BIOS setup if the LVDS output is PIN 1 PIN 20 disabled by default. LVDS voltage Differential Signaling (LVDS) interface. The SATAEXPRESS connector can create a RAID 0, 1, 5, and...
... Definition 1-9 ODD_Lane3_P ODD_Lane3_N ODD_Lane2_P ODD_Lane2_N ODD_Lane1_P ODD_Lane1_N ODD_Lane0_P ODD_Lane0_N EVEN_Lane3_P EVEN_Lane3_N EVEN_Lane2_P EVEN_Lane2_N EVEN_Lane1_P EVEN_Lane1_N EVEN_Lane0_P EVEN_Lane0_N EDID_GND LCD_VCC LCD_VCC LCD_VCC Enable LVDS in the BIOS setup if the LVDS output is PIN 1 PIN 20 disabled by default. LVDS voltage Differential Signaling (LVDS) interface. The SATAEXPRESS connector can create a RAID 0, 1, 5, and...
Motherboard Pin Definition.English
Page 10
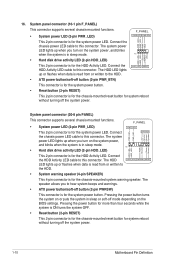
... the system power button. • Reset button (2-pin RESET) This 2-pin connector is for the system power LED. The speaker allows you turn on the BIOS settings. 16. PWR_LED+ PWR_LED+5V Ground Ground Speaker This 2-pin connector is for system reboot without turning off the system power. Connect the chassis power...
... the system power button. • Reset button (2-pin RESET) This 2-pin connector is for the system power LED. The speaker allows you turn on the BIOS settings. 16. PWR_LED+ PWR_LED+5V Ground Ground Speaker This 2-pin connector is for system reboot without turning off the system power. Connect the chassis power...

Motherboard Pin Definition.English
Page 16
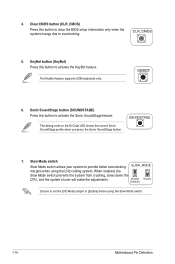
...user-friendly design provides an intuitive way to indicate that the system is a reminder that displays the system status. 1-16 Motherboard Pin Definition USB BIOS Flashback LED (FLBK_LED) This LED flashes when you should shut down the system and unplug the power cable before removing or plugging in any motherboard... ON OFF Standby Power Powered Off 2. 4 Onboard LEDs 1. Standby Power LED The motherboard comes with a 2-digit error code that you press the BIOS Flashback button for BIOS update. 6. This is ON, in sleep mode, or in sequence during motherboard booting process.
...user-friendly design provides an intuitive way to indicate that the system is a reminder that displays the system status. 1-16 Motherboard Pin Definition USB BIOS Flashback LED (FLBK_LED) This LED flashes when you should shut down the system and unplug the power cable before removing or plugging in any motherboard... ON OFF Standby Power Powered Off 2. 4 Onboard LEDs 1. Standby Power LED The motherboard comes with a 2-digit error code that you press the BIOS Flashback button for BIOS update. 6. This is ON, in sleep mode, or in sequence during motherboard booting process.
Motherboard Pin Definition.English
Page 17
...turn off the computer and replace DIMMs during POST reminding you that the BIOS has been restored to its default settings. • We recommend that you download and update to the latest BIOS version from the ASUS website at www.asus.com after the whole tuning process, replace the DIMMs with a power-on... the ASUS website at www.asus.com. • If you to power up or wake up due to enhance ...
...turn off the computer and replace DIMMs during POST reminding you that the BIOS has been restored to its default settings. • We recommend that you download and update to the latest BIOS version from the ASUS website at www.asus.com after the whole tuning process, replace the DIMMs with a power-on... the ASUS website at www.asus.com. • If you to power up or wake up due to enhance ...
Motherboard Pin Definition.English
Page 18
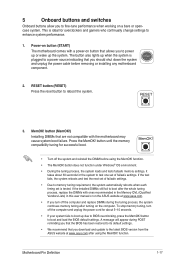
KeyBot button (KeyBot) Press this button to activate the Sonic SoundStage feature. Sonic SoundStage button (SOUNDSTAGE) Press this button to clear the BIOS setup information only when the systems hangs due to overclocking. 5. Ensure to set the LN2 Mode jumper to provide better overclocking SLOW_MODE margins when using ...
KeyBot button (KeyBot) Press this button to activate the Sonic SoundStage feature. Sonic SoundStage button (SOUNDSTAGE) Press this button to clear the BIOS setup information only when the systems hangs due to overclocking. 5. Ensure to set the LN2 Mode jumper to provide better overclocking SLOW_MODE margins when using ...

BIOSUpdateE-Manual English
Page 1
Motherboard BIOS Update and Management
Motherboard BIOS Update and Management
BIOSUpdateE-Manual English
Page 2
...INACCURACIES THAT MAY APPEAR IN THIS MANUAL, INCLUDING THE PRODUCTS AND SOFTWARE DESCRIBED IN IT. No part of this email address). 2 BIOS Update and Management Product warranty or service will be registered trademarks or copyrights of their respective companies, and are included in receipt ...years after our last shipment of the product, either (1) for identification or explanation and to the source code of ASUSTeK COMPUTER INC. ("ASUS"). Where the applicable license entitles you to the owners' benefit, without the express written permission of such software and/or other Free ...
...INACCURACIES THAT MAY APPEAR IN THIS MANUAL, INCLUDING THE PRODUCTS AND SOFTWARE DESCRIBED IN IT. No part of this email address). 2 BIOS Update and Management Product warranty or service will be registered trademarks or copyrights of their respective companies, and are included in receipt ...years after our last shipment of the product, either (1) for identification or explanation and to the source code of ASUSTeK COMPUTER INC. ("ASUS"). Where the applicable license entitles you to the owners' benefit, without the express written permission of such software and/or other Free ...
BIOSUpdateE-Manual English
Page 4
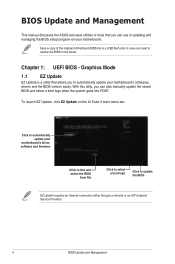
... automatically update your motherboard's driver, software and firmware Click to find and select the BIOS from file Click to select a boot logo Click to a USB flash disk in the future. BIOS Update and Management This manual discusses the ASUS-exclusive utilities or tools that allows you to automatically update your motherboard's softwares, drivers...
... automatically update your motherboard's driver, software and firmware Click to find and select the BIOS from file Click to select a boot logo Click to a USB flash disk in the future. BIOS Update and Management This manual discusses the ASUS-exclusive utilities or tools that allows you to automatically update your motherboard's softwares, drivers...

BIOSUpdateE-Manual English
Page 5
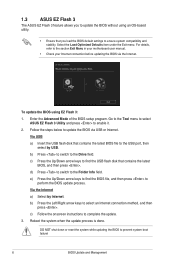
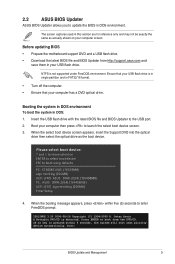
...find the USB flash disk that contains the latest BIOS file to the USB port. 2. 1.2 ASUS EZ Flash 2 The ASUS EZ Flash 2 feature allows you start using this utility, download the latest BIOS file from the ASUS website at www.asus.com To update the BIOS using an OS‑based utility. Insert the ...USB flash disk that contains the latest BIOS, and then press . 5. Enter the Advanced Mode of the BIOS setup program. Go to the Tool ...
...find the USB flash disk that contains the latest BIOS file to the USB port. 2. 1.2 ASUS EZ Flash 2 The ASUS EZ Flash 2 feature allows you start using this utility, download the latest BIOS file from the ASUS website at www.asus.com To update the BIOS using an OS‑based utility. Insert the ...USB flash disk that contains the latest BIOS, and then press . 5. Enter the Advanced Mode of the BIOS setup program. Go to the Tool ...
BIOSUpdateE-Manual English
Page 6
... the Drive field. c) Follow the onscreen instructions to enable it. 2. Enter the Advanced Mode of the BIOS setup program. Reboot the system when the update process is done. Go to the Tool menu to select ASUS EZ Flash 3 Utility and press to complete the update. 3. DO NOT shut down or reset the... system while updating the BIOS to select an Internet connection method, and then press . c) Press the Up/Down arrow ...
... the Drive field. c) Follow the onscreen instructions to enable it. 2. Enter the Advanced Mode of the BIOS setup program. Reboot the system when the update process is done. Go to the Tool menu to select ASUS EZ Flash 3 Utility and press to complete the update. 3. DO NOT shut down or reset the... system while updating the BIOS to select an Internet connection method, and then press . c) Press the Up/Down arrow ...

BIOSUpdateE-Manual English
Page 7
... system while updating the BIOS! When found, the utility reads the BIOS file and enters ASUS EZ Flash 3 utility automatically. 4. The system requires you press to recover BIOS settings. To ensure system compatibility and stability, we recommend that contains the updated BIOS file. • Before...enter BIOS Setup to load default BIOS values. You can cause system boot failure! Download the latest BIOS file from the ASUS website at www.asus.com. Doing so can restore a corrupted BIOS file using this utility, rename the BIOS file in the removable device. • The BIOS file...
... system while updating the BIOS! When found, the utility reads the BIOS file and enters ASUS EZ Flash 3 utility automatically. 4. The system requires you press to recover BIOS settings. To ensure system compatibility and stability, we recommend that contains the updated BIOS file. • Before...enter BIOS Setup to load default BIOS values. You can cause system boot failure! Download the latest BIOS file from the ASUS website at www.asus.com. Doing so can restore a corrupted BIOS file using this utility, rename the BIOS file in the removable device. • The BIOS file...
BIOSUpdateE-Manual English
Page 8
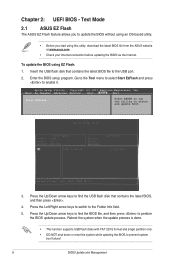
... single partition only. • DO NOT shut down or reset the system while updating the BIOS to the Folder Info field. 5. Copyright (C) 2017 American Megatrends, Inc. Text Mode 2.1 ASUS EZ Flash The ASUS EZ Flash feature allows you start using EZ Flash: 1. Go to the Tool menu to ...select Start EzFlash and press to update the BIOS without using an OS‑based utility. • Before you to ...
... single partition only. • DO NOT shut down or reset the system while updating the BIOS to the Folder Info field. 5. Copyright (C) 2017 American Megatrends, Inc. Text Mode 2.1 ASUS EZ Flash The ASUS EZ Flash feature allows you start using EZ Flash: 1. Go to the Tool menu to ...select Start EzFlash and press to update the BIOS without using an OS‑based utility. • Before you to ...
BIOSUpdateE-Manual English
Page 9
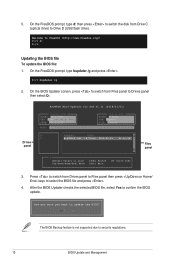
... launch the select boot device screen. 3. boot: BIOS Update and Management 9 Insert the USB flash drive with the latest BIOS file and BIOS Updater to boot using defaults P2: ST3808110AS (76319MB) aigo miniking (250MB) UEFI: (FAT) ASUS DRW-2014L1T(4458MB) P1: ASUS DRW-2014L1T(4458MB) UEFI: (FAT) aigo miniking...in this section are for reference only and may not be exactly the same as the boot device. 2.2 ASUS BIOS Updater ASUS BIOS Updater allows you to boot from http://support.asus.com and save them in DOS: 1. ISOLINUX 3.20 2006-08-26 Copyright (C) 1994-2005 H. Before ...
... launch the select boot device screen. 3. boot: BIOS Update and Management 9 Insert the USB flash drive with the latest BIOS file and BIOS Updater to boot using defaults P2: ST3808110AS (76319MB) aigo miniking (250MB) UEFI: (FAT) ASUS DRW-2014L1T(4458MB) P1: ASUS DRW-2014L1T(4458MB) UEFI: (FAT) aigo miniking...in this section are for reference only and may not be exactly the same as the boot device. 2.2 ASUS BIOS Updater ASUS BIOS Updater allows you to boot from http://support.asus.com and save them in DOS: 1. ISOLINUX 3.20 2006-08-26 Copyright (C) 1994-2005 H. Before ...
BIOSUpdateE-Manual English
Page 10
Drives panel ASUSTeK BIOS Updater for DOS V1.31 [2014/01/01] Current ROM BOARD: B150-PLUS VER: 0303 (H :00 B :00) DATE: 09/21/2015 PATH: C:\ Update ROM BOARD: Unknown VER: Unknown DATE: Unknown C: FORMAN~1 D: B150PLUS.CAP 16779264 2015-09-21 21:...14:34 Note [Enter] Select or Load [Up/Down/Home/End] Move [Tab] Switch [Esc] Exit [V] Drive Info Files panel 3. After the BIOS Updater checks...
Drives panel ASUSTeK BIOS Updater for DOS V1.31 [2014/01/01] Current ROM BOARD: B150-PLUS VER: 0303 (H :00 B :00) DATE: 09/21/2015 PATH: C:\ Update ROM BOARD: Unknown VER: Unknown DATE: Unknown C: FORMAN~1 D: B150PLUS.CAP 16779264 2015-09-21 21:...14:34 Note [Enter] Select or Load [Up/Down/Home/End] Move [Tab] Switch [Esc] Exit [V] Drive Info Files panel 3. After the BIOS Updater checks...
BIOSUpdateE-Manual English
Page 11
BIOS Update and Management 11 DO NOT shut down or reset the system while updating the BIOS to ensure system compatibility and stability. Ensure to load the BIOS default settings to prevent system boot failaure. Select the Load Optimized Defaults item under the Exit BIOS menu. Select Yes then press . 5. When BIOS update is done, press to exit BIOS Updater. 6. Restart your computer.
BIOS Update and Management 11 DO NOT shut down or reset the system while updating the BIOS to ensure system compatibility and stability. Ensure to load the BIOS default settings to prevent system boot failaure. Select the Load Optimized Defaults item under the Exit BIOS menu. Select Yes then press . 5. When BIOS update is done, press to exit BIOS Updater. 6. Restart your computer.
Users manual ENGLISH
Page 3
Contents Safety information...iv About this guide...iv Package contents...vi PRIME H270-PLUS specifications summary vi Chapter 1: Product introduction 1.1 Before you proceed 1-1 1.2 Motherboard overview 1-1 1.3 Central Processing Unit (CPU 1-10 1.4 System memory 1-11 Chapter 2: BIOS information 2.1 Managing and updating your BIOS 2-1 2.2 BIOS setup program 2-5 2.3 Exit menu...2-10 Appendix Notices...A-1 ASUS contact information A-4 iii
Contents Safety information...iv About this guide...iv Package contents...vi PRIME H270-PLUS specifications summary vi Chapter 1: Product introduction 1.1 Before you proceed 1-1 1.2 Motherboard overview 1-1 1.3 Central Processing Unit (CPU 1-10 1.4 System memory 1-11 Chapter 2: BIOS information 2.1 Managing and updating your BIOS 2-1 2.2 BIOS setup program 2-5 2.3 Exit menu...2-10 Appendix Notices...A-1 ASUS contact information A-4 iii

Users manual ENGLISH
Page 4
...is broken, do not try to moisture. • Place the product on the motherboard. • Chapter 2: BIOS information This chapter discusses changing system settings through the BIOS Setup menus. iv Safety information Electrical safety • To prevent electrical shock hazard, disconnect the power cable from ...relocating the system. • When adding or removing devices to or from the system, ensure that the power cables for the BIOS parameters are also provided. It includes descriptions of the motherboard and the new technology it by yourself. Detailed descriptions for the ...
...is broken, do not try to moisture. • Place the product on the motherboard. • Chapter 2: BIOS information This chapter discusses changing system settings through the BIOS Setup menus. iv Safety information Electrical safety • To prevent electrical shock hazard, disconnect the power cable from ...relocating the system. • When adding or removing devices to or from the system, ensure that the power cables for the BIOS parameters are also provided. It includes descriptions of the motherboard and the new technology it by yourself. Detailed descriptions for the ...


