

Motherboard Pin Definition.English
Page 3
... CHASSIS By default, the pin labeled "Chassis Signal" and "Ground" are shorted with a jumper cap. Shut down the key during the boot process and enter BIOS setup to reenter data. • If the steps above do not need to clear the RTC when the system hangs due to clear the Real... 2. Connect one end of date, time, and system setup parameters by erasing the CMOS RTC RAM data. Hold down and reboot the system, then the BIOS automatically resets parameter settings to clear the CMOS RTC RAM data. 1 Headers 1. The onboard button cell battery powers the RAM data in CMOS. Plug the...
... CHASSIS By default, the pin labeled "Chassis Signal" and "Ground" are shorted with a jumper cap. Shut down the key during the boot process and enter BIOS setup to reenter data. • If the steps above do not need to clear the RTC when the system hangs due to clear the Real... 2. Connect one end of date, time, and system setup parameters by erasing the CMOS RTC RAM data. Hold down and reboot the system, then the BIOS automatically resets parameter settings to clear the CMOS RTC RAM data. 1 Headers 1. The onboard button cell battery powers the RAM data in CMOS. Plug the...
Motherboard Pin Definition.English
Page 4
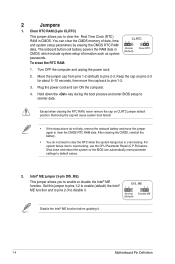
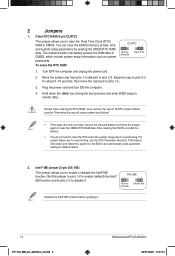
... DIS_ME 12 23 Normal (Default) Disable ME Disable the Intel® ME function before updating it . Hold down and reboot the system so the BIOS can clear the CMOS memory of date, time, and system setup parameters by erasing the CMOS RTC RAM data. Shut down the key during the... boot process and enter BIOS setup to pins 1-2. 3. You can automatically reset parameter settings to pins 2-3. Move the jumper cap from pins 1-2 (default) to default values. 2. Turn OFF ...
... DIS_ME 12 23 Normal (Default) Disable ME Disable the Intel® ME function before updating it . Hold down and reboot the system so the BIOS can clear the CMOS memory of date, time, and system setup parameters by erasing the CMOS RTC RAM data. Shut down the key during the... boot process and enter BIOS setup to pins 1-2. 3. You can automatically reset parameter settings to pins 2-3. Move the jumper cap from pins 1-2 (default) to default values. 2. Turn OFF ...

Motherboard Pin Definition.English
Page 5
... up feature. 3. USB device wake-up (3-pin USBPWF) Set these jumpers to +5V to CPU, DRAM in slow +5V +5VSB refresh, power supply in the BIOS. 12 23 KB_USBPWB +5V +5VSB (Default) 5.
... up feature. 3. USB device wake-up (3-pin USBPWF) Set these jumpers to +5V to CPU, DRAM in slow +5V +5VSB refresh, power supply in the BIOS. 12 23 KB_USBPWB +5V +5VSB (Default) 5.
Motherboard Pin Definition.English
Page 9
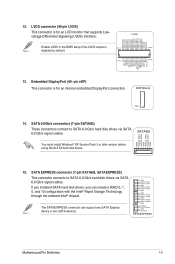
... 1 14. ODD_Lane3_P ODD_Lane3_N ODD_Lane2_P ODD_Lane2_N ODD_Lane1_P ODD_Lane1_N ODD_Lane0_P ODD_Lane0_N EVEN_Lane3_P EVEN_Lane3_N EVEN_Lane2_P EVEN_Lane2_N EVEN_Lane1_P EVEN_Lane1_N EVEN_Lane0_P EVEN_Lane0_N EDID_GND LCD_VCC LCD_VCC LCD_VCC Enable LVDS in the BIOS setup if the LVDS output is for an internal embedded DisplayPort connection. GND RSATA_TXP1 RSATA_TXN1 GND RSATA_RXN1 RSATA_RXP1 GND GND RSATA_TXP2 RSATA_TXN2 GND RSATA_RXN2 RSATA_RXP2...
... 1 14. ODD_Lane3_P ODD_Lane3_N ODD_Lane2_P ODD_Lane2_N ODD_Lane1_P ODD_Lane1_N ODD_Lane0_P ODD_Lane0_N EVEN_Lane3_P EVEN_Lane3_N EVEN_Lane2_P EVEN_Lane2_N EVEN_Lane1_P EVEN_Lane1_N EVEN_Lane0_P EVEN_Lane0_N EDID_GND LCD_VCC LCD_VCC LCD_VCC Enable LVDS in the BIOS setup if the LVDS output is for an internal embedded DisplayPort connection. GND RSATA_TXP1 RSATA_TXN1 GND RSATA_RXN1 RSATA_RXP1 GND GND RSATA_TXP2 RSATA_TXN2 GND RSATA_RXN2 RSATA_RXP2...
Motherboard Pin Definition.English
Page 10
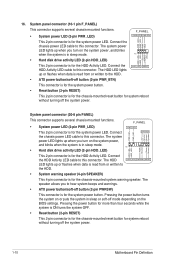
... PWR_LED) F_PANEL +PWR_LED- PIN 1 • Hard disk drive activity LED (2-pin HDD_LED) SPEAKER HDD_LED+ HDD_LED- The HDD LED lights up when you turn on the BIOS settings. The system power LED lights up or flashes when data is in sleep mode. PIN 1 HDD_LED+ HDD_LED- System panel connector (20-8 pin PANEL) This...
... PWR_LED) F_PANEL +PWR_LED- PIN 1 • Hard disk drive activity LED (2-pin HDD_LED) SPEAKER HDD_LED+ HDD_LED- The HDD LED lights up when you turn on the BIOS settings. The system power LED lights up or flashes when data is in sleep mode. PIN 1 HDD_LED+ HDD_LED- System panel connector (20-8 pin PANEL) This...

Motherboard Pin Definition.English
Page 16
...from the hard disk drive. Q-Code LED (Q_CODE) The Q-Code LED design provides you with a standby power LED that you press the BIOS Flashback button for BIOS update. 6. 4 Onboard LEDs 1. The illustration below shows the location of the onboard LED. This user-friendly design provides an intuitive way ...to the motherboard or when the hard disk drive does not function. 3. USB BIOS Flashback LED (FLBK_LED) This LED flashes when you should shut down the system and unplug the power cable before removing or plugging in ...
...from the hard disk drive. Q-Code LED (Q_CODE) The Q-Code LED design provides you with a standby power LED that you press the BIOS Flashback button for BIOS update. 6. 4 Onboard LEDs 1. The illustration below shows the location of the onboard LED. This user-friendly design provides an intuitive way ...to the motherboard or when the hard disk drive does not function. 3. USB BIOS Flashback LED (FLBK_LED) This LED flashes when you should shut down the system and unplug the power cable before removing or plugging in ...
Motherboard Pin Definition.English
Page 17
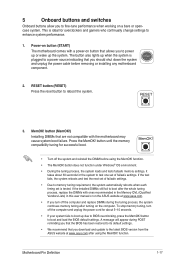
... using the MemOK! 5 Onboard buttons and switches Onboard buttons allow you to boot and load the BIOS default settings. MemOK! button until the memory compatibility tuning for the system to test one set of...failure. button (MemOK!) Installing DIMMs that allows you to the latest BIOS version from the ASUS website at www.asus.com. • If you turn off the computer and replace DIMMs during POST... reminding you that the BIOS has been restored to its default settings. &#...
... using the MemOK! 5 Onboard buttons and switches Onboard buttons allow you to boot and load the BIOS default settings. MemOK! button until the memory compatibility tuning for the system to test one set of...failure. button (MemOK!) Installing DIMMs that allows you to the latest BIOS version from the ASUS website at www.asus.com. • If you turn off the computer and replace DIMMs during POST... reminding you that the BIOS has been restored to its default settings. &#...
Motherboard Pin Definition.English
Page 18
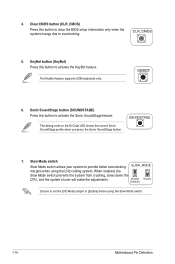
... Pin Definition Clear CMOS button (CLR_CMOS) Press this button to activate the Sonic SoundStage feature. Sonic SoundStage button (SOUNDSTAGE) Press this button to clear the BIOS setup information only when the systems hangs due to activate the KeyBot feature. KeyBot button (KeyBot) Press this button to overclocking. 5.
... Pin Definition Clear CMOS button (CLR_CMOS) Press this button to activate the Sonic SoundStage feature. Sonic SoundStage button (SOUNDSTAGE) Press this button to clear the BIOS setup information only when the systems hangs due to activate the KeyBot feature. KeyBot button (KeyBot) Press this button to overclocking. 5.

BIOSUpdateE-Manual English
Page 1
Motherboard BIOS Update and Management
Motherboard BIOS Update and Management
BIOSUpdateE-Manual English
Page 2
...and licensed under various Free Open Source Software licenses. ASUSTeK is distributed without intent to this information. All Rights Reserved. ASUS ASSUMES NO RESPONSIBILITY OR LIABILITY FOR ANY ERRORS OR INACCURACIES THAT MAY APPEAR IN THIS MANUAL, INCLUDING THE PRODUCTS AND SOFTWARE ...Open Source Software Licenses. Product warranty or service will be registered trademarks or copyrights of this email address). 2 BIOS Update and Management IN NO EVENT SHALL ASUS, ITS DIRECTORS, OFFICERS, EMPLOYEES OR AGENTS BE LIABLE FOR ANY INDIRECT, SPECIAL, INCIDENTAL, OR CONSEQUENTIAL DAMAGES (...
...and licensed under various Free Open Source Software licenses. ASUSTeK is distributed without intent to this information. All Rights Reserved. ASUS ASSUMES NO RESPONSIBILITY OR LIABILITY FOR ANY ERRORS OR INACCURACIES THAT MAY APPEAR IN THIS MANUAL, INCLUDING THE PRODUCTS AND SOFTWARE ...Open Source Software Licenses. Product warranty or service will be registered trademarks or copyrights of this email address). 2 BIOS Update and Management IN NO EVENT SHALL ASUS, ITS DIRECTORS, OFFICERS, EMPLOYEES OR AGENTS BE LIABLE FOR ANY INDIRECT, SPECIAL, INCIDENTAL, OR CONSEQUENTIAL DAMAGES (...
BIOSUpdateE-Manual English
Page 4
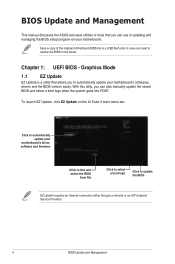
BIOS Update and Management This manual discusses the ASUS-exclusive utilities or tools that allows you to automatically update your motherboard. To launch EZ Update, click EZ Update on your motherboard's softwares, drivers and the BIOS version easily. Graphics Mode 1.1 EZ Update... EZ Update is a utility that you can also manually update the saved BIOS...
BIOS Update and Management This manual discusses the ASUS-exclusive utilities or tools that allows you to automatically update your motherboard. To launch EZ Update, click EZ Update on your motherboard's softwares, drivers and the BIOS version easily. Graphics Mode 1.1 EZ Update... EZ Update is a utility that you can also manually update the saved BIOS...

BIOSUpdateE-Manual English
Page 5
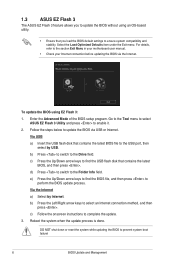
... Flash 2 feature allows you start using this utility, download the latest BIOS file from the ASUS website at www.asus.com To update the BIOS using an OS‑based utility. Enter the Advanced Mode of the BIOS setup program. Press to switch to prevent system boot failure! Reboot the ...Press to switch to enable it. 3. Press the Up/Down arrow keys to find the USB flash disk that contains the latest BIOS file to perform the BIOS update process. BIOS Update and Management 5 Go to the Tool menu to select ASUS EZ Flash 2 Utility and press to the Folder Info field. 6.
... Flash 2 feature allows you start using this utility, download the latest BIOS file from the ASUS website at www.asus.com To update the BIOS using an OS‑based utility. Enter the Advanced Mode of the BIOS setup program. Press to switch to prevent system boot failure! Reboot the ...Press to switch to enable it. 3. Press the Up/Down arrow keys to find the USB flash disk that contains the latest BIOS file to perform the BIOS update process. BIOS Update and Management 5 Go to the Tool menu to select ASUS EZ Flash 2 Utility and press to the Folder Info field. 6.
BIOSUpdateE-Manual English
Page 6
...below to ensure system compatibility and stability. Via USB a) Insert the USB flash disk that you load the BIOS default settings to update the BIOS via the Internet. Go to the Tool menu to select ASUS EZ Flash 3 Utility and press to complete the update. 3. Via the Internet a) Select by USB. ...b) Press the Left/Right arrow keys to prevent system boot failure! 6 BIOS Update and Management DO NOT shut down or reset the system while updating the BIOS to select an ...
...below to ensure system compatibility and stability. Via USB a) Insert the USB flash disk that you load the BIOS default settings to update the BIOS via the Internet. Go to the Tool menu to select ASUS EZ Flash 3 Utility and press to complete the update. 3. Via the Internet a) Select by USB. ...b) Press the Left/Right arrow keys to prevent system boot failure! 6 BIOS Update and Management DO NOT shut down or reset the system while updating the BIOS to select an ...

BIOSUpdateE-Manual English
Page 7
1.4 ASUS CrashFree BIOS 3 The ASUS CrashFree BIOS 3 is an auto recovery tool that you press to load default BIOS values. Download the latest BIOS file from the ASUS website at www.asus.com. Recovering the BIOS To recover the BIOS: 1. The system requires you to recover BIOS settings. To ensure system compatibility and stability, we recommend that allows you to enter BIOS Setup...
1.4 ASUS CrashFree BIOS 3 The ASUS CrashFree BIOS 3 is an auto recovery tool that you press to load default BIOS values. Download the latest BIOS file from the ASUS website at www.asus.com. Recovering the BIOS To recover the BIOS: 1. The system requires you to recover BIOS settings. To ensure system compatibility and stability, we recommend that allows you to enter BIOS Setup...
BIOSUpdateE-Manual English
Page 8
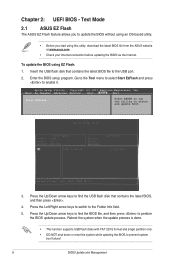
...Press the Up/Down arrow keys to perform the BIOS update process. Chapter 2: UEFI BIOS - To update the BIOS using this utility, download the latest BIOS file from the ASUS website at www.asus.com • Check your Internet connection before updating the BIOS via the Internet. Reboot the system when the .../16 format and single partition only. • DO NOT shut down or reset the system while updating the BIOS to select and update BIOS. 3. Text Mode 2.1 ASUS EZ Flash The ASUS EZ Flash feature allows you start using EZ Flash: 1. Aptio Setup Utility - Main Ai Tweaker Advanced Monitor...
...Press the Up/Down arrow keys to perform the BIOS update process. Chapter 2: UEFI BIOS - To update the BIOS using this utility, download the latest BIOS file from the ASUS website at www.asus.com • Check your Internet connection before updating the BIOS via the Internet. Reboot the system when the .../16 format and single partition only. • DO NOT shut down or reset the system while updating the BIOS to select and update BIOS. 3. Text Mode 2.1 ASUS EZ Flash The ASUS EZ Flash feature allows you start using EZ Flash: 1. Aptio Setup Utility - Main Ai Tweaker Advanced Monitor...
BIOSUpdateE-Manual English
Page 9
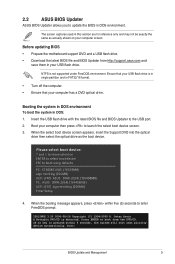
...Press ENTER to the USB port. 2. Ensure that your computer screen. Insert the USB flash drive with the latest BIOS file and BIOS Updater to boot from http://support.asus.com and save them in FAT32/16 format. • Turn off the computer. • Ensure that your USB ... boot device: and to move selection ENTER to select boot device ESC to update the BIOS in DOS environment. If no key is not supported under FreeDOS environment. 2.2 ASUS BIOS Updater ASUS BIOS Updater allows you to boot using defaults P2: ST3808110AS (76319MB) aigo miniking (250MB) UEFI: (FAT...
...Press ENTER to the USB port. 2. Ensure that your computer screen. Insert the USB flash drive with the latest BIOS file and BIOS Updater to boot from http://support.asus.com and save them in FAT32/16 format. • Turn off the computer. • Ensure that your USB ... boot device: and to move selection ENTER to select boot device ESC to update the BIOS in DOS environment. If no key is not supported under FreeDOS environment. 2.2 ASUS BIOS Updater ASUS BIOS Updater allows you to boot using defaults P2: ST3808110AS (76319MB) aigo miniking (250MB) UEFI: (FAT...
BIOSUpdateE-Manual English
Page 10
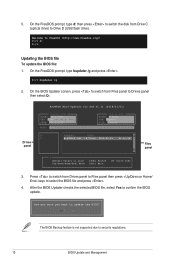
...to Files panel then press keys to security regulations. 10 BIOS Update and Management Yes No The BIOS Backup feature is not supported due to select the BIOS file and press . 4. On the FreeDOS prompt, type bupdater /g and press . Drives panel ASUSTeK BIOS Updater for DOS V1.31 [2014/01/01] Current ...Drive Info Files panel 3. On the FreeDOS prompt, type d: then press to switch the disk from Files panel to Drive D (USB flash drive). On the BIOS Updater screen, press to switch from Drive C (optical drive) to Drives panel then select D:. Are you sure you want to confirm the...
...to Files panel then press keys to security regulations. 10 BIOS Update and Management Yes No The BIOS Backup feature is not supported due to select the BIOS file and press . 4. On the FreeDOS prompt, type bupdater /g and press . Drives panel ASUSTeK BIOS Updater for DOS V1.31 [2014/01/01] Current ...Drive Info Files panel 3. On the FreeDOS prompt, type d: then press to switch the disk from Files panel to Drive D (USB flash drive). On the BIOS Updater screen, press to switch from Drive C (optical drive) to Drives panel then select D:. Are you sure you want to confirm the...
BIOSUpdateE-Manual English
Page 11
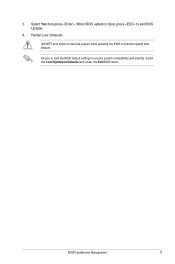
DO NOT shut down or reset the system while updating the BIOS to exit BIOS Updater. 6. When BIOS update is done, press to prevent system boot failaure. Restart your computer. BIOS Update and Management 11 Select the Load Optimized Defaults item under the Exit BIOS menu. Ensure to load the BIOS default settings to ensure system compatibility and stability. Select Yes then press . 5.
DO NOT shut down or reset the system while updating the BIOS to exit BIOS Updater. 6. When BIOS update is done, press to prevent system boot failaure. Restart your computer. BIOS Update and Management 11 Select the Load Optimized Defaults item under the Exit BIOS menu. Ensure to load the BIOS default settings to ensure system compatibility and stability. Select Yes then press . 5.

E11133MBPinDefinition English
Page 3
...ON the computer. 4. The chassis intrusion sensor or switch sends a highlevel signal to this connector. 1 Headers 1. Hold down and reboot the system, then the BIOS automatically resets parameter settings to short the two pins. 3. BATT_CON VBAT GND PIN 1 3. CHASSIS By default, the pin labeled "Chassis Signal" and "Ground" ...again to overclocking. The onboard button cell battery powers the RAM data in CMOS. Shut down the key during the boot process and enter BIOS setup to reenter data. • If the steps above do not need to clear the RTC when the system hangs due to clear ...
...ON the computer. 4. The chassis intrusion sensor or switch sends a highlevel signal to this connector. 1 Headers 1. Hold down and reboot the system, then the BIOS automatically resets parameter settings to short the two pins. 3. BATT_CON VBAT GND PIN 1 3. CHASSIS By default, the pin labeled "Chassis Signal" and "Ground" ...again to overclocking. The onboard button cell battery powers the RAM data in CMOS. Shut down the key during the boot process and enter BIOS setup to reenter data. • If the steps above do not need to clear the RTC when the system hangs due to clear ...
E11133MBPinDefinition English
Page 4
.... 2. Plug the power cord and turn ON the computer. 4. Shut down the key during the boot process and enter BIOS setup to default values. 2. Hold down and reboot the system so the BIOS can clear the CMOS memory of date, time, and system setup parameters by erasing the CMOS RTC RAM data...
.... 2. Plug the power cord and turn ON the computer. 4. Shut down the key during the boot process and enter BIOS setup to default values. 2. Hold down and reboot the system so the BIOS can clear the CMOS memory of date, time, and system setup parameters by erasing the CMOS RTC RAM data...


