
User Guide
Page 3
Contents Safety information iv About this guide iv Package contents vi PRIME A320M-A specifications summary vi Chapter 1: Product introduction Motherboard overview 1-1 Central Processing Unit (CPU 1-8 System memory 1-9 Chapter 2: BIOS information BIOS setup program 2-1 EZ Mode...2-2 Advanced Mode 2-3 Exit menu...2-4 Appendix Notices...A-1 ASUS contact information A-5 iii
Contents Safety information iv About this guide iv Package contents vi PRIME A320M-A specifications summary vi Chapter 1: Product introduction Motherboard overview 1-1 Central Processing Unit (CPU 1-8 System memory 1-9 Chapter 2: BIOS information BIOS setup program 2-1 EZ Mode...2-2 Advanced Mode 2-3 Exit menu...2-4 Appendix Notices...A-1 ASUS contact information A-5 iii

User Guide
Page 4
... circuit. • Ensure that your power supply is set to moisture. • Place the product on the motherboard. • Chapter 2: BIOS information This chapter discusses changing system settings through the BIOS Setup menus. If you are not sure about the voltage of the electrical outlet you are connected. If you add a device...
... circuit. • Ensure that your power supply is set to moisture. • Place the product on the motherboard. • Chapter 2: BIOS information This chapter discusses changing system settings through the BIOS Setup menus. If you are not sure about the voltage of the electrical outlet you are connected. If you add a device...
User Guide
Page 7
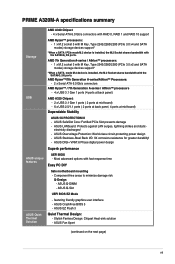
... at back panel, 4 ports at mid-board) Dependable Stability ASUS 5X PROTECTION III - ASUS SafeSlot Core: Fortified PCIe Slot prevents damage - ASUS DIGI+ VRM: 6 Phase digital power design Superb performance UEFI BIOS - Component-free areas to minimize damage risk Q-Design - PRIME A320M-A specifications summary Storage USB ASUS unique features ASUS Quiet Thermal Solution AMD A320 Chipset - 4 x Serial ATA...
... at back panel, 4 ports at mid-board) Dependable Stability ASUS 5X PROTECTION III - ASUS SafeSlot Core: Fortified PCIe Slot prevents damage - ASUS DIGI+ VRM: 6 Phase digital power design Superb performance UEFI BIOS - Component-free areas to minimize damage risk Q-Design - PRIME A320M-A specifications summary Storage USB ASUS unique features ASUS Quiet Thermal Solution AMD A320 Chipset - 4 x Serial ATA...
User Guide
Page 8
viii PRIME A320M-A specifications summary Rear panel I/O ports Internal connectors BIOS features Manageability Support DVD OS support Form factor 1 x PS/2 keyboard port (purple) 1 x PS/2 mouse port (green) 1 x HDMI port 1 x DVI-D port 1 x D-Sub ... pin TPM header 1 x Speaker connector 1 x System panel connector 128 Mb Flash ROM, UEFI AMI BIOS, PnP, WfM2.0, SM BIOS 3.0, ACPI 6.1, Multi-language BIOS, ASUS EZ Flash 3, ASUS CrashFree BIOS 3, My Favorites, Last Modified log, F12 PrintScreen, ASUS DRAM SPD (Serial Presence Detect) memory information, F6 Qfan Control WfM 2.0, DMI 3.0, WOL by PME,...
viii PRIME A320M-A specifications summary Rear panel I/O ports Internal connectors BIOS features Manageability Support DVD OS support Form factor 1 x PS/2 keyboard port (purple) 1 x PS/2 mouse port (green) 1 x HDMI port 1 x DVI-D port 1 x D-Sub ... pin TPM header 1 x Speaker connector 1 x System panel connector 128 Mb Flash ROM, UEFI AMI BIOS, PnP, WfM2.0, SM BIOS 3.0, ACPI 6.1, Multi-language BIOS, ASUS EZ Flash 3, ASUS CrashFree BIOS 3, My Favorites, Last Modified log, F12 PrintScreen, ASUS DRAM SPD (Serial Presence Detect) memory information, F6 Qfan Control WfM 2.0, DMI 3.0, WOL by PME,...

User Guide
Page 9
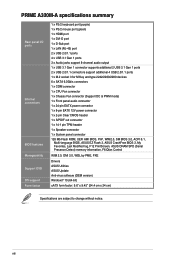
...the HDMI chassis SOCKET AM4 USB3_56 1 ASM 1143 USB12 CHA_FAN BATTERY LAN_USB3_34 LANGuard AUDIO 128Mb BIOS 2280 2260 2242 M.2_1(SOCKET3) SATA6G_5 SATA6G_6 17 16 Realtek® 8111H Super I/O Realtek 8111H PCIEX1_1 PCIEX16 6 AMD® A320 PRIME A320M-A ALC PCIEX1_2 887 SPDIF_OUT COM SPEAKER TPM USB34 USB56 USB3_12 7 CLRTC AAFP F_PANEL SATA6G_1 SATA6G_2... Motherboard overview 1 • Unplug the power cord from the wall socket before installing or removing the motherboard. Failure to get the detailed pin definitions. ASUS PRIME A320M-A 1-1
...the HDMI chassis SOCKET AM4 USB3_56 1 ASM 1143 USB12 CHA_FAN BATTERY LAN_USB3_34 LANGuard AUDIO 128Mb BIOS 2280 2260 2242 M.2_1(SOCKET3) SATA6G_5 SATA6G_6 17 16 Realtek® 8111H Super I/O Realtek 8111H PCIEX1_1 PCIEX16 6 AMD® A320 PRIME A320M-A ALC PCIEX1_2 887 SPDIF_OUT COM SPEAKER TPM USB34 USB56 USB3_12 7 CLRTC AAFP F_PANEL SATA6G_1 SATA6G_2... Motherboard overview 1 • Unplug the power cord from the wall socket before installing or removing the motherboard. Failure to get the detailed pin definitions. ASUS PRIME A320M-A 1-1
User Guide
Page 11
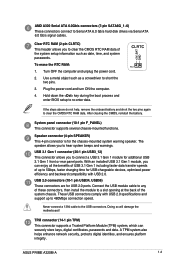
To erase the RTC RAM: 1. Hold down the key during the boot process and enter BIOS setup to re-enter data. +3V_BAT GND CLRTC PIN 1 If the steps above do not help, remove the onboard battery and short the two ...benefits of USB 3.1 Gen 1 including faster data transfer speeds of the system setup information such as a screwdriver to 5Gbps, faster charging time for USB 2.0 ports. ASUS PRIME A320M-A 1-3 AMD A320 Serial ATA 6.0Gb/s connectors (7-pin SATA6G_1~6) These connectors connect to 480Mbps connection speed. System panel connector (10-1 pin F_PANEL) This connector supports ...
To erase the RTC RAM: 1. Hold down the key during the boot process and enter BIOS setup to re-enter data. +3V_BAT GND CLRTC PIN 1 If the steps above do not help, remove the onboard battery and short the two ...benefits of USB 3.1 Gen 1 including faster data transfer speeds of the system setup information such as a screwdriver to 5Gbps, faster charging time for USB 2.0 ports. ASUS PRIME A320M-A 1-3 AMD A320 Serial ATA 6.0Gb/s connectors (7-pin SATA6G_1~6) These connectors connect to 480Mbps connection speed. System panel connector (10-1 pin F_PANEL) This connector supports ...
User Guide
Page 12
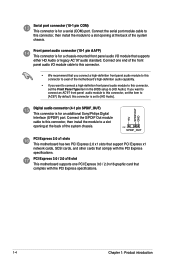
... panel audio I /O module cable to this connector, set the item to [HD Audio]. By default, this connector, set the Front Panel Type item in the BIOS setup to [AC97]. Connect the S/PDIF Out module cable to this connector, then install the module to a slot opening at the back of the system...
... panel audio I /O module cable to this connector, set the item to [HD Audio]. By default, this connector, set the Front Panel Type item in the BIOS setup to [AC97]. Connect the S/PDIF Out module cable to this connector, then install the module to a slot opening at the back of the system...

User Guide
Page 18
... and brief online help to guide you in using the ASUS CrashFree BIOS 3 utility, rename the BIOS file in this section are for reference purposes only, and may not exactly match what you failed to change between the two modes. 2-1 ASUS PRIME A320M-A BIOS menu screen The BIOS setup program can cause damage to your screen. • Visit...
... and brief online help to guide you in using the ASUS CrashFree BIOS 3 utility, rename the BIOS file in this section are for reference purposes only, and may not exactly match what you failed to change between the two modes. 2-1 ASUS PRIME A320M-A BIOS menu screen The BIOS setup program can cause damage to your screen. • Visit...
User Guide
Page 19
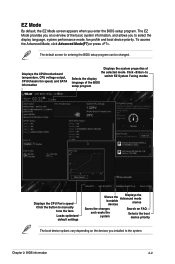
..., system performance mode, fan profile and boot device priority. Click to Selects the display switch EZ System Tuning modes language of the BIOS setup program Displays the CPU Fan's speed Click the button to manually tune the fans Loads optimized default settings Shows the bootable devices ...depending on the devices you to the system. The EZ Mode provides you an overview of the selected mode. Chapter 2: BIOS information 2-2 The default screen for entering the BIOS setup program can be changed. To access the Advanced Mode, click Advanced Mode(F7) or press . EZ Mode By ...
..., system performance mode, fan profile and boot device priority. Click to Selects the display switch EZ System Tuning modes language of the BIOS setup program Displays the CPU Fan's speed Click the button to manually tune the fans Loads optimized default settings Shows the bootable devices ...depending on the devices you to the system. The EZ Mode provides you an overview of the selected mode. Chapter 2: BIOS information 2-2 The default screen for entering the BIOS setup program can be changed. To access the Advanced Mode, click Advanced Mode(F7) or press . EZ Mode By ...

User Guide
Page 20
Advanced Mode The Advanced Mode provides advanced options for the detailed configurations. The figure below shows an example of the Advanced Mode. Refer to the following sections for experienced end-users to EZ Mode Search on FAQ Displays the CPU temperature, CPU and memory voltage output 2-3 ASUS PRIME A320M-A To access the EZ Mode, click EzMode(F7) or press . MyFavorite Language Menu bar Q-Fan control Hot Keys Sub-menu items General help Menu items Configuration fields Popup window Scroll bar Last modified settings Goes back to configure the BIOS settings.
Advanced Mode The Advanced Mode provides advanced options for the detailed configurations. The figure below shows an example of the Advanced Mode. Refer to the following sections for experienced end-users to EZ Mode Search on FAQ Displays the CPU temperature, CPU and memory voltage output 2-3 ASUS PRIME A320M-A To access the EZ Mode, click EzMode(F7) or press . MyFavorite Language Menu bar Q-Fan control Hot Keys Sub-menu items General help Menu items Configuration fields Popup window Scroll bar Last modified settings Goes back to configure the BIOS settings.
User Guide
Page 21
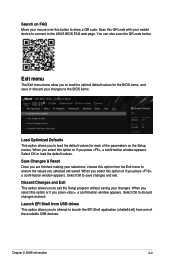
...Discard Changes and Exit This option allows you to save or discard your changes to the BIOS items. Load Optimized Defaults This option allows you to attempt to the ASUS BIOS FAQ web page. Chapter 2: BIOS information 2-4 Launch EFI Shell from the Exit menu to load the default values. Scan ...this option from USB drives This option allows you to load the default values for the BIOS items, and save changes and exit...
...Discard Changes and Exit This option allows you to save or discard your changes to the BIOS items. Load Optimized Defaults This option allows you to attempt to the ASUS BIOS FAQ web page. Chapter 2: BIOS information 2-4 Launch EFI Shell from the Exit menu to load the default values. Scan ...this option from USB drives This option allows you to load the default values for the BIOS items, and save changes and exit...


