
P8H61-MX R2.0 User's Manual
Page 7
... of the following parts: • Chapter 1: Product introduction This chapter describes the supported features of the motherboard. • Chapter 2: BIOS information This chapter provides a detailed guide to navigating and setting up the BIOS. Conventions used throughout this manual. CAUTION: Information to prevent damage to yourself when completing a task. IMPORTANT: Instructions you complete...
... of the following parts: • Chapter 1: Product introduction This chapter describes the supported features of the motherboard. • Chapter 2: BIOS information This chapter provides a detailed guide to navigating and setting up the BIOS. Conventions used throughout this manual. CAUTION: Information to prevent damage to yourself when completing a task. IMPORTANT: Instructions you complete...
P8H61-MX R2.0 User's Manual
Page 10
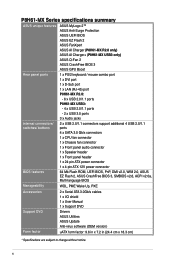
P8H61-MX Series specifications summary ASUS unique features ASUS MyLogo 2™ ASUS Anti-Surge Protection ASUS UEFI BIOS ASUS EZ Flash 2 ASUS FanXpert ASUS AI Charger (P8H61-MX R2.0 only) ASUS AI Charger+ (P8H61-MX USB3 only) ASUS Q-Fan 2 ASUS CrashFree BIOS 3 ASUS GPU Boost Rear panel ports 1 x PS/2 keyboard / mouse combo port 1 x DVI port 1 x D-Sub port 1 x LAN (RJ-45) port P8H61-MX R2.0: - 6 x USB 2.0/1.1 ports P8H61-MX USB3: - 4 x USB 2.0/1.1 ports - 2 x USB 3.0 ports 3 x Audio jacks Internal...
P8H61-MX Series specifications summary ASUS unique features ASUS MyLogo 2™ ASUS Anti-Surge Protection ASUS UEFI BIOS ASUS EZ Flash 2 ASUS FanXpert ASUS AI Charger (P8H61-MX R2.0 only) ASUS AI Charger+ (P8H61-MX USB3 only) ASUS Q-Fan 2 ASUS CrashFree BIOS 3 ASUS GPU Boost Rear panel ports 1 x PS/2 keyboard / mouse combo port 1 x DVI port 1 x D-Sub port 1 x LAN (RJ-45) port P8H61-MX R2.0: - 6 x USB 2.0/1.1 ports P8H61-MX USB3: - 4 x USB 2.0/1.1 ports - 2 x USB 3.0 ports 3 x Audio jacks Internal...
P8H61-MX R2.0 User's Manual
Page 14
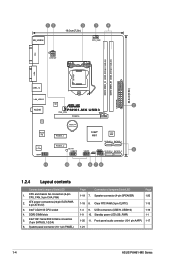
...SPEAKER) Page 1-20 1-18 8. Standby power LED (SB_PWR) 1-1 1-20 11. Front panel audio connector (10-1 pin AAFP) 1-17 1-21 1-4 ASUS P8H61-MX Series DDR3 DIMM slots 5. Intel® H61 Serial ATA 3.0Gb/s connectors (7-pin SATA3G_1/2/3/4) 6. Clear RTC RAM (3-pin CLRTC) 1-15 1-4 9. ...) EATXPWR 24.4cm(9.6in) VGA LGA1155 USB3_12 LAN_USB12 ASM 1042 2 AUDIO P8H61-MX USB3 CHA_FAN PCIEX16 RTL 8111F Lithium Cell CMOS Power Super I/O PCIEX1_1 Intel® 64Mb H61 BIOS VIA VT1708S AAFP SATA3G_3 SATA3G_1 PCIEX1_2 SB_PWR USB910 USB78 SPEAKER CLRTC SATA3G_4 SATA3G_2 ...
...SPEAKER) Page 1-20 1-18 8. Standby power LED (SB_PWR) 1-1 1-20 11. Front panel audio connector (10-1 pin AAFP) 1-17 1-21 1-4 ASUS P8H61-MX Series DDR3 DIMM slots 5. Intel® H61 Serial ATA 3.0Gb/s connectors (7-pin SATA3G_1/2/3/4) 6. Clear RTC RAM (3-pin CLRTC) 1-15 1-4 9. ...) EATXPWR 24.4cm(9.6in) VGA LGA1155 USB3_12 LAN_USB12 ASM 1042 2 AUDIO P8H61-MX USB3 CHA_FAN PCIEX16 RTL 8111F Lithium Cell CMOS Power Super I/O PCIEX1_1 Intel® 64Mb H61 BIOS VIA VT1708S AAFP SATA3G_3 SATA3G_1 PCIEX1_2 SB_PWR USB910 USB78 SPEAKER CLRTC SATA3G_4 SATA3G_2 ...
P8H61-MX R2.0 User's Manual
Page 28
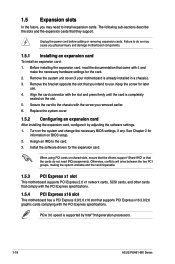
... the system and change the necessary BIOS settings, if any. The following sub‑sections describe the slots and the expansion cards that supports PCI Express x16 3.0/2.0 graphic cards complying with it by Intel® 3rd generation processors. 1-18 ASUS P8H61-MX Series Remove the bracket opposite the... card, read the documentation that you intend to the chassis with the slot and press firmly until the card is completely seated on BIOS setup. 2. Install the software drivers for information on the slot. 5. Unplug the power cord before adding or removing expansion cards. ...
... the system and change the necessary BIOS settings, if any. The following sub‑sections describe the slots and the expansion cards that supports PCI Express x16 3.0/2.0 graphic cards complying with it by Intel® 3rd generation processors. 1-18 ASUS P8H61-MX Series Remove the bracket opposite the... card, read the documentation that you intend to the chassis with the slot and press firmly until the card is completely seated on BIOS setup. 2. Install the software drivers for information on the slot. 5. Unplug the power cord before adding or removing expansion cards. ...
P8H61-MX R2.0 User's Manual
Page 29
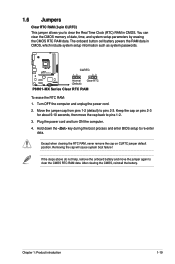
.... 4. Hold down the key during the boot process and enter BIOS setup to pins 2-3. Keep the cap on CLRTC jumper default position. Removing the cap will cause system boot failure! Chapter 1: Product introduction 1-19 P8H61-MX R2.0 CLRTC 12 23 Normal (Default) Clear RTC P8H61-MX Series Clear RTC RAM To erase the RTC RAM...
.... 4. Hold down the key during the boot process and enter BIOS setup to pins 2-3. Keep the cap on CLRTC jumper default position. Removing the cap will cause system boot failure! Chapter 1: Product introduction 1-19 P8H61-MX R2.0 CLRTC 12 23 Normal (Default) Clear RTC P8H61-MX Series Clear RTC RAM To erase the RTC RAM...

P8H61-MX R2.0 User's Manual
Page 32
ATX power connectors (24-pin EATXPWR, 4-pin ATX12V) These connectors are designed to fit these connectors in the BIOS setup to [HD]. Otherwise, the system will not boot up if the power is set to [HD]. By default, this connector is inadequate. • If...the 4-pin ATX +12V power plug. The power supply plugs are for your system, refer to the Recommended Power Supply Wattage Calculator at http://support.asus. See section 2.5.6 Onboard Devices Configuration for details. 1-22 ASUS P8H61-MX Series Find the proper orientation and push down firmly until the connectors completely fit.
ATX power connectors (24-pin EATXPWR, 4-pin ATX12V) These connectors are designed to fit these connectors in the BIOS setup to [HD]. Otherwise, the system will not boot up if the power is set to [HD]. By default, this connector is inadequate. • If...the 4-pin ATX +12V power plug. The power supply plugs are for your system, refer to the Recommended Power Supply Wattage Calculator at http://support.asus. See section 2.5.6 Onboard Devices Configuration for details. 1-22 ASUS P8H61-MX Series Find the proper orientation and push down firmly until the connectors completely fit.
P8H61-MX R2.0 User's Manual
Page 34
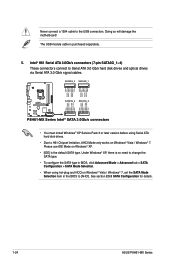
... AHCI Mode only works on Windows® Vista / Windows® 7, set the SATA Mode Selection item in the BIOS to change the SATA type. • To configure the SATA type in BIOS, click Advanced Mode > Advanced tab > SATA Configuration > SATA Mode Selection. • When using hot-plug and ... Serial ATA 3.0 Gb/s hard disk drives and optical drives via Serial ATA 3.0 Gb/s signal cables. See section 2.5.3 SATA Configuration for details. 1-24 ASUS P8H61-MX Series The USB module cable is the default SATA type. Please use IDE Mode on Windows® XP. • [IDE] is purchased separately. 5.
... AHCI Mode only works on Windows® Vista / Windows® 7, set the SATA Mode Selection item in the BIOS to change the SATA type. • To configure the SATA type in BIOS, click Advanced Mode > Advanced tab > SATA Configuration > SATA Mode Selection. • When using hot-plug and ... Serial ATA 3.0 Gb/s hard disk drives and optical drives via Serial ATA 3.0 Gb/s signal cables. See section 2.5.3 SATA Configuration for details. 1-24 ASUS P8H61-MX Series The USB module cable is the default SATA type. Please use IDE Mode on Windows® XP. • [IDE] is purchased separately. 5.
P8H61-MX R2.0 User's Manual
Page 37
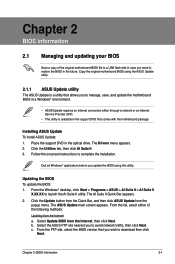
... X.XX.XX to complete the installation. Chapter 2 BIOS information 2.1 Managing and updating your BIOS Save a copy of the following methods: Updating from the Internet a. Installing ASUS Update To install ASUS Update: 1. Quit all Windows® applications before you update the BIOS using the ASUS Update utility. 2.1.1 ASUS Update utility The ASUS Update is available in the support DVD...
... X.XX.XX to complete the installation. Chapter 2 BIOS information 2.1 Managing and updating your BIOS Save a copy of the following methods: Updating from the Internet a. Installing ASUS Update To install ASUS Update: 1. Quit all Windows® applications before you update the BIOS using the ASUS Update utility. 2.1.1 ASUS Update utility The ASUS Update is available in the support DVD...

P8H61-MX R2.0 User's Manual
Page 38
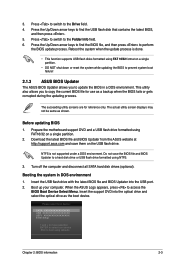
b. ASUSTek EZ Flash BIOS ROM Utility V01.04 Flash Info MODEL: P8H61-MX R2.0 File Path: fs0:\ Drive fs0:\ VER: 0303 Folder Info 03/13/12 10:23p 4194304 Exit DATE: 03/14/2012 P8H61-MX-R2-SI-0401.ROM File Info MODEL: Help Info VER: DATE [Enter] Select or Load [Tab]... Switch [Up/Down/PageUp/PageDown/Home/End] Move [Esc] Exit 2-2 ASUS P8H61-MX Series Before you to complete the update process. 2.1.2 ASUS EZ Flash 2 The ASUS EZ Flash 2 feature allows you start using this utility, download the latest BIOS file from file, then click Next. Insert the USB flash disk that contains...
b. ASUSTek EZ Flash BIOS ROM Utility V01.04 Flash Info MODEL: P8H61-MX R2.0 File Path: fs0:\ Drive fs0:\ VER: 0303 Folder Info 03/13/12 10:23p 4194304 Exit DATE: 03/14/2012 P8H61-MX-R2-SI-0401.ROM File Info MODEL: Help Info VER: DATE [Enter] Select or Load [Tab]... Switch [Up/Down/PageUp/PageDown/Home/End] Move [Esc] Exit 2-2 ASUS P8H61-MX Series Before you to complete the update process. 2.1.2 ASUS EZ Flash 2 The ASUS EZ Flash 2 feature allows you start using this utility, download the latest BIOS file from file, then click Next. Insert the USB flash disk that contains...
P8H61-MX R2.0 User's Manual
Page 39
... appears, press to the Drive field. 4. Download the latest BIOS file and BIOS Updater from the ASUS website at http://support.asus.com and save the BIOS file and BIOS Updater to a hard disk drive or USB flash drive formatted using FAT 16/32 format on a single partition. • DO ...NOT shut down or reset the system while updating the BIOS to prevent system boot failure! 2.1.3 ASUS BIOS Updater The ASUS BIOS Updater allows you to update the BIOS in DOS environment 1. Insert the support DVD into the USB port. 2. Reboot the system when the ...
... appears, press to the Drive field. 4. Download the latest BIOS file and BIOS Updater from the ASUS website at http://support.asus.com and save the BIOS file and BIOS Updater to a hard disk drive or USB flash drive formatted using FAT 16/32 format on a single partition. • DO ...NOT shut down or reset the system while updating the BIOS to prevent system boot failure! 2.1.3 ASUS BIOS Updater The ASUS BIOS Updater allows you to update the BIOS in DOS environment 1. Insert the support DVD into the USB port. 2. Reboot the system when the ...

P8H61-MX R2.0 User's Manual
Page 40
... the BIOS file and press . Yes No 2-4 ASUS P8H61-MX Series When the Make Disk menu appears, select the FreeDOS command prompt item by pressing the item number. 4. ASUSTek BIOS Updater for DOS V1.18 Current ROM BOARD: P8H61-MX R2.0 VER: 0401 DATE: 02/16/2012 Update ROM BOARD: Unknown VER: Unknown DATE: Unknown PATH: A:\ A: P8H61-MX-R2...
... the BIOS file and press . Yes No 2-4 ASUS P8H61-MX Series When the Make Disk menu appears, select the FreeDOS command prompt item by pressing the item number. 4. ASUSTek BIOS Updater for DOS V1.18 Current ROM BOARD: P8H61-MX R2.0 VER: 0401 DATE: 02/16/2012 Update ROM BOARD: Unknown VER: Unknown DATE: Unknown PATH: A:\ A: P8H61-MX-R2...
P8H61-MX R2.0 User's Manual
Page 41
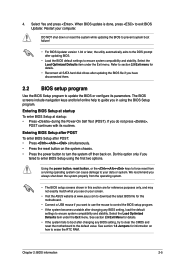
.... Using the power button, reset button, or the ++ keys to ensure system compatibility and stability. Chapter 2: BIOS information 2-5 Select Yes and press . Restart your screen. • Visit the ASUS website at startup: • Press during the Power-On Self Test (POST). Select the Load Optimized Defaults item... the system properly from a running operating system can cause damage to the default value. Entering BIOS Setup at startup To enter BIOS Setup at www.asus.com to download the latest BIOS file for reference purposes only, and may not exactly match what you always shut down or ...
.... Using the power button, reset button, or the ++ keys to ensure system compatibility and stability. Chapter 2: BIOS information 2-5 Select Yes and press . Restart your screen. • Visit the ASUS website at startup: • Press during the Power-On Self Test (POST). Select the Load Optimized Defaults item... the system properly from a running operating system can cause damage to the default value. Entering BIOS Setup at startup To enter BIOS Setup at www.asus.com to download the latest BIOS file for reference purposes only, and may not exactly match what you always shut down or ...

P8H61-MX R2.0 User's Manual
Page 42
...then select Advanced Mode. EZ Mode By default, the EZ Mode screen appears when you to the system. 2-6 ASUS P8H61-MX Series You can also press F7 for entering the BIOS setup program can be changed. The EZ Mode provides you an overview of the selected mode on the right hand ...device priority. Displays the CPU/ motherboard temperature, CPU voltage output, and CPU/chassis fan speed Selects the display language of the BIOS setup program Exits the BIOS setup program without saving the changes, saves the changes and resets the system, or enters the Advanced Mode Selects the boot ...
...then select Advanced Mode. EZ Mode By default, the EZ Mode screen appears when you to the system. 2-6 ASUS P8H61-MX Series You can also press F7 for entering the BIOS setup program can be changed. The EZ Mode provides you an overview of the selected mode on the right hand ...device priority. Displays the CPU/ motherboard temperature, CPU voltage output, and CPU/chassis fan speed Selects the display language of the BIOS setup program Exits the BIOS setup program without saving the changes, saves the changes and resets the system, or enters the Advanced Mode Selects the boot ...
P8H61-MX R2.0 User's Manual
Page 43
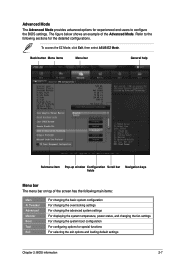
... figure below shows an example of the screen has the following sections for special functions For selecting the exit options and loading default settings Chapter 2: BIOS information 2-7 Advanced Mode The Advanced Mode provides advanced options for experienced end-users to the following main items: Main Ai Tweaker Advanced Monitor Boot Tool... temperature, power status, and changing the fan settings For changing the system boot configuration For configuring options for the detailed configurations. Refer to configure the BIOS settings. To access the EZ Mode, click Exit, then select...
... figure below shows an example of the screen has the following sections for special functions For selecting the exit options and loading default settings Chapter 2: BIOS information 2-7 Advanced Mode The Advanced Mode provides advanced options for experienced end-users to the following main items: Main Ai Tweaker Advanced Monitor Boot Tool... temperature, power status, and changing the fan settings For changing the system boot configuration For configuring options for the detailed configurations. Refer to configure the BIOS settings. To access the EZ Mode, click Exit, then select...

P8H61-MX R2.0 User's Manual
Page 44
... to display a pop-up window with the configuration options for the BIOS setup program. Configuration fields These fields show the values for that is highlighted when selected. Press the Up/Down arrow keys or / keys to display a list of options. 2-8 ASUS P8H61-MX Series Menu items The highlighted item on the menu bar displays...
... to display a pop-up window with the configuration options for the BIOS setup program. Configuration fields These fields show the values for that is highlighted when selected. Press the Up/Down arrow keys or / keys to display a list of options. 2-8 ASUS P8H61-MX Series Menu items The highlighted item on the menu bar displays...

P8H61-MX R2.0 User's Manual
Page 45
...Security The Security menu items allow you to change the system security settings. • If you have forgotten your BIOS password, erase the CMOS Real Time Clock (RTC) RAM to choose the BIOS language version from the options. The Main menu provides you an overview of the basic system information, and allows... See section 1.6 Jumpers for information on how to erase the RTC RAM. • The Administrator or User Password items on top of the BIOS Setup program. After you set the system date, time, language, and security settings. 2.3.1 System Language [English] Allows you to clear the...
...Security The Security menu items allow you to change the system security settings. • If you have forgotten your BIOS password, erase the CMOS Real Time Clock (RTC) RAM to choose the BIOS language version from the options. The Main menu provides you an overview of the basic system information, and allows... See section 1.6 Jumpers for information on how to erase the RTC RAM. • The Administrator or User Password items on top of the BIOS Setup program. After you set the system date, time, language, and security settings. 2.3.1 System Language [English] Allows you to clear the...

P8H61-MX R2.0 User's Manual
Page 46
... password: 1. From the Enter Current Password box, key in a password, then press . 3. The User Password item on top of the screen shows Not Installed. 2-10 ASUS P8H61-MX Series Select the User Password item and press . 2. From the Create New Password box, key in the current password, then press . 3. From the Create New..., but press when prompted to see or change only selected fields in a new password, then press . 4. From the Create New Password box, key in the BIOS setup program.
... password: 1. From the Enter Current Password box, key in a password, then press . 3. The User Password item on top of the screen shows Not Installed. 2-10 ASUS P8H61-MX Series Select the User Password item and press . 2. From the Create New Password box, key in the current password, then press . 3. From the Create New..., but press when prompted to see or change only selected fields in a new password, then press . 4. From the Create New Password box, key in the BIOS setup program.
P8H61-MX R2.0 User's Manual
Page 47
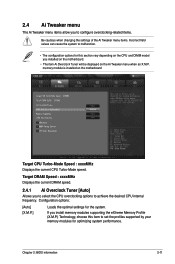
...; The item Ai Overclock Tuner will be displayed on the motherboard Target CPU Turbo-Mode Speed : xxxxMHz Displays the current CPU Turbo-Mode speed. Chapter 2: BIOS information 2-11 Configuration options: [Auto] [X.M.P.] Loads the optimal settings for optimizing system performance. 2.4 Ai Tweaker menu The Ai Tweaker menu items allow you to configure...
...; The item Ai Overclock Tuner will be displayed on the motherboard Target CPU Turbo-Mode Speed : xxxxMHz Displays the current CPU Turbo-Mode speed. Chapter 2: BIOS information 2-11 Configuration options: [Auto] [X.M.P.] Loads the optimal settings for optimizing system performance. 2.4 Ai Tweaker menu The Ai Tweaker menu items allow you to configure...

P8H61-MX R2.0 User's Manual
Page 49
... value ranges vary according to adjust the ratio. The following items appear only when you to manually adjust the maximum non-turbo CPU ratio. Chapter 2: BIOS information 2-13 2.4.7 CPU Power Management The sub-items in this menu allow you to enable or disable the Enhanced Intel® SpeedStep Technology (EIST). [Disabled...
... value ranges vary according to adjust the ratio. The following items appear only when you to manually adjust the maximum non-turbo CPU ratio. Chapter 2: BIOS information 2-13 2.4.7 CPU Power Management The sub-items in this menu allow you to enable or disable the Enhanced Intel® SpeedStep Technology (EIST). [Disabled...
P8H61-MX R2.0 User's Manual
Page 51
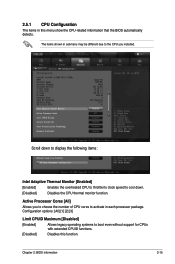
... clock speed to boot even without support for CPUs with extended CPUID functions. [Disabled] Disables this menu show the CPU-related information that the BIOS automatically detects. Chapter 2: BIOS information 2-15 Configuration options: [All] [1] [2] [3] Limit CPUID Maximum [Disabled] [Enabled] Allows legacy operating systems to cool down. [Disabled] Disables the CPU thermal monitor...
... clock speed to boot even without support for CPUs with extended CPUID functions. [Disabled] Disables this menu show the CPU-related information that the BIOS automatically detects. Chapter 2: BIOS information 2-15 Configuration options: [All] [1] [2] [3] Limit CPUID Maximum [Disabled] [Enabled] Allows legacy operating systems to cool down. [Disabled] Disables the CPU thermal monitor...


