
User Manual
Page 1
P5KPL/EPU Motherboard
P5KPL/EPU Motherboard

User Manual
Page 3
Contents Notices...vi Safety information vii About this guide vii P5KPL/EPU specifications summary ix Chapter 1: Product introduction 1.1 Welcome 1-1 1.2 Package contents 1-1 1.3 Special features 1-1 1.3.1 Product highlights 1-1 1.3.2 Innovative ASUS features 1-2 1.4 Before you proceed 1-4 1.5 Motherboard overview 1-5 1.5.1 Placement direction 1-5 1.5.2 Screw holes 1-5 1.5.3 Motherboard layout 1-6 1.5.4 Layout contents 1-6 1.6 Central Processing Unit (CPU 1-7 1.6.1 Installing the CPU 1-7 1.6.2 Installing the CPU heatsink ...
Contents Notices...vi Safety information vii About this guide vii P5KPL/EPU specifications summary ix Chapter 1: Product introduction 1.1 Welcome 1-1 1.2 Package contents 1-1 1.3 Special features 1-1 1.3.1 Product highlights 1-1 1.3.2 Innovative ASUS features 1-2 1.4 Before you proceed 1-4 1.5 Motherboard overview 1-5 1.5.1 Placement direction 1-5 1.5.2 Screw holes 1-5 1.5.3 Motherboard layout 1-6 1.5.4 Layout contents 1-6 1.6 Central Processing Unit (CPU 1-7 1.6.1 Installing the CPU 1-7 1.6.2 Installing the CPU heatsink ...
User Manual
Page 9
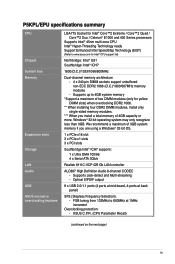
...at mid-board, 4-ports at 1MHz increment Overclocking protection: - ASUS C.P.R. (CPU Parameter Recall) (continued on the next page) ix P5KPL/EPU specifications summary CPU Chipset System bus Memory Expansion slots Storage LAN Audio USB ASUS exclusive overclocking features LGA775 Socket for Intel® Core™2 ... 600MHz at back panel) SFS (Stepless Frequency Selection): - Supports Jack-detect and Multi-streaming - Supports up to www.asus.com for yellow DIMM slots) when overclocking DDR2 1066. ** When installing four DDR2 DIMM modules, install only single-sided memory...
...at mid-board, 4-ports at 1MHz increment Overclocking protection: - ASUS C.P.R. (CPU Parameter Recall) (continued on the next page) ix P5KPL/EPU specifications summary CPU Chipset System bus Memory Expansion slots Storage LAN Audio USB ASUS exclusive overclocking features LGA775 Socket for Intel® Core™2 ... 600MHz at back panel) SFS (Stepless Frequency Selection): - Supports Jack-detect and Multi-streaming - Supports up to www.asus.com for yellow DIMM slots) when overclocking DDR2 1066. ** When installing four DDR2 DIMM modules, install only single-sided memory...

User Manual
Page 10
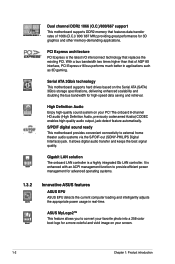
P5KPL/EPU specifications summary Rear panel ports Internal connectors ASUS Special features BIOS features Manageability Accessories Support OS Support DVD Form factor 1 x PS/2 mouse port 1 x PS/2 keyboard port 1 x Optical S/PDIF Out port 1 x ... 1 x Chassis / 1 x Power fan connectors 1 x CD audio-in connector 1 x IDE connector 1 x 24-pin EPS Power connector 1 x 4-pin ATX 12V Power connector ASUS CrashFree BIOS 3 ASUS EZ Flash2 ASUS Express Gate ASUS EPU ASUS Q-Fan ASUS MyLogo 2 8 Mb Flash ROM, AMI BIOS, Special H/W write protection, PnP, DMI v2.0, WfM2.0, SMBIOS v2.5, ACPI v2 0a WOL by PME,WOR...
P5KPL/EPU specifications summary Rear panel ports Internal connectors ASUS Special features BIOS features Manageability Accessories Support OS Support DVD Form factor 1 x PS/2 mouse port 1 x PS/2 keyboard port 1 x Optical S/PDIF Out port 1 x ... 1 x Chassis / 1 x Power fan connectors 1 x CD audio-in connector 1 x IDE connector 1 x 24-pin EPS Power connector 1 x 4-pin ATX 12V Power connector ASUS CrashFree BIOS 3 ASUS EZ Flash2 ASUS Express Gate ASUS EPU ASUS Q-Fan ASUS MyLogo 2 8 Mb Flash ROM, AMI BIOS, Special H/W write protection, PnP, DMI v2.0, WfM2.0, SMBIOS v2.5, ACPI v2 0a WOL by PME,WOR...

User Manual
Page 11
... with the list below. 1.2 Package contents Check your motherboard package for the following items. Motherboard Cables Accessories Application DVD Documentation ASUS P5KPL/EPU motherboard 1 x Serial ATA cable 1 x Ultra DMA 100/66 cable 1 x I/O shield ASUS motherboard support DVD User Manual If any of the above items is damaged or missing, contact your retailer. 1.3 1.3.1 Special features...
... with the list below. 1.2 Package contents Check your motherboard package for the following items. Motherboard Cables Accessories Application DVD Documentation ASUS P5KPL/EPU motherboard 1 x Serial ATA cable 1 x Ultra DMA 100/66 cable 1 x I/O shield ASUS motherboard support DVD User Manual If any of the above items is damaged or missing, contact your retailer. 1.3 1.3.1 Special features...
User Manual
Page 12
... (High Definition Audio, previously codenamed Azalia) CODEC enables high-quality audio output, jack-detect feature automatically. ASUS MyLogo2™ This feature allows you to provide efficient power management for advanced operating systems. 1.3.2 Innovative ASUS features ASUS EPU ASUS EPU detects the current computer loading and intelligently adjusts the appropriate power usage in applications such as 3D...
... (High Definition Audio, previously codenamed Azalia) CODEC enables high-quality audio output, jack-detect feature automatically. ASUS MyLogo2™ This feature allows you to provide efficient power management for advanced operating systems. 1.3.2 Innovative ASUS features ASUS EPU ASUS EPU detects the current computer loading and intelligently adjusts the appropriate power usage in applications such as 3D...

User Manual
Page 13
... entering the Windows® OS. • The actual boot time depends on the system configuration. • ASUS Express Gate supports file uploading from SATA HDDs, ODDs and USB drives and downloading to USB drives only. ASUS P5KPL/EPU 1-3 C.P.R. (CPU Parameter Recall) The BIOS C.P.R. Simply shut down and reboot the system, and the BIOS automatically...
... entering the Windows® OS. • The actual boot time depends on the system configuration. • ASUS Express Gate supports file uploading from SATA HDDs, ODDs and USB drives and downloading to USB drives only. ASUS P5KPL/EPU 1-3 C.P.R. (CPU Parameter Recall) The BIOS C.P.R. Simply shut down and reboot the system, and the BIOS automatically...

User Manual
Page 15
... installing the motherboard, ensure that you unplug the power cord before installing or removing the motherboard. Place this side towards the rear of the chassis ASUS P5KPL/EPU 1-5 The edge with external ports goes to the rear part of the chassis as indicated in the correct orientation. Do not overtighten the screws! Ensure...
... installing the motherboard, ensure that you unplug the power cord before installing or removing the motherboard. Place this side towards the rear of the chassis ASUS P5KPL/EPU 1-5 The edge with external ports goes to the rear part of the chassis as indicated in the correct orientation. Do not overtighten the screws! Ensure...

User Manual
Page 17
ASUS will process Return Merchandise Authorization (RMA) requests only if the motherboard comes with the cap on the socket and the ... the LGA775 socket. • The product warranty does not cover damage to the PnP cap/socket contacts/motherboard components. Contact your left. ASUS will shoulder the cost of repair only if the damage is shipment/transit-related. • Keep the cap after installing the motherboard. Locate... damage to the socket contacts resulting from incorrect CPU installation/removal, or misplacement/loss/incorrect removal of the PnP cap. ASUS P5KPL/EPU 1-7
ASUS will process Return Merchandise Authorization (RMA) requests only if the motherboard comes with the cap on the socket and the ... the LGA775 socket. • The product warranty does not cover damage to the PnP cap/socket contacts/motherboard components. Contact your left. ASUS will shoulder the cost of repair only if the damage is shipment/transit-related. • Keep the cap after installing the motherboard. Locate... damage to the socket contacts resulting from incorrect CPU installation/removal, or misplacement/loss/incorrect removal of the PnP cap. ASUS P5KPL/EPU 1-7
User Manual
Page 19
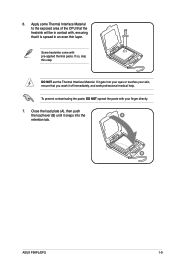
... (A), then push the load lever (B) until it snaps into your eyes or touches your finger directly. 7. If it off immediately, and seek professional medical help. 6. B ASUS P5KPL/EPU 1-9 Some heatsinks come with your skin, ensure that it is spread in contact with, ensuring that you wash it gets into the A retention tab. To...
... (A), then push the load lever (B) until it snaps into your eyes or touches your finger directly. 7. If it off immediately, and seek professional medical help. 6. B ASUS P5KPL/EPU 1-9 Some heatsinks come with your skin, ensure that it is spread in contact with, ensuring that you wash it gets into the A retention tab. To...
User Manual
Page 21
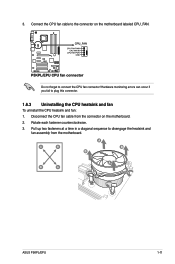
Connect the CPU fan cable to disengage the heatsink and fan assembly from the connector on the motherboard labeled CPU_FAN. Pull up two fasteners at a time in a diagonal sequence to the connector on the motherboard. 2. Hardware monitoring errors can occur if you fail to connect the CPU fan connector! Disconnect the CPU fan cable from the motherboard. Rotate each fastener counterclockwise. 3. Do not forget to plug this connector. 1.6.3 Uninstalling the CPU heatsink and fan To uninstall the CPU heatsink and fan: 1. A B A B B A B A ASUS P5KPL/EPU 1-11 3.
Connect the CPU fan cable to disengage the heatsink and fan assembly from the connector on the motherboard labeled CPU_FAN. Pull up two fasteners at a time in a diagonal sequence to the connector on the motherboard. 2. Hardware monitoring errors can occur if you fail to connect the CPU fan connector! Disconnect the CPU fan cable from the motherboard. Rotate each fastener counterclockwise. 3. Do not forget to plug this connector. 1.6.3 Uninstalling the CPU heatsink and fan To uninstall the CPU heatsink and fan: 1. A B A B B A B A ASUS P5KPL/EPU 1-11 3.
User Manual
Page 23
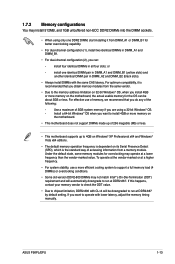
... at DDR2-667 by default setting. If this happens, contact your memory vendor to check the ODT value. • Due to run at DDR2-667. ASUS P5KPL/EPU 1-13 To operate at the vendor-marked or at a lower frequency than the vendor-marked value. Use a maximum of the following: - If you are using...
... at DDR2-667 by default setting. If this happens, contact your memory vendor to check the ODT value. • Due to run at DDR2-667. ASUS P5KPL/EPU 1-13 To operate at the vendor-marked or at a lower frequency than the vendor-marked value. Use a maximum of the following: - If you are using...
User Manual
Page 25
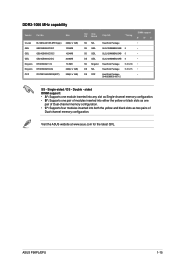
Double - DDR2-1066 MHz capability Vendor Part No. ASUS P5KPL/EPU 1-15 Visit the ASUS website at www.asus.com for the latest QVL. Single-sided / DS - "Timing SS N/A Heat-Sink Package SS GEIL GL2L128M88BA25AB 5 SS GEIL GL2L128M88BA25AB 5 DS GEIL GL2L128M88BA25AB 5 SS Kingston Heat-...
Double - DDR2-1066 MHz capability Vendor Part No. ASUS P5KPL/EPU 1-15 Visit the ASUS website at www.asus.com for the latest QVL. Single-sided / DS - "Timing SS N/A Heat-Sink Package SS GEIL GL2L128M88BA25AB 5 SS GEIL GL2L128M88BA25AB 5 DS GEIL GL2L128M88BA25AB 5 SS Kingston Heat-...

User Manual
Page 27
... the card connector with the screw you removed earlier. 6. When using PCI cards on BIOS setup. 2. Turn on the slot. 5. Assign an IRQ to use . 4. ASUS P5KPL/EPU 1-17 Remove the bracket opposite the slot that the cards do so may need IRQ assignments. 1.8 Expansion slots In the future, you may cause you...
... the card connector with the screw you removed earlier. 6. When using PCI cards on BIOS setup. 2. Turn on the slot. 5. Assign an IRQ to use . 4. ASUS P5KPL/EPU 1-17 Remove the bracket opposite the slot that the cards do so may need IRQ assignments. 1.8 Expansion slots In the future, you may cause you...
User Manual
Page 29
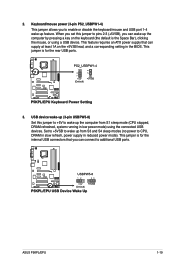
... to wake up from S1 sleep mode (CPU stopped, DRAM refreshed, system running in reduced power mode). This jumper is for the rear USB ports. 3. ASUS P5KPL/EPU 1-19 2. USB device wake-up the computer by pressing a key on the +5VSB lead, and a corresponding setting in the BIOS. This jumper is for the...
... to wake up from S1 sleep mode (CPU stopped, DRAM refreshed, system running in reduced power mode). This jumper is for the rear USB ports. 3. ASUS P5KPL/EPU 1-19 2. USB device wake-up the computer by pressing a key on the +5VSB lead, and a corresponding setting in the BIOS. This jumper is for the...
User Manual
Page 31
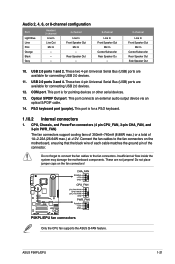
... port is for pointing devices or other serial devices. 13. Connect the fan cables to the fan connectors. Only the CPU fan supports the ASUS Q-FAN feature. ASUS P5KPL/EPU 1-21 Optical S/PDIF Out port. This port connects an external audio output device via an optical S/PDIF cable. 14. CPU, Chassis, and PowerFan connectors...
... port is for pointing devices or other serial devices. 13. Connect the fan cables to the fan connectors. Only the CPU fan supports the ASUS Q-FAN feature. ASUS P5KPL/EPU 1-21 Optical S/PDIF Out port. This port connects an external audio output device via an optical S/PDIF cable. 14. CPU, Chassis, and PowerFan connectors...
User Manual
Page 33
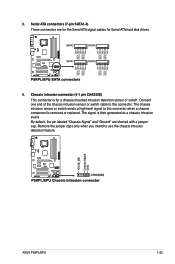
... drives. 4. By default, the pin labeled "Chassis Signal" and "Ground" are for the Serial ATA signal cables for a chassis-mounted intrusion detection sensor or switch. ASUS P5KPL/EPU 1-23 Serial ATA connectors (7-pin SATA1-4) These connectors are shorted with a jumper cap. Connect one end of the chassis intrusion sensor or switch cable to...
... drives. 4. By default, the pin labeled "Chassis Signal" and "Ground" are for the Serial ATA signal cables for a chassis-mounted intrusion detection sensor or switch. ASUS P5KPL/EPU 1-23 Serial ATA connectors (7-pin SATA1-4) These connectors are shorted with a jumper cap. Connect one end of the chassis intrusion sensor or switch cable to...

User Manual
Page 35
.... The IDE LED lights up when you to the HDD. • System warning speaker (4-pin SPEAKER) This 4-pin connector is for the HDD Activity LED. ASUS P5KPL/EPU 1-25
.... The IDE LED lights up when you to the HDD. • System warning speaker (4-pin SPEAKER) This 4-pin connector is for the HDD Activity LED. ASUS P5KPL/EPU 1-25
User Manual
Page 37
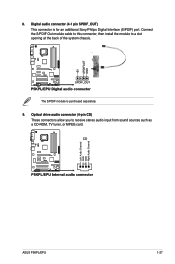
Optical drive audio connector (4-pin CD) These connectors allow you to a slot opening at the back of the system chassis. Connect the S/PDIF Out module cable to this connector, then install the module to receive stereo audio input from sound sources such as a CD-ROM, TV tuner, or MPEG card. The S/PDIF module is for an additional Sony/Philips Digital Interface (S/PDIF) port. Digital audio connector (4-1 pin SPDIF_OUT) This connector is purchased separately. 9. ASUS P5KPL/EPU 1-27 8.
Optical drive audio connector (4-pin CD) These connectors allow you to a slot opening at the back of the system chassis. Connect the S/PDIF Out module cable to this connector, then install the module to receive stereo audio input from sound sources such as a CD-ROM, TV tuner, or MPEG card. The S/PDIF module is for an additional Sony/Philips Digital Interface (S/PDIF) port. Digital audio connector (4-1 pin SPDIF_OUT) This connector is purchased separately. 9. ASUS P5KPL/EPU 1-27 8.
User Manual
Page 39
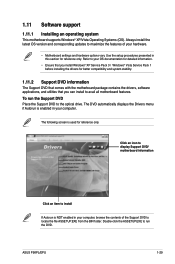
ASUS P5KPL/EPU 1-29 Use the setup procedures presented in your OS documentation for detailed information. • Ensure that you install Windows® XP Service Pack 3 / Windows® ...
ASUS P5KPL/EPU 1-29 Use the setup procedures presented in your OS documentation for detailed information. • Ensure that you install Windows® XP Service Pack 3 / Windows® ...

