User Manual
Page 4
... Software support 1-30 1.11.1 Installing an operating system 1-30 1.11.2 Support DVD information 1-30 Chapter 2: BIOS information 2.1 Managing and updating your BIOS 2-1 2.1.1 Creating a bootable floppy disk 2-1 2.1.2 ASUS Update utility 2-2 2.1.3 ASUS EZ Flash 2 utility 2-3 2.1.4 AFUDOS utility 2-4 2.1.5 ASUS CrashFree BIOS 3 utility 2-5 2.2 BIOS setup program 2-6 2.2.1 BIOS menu screen 2-7 2.2.2 Menu bar 2-7 2.2.3 Navigation keys 2-7 2.2.4 Menu items 2-8 2.2.5 Submenu items 2-8 2.2.6 Configuration fields 2-8 2.2.7 Pop-up window...
... Software support 1-30 1.11.1 Installing an operating system 1-30 1.11.2 Support DVD information 1-30 Chapter 2: BIOS information 2.1 Managing and updating your BIOS 2-1 2.1.1 Creating a bootable floppy disk 2-1 2.1.2 ASUS Update utility 2-2 2.1.3 ASUS EZ Flash 2 utility 2-3 2.1.4 AFUDOS utility 2-4 2.1.5 ASUS CrashFree BIOS 3 utility 2-5 2.2 BIOS setup program 2-6 2.2.1 BIOS menu screen 2-7 2.2.2 Menu bar 2-7 2.2.3 Navigation keys 2-7 2.2.4 Menu items 2-8 2.2.5 Submenu items 2-8 2.2.6 Configuration fields 2-8 2.2.7 Pop-up window...
User Manual
Page 7
...8226; If the power supply is broken, do not try to fix it supports. • Chapter 2: BIOS information This chapter tells how to change system settings through the BIOS Setup menus. About this guide is set to the correct voltage in any damage, contact your area. vii...your power supply is organized This guide contains the following parts: • Chapter 1: Product introduction This chapter describes the features of the BIOS parameters are unplugged. • Seek professional assistance before using the product, make sure all power cables from the existing system before you encounter...
...8226; If the power supply is broken, do not try to fix it supports. • Chapter 2: BIOS information This chapter tells how to change system settings through the BIOS Setup menus. About this guide is set to the correct voltage in any damage, contact your area. vii...your power supply is organized This guide contains the following parts: • Chapter 1: Product introduction This chapter describes the features of the BIOS parameters are unplugged. • Seek professional assistance before using the product, make sure all power cables from the existing system before you encounter...
User Manual
Page 10
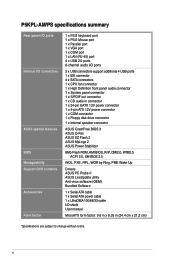
P5KPL-AM/PS specifications summary Rear panel I/O ports Internal I/O connectors ASUS special features BIOS Manageability Support DVD contents Accessories Form factor 1 x PS/2 keyboard port 1 x PS/2 Mouse port 1 x Parallel port 1 x VGA port 1 x COM port 1 x LAN (RJ-45) port ...2.0, SM BIOS 2.5 WOL, PXE, RPL, WOR by Ring, PME Wake Up Drivers ASUS PC Probe II ASUS LiveUpdate utility Anti-virus software (OEM) Bundled Software 1 x Serial ATA cable 1 x Serial ATA power cable 1 x UltraDMA 100/66/33 cable I/O shield User manual MicroATX form factor: 9.6 in x 8.35 in (24.4 cm x 21.2 cm) *Specifications...
P5KPL-AM/PS specifications summary Rear panel I/O ports Internal I/O connectors ASUS special features BIOS Manageability Support DVD contents Accessories Form factor 1 x PS/2 keyboard port 1 x PS/2 Mouse port 1 x Parallel port 1 x VGA port 1 x COM port 1 x LAN (RJ-45) port ...2.0, SM BIOS 2.5 WOL, PXE, RPL, WOR by Ring, PME Wake Up Drivers ASUS PC Probe II ASUS LiveUpdate utility Anti-virus software (OEM) Bundled Software 1 x Serial ATA cable 1 x Serial ATA power cable 1 x UltraDMA 100/66/33 cable I/O shield User manual MicroATX form factor: 9.6 in x 8.35 in (24.4 cm x 21.2 cm) *Specifications...

User Manual
Page 13
...CPU fan speeds according to system loading to restore a corrupted BIOS file using an OS-based utility. ASUS CrashFree BIOS 3 ASUS CrashFree BIOS 3 is an auto-recovery tool that contains the BIOS file. It is in line with the ASUS vision of Hazardous Substances (RoHS). It can provide a ...safeguard consumers' health while minimizing the impact on the environment. ASUS P5KPL-AM/PS 1-3 ASUS EZ Flash 2 ASUS EZ Flash 2 is in short circuit or over voltage. ASUS MyLogo 2™ This feature allows you to update the BIOS without using the bundled support DVD, floppy disk, or USB...
...CPU fan speeds according to system loading to restore a corrupted BIOS file using an OS-based utility. ASUS CrashFree BIOS 3 ASUS CrashFree BIOS 3 is an auto-recovery tool that contains the BIOS file. It is in line with the ASUS vision of Hazardous Substances (RoHS). It can provide a ...safeguard consumers' health while minimizing the impact on the environment. ASUS P5KPL-AM/PS 1-3 ASUS EZ Flash 2 ASUS EZ Flash 2 is in short circuit or over voltage. ASUS MyLogo 2™ This feature allows you to update the BIOS without using the bundled support DVD, floppy disk, or USB...
User Manual
Page 29
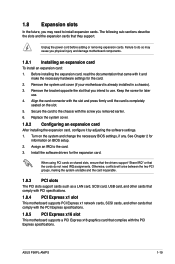
...an expansion card After installing the expansion card, configure it and make the necessary hardware settings for information on the system and change the necessary BIOS settings, if any. See Chapter 2 for the card. 2. Install the software drivers for later use . The following sub‑sections ...x1 slot This motherboard supports PCI Express x1 network cards, SCSI cards, and other cards that comply with the screw you removed earlier. 6. ASUS P5KPL-AM/PS 1-19 Remove the bracket opposite the slot that the cards do so may need to do not need IRQ assignments. Assign an ...
...an expansion card After installing the expansion card, configure it and make the necessary hardware settings for information on the system and change the necessary BIOS settings, if any. See Chapter 2 for the card. 2. Install the software drivers for later use . The following sub‑sections ...x1 slot This motherboard supports PCI Express x1 network cards, SCSI cards, and other cards that comply with the screw you removed earlier. 6. ASUS P5KPL-AM/PS 1-19 Remove the bracket opposite the slot that the cards do so may need to do not need IRQ assignments. Assign an ...
User Manual
Page 30
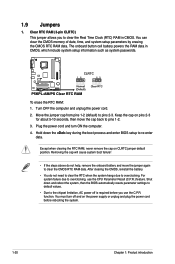
Hold down and reboot the system, then the BIOS automatically resets parameter settings to default values. • Due to pins 1-2. 3. Removing the cap will cause system boot failure! • If the steps above do ... the CPU Parameter Recall (C.P.R.) feature. Turn OFF the computer and unplug the power cord. 2. 1.9 Jumpers 1. Shut down the key during the boot process and enter BIOS setup to clear the CMOS RTC RAM data. Keep the cap on CLRTC jumper default position. Plug the power cord and turn off is required...
Hold down and reboot the system, then the BIOS automatically resets parameter settings to default values. • Due to pins 1-2. 3. Removing the cap will cause system boot failure! • If the steps above do ... the CPU Parameter Recall (C.P.R.) feature. Turn OFF the computer and unplug the power cord. 2. 1.9 Jumpers 1. Shut down the key during the boot process and enter BIOS setup to clear the CMOS RTC RAM data. Keep the cap on CLRTC jumper default position. Plug the power cord and turn off is required...
User Manual
Page 37
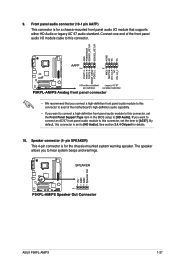
...panel audio connector (10-1 pin AAFP) This connector is for a chassis-mounted front panel audio I /O module cable to hear system beeps and warnings. ASUS P5KPL-AM/PS 1-27 By default, this connector, set to [AC97]. pin SPEAKER) This 4-pin connector is set the Front Panel Support Type item in the... BIOS setup to [HD Audio]. Speaker connector (4- The speaker allows you want to connect an AC'97 front panel audio module to this connector. •...
...panel audio connector (10-1 pin AAFP) This connector is for a chassis-mounted front panel audio I /O module cable to hear system beeps and warnings. ASUS P5KPL-AM/PS 1-27 By default, this connector, set to [AC97]. pin SPEAKER) This 4-pin connector is set the Front Panel Support Type item in the... BIOS setup to [HD Audio]. Speaker connector (4- The speaker allows you want to connect an AC'97 front panel audio module to this connector. •...
User Manual
Page 39
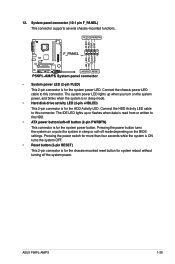
... seconds while the system is ON turns the system OFF. • Reset button (2-pin RESET) This 2-pin connector is for the HDD Activity LED. 12. ASUS P5KPL-AM/PS 1-29 System panel connector (10-1 pin F_PANEL) This connector supports several chassis-mounted functions. • System power LED (2-pin PLED) This 2-pin connector... chassis power LED cable to this connector. Connect the HDD Activity LED cable to this connector. Pressing the power button turns the system on the BIOS settings.
... seconds while the system is ON turns the system OFF. • Reset button (2-pin RESET) This 2-pin connector is for the HDD Activity LED. 12. ASUS P5KPL-AM/PS 1-29 System panel connector (10-1 pin F_PANEL) This connector supports several chassis-mounted functions. • System power LED (2-pin PLED) This 2-pin connector... chassis power LED cable to this connector. Connect the HDD Activity LED cable to this connector. Pressing the power button turns the system on the BIOS settings.
User Manual
Page 41
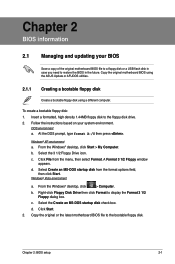
Copy the original motherboard BIOS using the ASUS Update or AFUDOS utilities. 2.1.1 Creating a bootable floppy disk Create a bootable floppy disk using a different computer. DOS environment a. b. Select the 3 1/2 Floppy Drive icon. c. From the Windows&#...
Copy the original motherboard BIOS using the ASUS Update or AFUDOS utilities. 2.1.1 Creating a bootable floppy disk Create a bootable floppy disk using a different computer. DOS environment a. b. Select the 3 1/2 Floppy Drive icon. c. From the Windows&#...
User Manual
Page 42
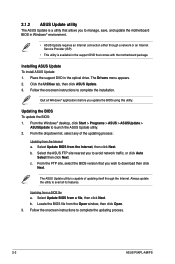
... update the utility to complete the installation. Updating from the Internet, then click Next. From the FTP site, select the BIOS version that you wish to complete the updating process. 2-2 ASUS P5KPL-AM/PS Follow the onscreen instructions to download then click Next. Place the support DVD in the optical drive. The Drivers...
... update the utility to complete the installation. Updating from the Internet, then click Next. From the FTP site, select the BIOS version that you wish to complete the updating process. 2-2 ASUS P5KPL-AM/PS Follow the onscreen instructions to download then click Next. Place the support DVD in the optical drive. The Drivers...

User Manual
Page 43
... disk drive or the USB port, then launch EZ Flash 2. Press to display the following: ASUSTek EZ Flash 2 BIOS ROM Utility V3.25 FLASH TYPE: MXIC 25L8005 Current ROM BOARD: P5KPL-AM/PS VER: 0003 DATE: 07/22/08 Update ROM BOARD: Unknown VER: Unknown DATE: Unknown PATH: A:\...floppy disk or an OS‑based utility. com. To update the BIOS using this utility, download the latest BIOS file from the ASUS website at www.asus. 2.1.3 ASUS EZ Flash 2 utility The ASUS EZ Flash 2 feature allows you to update the BIOS without having to enable it. 2. Insert the floppy/USB flash disk...
... disk drive or the USB port, then launch EZ Flash 2. Press to display the following: ASUSTek EZ Flash 2 BIOS ROM Utility V3.25 FLASH TYPE: MXIC 25L8005 Current ROM BOARD: P5KPL-AM/PS VER: 0003 DATE: 07/22/08 Update ROM BOARD: Unknown VER: Unknown DATE: Unknown PATH: A:\...floppy disk or an OS‑based utility. com. To update the BIOS using this utility, download the latest BIOS file from the ASUS website at www.asus. 2.1.3 ASUS EZ Flash 2 utility The ASUS EZ Flash 2 feature allows you to update the BIOS without having to enable it. 2. Insert the floppy/USB flash disk...
User Manual
Page 44
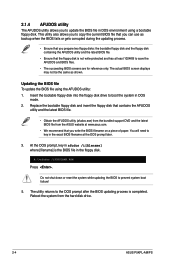
...Ensure that contains the AFUDOS utility and the latest BIOS file. • Obtain the AFUDOS utility (afudos.exe) from the bundled support DVD and the latest BIOS file from the hard disk drive. 2-4 ASUS P5KPL-AM/PS The utility returns to update the BIOS file in the floppy disk. 2.1.4 AFUDOS utility ...The AFUDOS utility allows you to the DOS prompt after the BIOS updating process is completed. Insert the...
...Ensure that contains the AFUDOS utility and the latest BIOS file. • Obtain the AFUDOS utility (afudos.exe) from the bundled support DVD and the latest BIOS file from the hard disk drive. 2-4 ASUS P5KPL-AM/PS The utility returns to update the BIOS file in the floppy disk. 2.1.4 AFUDOS utility ...The AFUDOS utility allows you to the DOS prompt after the BIOS updating process is completed. Insert the...
User Manual
Page 45
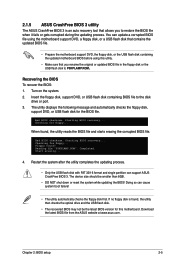
... gets corrupted during the updating process. Insert the floppy disk, support DVD, or USB flash disk containing BIOS file to P5KPLAMP.ROM. Starting BIOS recovery... Download the latest BIOS file from the ASUS website at www.asus.com. Chapter 2: BIOS setup 2-5 The utility displays the following message and automatically checks the floppy disk, support DVD, or...
... gets corrupted during the updating process. Insert the floppy disk, support DVD, or USB flash disk containing BIOS file to P5KPLAMP.ROM. Starting BIOS recovery... Download the latest BIOS file from the ASUS website at www.asus.com. Chapter 2: BIOS setup 2-5 The utility displays the following message and automatically checks the floppy disk, support DVD, or...

User Manual
Page 46
...following procedures: • Restart using the provided utility described in section "2.1 Managing and updating your BIOS." This section explains how to run this motherboard apply for this motherboard. 2-6 ASUS P5KPL-AM/PS Otherwise, POST continues with the opportunity to configure your selections from the operating system.... at www.asus.com to turn the system off then back on. Select the Load Setups Default item under the Exit Menu. Even if you are installing a motherboard, reconfiguring your system using the BIOS Setup program so that you can update using the OS ...
...following procedures: • Restart using the provided utility described in section "2.1 Managing and updating your BIOS." This section explains how to run this motherboard apply for this motherboard. 2-6 ASUS P5KPL-AM/PS Otherwise, POST continues with the opportunity to configure your selections from the operating system.... at www.asus.com to turn the system off then back on. Select the Load Setups Default item under the Exit Menu. Even if you are installing a motherboard, reconfiguring your system using the BIOS Setup program so that you can update using the OS ...
User Manual
Page 47
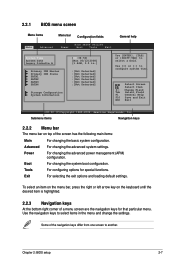
... Configuration System Information Use [ENTER], [TAB] or [SHIFT-TAB] to configure system Time. Chapter 2: BIOS setup 2-7 Tools For configuring options for that particular menu. 2.2.1 BIOS menu screen Menu items Menu bar Configuration fields General help Main Advanced Power BIOS SETUP UTILITY Boot Tools Exit System Time 00:38:56] System Date [Mon 05...
... Configuration System Information Use [ENTER], [TAB] or [SHIFT-TAB] to configure system Time. Chapter 2: BIOS setup 2-7 Tools For configuring options for that particular menu. 2.2.1 BIOS menu screen Menu items Menu bar Configuration fields General help Main Advanced Power BIOS SETUP UTILITY Boot Tools Exit System Time 00:38:56] System Date [Mon 05...
User Manual
Page 48
...i c a n Megatrends, Inc. configurable, you can change the value of a field, select it then press to display a list of the selected item. 2-8 ASUS P5KPL-AM/PS Refer to 2.2.7 Pop-up window. 2.2.7 Pop-up window Select a menu item then press to display the other items (Advanced, Power, Boot, Tools, ... and is not userconfigurable. For example, selecting Main shows the Main menu items. The other items on the screen. Main Advanced BIOS SETUP UTILITY Power Boot Tools Exit Suspend Mode ACPI Version Features ACPI APIC support APM Configuration Hardware Monitor [Auto] [Disabled] [E ...
...i c a n Megatrends, Inc. configurable, you can change the value of a field, select it then press to display a list of the selected item. 2-8 ASUS P5KPL-AM/PS Refer to 2.2.7 Pop-up window. 2.2.7 Pop-up window Select a menu item then press to display the other items (Advanced, Power, Boot, Tools, ... and is not userconfigurable. For example, selecting Main shows the Main menu items. The other items on the screen. Main Advanced BIOS SETUP UTILITY Power Boot Tools Exit Suspend Mode ACPI Version Features ACPI APIC support APM Configuration Hardware Monitor [Auto] [Disabled] [E ...
User Manual
Page 49
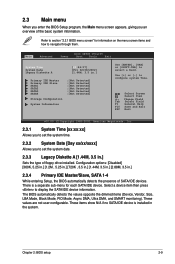
... to set the system time. 2.3.2 System Date [Day xx/xx/xxxx] Allows you an overview of the basic system information. Chapter 2: BIOS setup 2-9 Main Advanced Power BIOS SETUP UTILITY Boot Tools Exit System Time 20:46:57] System Date [Fri 02/08/2002] Legacy Diskette A [1.44M, 3.5 in .]...Detected] :[Not Detected] :[Not Detected] UUssee [[EENNTTEERR]],, [[TTAABB]] oorr [[SSHHIIFFTT--TTAABB]] ttoo sseelleecctt aa ffiieelldd.. 2.3 Main menu When you enter the BIOS Setup program, the Main menu screen appears, giving you to display the SATA/IDE device information. Refer to section...
... to set the system time. 2.3.2 System Date [Day xx/xx/xxxx] Allows you an overview of the basic system information. Chapter 2: BIOS setup 2-9 Main Advanced Power BIOS SETUP UTILITY Boot Tools Exit System Time 20:46:57] System Date [Fri 02/08/2002] Legacy Diskette A [1.44M, 3.5 in .]...Detected] :[Not Detected] :[Not Detected] UUssee [[EENNTTEERR]],, [[TTAABB]] oorr [[SSHHIIFFTT--TTAABB]] ttoo sseelleecctt aa ffiieelldd.. 2.3 Main menu When you enter the BIOS Setup program, the Main menu screen appears, giving you to display the SATA/IDE device information. Refer to section...
User Manual
Page 51
... for the CPU and other system devices. allows you to change the settings for stability when overclocking. Overclock Profile - Chapter 2: BIOS setup 2-11 Select either one of the general system specifications. loads overclocking profiles with spread spectrum. Test Mode - Configuration options: ...[20] [25] [30] [35] 2.3.6 System Information This menu gives you to individually set overclocking parameters. AMI BIOS Displays the auto-detected BIOS information. IDE Detect Time Out (Sec) [35] Selects the time out value for the system. System Memory Displays the...
... for the CPU and other system devices. allows you to change the settings for stability when overclocking. Overclock Profile - Chapter 2: BIOS setup 2-11 Select either one of the general system specifications. loads overclocking profiles with spread spectrum. Test Mode - Configuration options: ...[20] [25] [30] [35] 2.3.6 System Information This menu gives you to individually set overclocking parameters. AMI BIOS Displays the auto-detected BIOS information. IDE Detect Time Out (Sec) [35] Selects the time out value for the system. System Memory Displays the...
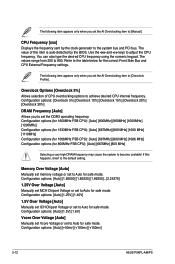
User Manual
Page 52
... the table below for safe mode. Refer to Auto for safe mode. Configuration options: [Auto] [+50mv] [+100mv] [+150mv] 2-12 ASUS P5KPL-AM/PS CPU Frequency [xxx] Displays the frequency sent by the BIOS. The following item appears only when you set the AI Overclocking item to the default setting. Configuration options (for 1600MHz...
... the table below for safe mode. Refer to Auto for safe mode. Configuration options: [Auto] [+50mv] [+100mv] [+150mv] 2-12 ASUS P5KPL-AM/PS CPU Frequency [xxx] Displays the frequency sent by the BIOS. The following item appears only when you set the AI Overclocking item to the default setting. Configuration options (for 1600MHz...
User Manual
Page 53
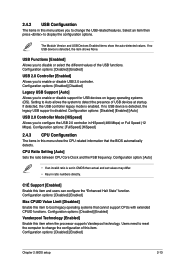
...Max CPUID Value Limit [Disabled] Enable this item when the processor supports Vanderpool technology. Configuration options: [Disabled] [Enabled] Chapter 2: BIOS setup 2-13 Select an item then press to change the USB-related features. Configuration options: [Enabled] [Disabled] Legacy USB Support...: [FullSpeed] [HiSpeed] 2.4.3 CPU Configuration The items in this menu allows you to boot legacy operating systems that the BIOS automatically detects. Configuration options: [Disabled] [Enabled] Vanderpool Technology [Enabled] Enable this item to disable or select the different...
...Max CPUID Value Limit [Disabled] Enable this item when the processor supports Vanderpool technology. Configuration options: [Disabled] [Enabled] Chapter 2: BIOS setup 2-13 Select an item then press to change the USB-related features. Configuration options: [Enabled] [Disabled] Legacy USB Support...: [FullSpeed] [HiSpeed] 2.4.3 CPU Configuration The items in this menu allows you to boot legacy operating systems that the BIOS automatically detects. Configuration options: [Disabled] [Enabled] Vanderpool Technology [Enabled] Enable this item to disable or select the different...


