
User Guide
Page 7
... and can be determined by the party responsible for compliance could void the user's authority to the transmitting antenna during transmitting. This equipment has been tested and found to comply with manufacturer's instructions, may not cause harmful interference, and • This device must follow the specific operating instructions for satisfying RF...
... and can be determined by the party responsible for compliance could void the user's authority to the transmitting antenna during transmitting. This equipment has been tested and found to comply with manufacturer's instructions, may not cause harmful interference, and • This device must follow the specific operating instructions for satisfying RF...
User Guide
Page 8
... [Article 3] • Protection requirements for health and safety as in [Article 3.1a] • Testing for electric safety according to [EN 60950] • Protection requirements for electromagnetic compatibility in [Article 3.1b] • Testing for electromagnetic compatibility in [EN 301 489-1] & [EN 301 489-17] • Effective use... of the radio spectrum as in [Article 3.2] • Radio test suites according to [EN 300 328-2] CE Marking CE marking for devices without wireless LAN/Bluetooth The shipped version of this transmitter must ...
... [Article 3] • Protection requirements for health and safety as in [Article 3.1a] • Testing for electric safety according to [EN 60950] • Protection requirements for electromagnetic compatibility in [Article 3.1b] • Testing for electromagnetic compatibility in [EN 301 489-1] & [EN 301 489-17] • Effective use... of the radio spectrum as in [Article 3.2] • Radio test suites according to [EN 300 328-2] CE Marking CE marking for devices without wireless LAN/Bluetooth The shipped version of this transmitter must ...
User Guide
Page 30
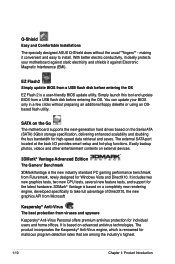
Q-Shield Easy and Comfortable Installations The specially designed ASUS Q-Shield does without preparing an additional floppy diskette or using an OSbased flash utility. It includes two new graphics tests, two new CPU tests, several new feature tests, and support for the latest hardware. 3DMark® Vantage is a user-friendly BIOS update utility. EZ Flash2 Simply...
Q-Shield Easy and Comfortable Installations The specially designed ASUS Q-Shield does without preparing an additional floppy diskette or using an OSbased flash utility. It includes two new graphics tests, two new CPU tests, several new feature tests, and support for the latest hardware. 3DMark® Vantage is a user-friendly BIOS update utility. EZ Flash2 Simply...
User Guide
Page 57
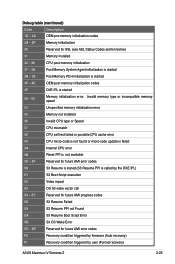
... or incompatible memory speed 54 Unspecified memory initialization error 55 Memory not installed 56 Invalid CPU type or Speed 57 CPU mismatch 58 CPU self test failed or possible CPU cache error 59 CPU micro-code is not found or micro-code update is failed 5A Internal CPU error 5B Reset... S3 Resume is stared (S3 Resume PPI is started 3F - 4E OEM post memory initialization codes 4F DXE IPL is called by user (Forced recovery) ASUS Maximus IV Extreme-Z 2-25
... or incompatible memory speed 54 Unspecified memory initialization error 55 Memory not installed 56 Invalid CPU type or Speed 57 CPU mismatch 58 CPU self test failed or possible CPU cache error 59 CPU micro-code is not found or micro-code update is failed 5A Internal CPU error 5B Reset... S3 Resume is stared (S3 Resume PPI is started 3F - 4E OEM post memory initialization codes 4F DXE IPL is called by user (Forced recovery) ASUS Maximus IV Extreme-Z 2-25
User Guide
Page 88
... SCSI devices (starting with the "green" standards or if it has a "power standby" feature, the monitor LED may have failed a power-on self tests or POST. While the tests are off. 3. BIOS Beep Description One short beep VGA detected Quick boot set to the power connector at the back of the system... jumper settings and connections or call your monitor complies with the last device on the screen. System power 6. The system then runs the power-on test. If you do not see anything within 30 seconds from orange to green after the system LED turns on , hold down the key to enter...
... SCSI devices (starting with the "green" standards or if it has a "power standby" feature, the monitor LED may have failed a power-on self tests or POST. While the tests are off. 3. BIOS Beep Description One short beep VGA detected Quick boot set to the power connector at the back of the system... jumper settings and connections or call your monitor complies with the last device on the screen. System power 6. The system then runs the power-on test. If you do not see anything within 30 seconds from orange to green after the system LED turns on , hold down the key to enter...
User Guide
Page 93
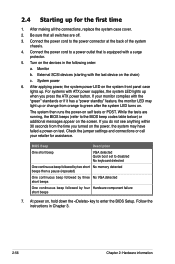
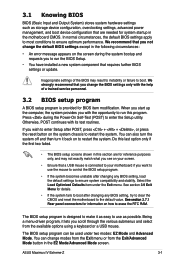
...mouse. Otherwise, POST continues with the opportunity to ensure system compatibility and stability. Being a menu-driven program, it lets you with its test routines. The BIOS setup program is designed to make it back on the system chassis to boot. The BIOS setup program can also ...to your screen. • Ensure that are for reference purposes only, and may result to instability or failure to restart the system. ASUS Maximus IV Extreme-Z 3-1 In normal circumstances, the default BIOS settings apply to most conditions to enter the Setup utility. We recommend that you not change...
...mouse. Otherwise, POST continues with the opportunity to ensure system compatibility and stability. Being a menu-driven program, it lets you with its test routines. The BIOS setup program is designed to make it back on the system chassis to boot. The BIOS setup program can also ...to your screen. • Ensure that are for reference purposes only, and may result to instability or failure to restart the system. ASUS Maximus IV Extreme-Z 3-1 In normal circumstances, the default BIOS settings apply to most conditions to enter the Setup utility. We recommend that you not change...
User Guide
Page 135
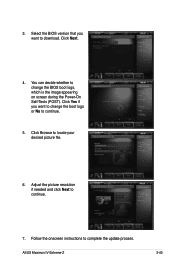
Click Next. 4. Adjust the picture resolution if needed and click Next to locate your desired picture file. 6. ASUS Maximus IV Extreme-Z 3-43 Click Yes if you want to change the BIOS boot logo, which is the image appearing on screen during the Power‑On Self-Tests (POST). Click Browse to continue. 7. Select the BIOS version that you want to continue. 5. You can decide whether to complete the update process. 3. Follow the onscreen instructions to change the boot logo or No to download.
Click Next. 4. Adjust the picture resolution if needed and click Next to locate your desired picture file. 6. ASUS Maximus IV Extreme-Z 3-43 Click Yes if you want to change the BIOS boot logo, which is the image appearing on screen during the Power‑On Self-Tests (POST). Click Browse to continue. 7. Select the BIOS version that you want to continue. 5. You can decide whether to complete the update process. 3. Follow the onscreen instructions to change the boot logo or No to download.
User Guide
Page 154
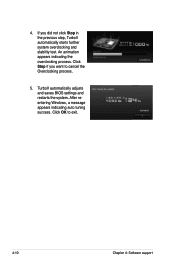
TurboV automatically adjusts and saves BIOS settings and restarts the system. Click Stop if you did not click Stop in the previous step, TurboV automatically starts further system overclocking and stability test. An animation appears indicating the overclocking process. Click OK to cancel the Overclocking process. 5. After reentering Windows, a message appears indicating auto tuning success. If you want to exit. 4-10 Chapter 4: Software support 4.
TurboV automatically adjusts and saves BIOS settings and restarts the system. Click Stop if you did not click Stop in the previous step, TurboV automatically starts further system overclocking and stability test. An animation appears indicating the overclocking process. Click OK to cancel the Overclocking process. 5. After reentering Windows, a message appears indicating auto tuning success. If you want to exit. 4-10 Chapter 4: Software support 4.

