
User Guide
Page 40
...the CPU heatsink and fan The Intel® LGA775 processor requires a specially designed heatsink and fan assembly to ensure optimum thermal condition and performance. • When you install the CPU fan and heatsink assembly. Place the heatsink on the motherboard. Narrow end of the groove Motherboard hole Fastener Make sure ...sure that you use only Intel®‑certified multi‑directional heatsink and fan. • Your Intel® LGA775 heatsink and fan assembly comes in a push-pin design and requires no tool to install. • If you purchased a separate CPU heatsink and fan...
...the CPU heatsink and fan The Intel® LGA775 processor requires a specially designed heatsink and fan assembly to ensure optimum thermal condition and performance. • When you install the CPU fan and heatsink assembly. Place the heatsink on the motherboard. Narrow end of the groove Motherboard hole Fastener Make sure ...sure that you use only Intel®‑certified multi‑directional heatsink and fan. • Your Intel® LGA775 heatsink and fan assembly comes in a push-pin design and requires no tool to install. • If you purchased a separate CPU heatsink and fan...
User Guide
Page 41
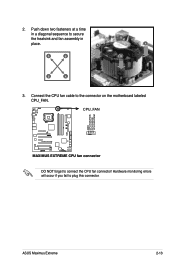
A A A B B B A 3. Connect the CPU fan cable to connect the CPU fan connector! ASUS Maximus Extreme 2-13 CPU_FAN GND CPU FAN PWR CPU FAN IN CPU FAN PWM ® MAXIMUS EXTREME MAXIMUS EXTREME CPU fan connector DO NOT forget to the connector on the motherboard labeled CPU_FAN. Hardware monitoring errors will occur if you fail to secure the heatsink and fan assembly in a diagonal sequence to plug this connector. 2. Push down two fasteners at a time in B place.
A A A B B B A 3. Connect the CPU fan cable to connect the CPU fan connector! ASUS Maximus Extreme 2-13 CPU_FAN GND CPU FAN PWR CPU FAN IN CPU FAN PWM ® MAXIMUS EXTREME MAXIMUS EXTREME CPU fan connector DO NOT forget to the connector on the motherboard labeled CPU_FAN. Hardware monitoring errors will occur if you fail to secure the heatsink and fan assembly in a diagonal sequence to plug this connector. 2. Push down two fasteners at a time in B place.
User Guide
Page 42
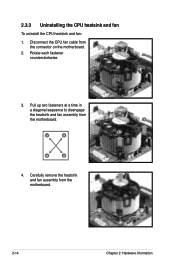
Pull up two fasteners at a time in a diagonal sequence to disengage the heatsink and fan assembly from the connector on the motherboard. 2. 2.3.3 Uninstalling the CPU heatsink and fan To uninstall the CPU heatsink and fan: 1. Disconnect the CPU fan cable from B the motherboard. Rotate each fastener counterclockwise. 3. Carefully remove the heatsink and fan assembly from the motherboard. 2-14 Chapter 2: Hardware information A A B A B B A 4.
Pull up two fasteners at a time in a diagonal sequence to disengage the heatsink and fan assembly from the connector on the motherboard. 2. 2.3.3 Uninstalling the CPU heatsink and fan To uninstall the CPU heatsink and fan: 1. Disconnect the CPU fan cable from B the motherboard. Rotate each fastener counterclockwise. 3. Carefully remove the heatsink and fan assembly from the motherboard. 2-14 Chapter 2: Hardware information A A B A B B A 4.

User Guide
Page 65
...; MAXIMUS EXTREME MAXIMUS EXTREME ROG connector ASUS Maximus Extreme 2-37 Digital audio connector (4-1 pin SPDIF, for ASUS HDMI VGA card) This connector is for the box (labeled as Republic of the box and it lights when the system is for an additional Sony/Philips Digital Interface (S/PDIF) port(s). ROG connector (2-pin ROG) This connector is on the heatpipe assembly...
...; MAXIMUS EXTREME MAXIMUS EXTREME ROG connector ASUS Maximus Extreme 2-37 Digital audio connector (4-1 pin SPDIF, for ASUS HDMI VGA card) This connector is for the box (labeled as Republic of the box and it lights when the system is for an additional Sony/Philips Digital Interface (S/PDIF) port(s). ROG connector (2-pin ROG) This connector is on the heatpipe assembly...
User Guide
Page 69
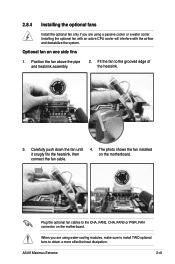
Position the fan above the pipe and heatsink assembly. 2. Fit the fan to obtain a more effective heat dissipation. ASUS Maximus Extreme 2-41 2.8.4 Installing the optional fans Install the optional fan only if you are using water-cooling modules, make sure to install TWO optional fans to ...
Position the fan above the pipe and heatsink assembly. 2. Fit the fan to obtain a more effective heat dissipation. ASUS Maximus Extreme 2-41 2.8.4 Installing the optional fans Install the optional fan only if you are using water-cooling modules, make sure to install TWO optional fans to ...
User Guide
Page 71
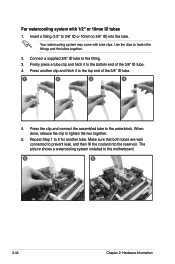
... and fit the tube into the reservoir. 1 2 ASUS Maximus Extreme 2-43 Press the clip and connect the tube to prevent leak, and then fill the coolant into the clip. 2. Make sure that both tubes are for another tube. Repeat Step 1 and 2 for demonstration only. The heatpipe assembly and motherboard layout may vary depending on...
... and fit the tube into the reservoir. 1 2 ASUS Maximus Extreme 2-43 Press the clip and connect the tube to prevent leak, and then fill the coolant into the clip. 2. Make sure that both tubes are for another tube. Repeat Step 1 and 2 for demonstration only. The heatpipe assembly and motherboard layout may vary depending on...
User Guide
Page 72
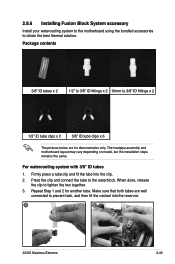
... the bottom end of the 3/8" ID tube. 1 2 3 4 5. The picture shows a watercooling system installed to the waterblock. Press another tube. Press the clip and connect the assembled tube to the motherboard. 5 6 2-44 Chapter 2: Hardware information Your watercooling system may come with 1/2" or 10mm ID tubes 1. Make sure that both tubes are well...
... the bottom end of the 3/8" ID tube. 1 2 3 4 5. The picture shows a watercooling system installed to the waterblock. Press another tube. Press the clip and connect the assembled tube to the motherboard. 5 6 2-44 Chapter 2: Hardware information Your watercooling system may come with 1/2" or 10mm ID tubes 1. Make sure that both tubes are well...
