User Manual
Page 13
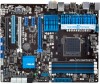
...™ bridge connector • If any of the above items is damaged or missing, contact your motherboard package for the following items. User Manual ASUS M5A99X EVO motherboard User guide Support DVD 4 x Serial ATA 6.0 Gb/s cables 1 x 2-in the long line of new features and latest technologies, making it , check ... product specifications may vary with the list below. 1.2 Package contents Check your retailer. • The illustrated items above are for buying an ASUS® M5A99X EVO motherboard! The motherboard delivers a host of ASUS quality motherboards! ASUS M5A99X EVO 1-1
...™ bridge connector • If any of the above items is damaged or missing, contact your motherboard package for the following items. User Manual ASUS M5A99X EVO motherboard User guide Support DVD 4 x Serial ATA 6.0 Gb/s cables 1 x 2-in the long line of new features and latest technologies, making it , check ... product specifications may vary with the list below. 1.2 Package contents Check your retailer. • The illustrated items above are for buying an ASUS® M5A99X EVO motherboard! The motherboard delivers a host of ASUS quality motherboards! ASUS M5A99X EVO 1-1
User Manual
Page 15
...ensure optimized performance, extreme system stability and greater power efficiency. This also reduces fan noise and extends component longevity. 1.3.3 ASUS Exclusive Features MemOK! New generation Dual Intelligent Processors 2 with DIGI+ VRM digital power design launch control into the world's... II utility. The TPU chip offers precise voltage control and advanced monitoring through enabling VRM spread spectrum. ASUS M5A99X EVO 1-3 DIGI+ VRM The new ASUS DIGI+ VRM design upgrades motherboard power delivery to supervise overclocking, energy management, fan speed control, voltage and...
...ensure optimized performance, extreme system stability and greater power efficiency. This also reduces fan noise and extends component longevity. 1.3.3 ASUS Exclusive Features MemOK! New generation Dual Intelligent Processors 2 with DIGI+ VRM digital power design launch control into the world's... II utility. The TPU chip offers precise voltage control and advanced monitoring through enabling VRM spread spectrum. ASUS M5A99X EVO 1-3 DIGI+ VRM The new ASUS DIGI+ VRM design upgrades motherboard power delivery to supervise overclocking, energy management, fan speed control, voltage and...

User Manual
Page 17
...creating environment-friendly and energy-efficient products through the most common PC audio setups-your existing stereo speakers or headphones. ASUS M5A99X EVO 1-5 In addition to reduce carbon footprint of connecting the system panel cables one at a time and avoiding wrong cable... combines the eSATA connector and power source together, allowing you to provide 5V power for the external SATA device. Chapter 1 ASUS Q-Connector ASUS Q-Connector allows you may experience a better home-theater audio with ease. DTS Surround Sensation UltraPC DTS Surround Sensation UltraPC delivers ...
...creating environment-friendly and energy-efficient products through the most common PC audio setups-your existing stereo speakers or headphones. ASUS M5A99X EVO 1-5 In addition to reduce carbon footprint of connecting the system panel cables one at a time and avoiding wrong cable... combines the eSATA connector and power source together, allowing you to provide 5V power for the external SATA device. Chapter 1 ASUS Q-Connector ASUS Q-Connector allows you may experience a better home-theater audio with ease. DTS Surround Sensation UltraPC DTS Surround Sensation UltraPC delivers ...
User Manual
Page 19
... 2 Hardware information 2.1 Before you proceed Take note of the following precautions before touching any motherboard settings. • Unplug the power cord from the power supply. ASUS M5A99X EVO 2-1 Failure to do so may cause severe damage to avoid touching the ICs on them. • Whenever you uninstall any component, place it on a grounded...
... 2 Hardware information 2.1 Before you proceed Take note of the following precautions before touching any motherboard settings. • Unplug the power cord from the power supply. ASUS M5A99X EVO 2-1 Failure to do so may cause severe damage to avoid touching the ICs on them. • Whenever you uninstall any component, place it on a grounded...
User Manual
Page 21
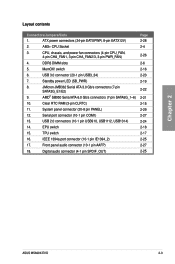
... IE1394_2) 17. Digital audio connector (4-1 pin SPDIF_OUT) Page 2-28 2-4 2-26 2-6 2-16 2-23 2-19 2-22 2-21 2-15 2-29 2-27 2-24 2-18 2-17 2-25 2-27 2-25 Chapter 2 ASUS M5A99X EVO 2-3 CPU, chassis, and power fan connectors (4-pin CPU_FAN, 4-pin CHA_FAN1, 3-pin CHA_FAN2/3, 3-pin PWR_FAN) 4. DDR3 DIMM slots 5. MemOK! System panel connector (20-8 pin PANEL) 12...
... IE1394_2) 17. Digital audio connector (4-1 pin SPDIF_OUT) Page 2-28 2-4 2-26 2-6 2-16 2-23 2-19 2-22 2-21 2-15 2-29 2-27 2-24 2-18 2-17 2-25 2-27 2-25 Chapter 2 ASUS M5A99X EVO 2-3 CPU, chassis, and power fan connectors (4-pin CPU_FAN, 4-pin CHA_FAN1, 3-pin CHA_FAN2/3, 3-pin PWR_FAN) 4. DDR3 DIMM slots 5. MemOK! System panel connector (20-8 pin PANEL) 12...
User Manual
Page 23
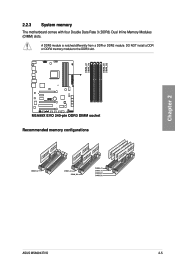
DO NOT install a DDR or DDR2 memory module to the DDR3 slot. Recommended memory configurations Chapter 2 ASUS M5A99X EVO 2-5 2.2.3 System memory The motherboard comes with four Double Data Rate 3 (DDR3) Dual Inline Memory Modules (DIMM) slots. A DDR3 module is notched differently from a DDR or DDR2 module.
DO NOT install a DDR or DDR2 memory module to the DDR3 slot. Recommended memory configurations Chapter 2 ASUS M5A99X EVO 2-5 2.2.3 System memory The motherboard comes with four Double Data Rate 3 (DDR3) Dual Inline Memory Modules (DIMM) slots. A DDR3 module is notched differently from a DDR or DDR2 module.
User Manual
Page 25
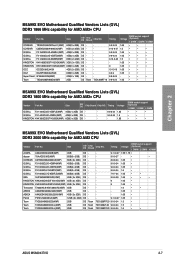
...• • • • • • • • • • • • • • • • M5A99X EVO Motherboard Qualified Vendors Lists (QVL) DDR3 1800 MHz capability for AMD AM3 CPU Vendor Part No. Size SS/ DS Chip Brand Chip NO. Timing Voltage...-L(XMP) 2GB DS Team T3D1288LT-20 9-9-9-24 1.5 • Team TXD32048M2000C9-L(XMP) 2GB DS Team T3D1288RT-20 9-9-9-24 1.6 • • ASUS M5A99X EVO 2-7 F3-15000CL9D-4GBTD(XMP) 4GB(2 x 2GB) DS - F3-14900CL9D-8GBSR(XMP) 8GB ( 2x 4GB ) DS - CMZ8GX3M2A1866C9(XMP) 8GB...
...• • • • • • • • • • • • • • • • M5A99X EVO Motherboard Qualified Vendors Lists (QVL) DDR3 1800 MHz capability for AMD AM3 CPU Vendor Part No. Size SS/ DS Chip Brand Chip NO. Timing Voltage...-L(XMP) 2GB DS Team T3D1288LT-20 9-9-9-24 1.5 • Team TXD32048M2000C9-L(XMP) 2GB DS Team T3D1288RT-20 9-9-9-24 1.6 • • ASUS M5A99X EVO 2-7 F3-15000CL9D-4GBTD(XMP) 4GB(2 x 2GB) DS - F3-14900CL9D-8GBSR(XMP) 8GB ( 2x 4GB ) DS - CMZ8GX3M2A1866C9(XMP) 8GB...
User Manual
Page 31
...) VGA configuration Single VGA/PCIe card Dual VGA/PCIe card PCI Express operating mode PCIe 2.0 x16_1 x16 (Recommend for single VGA) x8 PCIe 2.0 x16_2 N/A x8 ASUS M5A99X EVO 2-13 Failure to unplug the power cord before adding or removing expansion cards. Chapter 2 Slot No.
...) VGA configuration Single VGA/PCIe card Dual VGA/PCIe card PCI Express operating mode PCIe 2.0 x16_1 x16 (Recommend for single VGA) x8 PCIe 2.0 x16_2 N/A x8 ASUS M5A99X EVO 2-13 Failure to unplug the power cord before adding or removing expansion cards. Chapter 2 Slot No.
User Manual
Page 33
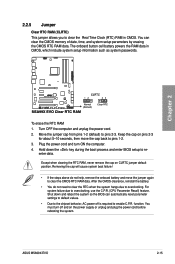
... system so the BIOS can clear the CMOS memory of date, time, and system setup parameters by erasing the CMOS RTC RAM data. enter data. ASUS M5A99X EVO 2-15 You can automatically reset parameter settings to default values. • Due to the chipset behavior, AC power off and on CLRTC jumper default position...
... system so the BIOS can clear the CMOS memory of date, time, and system setup parameters by erasing the CMOS RTC RAM data. enter data. ASUS M5A99X EVO 2-15 You can automatically reset parameter settings to default values. • Due to the chipset behavior, AC power off and on CLRTC jumper default position...
User Manual
Page 35
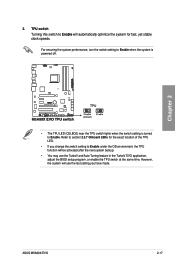
... switch to Enable will automatically optimize the system for the exact location of the TPU LED. • If you change the switch setting to Enable. ASUS M5A99X EVO 2-17 For ensuring the system performance, turn the switch setting to Enable when the system is powered off. • The TPU LED (O2LED2) near the... the switch setting is turned to Enable under the OS environment, the TPU function will use the TurboV and Auto Tuning feature in the TurboV EVO application, adjust the BIOS setup program, or enable the TPU switch at the same time.
... switch to Enable will automatically optimize the system for the exact location of the TPU LED. • If you change the switch setting to Enable. ASUS M5A99X EVO 2-17 For ensuring the system performance, turn the switch setting to Enable when the system is powered off. • The TPU LED (O2LED2) near the... the switch setting is turned to Enable under the OS environment, the TPU function will use the TurboV and Auto Tuning feature in the TurboV EVO application, adjust the BIOS setup program, or enable the TPU switch at the same time.
User Manual
Page 37
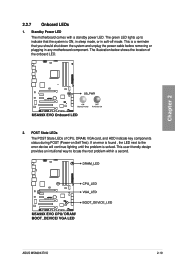
... LED. The illustration below shows the location of CPU, DRAM, VGA card, and HDD indicate key components status during POST (Power-on Self Test). Chapter 2 ASUS M5A99X EVO 2-19 The green LED lights up to indicate that you should shut down the system and unplug the power cable before removing or plugging in...
... LED. The illustration below shows the location of CPU, DRAM, VGA card, and HDD indicate key components status during POST (Power-on Self Test). Chapter 2 ASUS M5A99X EVO 2-19 The green LED lights up to indicate that you should shut down the system and unplug the power cable before removing or plugging in...
User Manual
Page 39
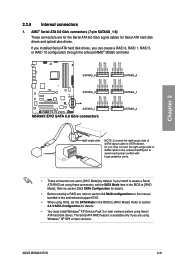
... using these connectors, set the SATA Mode item in the BIOS to section 3.5.3 SATA Configuration for Serial ATA hard disk drives and optical disc drives. ASUS M5A99X EVO 2-21 2.2.8 Internal connectors 1.
... using these connectors, set the SATA Mode item in the BIOS to section 3.5.3 SATA Configuration for Serial ATA hard disk drives and optical disc drives. ASUS M5A99X EVO 2-21 2.2.8 Internal connectors 1.

User Manual
Page 41
3. Chapter 2 ASUS M5A99X EVO 2-23 If the USB 3.0 front panel cable is for the additional USB 3.0 ports, and complies with this USB 3.0 connector, you can have a front panel USB 3.0 solution. USB 3.0 connector (20-1 pin USB3_34) This connector is available from your system chassis, with the USB 3.0 specificaton that supports up to 480 MBps connection speed.
3. Chapter 2 ASUS M5A99X EVO 2-23 If the USB 3.0 front panel cable is for the additional USB 3.0 ports, and complies with this USB 3.0 connector, you can have a front panel USB 3.0 solution. USB 3.0 connector (20-1 pin USB3_34) This connector is available from your system chassis, with the USB 3.0 specificaton that supports up to 480 MBps connection speed.
User Manual
Page 43
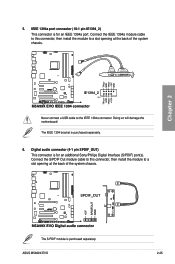
... connect a USB cable to a slot opening at the back of the system chassis. The S/PDIF module is purchased separately. 6. Doing so will damage the motherboard! ASUS M5A99X EVO 2-25 The IEEE 1394 bracket is purchased separately. Connect the S/PDIF Out module cable to this connector, then install the module to a slot opening at...
... connect a USB cable to a slot opening at the back of the system chassis. The S/PDIF module is purchased separately. 6. Doing so will damage the motherboard! ASUS M5A99X EVO 2-25 The IEEE 1394 bracket is purchased separately. Connect the S/PDIF Out module cable to this connector, then install the module to a slot opening at...
User Manual
Page 45
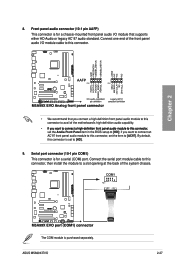
... the BIOS setup to a slot opening at the back of the system chassis. Front panel audio connector (10-1 pin AAFP) This connector is purchased separately. ASUS M5A99X EVO 2-27
... the BIOS setup to a slot opening at the back of the system chassis. Front panel audio connector (10-1 pin AAFP) This connector is purchased separately. ASUS M5A99X EVO 2-27
User Manual
Page 47
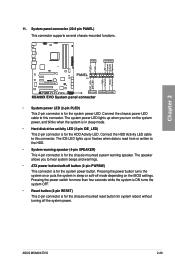
... puts the system in sleep mode. • Hard disk drive activity LED (2-pin IDE_LED) This 2-pin connector is read from or written to this connector. ASUS M5A99X EVO 2-29 11. The system power LED lights up or flashes when data is for the chassis-mounted system warning speaker. Pressing the power button turns...
... puts the system in sleep mode. • Hard disk drive activity LED (2-pin IDE_LED) This 2-pin connector is read from or written to this connector. ASUS M5A99X EVO 2-29 11. The system power LED lights up or flashes when data is for the chassis-mounted system warning speaker. Pressing the power button turns...
User Manual
Page 49
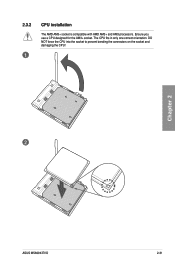
DO NOT force the CPU into the socket to prevent bending the connectors on the socket and damaging the CPU! 2 Chapter 2 ASUS M5A99X EVO 2-31 The CPU fits in only one correct orientation. 2.3.2 1 CPU installation The AMD AM3+ socket is compatible with AMD AM3+ and AM3 processors. Ensure you use a CPU designed for the AM3+ socket.
DO NOT force the CPU into the socket to prevent bending the connectors on the socket and damaging the CPU! 2 Chapter 2 ASUS M5A99X EVO 2-31 The CPU fits in only one correct orientation. 2.3.2 1 CPU installation The AMD AM3+ socket is compatible with AMD AM3+ and AM3 processors. Ensure you use a CPU designed for the AM3+ socket.
User Manual
Page 51
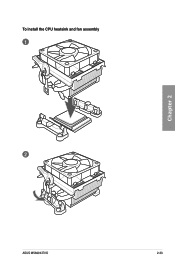
To install the CPU heatsink and fan assembly 1 Chapter 2 2 ASUS M5A99X EVO 2-33
To install the CPU heatsink and fan assembly 1 Chapter 2 2 ASUS M5A99X EVO 2-33

User Manual
Page 53
2.3.4 1 DIMM installation 2 Chapter 2 3 To remove a DIMM B A ASUS M5A99X EVO 2-35
2.3.4 1 DIMM installation 2 Chapter 2 3 To remove a DIMM B A ASUS M5A99X EVO 2-35
User Manual
Page 55
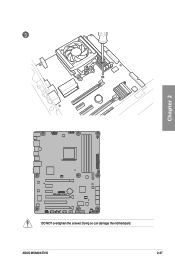
ASUS M5A99X EVO 2-37 Doing so can damage the motherboard. 3 Chapter 2 DO NOT overtighten the screws!
ASUS M5A99X EVO 2-37 Doing so can damage the motherboard. 3 Chapter 2 DO NOT overtighten the screws!


