
User Manual
Page 12
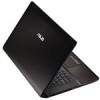
Slowly tilt the display panel forward or backward to adjust the LCD brightness. 12 Notebook PC User Manual Push and release the power button located beneath the LCD display panel. 2. Turning on the Power 1. Use [Fn]+[F5] or [Fn]+[F6] to a comfortable viewing angle. Opening the LCD display panel 1. Carefully lift up the display panel with your thumb. 2.
Slowly tilt the display panel forward or backward to adjust the LCD brightness. 12 Notebook PC User Manual Push and release the power button located beneath the LCD display panel. 2. Turning on the Power 1. Use [Fn]+[F5] or [Fn]+[F6] to a comfortable viewing angle. Opening the LCD display panel 1. Carefully lift up the display panel with your thumb. 2.

User Manual
Page 16
... the display panel. 5 Power Switch The power switch allows powering ON and OFF the Notebook PC and recovering from STD. Unlike desktop monitors, the LCD panel does not produce any radiation or flickering, so it is in the Suspend-to -Disk (Hibernation) mode. 16 Notebook PC User Manual The ... the built-in camera is in use plain water if necessary) to turn OFF the Notebook PC. The Notebook PC uses an active matrix TFT LCD, which provides excellent viewing like that of desktop monitors. 1 Microphone (Built-in) The built-in mono microphone can be used for video conferencing, ...
... the display panel. 5 Power Switch The power switch allows powering ON and OFF the Notebook PC and recovering from STD. Unlike desktop monitors, the LCD panel does not produce any radiation or flickering, so it is in the Suspend-to -Disk (Hibernation) mode. 16 Notebook PC User Manual The ... the built-in camera is in use plain water if necessary) to turn OFF the Notebook PC. The Notebook PC uses an active matrix TFT LCD, which provides excellent viewing like that of desktop monitors. 1 Microphone (Built-in) The built-in mono microphone can be used for video conferencing, ...

User Manual
Page 44
... or Save-to fill the entire display when using low resolution modes.) LCD/Monitor Icons (F8): Toggles between the Notebook PC's LCD display and an external monitor in this series: LCD Only -> CRT Only (External Monitor) -> LCD + CRT Clone -> LCD + CRT Extend. (This function does not work in 256 Colors, ...select High Color in power management setup). Sun Down Icon (F5): Decreases the display brightness Sun Up Icon (F6): Increases the display brightness LCD Icon (F7): Toggles the display panel ON and OFF. (On certain models; stretches the screen area to -Disk depending on selected models) ON...
... or Save-to fill the entire display when using low resolution modes.) LCD/Monitor Icons (F8): Toggles between the Notebook PC's LCD display and an external monitor in this series: LCD Only -> CRT Only (External Monitor) -> LCD + CRT Clone -> LCD + CRT Extend. (This function does not work in 256 Colors, ...select High Color in power management setup). Sun Down Icon (F5): Decreases the display brightness Sun Up Icon (F6): Increases the display brightness LCD Icon (F7): Toggles the display panel ON and OFF. (On certain models; stretches the screen area to -Disk depending on selected models) ON...


