
H81M-A User's Manual
Page 3
Contents Safety information...iv About this guide...iv Package contents...vi H81M series specifications summary vi Product introduction 1.1 Before you proceed 1-1 1.2 Motherboard overview 1-1 1.3 Central Processing Unit (CPU 1-4 1.4 System memory 1-7 1.5 Expansion slots 1-9 1.6 Jumpers...1-11 1.7 Connectors 1-13 1.8 Onboard LEDs 1-... 2-1 2.2 BIOS setup program 2-5 2.3 Main menu...2-9 2.4 Ai Tweaker menu 2-9 2.5 Advanced menu 2-11 2.6 Monitor menu 2-12 2.7 Boot menu 2-13 2.8 Tools menu 2-14 2.9 Exit menu...2-14 Appendices Notices...A-1 ASUS contact information A-3 iii
Contents Safety information...iv About this guide...iv Package contents...vi H81M series specifications summary vi Product introduction 1.1 Before you proceed 1-1 1.2 Motherboard overview 1-1 1.3 Central Processing Unit (CPU 1-4 1.4 System memory 1-7 1.5 Expansion slots 1-9 1.6 Jumpers...1-11 1.7 Connectors 1-13 1.8 Onboard LEDs 1-... 2-1 2.2 BIOS setup program 2-5 2.3 Main menu...2-9 2.4 Ai Tweaker menu 2-9 2.5 Advanced menu 2-11 2.6 Monitor menu 2-12 2.7 Boot menu 2-13 2.8 Tools menu 2-14 2.9 Exit menu...2-14 Appendices Notices...A-1 ASUS contact information A-3 iii

H81M-A User's Manual
Page 6
...Extreme Memory Profile (XMP) * Hyper DIMM support is damaged or missing, contact your motherboard package for the following items. Motherboard ASUS H81M Series motherboard Cables 2 x Serial ATA 6.0 Gb/s cables Accessories 1 x I/O Shield Application DVD Support DVD Documentation User Guide ...; H81 Express Chipset: - 2 x Serial ATA 6.0 Gb/s connectors (yellow) - 2 x Serial ATA 3.0 Gb/s connectors (dark brown) - H81M series specifications summary CPU LGA1150 socket for Intel® 4th Generation CoreTM i7/ i5 / i3, Pentium® and Celeron® Processors Supports 22nm CPU...
...Extreme Memory Profile (XMP) * Hyper DIMM support is damaged or missing, contact your motherboard package for the following items. Motherboard ASUS H81M Series motherboard Cables 2 x Serial ATA 6.0 Gb/s cables Accessories 1 x I/O Shield Application DVD Support DVD Documentation User Guide ...; H81 Express Chipset: - 2 x Serial ATA 6.0 Gb/s connectors (yellow) - 2 x Serial ATA 3.0 Gb/s connectors (dark brown) - H81M series specifications summary CPU LGA1150 socket for Intel® 4th Generation CoreTM i7/ i5 / i3, Pentium® and Celeron® Processors Supports 22nm CPU...

H81M-A User's Manual
Page 9
ASUS H81M Series 1-1 Ensure that the ATX power supply is switched off or the power cord is detached from the wall socket before installing or removing the ...
ASUS H81M Series 1-1 Ensure that the ATX power supply is switched off or the power cord is detached from the wall socket before installing or removing the ...

H81M-A User's Manual
Page 11
...; H81 64Mb BIOS 6 SPEAKER 7 F_PANEL AAFP TPM USB910 USB1112 SATA6G_1 SATA6G_2 SATA3G_1 SATA3G_2 16 15 14 13 12 11 10 9 8 ASUS H81M Series 1-3 The layout illustrations in this user guide are for H81M-A only. 12 3 4 17.5cm(6.9in) 35 KBMS DIGI +VRM HDMI ATX12V CPU_FAN DDR3 DIMM_A1 (64bit, 240-pin module) DDR3 DIMM_B1...
...; H81 64Mb BIOS 6 SPEAKER 7 F_PANEL AAFP TPM USB910 USB1112 SATA6G_1 SATA6G_2 SATA3G_1 SATA3G_2 16 15 14 13 12 11 10 9 8 ASUS H81M Series 1-3 The layout illustrations in this user guide are for H81M-A only. 12 3 4 17.5cm(6.9in) 35 KBMS DIGI +VRM HDMI ATX12V CPU_FAN DDR3 DIMM_A1 (64bit, 240-pin module) DDR3 DIMM_B1...

H81M-A User's Manual
Page 13
1.3.1 Installing the CPU 1 2 3 A B 4 C 5 A B ASUS H81M Series 1-5
1.3.1 Installing the CPU 1 2 3 A B 4 C 5 A B ASUS H81M Series 1-5

H81M-A User's Manual
Page 15
DIMM_A1 DIMM_B1 Channel Sockets Channel A DIMM_A1 H81M-A Channel B DIMM_B1 H81M-A 240-pin DDR3 DIMM sockets 1.4.2 Memory configurations You may install 1GB, 2GB, 4GB, and 8GB unbuffered non‑ECC DDR3 DIMMs into the DIMM sockets. A ... module is recommended to the DDR3 slot. According to Intel® CPU spec, DIMM voltage below 1.65V is notched differently from a DDR or DDR2 module. ASUS H81M Series 1-7 DO NOT install a DDR or DDR2 memory module to protect the CPU. To uninstall the CPU heatsink and fan assembly 1 2 A B B A 1.4 System memory 1.4.1 Overview This...
DIMM_A1 DIMM_B1 Channel Sockets Channel A DIMM_A1 H81M-A Channel B DIMM_B1 H81M-A 240-pin DDR3 DIMM sockets 1.4.2 Memory configurations You may install 1GB, 2GB, 4GB, and 8GB unbuffered non‑ECC DDR3 DIMMs into the DIMM sockets. A ... module is recommended to the DDR3 slot. According to Intel® CPU spec, DIMM voltage below 1.65V is notched differently from a DDR or DDR2 module. ASUS H81M Series 1-7 DO NOT install a DDR or DDR2 memory module to protect the CPU. To uninstall the CPU heatsink and fan assembly 1 2 A B B A 1.4 System memory 1.4.1 Overview This...

H81M-A User's Manual
Page 17
... in place and the DIMM is keyed with a notch so that they support. 2 DIMM notch 1 1 Unlocked retaining clip DIMM slot key A DIMM is properly seated. ASUS H81M Series 1-9 The following sub‑sections describe the slots and the expansion cards that it flips out with your fingers when pressing the retaining clips.
... in place and the DIMM is keyed with a notch so that they support. 2 DIMM notch 1 1 Unlocked retaining clip DIMM slot key A DIMM is properly seated. ASUS H81M Series 1-9 The following sub‑sections describe the slots and the expansion cards that it flips out with your fingers when pressing the retaining clips.

H81M-A User's Manual
Page 19
... the BIOS automatically resets parameter settings to clear the Real Time Clock (RTC) RAM in CMOS, which include system setup information such as system passwords. ASUS H81M Series 1-11 Turn OFF the computer and unplug the power cord. 2. Move the jumper cap from pins 1-2 (default) to clear the CMOS RTC... the battery. • You do not help, remove the onboard battery and move the cap back to reenter data. 1.6 Jumpers 1. H81M-A CLRTC 12 23 Normal (Default) H81M-A Clear RTC RAM Clear RTC To erase the RTC RAM: 1. Shut down the key during the boot process and enter BIOS setup to...
... the BIOS automatically resets parameter settings to clear the Real Time Clock (RTC) RAM in CMOS, which include system setup information such as system passwords. ASUS H81M Series 1-11 Turn OFF the computer and unplug the power cord. 2. Move the jumper cap from pins 1-2 (default) to clear the CMOS RTC... the battery. • You do not help, remove the onboard battery and move the cap back to reenter data. 1.6 Jumpers 1. H81M-A CLRTC 12 23 Normal (Default) H81M-A Clear RTC RAM Clear RTC To erase the RTC RAM: 1. Shut down the key during the boot process and enter BIOS setup to...

H81M-A User's Manual
Page 21
... GREEN 1Gbps connection Activity Link Speed LED LED LAN port 4. In 4-channel, 6channel, and 8-channel configurations, the function of this port becomes Front Speaker Out. 6. ASUS H81M Series 1-13 This port connects the tape, CD, DVD player, or other VGA-compatible devices. 3. This port connects a microphone. Video Graphics Adapter (VGA) port. This...
... GREEN 1Gbps connection Activity Link Speed LED LED LAN port 4. In 4-channel, 6channel, and 8-channel configurations, the function of this port becomes Front Speaker Out. 6. ASUS H81M Series 1-13 This port connects the tape, CD, DVD player, or other VGA-compatible devices. 3. This port connects a microphone. Video Graphics Adapter (VGA) port. This...
H81M-A User's Manual
Page 23
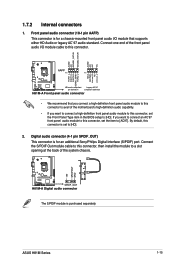
...you want to connect a high-definition front panel audio module to a slot opening at the back of the system chassis. +5V SPDIFOUT GND H81M-A SPDIF_OUT H81M-A Digital audio connector The S/PDIF module is set the item to [HD]. 2. AGND NC SENSE1_RETUR SENSE2_RETUR AGND NC NC NC AAFP PIN ... that supports either HD Audio or legacy AC`97 audio standard. By default, this connector, set to [AC97]. 1.7.2 Internal connectors 1. ASUS H81M Series 1-15 If you want to connect an AC'97 front panel audio module to this connector is purchased separately. Connect the S/PDIF ...
...you want to connect a high-definition front panel audio module to a slot opening at the back of the system chassis. +5V SPDIFOUT GND H81M-A SPDIF_OUT H81M-A Digital audio connector The S/PDIF module is set the item to [HD]. 2. AGND NC SENSE1_RETUR SENSE2_RETUR AGND NC NC NC AAFP PIN ... that supports either HD Audio or legacy AC`97 audio standard. By default, this connector, set to [AC97]. 1.7.2 Internal connectors 1. ASUS H81M Series 1-15 If you want to connect an AC'97 front panel audio module to this connector is purchased separately. Connect the S/PDIF ...

H81M-A User's Manual
Page 25
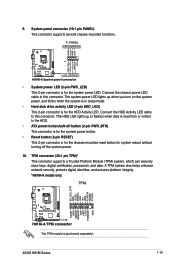
... power supply plugs. com/PowerSupplyCalculator/PSCalculator.aspx?SLanguage=en-us for your system, refer to the Recommended Power Supply Wattage Calculator at http://support.asus. ATX power connectors (24-pin EATXPWR, 4-pin ATX12V) These connectors are designed to connect the 4-pin ATX +12V power plug. This... install additional devices. The speaker allows you intend to hear system beeps and warnings. +5V GND GND Speaker Out SPEAKER H81M-A PIN 1 H81M-A Speaker Out Connector ASUS H81M Series 1-17 5. The power supply plugs are for the chassis-mounted system warning speaker.
... power supply plugs. com/PowerSupplyCalculator/PSCalculator.aspx?SLanguage=en-us for your system, refer to the Recommended Power Supply Wattage Calculator at http://support.asus. ATX power connectors (24-pin EATXPWR, 4-pin ATX12V) These connectors are designed to connect the 4-pin ATX +12V power plug. This... install additional devices. The speaker allows you intend to hear system beeps and warnings. +5V GND GND Speaker Out SPEAKER H81M-A PIN 1 H81M-A Speaker Out Connector ASUS H81M Series 1-17 5. The power supply plugs are for the chassis-mounted system warning speaker.
H81M-A User's Manual
Page 27
... to this connector. F_PANEL PWR LED PWR BTN PIN 1 H81M-A +HDD_LED RESET H81M-A System panel connector • System power LED (2-pin PWR_LED) This 2-pin connector is purchased separately! PLED+ PLEDPWR GND HDD_LED+ HDD_LED- ASUS H81M Series 1-19 TPM SB_SUS_STAT GND +3VSB SMBSCL LAD0 +3V LAD3... PCIRST# FRAME PCICLK RESET GPIO SERIRQ SMBSDA GND LAD1 LAD2 PWROWN GND H81M-A H81M-A TPM connector The TPM module is for system reboot without turning...
... to this connector. F_PANEL PWR LED PWR BTN PIN 1 H81M-A +HDD_LED RESET H81M-A System panel connector • System power LED (2-pin PWR_LED) This 2-pin connector is purchased separately! PLED+ PLEDPWR GND HDD_LED+ HDD_LED- ASUS H81M Series 1-19 TPM SB_SUS_STAT GND +3VSB SMBSCL LAD0 +3V LAD3... PCIRST# FRAME PCICLK RESET GPIO SERIRQ SMBSDA GND LAD1 LAD2 PWROWN GND H81M-A H81M-A TPM connector The TPM module is for system reboot without turning...

H81M-A User's Manual
Page 29
...corresponding updates to maximize the features of your computer, browse the contents of the Support DVD are subject to change at www.asus.com for detailed information. 1.9.2 Support DVD information The Support DVD that comes with the motherboard package contains the drivers, software ...DVD Place the Support DVD into the optical drive. If Autorun is enabled in your ASUS motherboard. Double-click the ASSETUP.EXE to avail all motherboard features. ASUS H81M Series 1-21 Visit the ASUS website at any time without notice. 1.9 Software support 1.9.1 Installing an operating system ...
...corresponding updates to maximize the features of your computer, browse the contents of the Support DVD are subject to change at www.asus.com for detailed information. 1.9.2 Support DVD information The Support DVD that comes with the motherboard package contains the drivers, software ...DVD Place the Support DVD into the optical drive. If Autorun is enabled in your ASUS motherboard. Double-click the ASSETUP.EXE to avail all motherboard features. ASUS H81M Series 1-21 Visit the ASUS website at any time without notice. 1.9 Software support 1.9.1 Installing an operating system ...

H81M-A User's Manual
Page 31
Copy the original motherboard BIOS using the ASUS Update utility. 2.1.1 EZ Update EZ Update is a utility that allows you to update the BIOS EZ Update requires an Internet connection either through a network or ... file to a USB flash disk in case you can also manually update the saved BIOS and select a boot logo when the system goes into POST. ASUS H81M Series 2-1 BIOS information 2.1 Managing and updating your motherboard's softwares, drivers and the BIOS version easily. With this utlity, you need to restore the BIOS in...
Copy the original motherboard BIOS using the ASUS Update utility. 2.1.1 EZ Update EZ Update is a utility that allows you to update the BIOS EZ Update requires an Internet connection either through a network or ... file to a USB flash disk in case you can also manually update the saved BIOS and select a boot logo when the system goes into POST. ASUS H81M Series 2-1 BIOS information 2.1 Managing and updating your motherboard's softwares, drivers and the BIOS version easily. With this utlity, you need to restore the BIOS in...
H81M-A User's Manual
Page 33
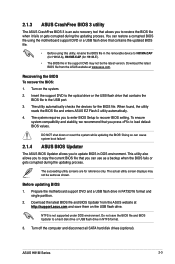
...Setup to load default BIOS values. You can cause system boot failure! 2.1.4 ASUS BIOS Updater The ASUS BIOS Updater allows you press to recover BIOS setting. Before updating BIOS 1. ASUS H81M Series 2-3 The utility automatically checks the devices for reference only. To ensure ...system compatibility and stability, we recommend that you to H81MA.CAP (for H81M-A), H81ME.CAP (for H81M-E). • The BIOS file in DOS environment...
...Setup to load default BIOS values. You can cause system boot failure! 2.1.4 ASUS BIOS Updater The ASUS BIOS Updater allows you press to recover BIOS setting. Before updating BIOS 1. ASUS H81M Series 2-3 The utility automatically checks the devices for reference only. To ensure ...system compatibility and stability, we recommend that you to H81MA.CAP (for H81M-A), H81ME.CAP (for H81M-E). • The BIOS file in DOS environment...

H81M-A User's Manual
Page 35
3. ASUS H81M Series 2-5 When BIOS update is done, press to select the BIOS file and press . Do this option only if you failed to update the BIOS ...
3. ASUS H81M Series 2-5 When BIOS update is done, press to select the BIOS file and press . Do this option only if you failed to update the BIOS ...

H81M-A User's Manual
Page 37
ASUS H81M Series 2-7 Selects the display language of the BIOS setup program Displays the CPU/motherboard temperature, CPU/5V/3.3V/12V voltage output, CPU/chassis fan speed ... setup program without saving the changes, saves the changes and resets the system, or enters the Advanced Mode Power Saving mode Selects the boot device ASUS Optimal mode Loads optimized default Selects the priority Displays the system properties Advanced mode Normal mode of the selected mode on the functions Selects the...
ASUS H81M Series 2-7 Selects the display language of the BIOS setup program Displays the CPU/motherboard temperature, CPU/5V/3.3V/12V voltage output, CPU/chassis fan speed ... setup program without saving the changes, saves the changes and resets the system, or enters the Advanced Mode Power Saving mode Selects the boot device ASUS Optimal mode Loads optimized default Selects the priority Displays the system properties Advanced mode Normal mode of the selected mode on the functions Selects the...

H81M-A User's Manual
Page 39
... appears when you enter the Advanced Mode of the basic system information, and allows you to set a password, these items show the default Not Installed. ASUS H81M Series 2-9 The Main menu provides you an overview of the BIOS Setup program. After you set the system date, time, language, and security settings. •...
... appears when you enter the Advanced Mode of the basic system information, and allows you to set a password, these items show the default Not Installed. ASUS H81M Series 2-9 The Main menu provides you an overview of the BIOS Setup program. After you set the system date, time, language, and security settings. •...

H81M-A User's Manual
Page 41
ASUS H81M Series 2-11 Be cautious when changing the settings of the Advanced menu items. Incorrect field values can cause the system to change the settings for the CPU and other system devices. Scroll down to display the following items: 2.5 Advanced menu The Advanced menu items allow you to malfunction.
ASUS H81M Series 2-11 Be cautious when changing the settings of the Advanced menu items. Incorrect field values can cause the system to change the settings for the CPU and other system devices. Scroll down to display the following items: 2.5 Advanced menu The Advanced menu items allow you to malfunction.

H81M-A User's Manual
Page 43
Scroll down to change the system boot options. 2.7 Boot menu The Boot menu items allow you to display the following items: ASUS H81M Series 2-13
Scroll down to change the system boot options. 2.7 Boot menu The Boot menu items allow you to display the following items: ASUS H81M Series 2-13


