
H81M-A User's Manual
Page 3
Contents Safety information...iv About this guide...iv Package contents...vi H81M series specifications summary vi Product introduction 1.1 Before you proceed 1-1 1.2 Motherboard overview 1-1 1.3 Central Processing Unit (CPU 1-4 1.4 System memory 1-7 1.5 Expansion slots 1-9 1.6 Jumpers...1-11 1.7 Connectors 1-13 1.8 Onboard LEDs 1-... 2-1 2.2 BIOS setup program 2-5 2.3 Main menu...2-9 2.4 Ai Tweaker menu 2-9 2.5 Advanced menu 2-11 2.6 Monitor menu 2-12 2.7 Boot menu 2-13 2.8 Tools menu 2-14 2.9 Exit menu...2-14 Appendices Notices...A-1 ASUS contact information A-3 iii
Contents Safety information...iv About this guide...iv Package contents...vi H81M series specifications summary vi Product introduction 1.1 Before you proceed 1-1 1.2 Motherboard overview 1-1 1.3 Central Processing Unit (CPU 1-4 1.4 System memory 1-7 1.5 Expansion slots 1-9 1.6 Jumpers...1-11 1.7 Connectors 1-13 1.8 Onboard LEDs 1-... 2-1 2.2 BIOS setup program 2-5 2.3 Main menu...2-9 2.4 Ai Tweaker menu 2-9 2.5 Advanced menu 2-11 2.6 Monitor menu 2-12 2.7 Boot menu 2-13 2.8 Tools menu 2-14 2.9 Exit menu...2-14 Appendices Notices...A-1 ASUS contact information A-3 iii

H81M-A User's Manual
Page 6
... specifications summary CPU LGA1150 socket for Intel® CPU support list. Please refer to Memory QVL for details. ** Refer to www.asus.com for the following items. Motherboard ASUS H81M Series motherboard Cables 2 x Serial ATA 6.0 Gb/s cables Accessories 1 x I/O Shield Application DVD Support DVD Documentation User Guide If any of the above items is...
... specifications summary CPU LGA1150 socket for Intel® CPU support list. Please refer to Memory QVL for details. ** Refer to www.asus.com for the following items. Motherboard ASUS H81M Series motherboard Cables 2 x Serial ATA 6.0 Gb/s cables Accessories 1 x I/O Shield Application DVD Support DVD Documentation User Guide If any of the above items is...

H81M-A User's Manual
Page 9
... any component. • Before handling components, use a grounded wrist strap or touch a safely grounded object or a metal object, such as indicated in the correct orientation. ASUS H81M Series 1-1 Failure to ensure that you place it . Failure to do so may cause severe damage to the motherboard, peripherals, or components. 1.2 Motherboard overview Before...
... any component. • Before handling components, use a grounded wrist strap or touch a safely grounded object or a metal object, such as indicated in the correct orientation. ASUS H81M Series 1-1 Failure to ensure that you place it . Failure to do so may cause severe damage to the motherboard, peripherals, or components. 1.2 Motherboard overview Before...

H81M-A User's Manual
Page 11
... does not include an HDMI port and a TPM connector. The layout illustrations in this user guide are for H81M-A only. 12 3 4 17.5cm(6.9in) 35 KBMS DIGI +VRM HDMI ATX12V CPU_FAN DDR3 DIMM_A1 (64bit, 240-pin module) DDR3 DIMM_B1 (64bit, 240-...pin module) DVI_VGA LGA1150 22.6cm(8.9in) USB56 USB3_12 KB_USBPWB LAN_USB34 CHA_FAN 2 EATXPWR BATTERY AUDIO H81M-A RTL 8111G PCIEX16 Super I/O SB_PWR PCIEX1_1 ALC 887- VD2 PCIEX1_2 SPDIF_OUT CLRTC USBPWF Intel® H81 64Mb BIOS 6 SPEAKER 7 F_PANEL AAFP TPM USB910 ...
... does not include an HDMI port and a TPM connector. The layout illustrations in this user guide are for H81M-A only. 12 3 4 17.5cm(6.9in) 35 KBMS DIGI +VRM HDMI ATX12V CPU_FAN DDR3 DIMM_A1 (64bit, 240-pin module) DDR3 DIMM_B1 (64bit, 240-...pin module) DVI_VGA LGA1150 22.6cm(8.9in) USB56 USB3_12 KB_USBPWB LAN_USB34 CHA_FAN 2 EATXPWR BATTERY AUDIO H81M-A RTL 8111G PCIEX16 Super I/O SB_PWR PCIEX1_1 ALC 887- VD2 PCIEX1_2 SPDIF_OUT CLRTC USBPWF Intel® H81 64Mb BIOS 6 SPEAKER 7 F_PANEL AAFP TPM USB910 ...

H81M-A User's Manual
Page 13
1.3.1 Installing the CPU 1 2 3 A B 4 C 5 A B ASUS H81M Series 1-5
1.3.1 Installing the CPU 1 2 3 A B 4 C 5 A B ASUS H81M Series 1-5

H81M-A User's Manual
Page 15
...-pin DDR3 DIMM sockets 1.4.2 Memory configurations You may install 1GB, 2GB, 4GB, and 8GB unbuffered non‑ECC DDR3 DIMMs into the DIMM sockets. ASUS H81M Series 1-7 DO NOT install a DDR or DDR2 memory module to protect the CPU. According to Intel® CPU spec, DIMM voltage below 1.65V is notched ...
...-pin DDR3 DIMM sockets 1.4.2 Memory configurations You may install 1GB, 2GB, 4GB, and 8GB unbuffered non‑ECC DDR3 DIMMs into the DIMM sockets. ASUS H81M Series 1-7 DO NOT install a DDR or DDR2 memory module to protect the CPU. According to Intel® CPU spec, DIMM voltage below 1.65V is notched ...

H81M-A User's Manual
Page 17
... to avoid damaging the DIMM. 3. Simultaneously press the retaining clips outward to install expansion cards. Unplug the power cord before adding or removing expansion cards. ASUS H81M Series 1-9 Failure to do so may cause you may need to unlock the DIMM. Support the DIMM lightly 2 with a notch so that they support. The...
... to avoid damaging the DIMM. 3. Simultaneously press the retaining clips outward to install expansion cards. Unplug the power cord before adding or removing expansion cards. ASUS H81M Series 1-9 Failure to do so may cause you may need to unlock the DIMM. Support the DIMM lightly 2 with a notch so that they support. The...

H81M-A User's Manual
Page 19
... 23 Normal (Default) H81M-A Clear RTC RAM Clear RTC To erase the RTC RAM: 1. Removing the cap will cause system boot failure! • If the steps above do not ... unplug the power cord. 2. Hold down and reboot the system, then the BIOS automatically resets parameter settings to overclocking, use the CPU Parameter Recall (C.P.R.) feature. ASUS H81M Series 1-11 1.6 Jumpers 1. You can clear the CMOS memory of date, time, and system setup parameters by erasing the CMOS RTC RAM data.
... 23 Normal (Default) H81M-A Clear RTC RAM Clear RTC To erase the RTC RAM: 1. Removing the cap will cause system boot failure! • If the steps above do not ... unplug the power cord. 2. Hold down and reboot the system, then the BIOS automatically resets parameter settings to overclocking, use the CPU Parameter Recall (C.P.R.) feature. ASUS H81M Series 1-11 1.6 Jumpers 1. You can clear the CMOS memory of date, time, and system setup parameters by erasing the CMOS RTC RAM data.

H81M-A User's Manual
Page 21
... Status Description OFF 10Mbps connection ORANGE 100Mbps connection GREEN 1Gbps connection Activity Link Speed LED LED LAN port 4. Line Out port (lime). Microphone port (pink). ASUS H81M Series 1-13 LAN (RJ-45) port. This 15-pin port is for a PS/2 mouse. 2. LAN port LED indications Activity/Link LED Status Description Off No...
... Status Description OFF 10Mbps connection ORANGE 100Mbps connection GREEN 1Gbps connection Activity Link Speed LED LED LAN port 4. Line Out port (lime). Microphone port (pink). ASUS H81M Series 1-13 LAN (RJ-45) port. This 15-pin port is for a PS/2 mouse. 2. LAN port LED indications Activity/Link LED Status Description Off No...
H81M-A User's Manual
Page 23
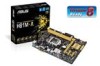
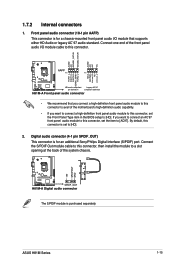
...(S/PDIF) port. Connect the S/PDIF Out module cable to this connector, then install the module to this connector is purchased separately. ASUS H81M Series 1-15 Connect one end of the front panel audio I /O module that you connect a high-definition front panel audio module ...to this connector to avail of the system chassis. +5V SPDIFOUT GND H81M-A SPDIF_OUT H81M-A Digital audio connector The S/PDIF module is set to [HD]. By default, this connector. 1.7.2 Internal connectors 1. AGND NC SENSE1_RETUR ...
...(S/PDIF) port. Connect the S/PDIF Out module cable to this connector, then install the module to this connector is purchased separately. ASUS H81M Series 1-15 Connect one end of the front panel audio I /O module that you connect a high-definition front panel audio module ...to this connector to avail of the system chassis. +5V SPDIFOUT GND H81M-A SPDIF_OUT H81M-A Digital audio connector The S/PDIF module is set to [HD]. By default, this connector. 1.7.2 Internal connectors 1. AGND NC SENSE1_RETUR ...

H81M-A User's Manual
Page 25
...if the power is for ATX power supply plugs. ATX12V EATXPWR +12V DC +12V DC H81M-A GND GND +3 Volts +12 Volts +12 Volts +5V Standby Power OK PIN 1 GND +5 Volts GND +5 ...Volts GND +3 Volts +3 Volts PIN 1 H81M-A ATX power connectors GND +5 Volts +5 Volts +5 Volts -5 Volts GND GND GND PSON# GND -12 Volts +3... or when you to hear system beeps and warnings. +5V GND GND Speaker Out SPEAKER H81M-A PIN 1 H81M-A Speaker Out Connector ASUS H81M Series 1-17 This PSU type has 24-pin and 4-pin power plugs. • DO...
...if the power is for ATX power supply plugs. ATX12V EATXPWR +12V DC +12V DC H81M-A GND GND +3 Volts +12 Volts +12 Volts +5V Standby Power OK PIN 1 GND +5 Volts GND +5 ...Volts GND +3 Volts +3 Volts PIN 1 H81M-A ATX power connectors GND +5 Volts +5 Volts +5 Volts -5 Volts GND GND GND PSON# GND -12 Volts +3... or when you to hear system beeps and warnings. +5V GND GND Speaker Out SPEAKER H81M-A PIN 1 H81M-A Speaker Out Connector ASUS H81M Series 1-17 This PSU type has 24-pin and 4-pin power plugs. • DO...
H81M-A User's Manual
Page 27
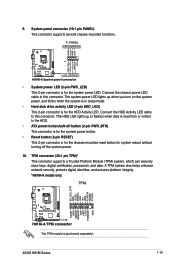
...) This 2-pin connector is read from or written to this connector. Ground HWRST# (NC) 9. F_PANEL PWR LED PWR BTN PIN 1 H81M-A +HDD_LED RESET H81M-A System panel connector • System power LED (2-pin PWR_LED) This 2-pin connector is purchased separately! PLED+ PLEDPWR GND HDD_LED+ HDD_LED- ...+3VSB SMBSCL LAD0 +3V LAD3 PCIRST# FRAME PCICLK RESET GPIO SERIRQ SMBSDA GND LAD1 LAD2 PWROWN GND H81M-A H81M-A TPM connector The TPM module is for the system power LED. ASUS H81M Series 1-19 TPM connector (20-1 pin TPM)* This connector supports a Trusted Platform Module (TPM) system...
...) This 2-pin connector is read from or written to this connector. Ground HWRST# (NC) 9. F_PANEL PWR LED PWR BTN PIN 1 H81M-A +HDD_LED RESET H81M-A System panel connector • System power LED (2-pin PWR_LED) This 2-pin connector is purchased separately! PLED+ PLEDPWR GND HDD_LED+ HDD_LED- ...+3VSB SMBSCL LAD0 +3V LAD3 PCIRST# FRAME PCICLK RESET GPIO SERIRQ SMBSDA GND LAD1 LAD2 PWROWN GND H81M-A H81M-A TPM connector The TPM module is for the system power LED. ASUS H81M Series 1-19 TPM connector (20-1 pin TPM)* This connector supports a Trusted Platform Module (TPM) system...

H81M-A User's Manual
Page 29
... Utilities, AHCI Driver, Manual, Contact and Specials tabs to run the Support DVD Place the Support DVD into the optical drive. ASUS H81M Series 1-21 Visit the ASUS website at any time without notice. If Autorun is enabled in your OS documentation for updates. The contents of your.... Always install the latest OS version and corresponding updates to maximize the features of the Support DVD are subject to change at www.asus.com for detailed information. 1.9.2 Support DVD information The Support DVD that comes with the motherboard package contains the drivers, software applications, ...
... Utilities, AHCI Driver, Manual, Contact and Specials tabs to run the Support DVD Place the Support DVD into the optical drive. ASUS H81M Series 1-21 Visit the ASUS website at any time without notice. If Autorun is enabled in your OS documentation for updates. The contents of your.... Always install the latest OS version and corresponding updates to maximize the features of the Support DVD are subject to change at www.asus.com for detailed information. 1.9.2 Support DVD information The Support DVD that comes with the motherboard package contains the drivers, software applications, ...

H81M-A User's Manual
Page 31
Click to automatically update your motherboard's softwares, drivers and the BIOS version easily. Copy the original motherboard BIOS using the ASUS Update utility. 2.1.1 EZ Update EZ Update is a utility that allows you to automatically update your motherboard's driver, software and firmware Click to find and select ... Internet connection either through a network or an ISP (Internet Service Provider). To launch EZ Update, click EZ Update on the AI Suite 3 main menu bar. ASUS H81M Series 2-1
Click to automatically update your motherboard's softwares, drivers and the BIOS version easily. Copy the original motherboard BIOS using the ASUS Update utility. 2.1.1 EZ Update EZ Update is a utility that allows you to automatically update your motherboard's driver, software and firmware Click to find and select ... Internet connection either through a network or an ISP (Internet Service Provider). To launch EZ Update, click EZ Update on the AI Suite 3 main menu bar. ASUS H81M Series 2-1
H81M-A User's Manual
Page 33
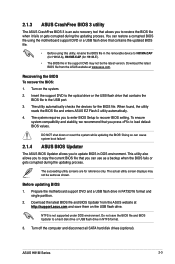
... DVD may not be the latest version. Turn off the computer and disconnect all SATA hard disk drives (optional). 2.1.3 ASUS CrashFree BIOS 3 utility The ASUS CrashFree BIOS 3 is not supported under DOS environment. The system requires you to restore the BIOS file when it fails ...NTFS format. 3. Do not save them on the system. 2. You can cause system boot failure! 2.1.4 ASUS BIOS Updater The ASUS BIOS Updater allows you to enter BIOS Setup to H81MA.CAP (for H81M-A), H81ME.CAP (for H81M-E). • The BIOS file in FAT32/16 format and single partition. 2. ASUS H81M Series 2-3
... DVD may not be the latest version. Turn off the computer and disconnect all SATA hard disk drives (optional). 2.1.3 ASUS CrashFree BIOS 3 utility The ASUS CrashFree BIOS 3 is not supported under DOS environment. The system requires you to restore the BIOS file when it fails ...NTFS format. 3. Do not save them on the system. 2. You can cause system boot failure! 2.1.4 ASUS BIOS Updater The ASUS BIOS Updater allows you to enter BIOS Setup to H81MA.CAP (for H81M-A), H81ME.CAP (for H81M-E). • The BIOS file in FAT32/16 format and single partition. 2. ASUS H81M Series 2-3

H81M-A User's Manual
Page 35
... after POST To enter BIOS Setup after updating BIOS. • Ensure to load the BIOS default settings to update the BIOS or configure its routines. ASUS H81M Series 2-5 When BIOS update is done, press to confirm BIOS update. 4. Refer to section 2.9 Exit menu for details. • Ensure to connect all SATA hard...
... after POST To enter BIOS Setup after updating BIOS. • Ensure to load the BIOS default settings to update the BIOS or configure its routines. ASUS H81M Series 2-5 When BIOS update is done, press to confirm BIOS update. 4. Refer to section 2.9 Exit menu for details. • Ensure to connect all SATA hard...

H81M-A User's Manual
Page 37
ASUS H81M Series 2-7 Selects the display language of the BIOS setup program Displays the CPU/motherboard temperature, CPU/5V/3.3V/12V voltage output, CPU/chassis fan speed ... setup program without saving the changes, saves the changes and resets the system, or enters the Advanced Mode Power Saving mode Selects the boot device ASUS Optimal mode Loads optimized default Selects the priority Displays the system properties Advanced mode Normal mode of the selected mode on the functions Selects the...
ASUS H81M Series 2-7 Selects the display language of the BIOS setup program Displays the CPU/motherboard temperature, CPU/5V/3.3V/12V voltage output, CPU/chassis fan speed ... setup program without saving the changes, saves the changes and resets the system, or enters the Advanced Mode Power Saving mode Selects the boot device ASUS Optimal mode Loads optimized default Selects the priority Displays the system properties Advanced mode Normal mode of the selected mode on the functions Selects the...

H81M-A User's Manual
Page 39
... Not Installed. After you set the system date, time, language, and security settings. • If you enter the Advanced Mode of the BIOS Setup program. ASUS H81M Series 2-9 The Main menu provides you an overview of the Ai Tweaker menu items. Incorrect field values can cause the system to malfunction. See section...
... Not Installed. After you set the system date, time, language, and security settings. • If you enter the Advanced Mode of the BIOS Setup program. ASUS H81M Series 2-9 The Main menu provides you an overview of the Ai Tweaker menu items. Incorrect field values can cause the system to malfunction. See section...

H81M-A User's Manual
Page 41
Be cautious when changing the settings of the Advanced menu items. Incorrect field values can cause the system to change the settings for the CPU and other system devices. ASUS H81M Series 2-11 Scroll down to display the following items: 2.5 Advanced menu The Advanced menu items allow you to malfunction.
Be cautious when changing the settings of the Advanced menu items. Incorrect field values can cause the system to change the settings for the CPU and other system devices. ASUS H81M Series 2-11 Scroll down to display the following items: 2.5 Advanced menu The Advanced menu items allow you to malfunction.

H81M-A User's Manual
Page 43
2.7 Boot menu The Boot menu items allow you to display the following items: ASUS H81M Series 2-13 Scroll down to change the system boot options.
2.7 Boot menu The Boot menu items allow you to display the following items: ASUS H81M Series 2-13 Scroll down to change the system boot options.


