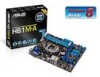
H61M-A User's Manual
Page 12
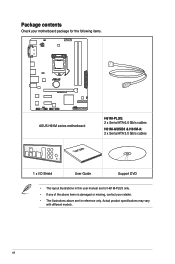
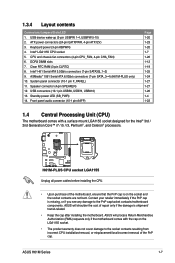
xii Package contents Check your motherboard package for the following items. H61M-PLUS H61M-A/USB3 ASUS H61M series motherboard User Guide H61M-PLUS: 2 x Serial ATA 6.0 Gb/s cables H61M-A/USB3 & H61M-A: 2 x Serial ATA 3.0 Gb/s cables 1 x I/O Shield User Guide Support DVD • The layout illustrations in this user manual are for H61M-PLUS only. • If any of the above items is damaged or missing, contact your retailer. • The illustrations above are for reference only. Actual product specifications may vary with different models.
xii Package contents Check your motherboard package for the following items. H61M-PLUS H61M-A/USB3 ASUS H61M series motherboard User Guide H61M-PLUS: 2 x Serial ATA 6.0 Gb/s cables H61M-A/USB3 & H61M-A: 2 x Serial ATA 3.0 Gb/s cables 1 x I/O Shield User Guide Support DVD • The layout illustrations in this user manual are for H61M-PLUS only. • If any of the above items is damaged or missing, contact your retailer. • The illustrations above are for reference only. Actual product specifications may vary with different models.

H61M-A User's Manual
Page 13
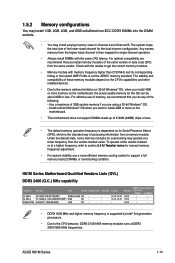
... the LGA1155 package, with iGPU, memory, and PCI Express controllers integrated to them. * PCI 3.0 speed is supported by Intel® 3rd generation Core™ processors. ASUS H61M Series 1-1 Dual-Channel DDR3 2200 (O.C.) / 2133 (O.C.) / 2000 (O.C.) / 1866 (O.C.) / 1600 / 1333 / 1066 MHz support The motherboard supports DDR3 memory that provide twice the performance of PCIe...
... the LGA1155 package, with iGPU, memory, and PCI Express controllers integrated to them. * PCI 3.0 speed is supported by Intel® 3rd generation Core™ processors. ASUS H61M Series 1-1 Dual-Channel DDR3 2200 (O.C.) / 2133 (O.C.) / 2000 (O.C.) / 1866 (O.C.) / 1600 / 1333 / 1066 MHz support The motherboard supports DDR3 memory that provide twice the performance of PCIe...
H61M-A User's Manual
Page 15
...profiles offer flexible controls of the product and thus mitigate environmental impacts. ASUS H61M Series 1-3 Get total system-wide energy optimization by power surges from switching power supply unit (PSU). ASUS EZ Flash 2 ASUS EZ Flash 2 is in regards to update the BIOS without using the...that contains the BIOS file. This is a user-friendly utility that allows you to switch back and forth between different utilities. ASUS CrashFree BIOS 3 ASUS CrashFree BIOS 3 is European Union´s Energy-related Products (ErP) ready, and ErP requires products to meet certain energy ...
...profiles offer flexible controls of the product and thus mitigate environmental impacts. ASUS H61M Series 1-3 Get total system-wide energy optimization by power surges from switching power supply unit (PSU). ASUS EZ Flash 2 ASUS EZ Flash 2 is in regards to update the BIOS without using the...that contains the BIOS file. This is a user-friendly utility that allows you to switch back and forth between different utilities. ASUS CrashFree BIOS 3 ASUS CrashFree BIOS 3 is European Union´s Energy-related Products (ErP) ready, and ErP requires products to meet certain energy ...
H61M-A User's Manual
Page 17
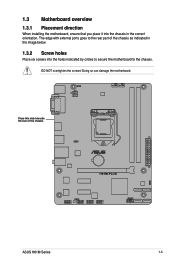
1.3 Motherboard overview 1.3.1 Placement direction When installing the motherboard, ensure that you place it into the chassis in the image below. 1.3.2 Screw holes Place six screws into the holes indicated by circles to secure the motherboard to the rear part of the chassis H61M-PLUS ASUS H61M Series 1-5 The edge with external ports goes to the chassis. DO NOT overtighten the screws! Doing so can damage the motherboard. Place this side towards the rear of the chassis as indicated in the correct orientation.
1.3 Motherboard overview 1.3.1 Placement direction When installing the motherboard, ensure that you place it into the chassis in the image below. 1.3.2 Screw holes Place six screws into the holes indicated by circles to secure the motherboard to the rear part of the chassis H61M-PLUS ASUS H61M Series 1-5 The edge with external ports goes to the chassis. DO NOT overtighten the screws! Doing so can damage the motherboard. Place this side towards the rear of the chassis as indicated in the correct orientation.
H61M-A User's Manual
Page 19
...the socket contacts are not bent. ASMedia® 1061 Serial ATA 6.0Gb/s connectors (7-pin SATA_3~4) (H61M-PLUS only) 10. USB connectors (10-1 pin USB56, USB78, USB910) 13. ASUS H61M Series 1-7 Standby power LED (SB_PWR) 14. CPU and chassis fan connectors (4-pin CPU_FAN, 4-pin CHA_FAN...) 6. System panel connector (10-1 pin F_PANEL) 11. H61M-PLUS H61M-PLUS CPU socket LGA1155 Unplug all power cables before installing ...
...the socket contacts are not bent. ASMedia® 1061 Serial ATA 6.0Gb/s connectors (7-pin SATA_3~4) (H61M-PLUS only) 10. USB connectors (10-1 pin USB56, USB78, USB910) 13. ASUS H61M Series 1-7 Standby power LED (SB_PWR) 14. CPU and chassis fan connectors (4-pin CPU_FAN, 4-pin CHA_FAN...) 6. System panel connector (10-1 pin F_PANEL) 11. H61M-PLUS H61M-PLUS CPU socket LGA1155 Unplug all power cables before installing ...

H61M-A User's Manual
Page 23
To uninstall the CPU heatsink and fan assembly 1 2 B A B A ASUS H61M Series 1-11
To uninstall the CPU heatsink and fan assembly 1 2 B A B A ASUS H61M Series 1-11
H61M-A User's Manual
Page 25
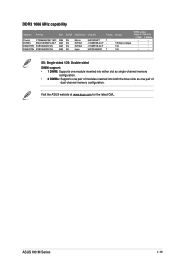
..., use of memory, we recommend that you do any of the following: - Timing - 10-12-12-31 - 10-12-12-31 - - ASUS H61M Series 1-13 1.5.2 Memory configurations You may install 1GB, 2GB, 4GB, and 8GB unbuffered non-ECC DDR3 DIMMs into the DIMM sockets. • You ... from the same vendor. Use a maximum of the lower-sized channel for overclocking may install varying memory sizes in Channel A and Channel B. H61M Series Motherboard Qualified Vendors Lists (QVL) DDR3 2400 (O.C.) MHz capability Vendors G.SKILL G.SKILL KINGSTON Part No. Chip NO. The stability and compatibility...
..., use of memory, we recommend that you do any of the following: - Timing - 10-12-12-31 - 10-12-12-31 - - ASUS H61M Series 1-13 1.5.2 Memory configurations You may install 1GB, 2GB, 4GB, and 8GB unbuffered non-ECC DDR3 DIMMs into the DIMM sockets. • You ... from the same vendor. Use a maximum of the lower-sized channel for overclocking may install varying memory sizes in Channel A and Channel B. H61M Series Motherboard Qualified Vendors Lists (QVL) DDR3 2400 (O.C.) MHz capability Vendors G.SKILL G.SKILL KINGSTON Part No. Chip NO. The stability and compatibility...
H61M-A User's Manual
Page 27
ASUS H61M Series 1-15 Visit the ASUS website at www.asus.com for the latest QVL. Size Crucial CT25664BA1067.16FF 2GB ELPIDA EBJ21UE8EDF0-AE-F 2GB KINGSTON KVR1066D3N7/2G 2GB KINGSTON KVR1066D3N7/4G 4GB SS/DS DS ...
ASUS H61M Series 1-15 Visit the ASUS website at www.asus.com for the latest QVL. Size Crucial CT25664BA1067.16FF 2GB ELPIDA EBJ21UE8EDF0-AE-F 2GB KINGSTON KVR1066D3N7/2G 2GB KINGSTON KVR1066D3N7/4G 4GB SS/DS DS ...
H61M-A User's Manual
Page 29
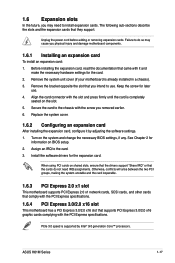
.... 1.6.4 PCI Express 3.0/2.0 x16 slot This motherboard has a PCI Express 3.0/2.0 x16 slot that supports PCI Express 3.0/2.0 x16 graphic cards complying with the screw you removed earlier. 6. ASUS H61M Series 1-17 Remove the bracket opposite the slot that the cards do so may need IRQ assignments. Replace the system cover. 1.6.2 Configuring an expansion card...
.... 1.6.4 PCI Express 3.0/2.0 x16 slot This motherboard has a PCI Express 3.0/2.0 x16 slot that supports PCI Express 3.0/2.0 x16 graphic cards complying with the screw you removed earlier. 6. ASUS H61M Series 1-17 Remove the bracket opposite the slot that the cards do so may need IRQ assignments. Replace the system cover. 1.6.2 Configuring an expansion card...
H61M-A User's Manual
Page 31
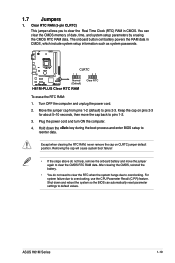
..., reinstall the battery. • You do not help, remove the onboard battery and move the cap back to reenter data. ASUS H61M Series 1-19 CLRTC H61M-PLUS 12 Normal (Default) 23 Clear RTC H61M-PLUS Clear RTC RAM To erase the RTC RAM: 1. Turn OFF the computer and unplug the power cord. 2. Shut down...
..., reinstall the battery. • You do not help, remove the onboard battery and move the cap back to reenter data. ASUS H61M Series 1-19 CLRTC H61M-PLUS 12 Normal (Default) 23 Clear RTC H61M-PLUS Clear RTC RAM To erase the RTC RAM: 1. Turn OFF the computer and unplug the power cord. 2. Shut down...

H61M-A User's Manual
Page 33
... the 4, 6, and 8-channel configurations, the function of the audio ports in the front panel to the tape, CD, DVD player, or other VGA-compatible devices. 3. ASUS H61M Series 1-21 PS/2 Mouse port. This port connects to a headphone or a speaker. D-Sub port. Audio 2, 4, 6, or 8-channel configuration Port Light Blue (Rear panel) Lime (Rear...
... the 4, 6, and 8-channel configurations, the function of the audio ports in the front panel to the tape, CD, DVD player, or other VGA-compatible devices. 3. ASUS H61M Series 1-21 PS/2 Mouse port. This port connects to a headphone or a speaker. D-Sub port. Audio 2, 4, 6, or 8-channel configuration Port Light Blue (Rear panel) Lime (Rear...

H61M-A User's Manual
Page 35
...of 350 W. • DO NOT forget to the Recommended Power Supply Wattage Calculator at http://support.asus. The power supply plugs are for ATX power supply plugs. ATX12V EATXPWR +12V DC +12V DC H61M-PLUS GND GND +3 Volts +12 Volts +12 Volts +5V Standby Power OK PIN 1 GND..., we recommend that you use a power supply unit (PSU) that you are uncertain about the minimum power supply requirement for details. ASUS H61M Series 1-23 Find the proper orientation and push down firmly until the connectors completely fit. com/PowerSupplyCalculator/PSCalculator.aspx?SLanguage=en-us for your...
...of 350 W. • DO NOT forget to the Recommended Power Supply Wattage Calculator at http://support.asus. The power supply plugs are for ATX power supply plugs. ATX12V EATXPWR +12V DC +12V DC H61M-PLUS GND GND +3 Volts +12 Volts +12 Volts +5V Standby Power OK PIN 1 GND..., we recommend that you use a power supply unit (PSU) that you are uncertain about the minimum power supply requirement for details. ASUS H61M Series 1-23 Find the proper orientation and push down firmly until the connectors completely fit. com/PowerSupplyCalculator/PSCalculator.aspx?SLanguage=en-us for your...
H61M-A User's Manual
Page 37
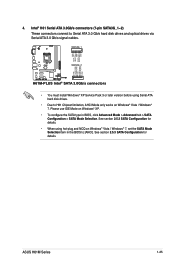
SATA3G_1 GND RSATA_TXP1 RSATA_TXN1 GND RSATA_RXN1 RSATA_RXP1 GND GND RSATA_TXP1 RSATA_TXN1 GND RSATA_RXN1 RSATA_RXP1 GND H61M-PLUS SATA3G_2 H61M-PLUS Intel® SATA 3.0Gb/s connectors • You must install Windows® XP Service Pack 3 or later version before using hot-plug and NCQ on ... Serial ATA 3.0Gb/s connectors (7-pin SATA3G_1~2) These connectors connect to Serial ATA 3.0 Gb/s hard disk drives and optical drives via Serial ATA 3.0 Gb/s signal cables. ASUS H61M Series 1-25 4.
SATA3G_1 GND RSATA_TXP1 RSATA_TXN1 GND RSATA_RXN1 RSATA_RXP1 GND GND RSATA_TXP1 RSATA_TXN1 GND RSATA_RXN1 RSATA_RXP1 GND H61M-PLUS SATA3G_2 H61M-PLUS Intel® SATA 3.0Gb/s connectors • You must install Windows® XP Service Pack 3 or later version before using hot-plug and NCQ on ... Serial ATA 3.0Gb/s connectors (7-pin SATA3G_1~2) These connectors connect to Serial ATA 3.0 Gb/s hard disk drives and optical drives via Serial ATA 3.0 Gb/s signal cables. ASUS H61M Series 1-25 4.
H61M-A User's Manual
Page 39
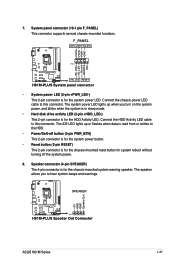
... LED cable to hear system beeps and warnings. PLED+ PLEDPWR GND HD_LED+ HD_LED- SPEAKER H61M-PLUS PIN 1 H61M-PLUS Speaker Out Connector +5V GND GND Speaker Out ASUS H61M Series 1-27 F_PANEL PWR LED PWR BTN PIN 1 H61M-PLUS +HD_LED RESET H61M-PLUS System panel connector • System power LED (2-pin +PWR_LED-) This 2-pin connector is...
... LED cable to hear system beeps and warnings. PLED+ PLEDPWR GND HD_LED+ HD_LED- SPEAKER H61M-PLUS PIN 1 H61M-PLUS Speaker Out Connector +5V GND GND Speaker Out ASUS H61M Series 1-27 F_PANEL PWR LED PWR BTN PIN 1 H61M-PLUS +HD_LED RESET H61M-PLUS System panel connector • System power LED (2-pin +PWR_LED-) This 2-pin connector is...
H61M-A User's Manual
Page 41
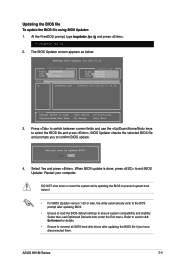
...in the support DVD that allows you to manage, save, and update the motherboard BIOS in Windows® environment. • ASUS Update requires an Internet connection either of the original motherboard BIOS file to restore the BIOS in the future. Follow the onscreen... that comes with the motherboard package. BIOS information 2.1 Managing and updating your BIOS 2 Save a copy of the following methods: ASUS H61M Series 2-1 The Specials menu appears. 2. The ASUS Update main screen appears. Installing ASUS Update To install ASUS Update: 1. The AI Suite II Quick Bar appears. 2.
...in the support DVD that allows you to manage, save, and update the motherboard BIOS in Windows® environment. • ASUS Update requires an Internet connection either of the original motherboard BIOS file to restore the BIOS in the future. Follow the onscreen... that comes with the motherboard package. BIOS information 2.1 Managing and updating your BIOS 2 Save a copy of the following methods: ASUS H61M Series 2-1 The Specials menu appears. 2. The ASUS Update main screen appears. Installing ASUS Update To install ASUS Update: 1. The AI Suite II Quick Bar appears. 2.
H61M-A User's Manual
Page 43
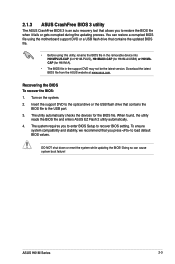
... utility automatically. 4. Download the latest BIOS file from the ASUS website at www.asus.com. The utility automatically checks the devices for H61M-A/USB3) or H61MA. DO NOT shut down or reset the system while updating the BIOS! ASUS H61M Series 2-3 Insert the support DVD to the optical drive or... the USB flash drive that contains the BIOS file to recover BIOS setting. The system requires you to enter BIOS Setup to the USB port. 3. 2.1.3 ASUS CrashFree BIOS 3 utility The ASUS CrashFree BIOS 3...
... utility automatically. 4. Download the latest BIOS file from the ASUS website at www.asus.com. The utility automatically checks the devices for H61M-A/USB3) or H61MA. DO NOT shut down or reset the system while updating the BIOS! ASUS H61M Series 2-3 Insert the support DVD to the optical drive or... the USB flash drive that contains the BIOS file to recover BIOS setting. The system requires you to enter BIOS Setup to the USB port. 3. 2.1.3 ASUS CrashFree BIOS 3 utility The ASUS CrashFree BIOS 3...
H61M-A User's Manual
Page 45
... disk drives after updating BIOS. • Ensure to load the BIOS default settings to section 2.9 Exit menu for DOS V1.30 Current ROM BOARD: H61M-PLUS VER: 0215 DATE: 11/07/2012 Update ROM BOARD: Unknown VER: Unknown DATE: Unknown PATH: A:\ A: H61MPLUS.CAP 8390656 2013-01-10 ... [Up/Down/Home/End] Move [Tab] Switch [B] Backup [V] Drive Info [Esc] Exit 3. Select the Load Optimized Defaults item under the Exit menu. ASUS H61M Series 2-5 The BIOS Updater screen appears as below. When BIOS update is done, press to select the BIOS file and press . BIOS Updater checks the...
... disk drives after updating BIOS. • Ensure to load the BIOS default settings to section 2.9 Exit menu for DOS V1.30 Current ROM BOARD: H61M-PLUS VER: 0215 DATE: 11/07/2012 Update ROM BOARD: Unknown VER: Unknown DATE: Unknown PATH: A:\ A: H61MPLUS.CAP 8390656 2013-01-10 ... [Up/Down/Home/End] Move [Tab] Switch [B] Backup [V] Drive Info [Esc] Exit 3. Select the Load Optimized Defaults item under the Exit menu. ASUS H61M Series 2-5 The BIOS Updater screen appears as below. When BIOS update is done, press to select the BIOS file and press . BIOS Updater checks the...
H61M-A User's Manual
Page 47
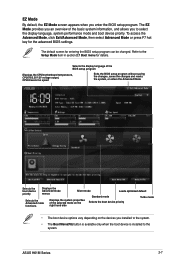
.... EZ Mode By default, the EZ Mode screen appears when you to select the display language, system performance mode and boot device priority. ASUS H61M Series 2-7 The EZ Mode provides you an overview of the selected mode on the right hand side Selects the boot device priority •... speed Exits the BIOS setup program without saving the changes, saves the changes and resets the system, or enters the Advanced Mode H61M-PLUS Selects the boot device priority Displays the Advanced mode menus Silent mode Loads optimized default Standard mode Turbo mode Selects the Advanced mode...
.... EZ Mode By default, the EZ Mode screen appears when you to select the display language, system performance mode and boot device priority. ASUS H61M Series 2-7 The EZ Mode provides you an overview of the selected mode on the right hand side Selects the boot device priority •... speed Exits the BIOS setup program without saving the changes, saves the changes and resets the system, or enters the Advanced Mode H61M-PLUS Selects the boot device priority Displays the Advanced mode menus Silent mode Loads optimized default Standard mode Turbo mode Selects the Advanced mode...

H61M-A User's Manual
Page 49
... on any menu screen means that menu. To change the value of a menu screen when there are the navigation keys for the BIOS setup program. ASUS H61M Series 2-9 General help At the top right corner of options. Menu items The highlighted item on the menu bar displays the specific items for that...
... on any menu screen means that menu. To change the value of a menu screen when there are the navigation keys for the BIOS setup program. ASUS H61M Series 2-9 General help At the top right corner of options. Menu items The highlighted item on the menu bar displays the specific items for that...

H61M-A User's Manual
Page 51
... fields in changing a user password, but press when prompted to create/confirm the password. From the Create New Password box, key in a password, then press . 3. ASUS H61M Series 2-11 The User Password item on top of the screen shows the default Not Installed. From the Enter Current Password box, key in the...
... fields in changing a user password, but press when prompted to create/confirm the password. From the Create New Password box, key in a password, then press . 3. ASUS H61M Series 2-11 The User Password item on top of the screen shows the default Not Installed. From the Enter Current Password box, key in the...


