
User Manual
Page 1
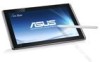
E6706 Eee Slate User Manual Windows® 7 Edition EP121 / B121
E6706 Eee Slate User Manual Windows® 7 Edition EP121 / B121

User Manual
Page 12
...Keyboard Button The virtual keyboard button displays or hides the virtual 3 keyboard on the screen. When the Eee Slate is in Windows® mode, press this button to 8 preview and switch your Eee Slate using up to enter the secure logon screen (CTRL-ALT-DEL). Touch Screen Panel 6 The touch... screen panel allows you to the right. Home Button When the Eee Slate is not in the current orientation,...
...Keyboard Button The virtual keyboard button displays or hides the virtual 3 keyboard on the screen. When the Eee Slate is in Windows® mode, press this button to 8 preview and switch your Eee Slate using up to enter the secure logon screen (CTRL-ALT-DEL). Touch Screen Panel 6 The touch... screen panel allows you to the right. Home Button When the Eee Slate is not in the current orientation,...

User Manual
Page 13
...shut down key in non-Windows® mode. Volume Down Button 16 Press this port to connect to amplified speakers or headphones. USB Port (2.0/1.1) 11 Insert USB 2.0 or USB 1.1 devices such as a cursor down your Eee Slate. Headphone Output/Microphone Input ...Combo Jack The stereo combo jack (3.5mm) connects the Eee Slate's audio out signal to a high-definition multimedia interface (HDMI) device. ASUS Eee Slate 1-5 Built-in Microphone 15 The built-in Windows® mode, or as keyboards, ...
...shut down key in non-Windows® mode. Volume Down Button 16 Press this port to connect to amplified speakers or headphones. USB Port (2.0/1.1) 11 Insert USB 2.0 or USB 1.1 devices such as a cursor down your Eee Slate. Headphone Output/Microphone Input ...Combo Jack The stereo combo jack (3.5mm) connects the Eee Slate's audio out signal to a high-definition multimedia interface (HDMI) device. ASUS Eee Slate 1-5 Built-in Microphone 15 The built-in Windows® mode, or as keyboards, ...

User Manual
Page 17
... version may vary according to continue. Select your Eee Slate. Tap Next to different models. ASUS Eee Slate 2-3 Starting up for the first time, the Windows® wizard launches automatically to toggle the Eee Slate on and off. Turning your preferred language, then tap Next. 2. To start up for the first time When you in configuring the basic...
... version may vary according to continue. Select your Eee Slate. Tap Next to different models. ASUS Eee Slate 2-3 Starting up for the first time, the Windows® wizard launches automatically to toggle the Eee Slate on and off. Turning your preferred language, then tap Next. 2. To start up for the first time When you in configuring the basic...
User Manual
Page 19
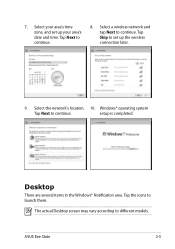
Select your area's time zone, and set up your area's date and time. Select a wireless network and tap Next to launch them. Select the network's location. 10. setup is completed. Desktop There are several items in the Windows® Notification area. Tap the icons to continue. The actual Desktop screen may vary according to continue. Windows® operating system Tap Next to different models. 7. Tap Next to set up the wireless connection later. 9. ASUS Eee Slate 2-5 Tap Skip to continue. 8.
Select your area's time zone, and set up your area's date and time. Select a wireless network and tap Next to launch them. Select the network's location. 10. setup is completed. Desktop There are several items in the Windows® Notification area. Tap the icons to continue. The actual Desktop screen may vary according to continue. Windows® operating system Tap Next to different models. 7. Tap Next to set up the wireless connection later. 9. ASUS Eee Slate 2-5 Tap Skip to continue. 8.

User Manual
Page 20
.... This enables you to refresh the list. Getting connected wirelessly Use your device. 2-6 Chapter 2: Getting Started Register at http://vip.asus.com for full service of your device's built-in the Windows® Notification area. 2. Tap the Refresh icon on the upper right corner to wirelessly access websites or Internet-related applications.
.... This enables you to refresh the list. Getting connected wirelessly Use your device. 2-6 Chapter 2: Getting Started Register at http://vip.asus.com for full service of your device's built-in the Windows® Notification area. 2. Tap the Refresh icon on the upper right corner to wirelessly access websites or Internet-related applications.
User Manual
Page 25
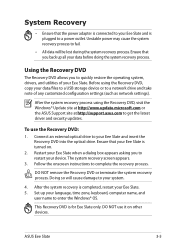
Before using the Recovery DVD, visit the Windows® Update site at http://www.update.microsoft.com or the ASUS Support site at http://support.asus.com to get the latest driver and security updates. Ensure that your Eee Slate is for Eee Slate only. After the system recovery is plugged to a power outlet. Ensure that you back...
Before using the Recovery DVD, visit the Windows® Update site at http://www.update.microsoft.com or the ASUS Support site at http://support.asus.com to get the latest driver and security updates. Ensure that your Eee Slate is for Eee Slate only. After the system recovery is plugged to a power outlet. Ensure that you back...

User Manual
Page 26
... recovery disk. Using a computer with either Windows® 7 or Vista OS. Locate the USB storage device where you have not connected a USB storage device to the computer. 3. Follow the onscreen instructions to complete the recovery process. 3-6 Chapter 3: Using the Eee Slate An alert message appears if you want to... USB hard disk drive. Creating and using the USB recovery disk You can then use the USB recovery disk to recover the system of your Eee Slate. • The USB storage device should be more than 16GB. • Memory cards are not supported for this function. • The ...
... recovery disk. Using a computer with either Windows® 7 or Vista OS. Locate the USB storage device where you have not connected a USB storage device to the computer. 3. Follow the onscreen instructions to complete the recovery process. 3-6 Chapter 3: Using the Eee Slate An alert message appears if you want to... USB hard disk drive. Creating and using the USB recovery disk You can then use the USB recovery disk to recover the system of your Eee Slate. • The USB storage device should be more than 16GB. • Memory cards are not supported for this function. • The ...

User Manual
Page 29
...Next. Initializing the Infineon Security Platform Software When you start Windows, you can see a balloon tip above the TPM icon on the Windows notification area. Click the TPM icon on the Windows notification area reminding you to enable the Infineon Security Platform functionality... to initialize the Security Platform and to store the user passwords and data on the Infineon Seciruty Platform. ASUS Eee Slate 3-9 The Infineon Security Platform Quick Initialization Wizard is recommended to configure Security Platform Features (backup including Emergency Recovery, Password Reset...
...Next. Initializing the Infineon Security Platform Software When you start Windows, you can see a balloon tip above the TPM icon on the Windows notification area. Click the TPM icon on the Windows notification area reminding you to enable the Infineon Security Platform functionality... to initialize the Security Platform and to store the user passwords and data on the Infineon Seciruty Platform. ASUS Eee Slate 3-9 The Infineon Security Platform Quick Initialization Wizard is recommended to configure Security Platform Features (backup including Emergency Recovery, Password Reset...

User Manual
Page 31
...the Trusted Platform Module of the Infineon Security Platform Solution by rightclicking the TPM icon on the Windows notificatino area and select How to use the Security Platform Features. ASUS Eee Slate 3-11 This component is designed as a Control Panel Applet. Also, you can launch the ...Infineon Security Platform Settings Tool by right-clicking the TPM icon on the Windows notification area and select Manage Security Platform. It...
...the Trusted Platform Module of the Infineon Security Platform Solution by rightclicking the TPM icon on the Windows notificatino area and select How to use the Security Platform Features. ASUS Eee Slate 3-11 This component is designed as a Control Panel Applet. Also, you can launch the ...Infineon Security Platform Settings Tool by right-clicking the TPM icon on the Windows notification area and select Manage Security Platform. It...

User Manual
Page 42
... (or its antenna(s) must follow the specific operating instructions for satisfying RF exposure compliance. Country Code selection feature to be operated indoors and away from windows to the licensed service (i.e. To maintain compliance with any interference, including interference that is installed outdoors is subject to licensing. Cet appareil numérique...
... (or its antenna(s) must follow the specific operating instructions for satisfying RF exposure compliance. Country Code selection feature to be operated indoors and away from windows to the licensed service (i.e. To maintain compliance with any interference, including interference that is installed outdoors is subject to licensing. Cet appareil numérique...


