

User Manual
Page 2
... Started Power System 3-2 Using AC Power 3-2 Using Battery Power 3-4 Touchpad Usage 3-6 Keyboard Usage 3-8 Special Function Keys 3-8 Adjust the window 3-10 First Run Wizard 3-11 Operating Mode 3-13 Shutdown...3-14 Chapter 4: Using the Eee PC Internet...4-2 Configuring a wireless network connection 4-2 Configuring a network connection 4-4 Wireless Point-to-Point Protocol over Ethernet 4-9 Browsing web pages 4-14...
... Started Power System 3-2 Using AC Power 3-2 Using Battery Power 3-4 Touchpad Usage 3-6 Keyboard Usage 3-8 Special Function Keys 3-8 Adjust the window 3-10 First Run Wizard 3-11 Operating Mode 3-13 Shutdown...3-14 Chapter 4: Using the Eee PC Internet...4-2 Configuring a wireless network connection 4-2 Configuring a network connection 4-4 Wireless Point-to-Point Protocol over Ethernet 4-9 Browsing web pages 4-14...

User Manual
Page 4
Table of Contents Task Manager 4-46 Favorites...4-47 Chapter 5: Installing & Optimizing Windows® XP Preparing to install Windows® XP 5-2 Installing Windows® XP 5-2 Optimizing Windows® XP 5-4 Changing Virtual Memory 5-4 Turning off System Restore 5-5 Compressing Disk Drive 5-6 Relocating Files 5-6 Deleting unnecessary Windows Components 5-8 Clearing System Backup Data 5-8 Deleting unnecessary document files 5-9 Chapter 6: Support DVD & System...
Table of Contents Task Manager 4-46 Favorites...4-47 Chapter 5: Installing & Optimizing Windows® XP Preparing to install Windows® XP 5-2 Installing Windows® XP 5-2 Optimizing Windows® XP 5-4 Changing Virtual Memory 5-4 Turning off System Restore 5-5 Compressing Disk Drive 5-6 Relocating Files 5-6 Deleting unnecessary Windows Components 5-8 Clearing System Backup Data 5-8 Deleting unnecessary document files 5-9 Chapter 6: Support DVD & System...

User Manual
Page 6
... recovery. 7. Getting Started Provides information on the Eee PC's components. 3. Appendix Provides you information on using the Eee PC's utilities. 5. The following are reading the Eee PC User's Manual.This User's Manual provides information regarding the various components in the Eee PC and how to install and optimize Windows® XP on your Eee PC. 6. Knowing the Parts Provides information on...
... recovery. 7. Getting Started Provides information on the Eee PC's components. 3. Appendix Provides you information on using the Eee PC's utilities. 5. The following are reading the Eee PC User's Manual.This User's Manual provides information regarding the various components in the Eee PC and how to install and optimize Windows® XP on your Eee PC. 6. Knowing the Parts Provides information on...

User Manual
Page 29
ASUS Eee PC 3-7 You can move the pointer over the item you can simply double-tap on the item and hold while dragging the item with your display window includes several sub-windows, move the pointer on the right side of the touchpad to the desired location, then release the button. If your ...fingertip.The following illustrations produce the same results. Or, you select, and while keeping the left button depressed, moving the pointer to scroll a window up or down . Dragging means to pick up an item and place it anywhere on the screen you finger up or down on that pane...
ASUS Eee PC 3-7 You can move the pointer over the item you can simply double-tap on the item and hold while dragging the item with your display window includes several sub-windows, move the pointer on the right side of the touchpad to the desired location, then release the button. If your ...fingertip.The following illustrations produce the same results. Or, you select, and while keeping the left button depressed, moving the pointer to scroll a window up or down . Dragging means to pick up an item and place it anywhere on the screen you finger up or down on that pane...

User Manual
Page 32
Hold and the touchpad left button to right-clicking the touchpad/mouse on the touchpad, dragging and placing the window as desired. 3-10 Chapter 3: Getting Started Menu with pointer icon : Activates the properties menu and is not in the center of the screen and you want to adjust the position of the window, follow the instructions below to move on an object. Use the other finger to adjust the window position. 1. Adjust the window If the application window is equivalent to turn the pointer into a cross arrow. 2. House icon: Returns to the main menu.
Hold and the touchpad left button to right-clicking the touchpad/mouse on the touchpad, dragging and placing the window as desired. 3-10 Chapter 3: Getting Started Menu with pointer icon : Activates the properties menu and is not in the center of the screen and you want to adjust the position of the window, follow the instructions below to move on an object. Use the other finger to adjust the window position. 1. Adjust the window If the application window is equivalent to turn the pointer into a cross arrow. 2. House icon: Returns to the main menu.
User Manual
Page 39
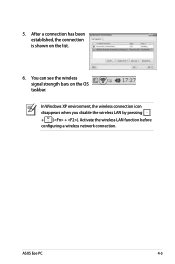
ASUS Eee PC 4-3 You can see the wireless signal strength bars on the list. 6. After a connection has been established, the connection is shown on the OS taskbar. In Windows XP environment, the wireless connection icon disappears when you disable the wireless LAN by pressing + ( + ). Activate the wireless LAN function before configuring a wireless network connection. 5.
ASUS Eee PC 4-3 You can see the wireless signal strength bars on the list. 6. After a connection has been established, the connection is shown on the OS taskbar. In Windows XP environment, the wireless connection icon disappears when you disable the wireless LAN by pressing + ( + ). Activate the wireless LAN function before configuring a wireless network connection. 5.

User Manual
Page 68
... right pane. • Closing the main window only minimizes the music manager on the OS taskbar. Unauthorized copy, reproduction, broadcasting and public performance are reserved by clicking Actions > Quit. • All rights of the built-in music samples are prohibited. 4-32 Chapter 4: Using the Eee PC You can drag and drop the wanted... device Locates your media files Shows your playlists Displays your collection Shows the track playing, newest albums and favorite albums Connect your iPod to your Eee PC and click the Media Device tab to create your multi-media data in your iPod.
... right pane. • Closing the main window only minimizes the music manager on the OS taskbar. Unauthorized copy, reproduction, broadcasting and public performance are reserved by clicking Actions > Quit. • All rights of the built-in music samples are prohibited. 4-32 Chapter 4: Using the Eee PC You can drag and drop the wanted... device Locates your media files Shows your playlists Displays your collection Shows the track playing, newest albums and favorite albums Connect your iPod to your Eee PC and click the Media Device tab to create your multi-media data in your iPod.

User Manual
Page 70
Activates Webcam 4-34 Chapter 4: Using the Eee PC Webcam (optional) Click Webcam and start video recording or image capture. The actual supported codecs vary depending on model. Video Manager Starts the Video Manager Moves the selected item to trash can Shows the properties of the selected item Switches to tree display Changes the display window Changes the view mode ASUS Eee PC supports video and audio files in the following format: wmv, DVD, MPEG1, MPEG2, MPEG4 SP, Xvid, mp3, wma, ogg, wav, MPEG4 AAC, PCM, Dolby digital (2.0 decode) format.
Activates Webcam 4-34 Chapter 4: Using the Eee PC Webcam (optional) Click Webcam and start video recording or image capture. The actual supported codecs vary depending on model. Video Manager Starts the Video Manager Moves the selected item to trash can Shows the properties of the selected item Switches to tree display Changes the display window Changes the view mode ASUS Eee PC supports video and audio files in the following format: wmv, DVD, MPEG1, MPEG2, MPEG4 SP, Xvid, mp3, wma, ogg, wav, MPEG4 AAC, PCM, Dolby digital (2.0 decode) format.

User Manual
Page 73
Refer to add a new printer. The installed printers display in standby, restart, or shut down the system. ASUS Eee PC 4-37 You can activate the task manager, put the system in the window. Instant Shutdown Click Instant Shutdown and select an action from the dialog box shown below. Printers To setup your printer, double-click Printers and press Add to the QVL in Appendix or visit our website for the latest qualified vendor for the printers.
Refer to add a new printer. The installed printers display in standby, restart, or shut down the system. ASUS Eee PC 4-37 You can activate the task manager, put the system in the window. Instant Shutdown Click Instant Shutdown and select an action from the dialog box shown below. Printers To setup your printer, double-click Printers and press Add to the QVL in Appendix or visit our website for the latest qualified vendor for the printers.
User Manual
Page 80
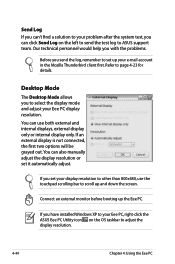
... will be grayed out. You can use the touchpad scrolling bar to scroll up the Eee PC. If you have installed Windows XP to your Eee PC, right-click the ASUS Eee PC Utility icon on the left to send the test log to ASUS support team. Send Log If you can't find a solution to your problem after the...
... will be grayed out. You can use the touchpad scrolling bar to scroll up the Eee PC. If you have installed Windows XP to your Eee PC, right-click the ASUS Eee PC Utility icon on the left to send the test log to ASUS support team. Send Log If you can't find a solution to your problem after the...

User Manual
Page 85
Preparing to Install Windows® XP Installing Windows® XP Optimizing Windows® XP 5 Installing & Optimizing Windows® XP
Preparing to Install Windows® XP Installing Windows® XP Optimizing Windows® XP 5 Installing & Optimizing Windows® XP

User Manual
Page 86
... recommend you use a USB flash disk smaller than 1GB) or external hard disk drive • ASUS Eee PC support DVD • The older version of Windows® OS does not support USB DVDROM. Connect the power cord to your Eee PC. 3. Go to [Start]. 5. Go to Advanced and set OS Installation to Advanced > Onboard ... Service Pack 2 disc to the USB DVD-ROM and connect the USB optical drive to your Eee PC. 2. Ensure the disc you have is Windows® XP Service Pack 2. • Your Eee PC might not be able to enter the BIOS setup. Start the system and press on bootup to detect all the items....
... recommend you use a USB flash disk smaller than 1GB) or external hard disk drive • ASUS Eee PC support DVD • The older version of Windows® OS does not support USB DVDROM. Connect the power cord to your Eee PC. 3. Go to [Start]. 5. Go to Advanced and set OS Installation to Advanced > Onboard ... Service Pack 2 disc to the USB DVD-ROM and connect the USB optical drive to your Eee PC. 2. Ensure the disc you have is Windows® XP Service Pack 2. • Your Eee PC might not be able to enter the BIOS setup. Start the system and press on bootup to detect all the items....

User Manual
Page 87
... partitions. Go to Advanced and set OS Installation back to select boot device 7. Drivers Installation Wizard to your data after deleting all drivers. ASUS Eee PC 5-3 6. Please select boot device: HDD:SM-SILICONMOTION SM223AC USB:Slimtype DVD ↑ and ↓ to move selection ENTER to [Finish]. 11...drive. Select USB:XXXXXX (may be labled as the ODD brand name) to start the Windows® XP OS setup. 9. After the Windows® XP OS installation is completed. After entering Windows, insert the Support DVD to save the configuration and reboot the system. 12. Ensure to...
... partitions. Go to Advanced and set OS Installation back to select boot device 7. Drivers Installation Wizard to your data after deleting all drivers. ASUS Eee PC 5-3 6. Please select boot device: HDD:SM-SILICONMOTION SM223AC USB:Slimtype DVD ↑ and ↓ to move selection ENTER to [Finish]. 11...drive. Select USB:XXXXXX (may be labled as the ODD brand name) to start the Windows® XP OS setup. 9. After the Windows® XP OS installation is completed. After entering Windows, insert the Support DVD to save the configuration and reboot the system. 12. Ensure to...

User Manual
Page 88
Go to change the virtual memory. 5-4 Chapter 5: Installing & Optimizing Windows® XP Click the Advanced tab on your needs. 1. Click Advanced tab and the Change button to Control Panel > System. 2. Change the virtual memory based on the top and click the Settings button in Performance area. 3. Changing Virtual Memory ASUS Eee PC supprt DVD will by default set the virtual memory to make your Eee PC run faster. Optimizing Windows® XP For the best performance of your Eee PC with Windows XP operating system, follow some quick steps below to 200MB.
Go to change the virtual memory. 5-4 Chapter 5: Installing & Optimizing Windows® XP Click the Advanced tab on your needs. 1. Click Advanced tab and the Change button to Control Panel > System. 2. Change the virtual memory based on the top and click the Settings button in Performance area. 3. Changing Virtual Memory ASUS Eee PC supprt DVD will by default set the virtual memory to make your Eee PC run faster. Optimizing Windows® XP For the best performance of your Eee PC with Windows XP operating system, follow some quick steps below to 200MB.
User Manual
Page 90
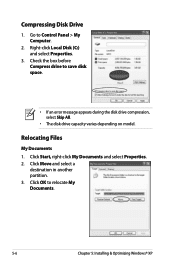
Click Move and select a destination in another partition. 3. Check the box before Compress drive to relocate My Documents. 5-6 Chapter 5: Installing & Optimizing Windows® XP Click OK to save disk space. • If an error message appears during the disk drive compression, select Skip All. • The disk drive capacity varies depending on model. Compressing Disk Drive 1. Right-click Local Disk (C:) and select Properties. 3. Relocating Files My Documents 1. Click Start, right-click My Documents and select Properties. 2. Go to Control Panel > My Computer. 2.
Click Move and select a destination in another partition. 3. Check the box before Compress drive to relocate My Documents. 5-6 Chapter 5: Installing & Optimizing Windows® XP Click OK to save disk space. • If an error message appears during the disk drive compression, select Skip All. • The disk drive capacity varies depending on model. Compressing Disk Drive 1. Right-click Local Disk (C:) and select Properties. 3. Relocating Files My Documents 1. Click Start, right-click My Documents and select Properties. 2. Go to Control Panel > My Computer. 2.

User Manual
Page 92
Clearing System Backup Data 1. Go to clear the system backup data. 5-8 Chapter 5: Installing & Optimizing Windows® XP Press to All Programs > Accessories > Command Prompt. 2. Key in sfc.exe/purgecache. 3. Go to display the component wizard. 3. Click Add/Remove Windows Components on the left to Control Panel > Add or Remove Programs. 2. Uncheck the boxes for the Windows components you do not need. Deleting unnecessary Windows Components 1.
Clearing System Backup Data 1. Go to clear the system backup data. 5-8 Chapter 5: Installing & Optimizing Windows® XP Press to All Programs > Accessories > Command Prompt. 2. Key in sfc.exe/purgecache. 3. Go to display the component wizard. 3. Click Add/Remove Windows Components on the left to Control Panel > Add or Remove Programs. 2. Uncheck the boxes for the Windows components you do not need. Deleting unnecessary Windows Components 1.
User Manual
Page 94
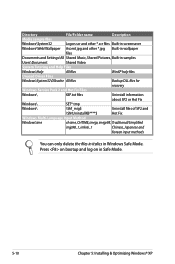
...\Dllcache All files Backup DLL files for recovery Windows Service Pack 2 and Hot Fix Files Windows\ KB*.txt files Uninstall information about SP2 or Hot Fix Windows\ SET*.tmp Windows\ \$hf_mig$ Uninstall files of SP2 and \$NtUninstallKB****$ Hot Fix Windows Multi-Language Input Method Windows\ime chsime, CHTIME, imejp, imejp98, Traditional/Simplified imjp98_1, imkr6_1 Chinese, Japanese...
...\Dllcache All files Backup DLL files for recovery Windows Service Pack 2 and Hot Fix Files Windows\ KB*.txt files Uninstall information about SP2 or Hot Fix Windows\ SET*.tmp Windows\ \$hf_mig$ Uninstall files of SP2 and \$NtUninstallKB****$ Hot Fix Windows Multi-Language Input Method Windows\ime chsime, CHTIME, imejp, imejp98, Traditional/Simplified imjp98_1, imkr6_1 Chinese, Japanese...

User Manual
Page 96
... the DVD. 6-2 Chapter 6: Support DVD & System Recovery Double-click the ASSETUP.EXE file to avail all the features. Click an icon to display support DVD/ Eee PC information Click an item to install If Autorun is enabled in your computer, browse the contents of the support DVD to locate the file ASSETUP... support DVD Insert the support DVD in the external optical drive.The DVD automatically displays the Drivers menu if Autorun is NOT enabled in the Windows® XP SP2 environment. All the following screens appear only in your computer.
... the DVD. 6-2 Chapter 6: Support DVD & System Recovery Double-click the ASSETUP.EXE file to avail all the features. Click an icon to display support DVD/ Eee PC information Click an item to install If Autorun is enabled in your computer, browse the contents of the support DVD to locate the file ASSETUP... support DVD Insert the support DVD in the external optical drive.The DVD automatically displays the Drivers menu if Autorun is NOT enabled in the Windows® XP SP2 environment. All the following screens appear only in your computer.

User Manual
Page 98
... a USB bootable disk with Linux system image for Utilities Installs all the utilities. InstAll - Installation Wizard for Eee PC system recovery. 6-4 Chapter 6: Support DVD & System Recovery ADOBE Acrobat Reader V7.0 Installs the Adobe® Acrobat® Reader that the Eee PC supports. ASUS Update The ASUS Update utility allows you to update the Eee PC BIOS in Portable Document...
... a USB bootable disk with Linux system image for Utilities Installs all the utilities. InstAll - Installation Wizard for Eee PC system recovery. 6-4 Chapter 6: Support DVD & System Recovery ADOBE Acrobat Reader V7.0 Installs the Adobe® Acrobat® Reader that the Eee PC supports. ASUS Update The ASUS Update utility allows you to update the Eee PC BIOS in Portable Document...
User Manual
Page 101
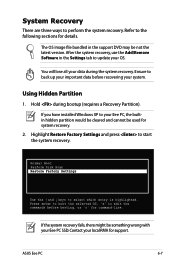
The OS image file bundled in the Settings tab to your Eee PC SSD. Ensure to edit the commands before recovering your data during bootup (requires a Recovery Partition). Hold during the system recovery. You will lose all your ... cleared and cannot be not the latest version. If you have installed WIndows XP to update your local RMA for support. Normal Boot Perform Disk Scan Restore Factory Settings Use the ↑ and ↓ keys to start the system recovery. ASUS Eee PC 6-7 Refer to perform the system recovery. System Recovery There are three...
The OS image file bundled in the Settings tab to your Eee PC SSD. Ensure to edit the commands before recovering your data during bootup (requires a Recovery Partition). Hold during the system recovery. You will lose all your ... cleared and cannot be not the latest version. If you have installed WIndows XP to update your local RMA for support. Normal Boot Perform Disk Scan Restore Factory Settings Use the ↑ and ↓ keys to start the system recovery. ASUS Eee PC 6-7 Refer to perform the system recovery. System Recovery There are three...


