
User Manual
Page 1
E6887 User Manual Windows® 7 Edition ASUS 1225/R252 Series
E6887 User Manual Windows® 7 Edition ASUS 1225/R252 Series

User Manual
Page 3
Experience ...3-8 Tools ...3-8 Instant On (on selected models 3-9 Smart Camera(on selected models 3-10 Media Sharing (on selected models 3-10 WiSharing (on selected models 3-10 Microsoft® Office Starter 2010 3-11 Chapter 4: System Recovery System Recovery (for models with Windows 7 OS only 4-2 Appendix Declarations and Safety Statements A-2 Copyright Information...A-13 Limitation of Liability...A-14 Service and Support...A-14 ASUS 1225/R252 Series iii
Experience ...3-8 Tools ...3-8 Instant On (on selected models 3-9 Smart Camera(on selected models 3-10 Media Sharing (on selected models 3-10 WiSharing (on selected models 3-10 Microsoft® Office Starter 2010 3-11 Chapter 4: System Recovery System Recovery (for models with Windows 7 OS only 4-2 Appendix Declarations and Safety Statements A-2 Copyright Information...A-13 Limitation of Liability...A-14 Service and Support...A-14 ASUS 1225/R252 Series iii
User Manual
Page 11
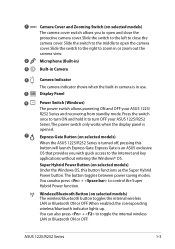
... wireless/bluetooth indicator lights up. Wireless/Bluetooth Button (on selected models) When the ASUS 1225/R252 Series is in use. 5 Display Panel 6 Power Switch (Windows) The power switch allows powering ON and OFF your ASUS 1225/R252 Series. Slide the switch to the left to zoom in or zoom out...(on selected models) Under the Windows OS, this button will launch Express Gate. The power switch only works when the display panel is an ASUS exclusive OS that provides you to open the camera cover. You can also press + to turn OFF your ASUS 1225/ R252 Series and recovering ...
... wireless/bluetooth indicator lights up. Wireless/Bluetooth Button (on selected models) When the ASUS 1225/R252 Series is in use. 5 Display Panel 6 Power Switch (Windows) The power switch allows powering ON and OFF your ASUS 1225/R252 Series. Slide the switch to the left to zoom in or zoom out...(on selected models) Under the Windows OS, this button will launch Express Gate. The power switch only works when the display panel is an ASUS exclusive OS that provides you to open the camera cover. You can also press + to turn OFF your ASUS 1225/ R252 Series and recovering ...

User Manual
Page 19
... Stops the media file playback. Play/Pause (↓): Begins or pauses the media file playback. Screensaver: Toggles the screensaver on an object. Windows icon: Displays the start menu. Menu with pointer icon: Activates the properties menu and is equivalent to use of a larger portion of the ...you to right-clicking the touchpad/mouse on /off . Forward (→): Skips to the previous song/movie chapter during the media file playback. ASUS 1225/R252 Series 1-11 Back (←): Goes back or return to the next song/movie chapter during media file playback. Allows use a larger...
... Stops the media file playback. Play/Pause (↓): Begins or pauses the media file playback. Screensaver: Toggles the screensaver on an object. Windows icon: Displays the start menu. Menu with pointer icon: Activates the properties menu and is equivalent to use of a larger portion of the ...you to right-clicking the touchpad/mouse on /off . Forward (→): Skips to the previous song/movie chapter during the media file playback. ASUS 1225/R252 Series 1-11 Back (←): Goes back or return to the next song/movie chapter during media file playback. Allows use a larger...

User Manual
Page 21
Use three fingers to move the pointer on the touchpad to scroll a window up /down- Three-finger right-click- Use two fingertips to slide up/down or left /right. Use three fingers to swipe pages. ASUS 1225/R252 Series 1-13 Swipe from left to the right to view the next page or ...right to the left /right- This action mimics the right-click function of a mouse. This action simulates the click on the touchpad to tap the touchpad. If your display window includes several ...
Use three fingers to move the pointer on the touchpad to scroll a window up /down- Three-finger right-click- Use two fingertips to slide up/down or left /right. Use three fingers to swipe pages. ASUS 1225/R252 Series 1-13 Swipe from left to the right to view the next page or ...right to the left /right- This action mimics the right-click function of a mouse. This action simulates the click on the touchpad to tap the touchpad. If your display window includes several ...

User Manual
Page 24
.../R252 Series 2-3 Follow the wizard instructions to finish the initialization: 1. First-time Startup For the first time you start your ASUS 1225/R252 Series, the Windows wizard will launch automatically and lead you through setting up your user account name 4. Set a password for your user and your computer's name, account if ...
.../R252 Series 2-3 Follow the wizard instructions to finish the initialization: 1. First-time Startup For the first time you start your ASUS 1225/R252 Series, the Windows wizard will launch automatically and lead you through setting up your user account name 4. Set a password for your user and your computer's name, account if ...

User Manual
Page 27
... build the connection. in the Notification area. You can see the wireless network icon in the If the wireless network icon with an orange star Windows® Notification area.
... build the connection. in the Notification area. You can see the wireless network icon in the If the wireless network icon with an orange star Windows® Notification area.
User Manual
Page 28
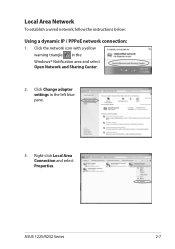
ASUS 1225/R252 Series 2-7 Local Area Network To establish a wired network, follow the instructions below: Using a dynamic IP / PPPoE network connection: 1. Click the network icon with a yellow warning triangle in the left blue pane. 3. Right-click Local Area Connection and select Properties. Click Change adapter settings in the Windows® Notification area and select Open Network and Sharing Center. 2.
ASUS 1225/R252 Series 2-7 Local Area Network To establish a wired network, follow the instructions below: Using a dynamic IP / PPPoE network connection: 1. Click the network icon with a yellow warning triangle in the left blue pane. 3. Right-click Local Area Connection and select Properties. Click Change adapter settings in the Windows® Notification area and select Open Network and Sharing Center. 2.
User Manual
Page 33
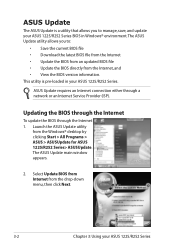
... requires an Internet connection either through the Internet 1. Select Update BIOS from Internet from the Windows® desktop by clicking Start > All Programs > ASUS > ASUSUpdate for ASUS 1225/R252 Series> ASUSUpdate. The ASUS Update main window appears. 2. The ASUS Update utility allows you to : • Save the current BIOS file • Download the latest BIOS file...
... requires an Internet connection either through the Internet 1. Select Update BIOS from Internet from the Windows® desktop by clicking Start > All Programs > ASUS > ASUSUpdate for ASUS 1225/R252 Series> ASUSUpdate. The ASUS Update main window appears. 2. The ASUS Update utility allows you to : • Save the current BIOS file • Download the latest BIOS file...

User Manual
Page 34
... utility is capable of updating itself through a BIOS file: 1. The ASUS Update main window appears. 2. Locate the BIOS file from the Windows® desktop by clicking Start > Programs > ASUS > ASUSUpdate for EeePC> ASUSUpdate. Launch the ASUS Update utility from the Open window, then click Open. 4. Select Update BIOS from file from the drop‑down menu...
... utility is capable of updating itself through a BIOS file: 1. The ASUS Update main window appears. 2. Locate the BIOS file from the Windows® desktop by clicking Start > Programs > ASUS > ASUSUpdate for EeePC> ASUSUpdate. Launch the ASUS Update utility from the Open window, then click Open. 4. Select Update BIOS from file from the drop‑down menu...
User Manual
Page 40
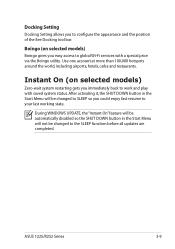
...changed to SLEEP so you easy access to the SLEEP function before all updates are completed. During WINDOWS UPDATE, the "Instant On" feature will be automatically disabled so the SHUT DOWN button in ...the Start Menu will not be changed to global Wi-Fi services with saved system status. ASUS 1225/R252 Series 3-9 Instant On (on selected models) Boingo gives you could enjoy fast resume ...to configure the appearance and the position of the Eee Docking tool bar. Boingo (on selected models) Zero-wait system restarting gets you to your last...
...changed to SLEEP so you easy access to the SLEEP function before all updates are completed. During WINDOWS UPDATE, the "Instant On" feature will be automatically disabled so the SHUT DOWN button in ...the Start Menu will not be changed to global Wi-Fi services with saved system status. ASUS 1225/R252 Series 3-9 Instant On (on selected models) Boingo gives you could enjoy fast resume ...to configure the appearance and the position of the Eee Docking tool bar. Boingo (on selected models) Zero-wait system restarting gets you to your last...
User Manual
Page 42
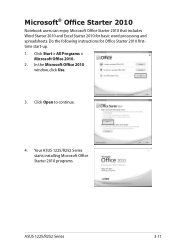
In the Microsoft Office 2010 window, click Use. 3. Do the following instructions for basic word processing and spreadsheets. Click Open to continue. 4. Microsoft® Office Starter 2010 Notebook users can enjoy Microsoft Office Starter 2010 that includes Word Starter 2010 and Excel Starter 2010 for Office Starter 2010 firsttime start-up. 1. Your ASUS 1225/R252 Series starts installing Microsoft Office Starter 2010 programs. ASUS 1225/R252 Series 3-11 Click Start > All Programs > Microsoft Office 2010. 2.
In the Microsoft Office 2010 window, click Use. 3. Do the following instructions for basic word processing and spreadsheets. Click Open to continue. 4. Microsoft® Office Starter 2010 Notebook users can enjoy Microsoft Office Starter 2010 that includes Word Starter 2010 and Excel Starter 2010 for Office Starter 2010 firsttime start-up. 1. Your ASUS 1225/R252 Series starts installing Microsoft Office Starter 2010 programs. ASUS 1225/R252 Series 3-11 Click Start > All Programs > Microsoft Office 2010. 2.

User Manual
Page 45
Select the language you use and click to start the system recovery. 4. Click Recovery in the Recovery System dialog box to continue. 3. The system starts system recovery automatically and follow the onscreen instructions to avoid recovery failure. System Recovery (for models with Windows 7 OS only) Ensure to connect your ASUS 1225/R252 Series to the AC power adapter before using F9 recovery to complete the recovery process. 4-2 Chapter 4: System Recovery Ensure to press only once during bootup. Using recovery partition (F9 Recovery) 1. Press during bootup. 2.
Select the language you use and click to start the system recovery. 4. Click Recovery in the Recovery System dialog box to continue. 3. The system starts system recovery automatically and follow the onscreen instructions to avoid recovery failure. System Recovery (for models with Windows 7 OS only) Ensure to connect your ASUS 1225/R252 Series to the AC power adapter before using F9 recovery to complete the recovery process. 4-2 Chapter 4: System Recovery Ensure to press only once during bootup. Using recovery partition (F9 Recovery) 1. Press during bootup. 2.


