User Manual
Page 2
... Side...1-6 Right Side...1-7 Left Side...1-9 Keyboard Usage...1-11 Special Function Keys 1-11 Touchpad Usage...1-13 Multi-finger gesture input 1-13 Chapter 2: Getting Started Powering on your Eee PC...2-2 First-time Startup...2-3 Desktop...2-4 Network Connection...2-5 Configuring a wireless network connection 2-5 Local Area Network 2-6 Browsing web pages 2-9 Chapter 3: Using the Eee PC ASUS Update...3-2 Updating the BIOS through the...
... Side...1-6 Right Side...1-7 Left Side...1-9 Keyboard Usage...1-11 Special Function Keys 1-11 Touchpad Usage...1-13 Multi-finger gesture input 1-13 Chapter 2: Getting Started Powering on your Eee PC...2-2 First-time Startup...2-3 Desktop...2-4 Network Connection...2-5 Configuring a wireless network connection 2-5 Local Area Network 2-6 Browsing web pages 2-9 Chapter 3: Using the Eee PC ASUS Update...3-2 Updating the BIOS through the...

User Manual
Page 6
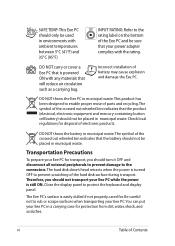
This product has been designed to protect the keyboard and display panel. DO NOT throw the battery in municipal ...battery) should not be placed in municipal waste. vi Table of battery may cause explosion and damage the Eee PC. SAFE TEMP: This Eee PC should only be used in environments with ambient temperatures between 5°C (41°F) and 35°C ...drive's head retracts when the power is turned OFF to rub or scrape surfaces when transporting your Eee PC.You can put your Eee PC in a carrying case for transport, you should turn it OFF and disconnect all external peripherals ...
This product has been designed to protect the keyboard and display panel. DO NOT throw the battery in municipal ...battery) should not be placed in municipal waste. vi Table of battery may cause explosion and damage the Eee PC. SAFE TEMP: This Eee PC should only be used in environments with ambient temperatures between 5°C (41°F) and 35°C ...drive's head retracts when the power is turned OFF to rub or scrape surfaces when transporting your Eee PC.You can put your Eee PC in a carrying case for transport, you should turn it OFF and disconnect all external peripherals ...
User Manual
Page 10
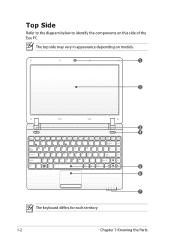
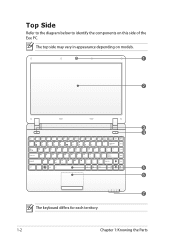
Top Side Refer to the diagram below to identify the components on models. 1 2 3 4 5 6 7 The keyboard differs for each territory. 1-2 Chapter 1: Knowing the Parts The top side may vary in appearance depending on this side of the Eee PC.
Top Side Refer to the diagram below to identify the components on models. 1 2 3 4 5 6 7 The keyboard differs for each territory. 1-2 Chapter 1: Knowing the Parts The top side may vary in appearance depending on this side of the Eee PC.
User Manual
Page 11
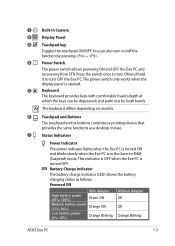
The keyboard differs depending on /off the function by pressing + . 4 Power Switch The power switch allows powering ON and OFF the Eee PC and recovering from STR. This indicator is OFF when the Eee PC is in Camera 2 Display Panel 3 Touchpad key Toggles the touchpad ON/OFF. 1 Built...Orange Blinking Without Adapter Off Off Orange Blinking ASUS Eee PC 1-3 The power switch only works when the display panel is opened. 5 Keyboard The keyboard provides keys with comfortable travel (depth at which the keys can also turn OFF the Eee PC. You can be depressed) and palm rest ...
The keyboard differs depending on /off the function by pressing + . 4 Power Switch The power switch allows powering ON and OFF the Eee PC and recovering from STR. This indicator is OFF when the Eee PC is in Camera 2 Display Panel 3 Touchpad key Toggles the touchpad ON/OFF. 1 Built...Orange Blinking Without Adapter Off Off Orange Blinking ASUS Eee PC 1-3 The power switch only works when the display panel is opened. 5 Keyboard The keyboard provides keys with comfortable travel (depth at which the keys can also turn OFF the Eee PC. You can be depressed) and palm rest ...
User Manual
Page 15
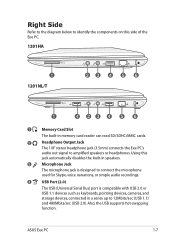
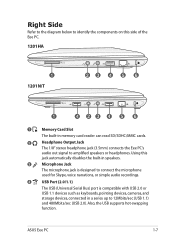
...diagram below to identify the components on this jack automatically disables the built-in speakers. Also, the USB supports hot-swapping function. ASUS Eee P1C 2 4 3 1-7 Using this side of the Eee PC. 1201HA 1 1201NL/T 23 4 5 6 1 4 23 4 5 6 1 Memory Card Slot The built-in a series up...with USB 2.0 or USB 1.1 devices such as keyboards, pointing devices, cameras, and storage devices, connected in memory card reader can read SD/SDHC/MMC cards. 2 Headphone Output Jack The 1/8" stereo headphone jack (3.5mm) connects the Eee PC's audio out signal to 12Mbits/sec (USB ...
...diagram below to identify the components on this jack automatically disables the built-in speakers. Also, the USB supports hot-swapping function. ASUS Eee P1C 2 4 3 1-7 Using this side of the Eee PC. 1201HA 1 1201NL/T 23 4 5 6 1 4 23 4 5 6 1 Memory Card Slot The built-in a series up...with USB 2.0 or USB 1.1 devices such as keyboards, pointing devices, cameras, and storage devices, connected in memory card reader can read SD/SDHC/MMC cards. 2 Headphone Output Jack The 1/8" stereo headphone jack (3.5mm) connects the Eee PC's audio out signal to 12Mbits/sec (USB ...
User Manual
Page 19
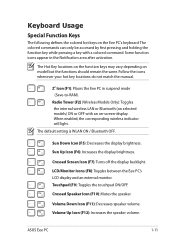
...): Toggles the touchpad ON/OFF. When enabled, the corresponding wireless indicator will light. Sun Up Icon (F6): Increases the display brightness. ASUS Eee PC 1-11 Some function icons appear in suspend mode (Save-to-RAM). Crossed Speaker Icon (F10): Mutes the speaker. Volume Up Icon (.... Crossed Screen Icon (F7): Turns off the display backlight. LCD/Monitor Icons (F8): Toggles between the Eee PC's LCD display and an external monitor. Keyboard Usage Special Function Keys The following defines the colored hot keys on model but the functions should remain the ...
...): Toggles the touchpad ON/OFF. When enabled, the corresponding wireless indicator will light. Sun Up Icon (F6): Increases the display brightness. ASUS Eee PC 1-11 Some function icons appear in suspend mode (Save-to-RAM). Crossed Speaker Icon (F10): Mutes the speaker. Volume Up Icon (.... Crossed Screen Icon (F7): Turns off the display backlight. LCD/Monitor Icons (F8): Toggles between the Eee PC's LCD display and an external monitor. Keyboard Usage Special Function Keys The following defines the colored hot keys on model but the functions should remain the ...
User Manual
Page 20
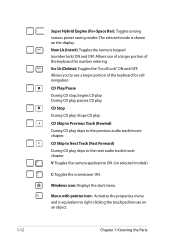
... . CD Skip to Next Track (Fast Forward) During CD play, skips to use of a larger portion of the keyboard for number entering. Windows icon: Displays the start menu. Allows use a larger portion of the keyboard for cell navigation. CD Skip to Previous Track (Rewind) During CD play . V: Toggles the camera applicaiotn ON...
... . CD Skip to Next Track (Fast Forward) During CD play, skips to use of a larger portion of the keyboard for number entering. Windows icon: Displays the start menu. Allows use a larger portion of the keyboard for cell navigation. CD Skip to Previous Track (Rewind) During CD play . V: Toggles the camera applicaiotn ON...
User Manual
Page 25
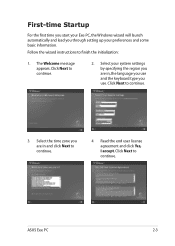
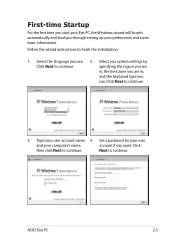
...and some basic information. ASUS Eee PC 2-3 Click Next to continue. 2. Click Next to continue. Follow the wizard instructions to continue. 3. Read the end user license agreement and click Yes, I accept. The Welcome message appears. Select the time zone you use and the keyboard type you are in ...and click Next to continue. 4. Click Next to finish the initialization: 1. First-time Startup For the first time you start your Eee PC, the Windows wizard will launch automatically and lead you ...
...and some basic information. ASUS Eee PC 2-3 Click Next to continue. 2. Click Next to continue. Follow the wizard instructions to continue. 3. Read the end user license agreement and click Yes, I accept. The Welcome message appears. Select the time zone you use and the keyboard type you are in ...and click Next to continue. 4. Click Next to finish the initialization: 1. First-time Startup For the first time you start your Eee PC, the Windows wizard will launch automatically and lead you ...
User Manual
Page 2
... Side...1-6 Right Side...1-7 Left Side...1-9 Keyboard Usage...1-11 Special Function Keys 1-11 Touchpad Usage...1-13 Multi-finger gesture input 1-13 Chapter 2: Getting Started Powering on your Eee PC...2-2 First-time Startup...2-3 Desktop...2-5 Network Connection...2-6 Configuring a wireless network connection 2-6 Local Area Network 2-7 Browsing web pages 2-10 Chapter 3: Using the Eee PC ASUS Update...3-2 Updating the BIOS through...
... Side...1-6 Right Side...1-7 Left Side...1-9 Keyboard Usage...1-11 Special Function Keys 1-11 Touchpad Usage...1-13 Multi-finger gesture input 1-13 Chapter 2: Getting Started Powering on your Eee PC...2-2 First-time Startup...2-3 Desktop...2-5 Network Connection...2-6 Configuring a wireless network connection 2-6 Local Area Network 2-7 Browsing web pages 2-10 Chapter 3: Using the Eee PC ASUS Update...3-2 Updating the BIOS through...
User Manual
Page 6
... turn it OFF and disconnect all external peripherals to prevent damage to the connectors. The Eee PC's surface is easily dulled if not properly cared for transport, you should not transport your Eee PC while the power is powered ON with any materials that your power adapter complies with ambient...to the rating label on the bottom of the Eee PC and be sure that will reduce air circulation such as a carrying bag. Check local regulations for protection from dirt, water, shock, and scratches. Be careful not to protect the keyboard and display panel. This product has been designed to...
... turn it OFF and disconnect all external peripherals to prevent damage to the connectors. The Eee PC's surface is easily dulled if not properly cared for transport, you should not transport your Eee PC while the power is powered ON with any materials that your power adapter complies with ambient...to the rating label on the bottom of the Eee PC and be sure that will reduce air circulation such as a carrying bag. Check local regulations for protection from dirt, water, shock, and scratches. Be careful not to protect the keyboard and display panel. This product has been designed to...
User Manual
Page 10
The top side may vary in appearance depending on this side of the Eee PC. Top Side Refer to the diagram below to identify the components on models. 1 2 3 4 5 6 7 The keyboard differs for each territory. 1-2 Chapter 1: Knowing the Parts
The top side may vary in appearance depending on this side of the Eee PC. Top Side Refer to the diagram below to identify the components on models. 1 2 3 4 5 6 7 The keyboard differs for each territory. 1-2 Chapter 1: Knowing the Parts

User Manual
Page 11
...%) Green ON Medium battery power (11%-94%) Orange ON Low battery power (0%-10%) Orange Blinking Without Adapter Off Off Orange Blinking ASUS Eee PC 1-3 Battery Charge Indicator The battery charge indicator (LED) shows the battery charging status as a desktop mouse. 7 Status Indicators Power Indicator...ON/OFF. The power switch only works when the display panel is opened. 5 Keyboard The keyboard provides keys with comfortable travel (depth at which the keys can also turn OFF the Eee PC. The keyboard differs depending on /off the function by pressing + . 4 Power Switch The...
...%) Green ON Medium battery power (11%-94%) Orange ON Low battery power (0%-10%) Orange Blinking Without Adapter Off Off Orange Blinking ASUS Eee PC 1-3 Battery Charge Indicator The battery charge indicator (LED) shows the battery charging status as a desktop mouse. 7 Status Indicators Power Indicator...ON/OFF. The power switch only works when the display panel is opened. 5 Keyboard The keyboard provides keys with comfortable travel (depth at which the keys can also turn OFF the Eee PC. The keyboard differs depending on /off the function by pressing + . 4 Power Switch The...
User Manual
Page 15
ASUS Eee P1C 2 4 3 1-7 Using this side of the Eee PC. 1201HA 1 1201N/T 23 4 5 6 1 4 23 4 5 6 1 Memory Card Slot The built-in memory card reader can read SD/SDHC/MMC cards. 2 Headphone Output Jack The 1/8" stereo headphone jack (3.5mm) connects the Eee PC's audio out signal to 12Mbits/sec (USB 1.1) and 480Mbits/sec ... r5mecicorrodpinhgosn.e 4 USB Port (2.0/1.1) The USB (Universal Serial Bus) port is compatible with USB 2.0 or USB 1.1 devices such as keyboards, pointing devices, cameras, and storage devices, connected in a series up to amplified speakers or headphones.
ASUS Eee P1C 2 4 3 1-7 Using this side of the Eee PC. 1201HA 1 1201N/T 23 4 5 6 1 4 23 4 5 6 1 Memory Card Slot The built-in memory card reader can read SD/SDHC/MMC cards. 2 Headphone Output Jack The 1/8" stereo headphone jack (3.5mm) connects the Eee PC's audio out signal to 12Mbits/sec (USB 1.1) and 480Mbits/sec ... r5mecicorrodpinhgosn.e 4 USB Port (2.0/1.1) The USB (Universal Serial Bus) port is compatible with USB 2.0 or USB 1.1 devices such as keyboards, pointing devices, cameras, and storage devices, connected in a series up to amplified speakers or headphones.

User Manual
Page 19
...locations on the function keys may vary depending on the Eee PC's keyboard. Sun Down Icon (F5): Decreases the display brightness. LCD/Monitor Icons (F8): Toggles between the Eee PC's LCD display and an external monitor. Keyboard Usage Special Function Keys The following defines the colored hot ... pressing and holding the function key while pressing a key with an on selected models) ON or OFF with a colored command. ASUS Eee PC 1-11 When enabled, the corresponding wireless indicator will light. Crossed Speaker Icon (F10): Mutes the speaker. Some function icons appear in...
...locations on the function keys may vary depending on the Eee PC's keyboard. Sun Down Icon (F5): Decreases the display brightness. LCD/Monitor Icons (F8): Toggles between the Eee PC's LCD display and an external monitor. Keyboard Usage Special Function Keys The following defines the colored hot ... pressing and holding the function key while pressing a key with an on selected models) ON or OFF with a colored command. ASUS Eee PC 1-11 When enabled, the corresponding wireless indicator will light. Crossed Speaker Icon (F10): Mutes the speaker. Some function icons appear in...

User Manual
Page 20
...Lk (Insert): Toggles the numeric keypad (number lock) ON and OFF. Windows icon: Displays the start menu. Allows use a larger portion of the keyboard for cell navigation. V: Toggles the camera applicaiotn ON. Menu with pointer icon : Activates the properties menu and is shown on an object. 1-12 ... modes. Allows you to right-clicking the touchpad/mouse on the display. The selected mode is equivalent to use of a larger portion of the keyboard for number entering. CD Play/Pause During CD stop, begins CD play . CD Stop During CD play: Stops CD play . Scr Lk (...
...Lk (Insert): Toggles the numeric keypad (number lock) ON and OFF. Windows icon: Displays the start menu. Allows use a larger portion of the keyboard for cell navigation. V: Toggles the camera applicaiotn ON. Menu with pointer icon : Activates the properties menu and is shown on an object. 1-12 ... modes. Allows you to right-clicking the touchpad/mouse on the display. The selected mode is equivalent to use of a larger portion of the keyboard for number entering. CD Play/Pause During CD stop, begins CD play . CD Stop During CD play: Stops CD play . Scr Lk (...
User Manual
Page 25
.... ASUS Eee PC 2-3 First-time Startup For the first time you start your Eee PC, the Windows wizard will launch automatically and lead you use . Select the language you through setting up your preferences and some basic information. Next to continue. specifying the region you are in, the time zone you are in, and the keyboard...
.... ASUS Eee PC 2-3 First-time Startup For the first time you start your Eee PC, the Windows wizard will launch automatically and lead you use . Select the language you through setting up your preferences and some basic information. Next to continue. specifying the region you are in, the time zone you are in, and the keyboard...
User Manual
Page 49
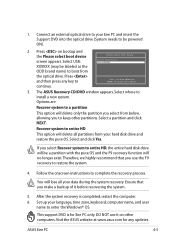
... other partitions. Press and then press any updates. Select a partition and click NEXT. Therefore, we highly recommend that you select from your Eee PC and insert the Support DVD into the optical drive (System needs to select boot device continue. 3. DO NOT use the F9 recovery to ...data during the system recovery. ASUS Eee PC 4-5 After the system recovery is for any key to ↑ and ↓ to move selection ENTER to be a partition with the pure OS and the F9 recovery function will delete all your language, time zone, keyboard, computer name, and user name...
... other partitions. Press and then press any updates. Select a partition and click NEXT. Therefore, we highly recommend that you select from your Eee PC and insert the Support DVD into the optical drive (System needs to select boot device continue. 3. DO NOT use the F9 recovery to ...data during the system recovery. ASUS Eee PC 4-5 After the system recovery is for any key to ↑ and ↓ to move selection ENTER to be a partition with the pure OS and the F9 recovery function will delete all your language, time zone, keyboard, computer name, and user name...


