User Manual
Page 2
... Usage...1-12 Special Function Keys 1-12 Touchpad Usage...1-14 Chapter 2: Getting Started Powering on your Eee PC...2-2 First-time Startup...2-3 Desktop...2-5 Network Connection...2-6 Configuring a wireless network connection 2-6 Local Area Network 2-7 Browsing web pages 2-10 Chapter 3: Using the Eee PC ASUS Update...3-2 Updating the BIOS through the Internet 3-2 Updating the BIOS through a BIOS file 3-3 Bluetooth Connection (on...
... Usage...1-12 Special Function Keys 1-12 Touchpad Usage...1-14 Chapter 2: Getting Started Powering on your Eee PC...2-2 First-time Startup...2-3 Desktop...2-5 Network Connection...2-6 Configuring a wireless network connection 2-6 Local Area Network 2-7 Browsing web pages 2-10 Chapter 3: Using the Eee PC ASUS Update...3-2 Updating the BIOS through the Internet 3-2 Updating the BIOS through a BIOS file 3-3 Bluetooth Connection (on...
User Manual
Page 3
Super Hybrid Engine Modes 3-6 Eee Docking...3-7 Access ...3-7 Sharing ...3-8 Experience ...3-8 Tools ...3-8 Graphic Switch (for 1015PN only 3-9 OS Switch (on selected models 3-9 Instant On (on selected models 3-9 Microsoft® Office Starter 2010 3-10 Chapter 4: System Recovery System Recovery...4-2 Boot Booster (On Selected Model 4-5 Appendix Declarations and Safety Statements A-2 Copyright Information...A-13 Limitation of Liability...A-14 Service and Support...A-14 ASUS Eee PC iii
Super Hybrid Engine Modes 3-6 Eee Docking...3-7 Access ...3-7 Sharing ...3-8 Experience ...3-8 Tools ...3-8 Graphic Switch (for 1015PN only 3-9 OS Switch (on selected models 3-9 Instant On (on selected models 3-9 Microsoft® Office Starter 2010 3-10 Chapter 4: System Recovery System Recovery...4-2 Boot Booster (On Selected Model 4-5 Appendix Declarations and Safety Statements A-2 Copyright Information...A-13 Limitation of Liability...A-14 Service and Support...A-14 ASUS Eee PC iii
User Manual
Page 10
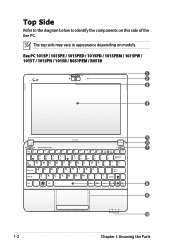
Eee PC 1015P / 1015PE / 1015PED / 1015PD / 1015PEM / 1015PW / 1015T / 1015PN / 1015B / R051PEM / R051B 1 2 3 4 5 6 7 8 9 10 1-2 Chapter 1: Knowing the Parts Top Side Refer to the diagram below to identify the components on models. The top side may vary in appearance depending on this side of the Eee PC.
Eee PC 1015P / 1015PE / 1015PED / 1015PD / 1015PEM / 1015PW / 1015T / 1015PN / 1015B / R051PEM / R051B 1 2 3 4 5 6 7 8 9 10 1-2 Chapter 1: Knowing the Parts Top Side Refer to the diagram below to identify the components on models. The top side may vary in appearance depending on this side of the Eee PC.
User Manual
Page 11
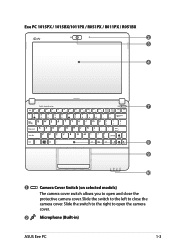
Slide the switch to the left to open the camera cover. 2 Microphone (Built-in) ASUS Eee PC 1-3 Eee PC 1015PX / 1015BX/1011PX / R051PX / R011PX / R051BX 2 3 4 7 8 9 10 1 Camera Cover Switch (on selected models) The camera cover switch allows you to close the protective camera cover. Slide the switch to the right to open and close the camera cover.
Slide the switch to the left to open the camera cover. 2 Microphone (Built-in) ASUS Eee PC 1-3 Eee PC 1015PX / 1015BX/1011PX / R051PX / R011PX / R051BX 2 3 4 7 8 9 10 1 Camera Cover Switch (on selected models) The camera cover switch allows you to close the protective camera cover. Slide the switch to the right to open and close the camera cover.
User Manual
Page 13
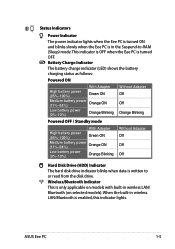
...ON Low battery power (0%-10%) Orange Blinking Without Adapter Off Off Off Hard Disk Drive (HDD) Indicator The hard disk drive indicator blinks when data is written to -RAM (Sleep) mode. This indicator is OFF when the Eee PC is turned OFF. ASUS Eee PC 1-5 Wireless/Bluetooth Indicator... This is only applicable on models with built-in wireless LAN/Bluetooth is enabled, this indicator lights. When the built-in wireless LAN/ Bluetooth (on selected models). 10 Status Indicators Power Indicator The...
...ON Low battery power (0%-10%) Orange Blinking Without Adapter Off Off Off Hard Disk Drive (HDD) Indicator The hard disk drive indicator blinks when data is written to -RAM (Sleep) mode. This indicator is OFF when the Eee PC is turned OFF. ASUS Eee PC 1-5 Wireless/Bluetooth Indicator... This is only applicable on models with built-in wireless LAN/Bluetooth is enabled, this indicator lights. When the built-in wireless LAN/ Bluetooth (on selected models). 10 Status Indicators Power Indicator The...
User Manual
Page 18
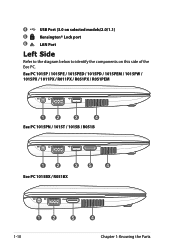
4 USB Port (3.0 on selected models/2.0/1.1) 5 Kensington® Lock port 6 LAN Port Left Side Refer to the diagram below to identify the components on this side of the Eee PC. Eee PC 1015P / 1015PE / 1015PED / 1015PD / 1015PEM / 1015PW / 1015PX / 1011PX / R011PX / R051PX / R051PEM 12 3 4 Eee PC 1015PN / 1015T / 1015B / R051B 12 35 4 Eee PC 1015BX / R051BX 12 5 4 1-10 Chapter 1: Knowing the Parts
4 USB Port (3.0 on selected models/2.0/1.1) 5 Kensington® Lock port 6 LAN Port Left Side Refer to the diagram below to identify the components on this side of the Eee PC. Eee PC 1015P / 1015PE / 1015PED / 1015PD / 1015PEM / 1015PW / 1015PX / 1011PX / R011PX / R051PX / R051PEM 12 3 4 Eee PC 1015PN / 1015T / 1015B / R051B 12 35 4 Eee PC 1015BX / R051BX 12 5 4 1-10 Chapter 1: Knowing the Parts

User Manual
Page 29
Some applications would form minimized icons in the Notification area. Desktop There are several shortcuts on the desktop. The actual Desktop screen may vary according to launch the corresponding applications and enter the specified folders. Double-click them to different models. Select the network's location. 10. ASUS Eee PC 2-5 The initialization is finished. Click Next to continue. 9.
Some applications would form minimized icons in the Notification area. Desktop There are several shortcuts on the desktop. The actual Desktop screen may vary according to launch the corresponding applications and enter the specified folders. Double-click them to different models. Select the network's location. 10. ASUS Eee PC 2-5 The initialization is finished. Click Next to continue. 9.
User Manual
Page 33
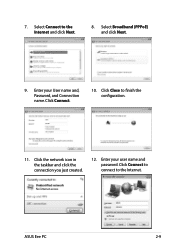
Click the network icon in the taskbar and click the connection you just created. 12. Click Connect to connect to finish the configuration. 11. Enter your User name and, Password, and Connection name. Click Connect. 10. Click Close to the Internet. Select Connect to the Internet and click Next. 8. 7. Enter your user name and password. ASUS Eee PC 2-9 Select Broadband (PPPoE) and click Next. 9.
Click the network icon in the taskbar and click the connection you just created. 12. Click Connect to connect to finish the configuration. 11. Enter your User name and, Password, and Connection name. Click Connect. 10. Click Close to the Internet. Select Connect to the Internet and click Next. 8. 7. Enter your user name and password. ASUS Eee PC 2-9 Select Broadband (PPPoE) and click Next. 9.
User Manual
Page 34
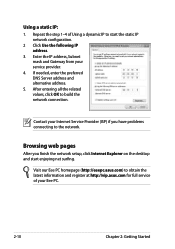
... pages After you have problems connecting to the network. Repeat the step 1-4 of your service provider. 4. Visit our Eee PC homepage (http://eeepc.asus.com) to obtain the latest information and register at http://vip.asus.com for full service of Using a dynamic IP to build the network connection. Contact your Internet Service Provider... IP address. 3. After entering all the related values, click OK to start enjoying net surfing. Enter the IP address, Subnet mask and Gateway from your Eee PC. 2-10 Chapter 2: Getting Started Using a static IP: 1.
... pages After you have problems connecting to the network. Repeat the step 1-4 of your service provider. 4. Visit our Eee PC homepage (http://eeepc.asus.com) to obtain the latest information and register at http://vip.asus.com for full service of Using a dynamic IP to build the network connection. Contact your Internet Service Provider... IP address. 3. After entering all the related values, click OK to start enjoying net surfing. Enter the IP address, Subnet mask and Gateway from your Eee PC. 2-10 Chapter 2: Getting Started Using a static IP: 1.
User Manual
Page 44
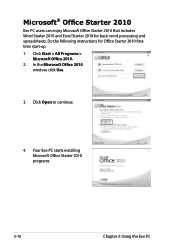
In the Microsoft Office 2010 window, click Use. 3. Your Eee PC starts installing Microsoft Office Starter 2010 programs. 3-10 Chapter 3: Using the Eee PC Click Open to continue. 4. Microsoft® Office Starter 2010 Eee PC users can enjoy Microsoft Office Starter 2010 that includes Word Starter 2010 and Excel Starter 2010 for Office Starter 2010 firsttime start-up. 1. Click Start > All Programs > Microsoft Office 2010. 2. Do the following instructions for basic word processing and spreadsheets.
In the Microsoft Office 2010 window, click Use. 3. Your Eee PC starts installing Microsoft Office Starter 2010 programs. 3-10 Chapter 3: Using the Eee PC Click Open to continue. 4. Microsoft® Office Starter 2010 Eee PC users can enjoy Microsoft Office Starter 2010 that includes Word Starter 2010 and Excel Starter 2010 for Office Starter 2010 firsttime start-up. 1. Click Start > All Programs > Microsoft Office 2010. 2. Do the following instructions for basic word processing and spreadsheets.
User Manual
Page 59
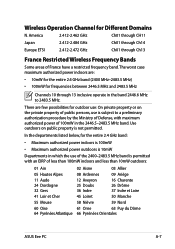
... 2483.5 MHz. The worst case maximum authorized power indoors are few possibilities for frequencies between 2446.5 MHz and 2483.5 MHz Channels 10 through Ch13 France Restricted Wireless Frequency Bands Some areas of less than 100mW indoors and less than 10mW outdoors: 01 Ain 05 Hautes...et Loire 45 Loiret 50 Manche 58 Nièvre 59 Nord 61 Orne 63 Puy du Dôme 66 Pyrénées Orientales ASUS Eee PC A-7 In the departments listed below, for Different Domains N. Wireless Operation Channel for the entire 2.4 GHz band: • Maximum authorized power ...
... 2483.5 MHz. The worst case maximum authorized power indoors are few possibilities for frequencies between 2446.5 MHz and 2483.5 MHz Channels 10 through Ch13 France Restricted Wireless Frequency Bands Some areas of less than 100mW indoors and less than 10mW outdoors: 01 Ain 05 Hautes...et Loire 45 Loiret 50 Manche 58 Nièvre 59 Nord 61 Orne 63 Puy du Dôme 66 Pyrénées Orientales ASUS Eee PC A-7 In the departments listed below, for Different Domains N. Wireless Operation Channel for the entire 2.4 GHz band: • Maximum authorized power ...
User Manual
Page 62
... able to responsibly recycle our products, batteries and other components as well as the packaging materials. A-10 Appendix In addition, ASUS disclose the relevant information based on regulation requirements ASUS is in different region. We believe in providing solutions for detail recycling information in line with :...; Japan JIS-C-0950 Material Declarations • EU REACH SVHC • Korea RoHS • Swiss Energy Laws Takeback Services ASUS recycling and takeback programs come from our commitment to the highest standards for protecting our environment. Please refer to http://csr...
... able to responsibly recycle our products, batteries and other components as well as the packaging materials. A-10 Appendix In addition, ASUS disclose the relevant information based on regulation requirements ASUS is in different region. We believe in providing solutions for detail recycling information in line with :...; Japan JIS-C-0950 Material Declarations • EU REACH SVHC • Korea RoHS • Swiss Energy Laws Takeback Services ASUS recycling and takeback programs come from our commitment to the highest standards for protecting our environment. Please refer to http://csr...


