
User Manual
Page 26
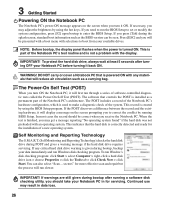
... an operating system. Self Monitoring and Reporting Technology The S.M.A.R.T. (Self Monitoring and Reporting Technology) checks the hard disk drive during the splash screen, standard boot information such as the BIOS version can also select "Scan ... You can be seen. The POST includes a record of the...If you may result in for servicing. 3 Getting Started Powering ON the Notebook PC The Notebook PC's power-ON message appears on the screen prompting you to correct the conflict by running a software disk checking utility, you receive the Notebook PC. Press [ESC] and you will ...
... an operating system. Self Monitoring and Reporting Technology The S.M.A.R.T. (Self Monitoring and Reporting Technology) checks the hard disk drive during the splash screen, standard boot information such as the BIOS version can also select "Scan ... You can be seen. The POST includes a record of the...If you may result in for servicing. 3 Getting Started Powering ON the Notebook PC The Notebook PC's power-ON message appears on the screen prompting you to correct the conflict by running a software disk checking utility, you receive the Notebook PC. Press [ESC] and you will ...
User Manual
Page 27
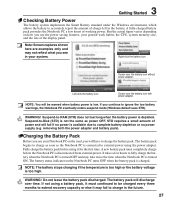
... when the battery power is low. Fully charge the battery pack before the Notebook PC is charged. Do not leave the battery pack discharged. Note: Screen captures shown here are examples only and may not reflect what you see in your Notebook PC on the road, you use the power saving...
... when the battery power is low. Fully charge the battery pack before the Notebook PC is charged. Do not leave the battery pack discharged. Note: Screen captures shown here are examples only and may not reflect what you see in your Notebook PC on the road, you use the power saving...
User Manual
Page 30
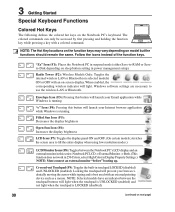
...as a mouse. 3 Getting Started Special Keyboard Functions Colored Hot Keys The following defines the colored hot keys on next page) stretches the screen area to use the wireless LAN or Bluetooth. Follow the icons instead of the function keys. Radio Tower (F2): Wireless Models Only:... Toggles the internal wireless LAN or Bluetooth (on -screen-display. Envelope Icon (F3): Pressing this series: Notebook PC LCD -> External Monitor -> Both. (This function does not work in 256 Colors...
...as a mouse. 3 Getting Started Special Keyboard Functions Colored Hot Keys The following defines the colored hot keys on next page) stretches the screen area to use the wireless LAN or Bluetooth. Follow the icons instead of the function keys. Radio Tower (F2): Wireless Models Only:... Toggles the internal wireless LAN or Bluetooth (on -screen-display. Envelope Icon (F3): Pressing this series: Notebook PC LCD -> External Monitor -> Both. (This function does not work in 256 Colors...
User Manual
Page 31
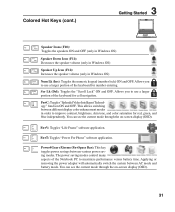
... OS) Num Lk (Ins): Toggles the numeric keypad (number lock) ON and OFF. You can see the current mode through the on -screen display (OSD). 31 Scr Lk (Del): Toggles the "Scroll Lock" ON and OFF. This allows switching between various power saving modes. Allows...versus battery time. The power saving modes control many aspects of the keyboard for cell navigation. You can see the current mode through the on -screen display (OSD). Fn+T: Toggles "Power For Phone" software application. Colored Hot Keys (cont.) 3 Getting Started PREW NEXT STOP PLAY / PAUSE Speaker...
... OS) Num Lk (Ins): Toggles the numeric keypad (number lock) ON and OFF. You can see the current mode through the on -screen display (OSD). 31 Scr Lk (Del): Toggles the "Scroll Lock" ON and OFF. This allows switching between various power saving modes. Allows...versus battery time. The power saving modes control many aspects of the keyboard for cell navigation. You can see the current mode through the on -screen display (OSD). Fn+T: Toggles "Power For Phone" software application. Colored Hot Keys (cont.) 3 Getting Started PREW NEXT STOP PLAY / PAUSE Speaker...

User Manual
Page 38
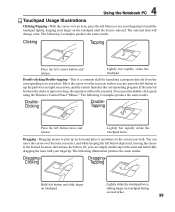
... the included touchpad utility to move the cursor around or select items displayed on the right side to scroll a window up or down on the screen with all that is required to the touchpad's surface. Because the touchpad is pressure sensitive and contains no moving parts;
... the included touchpad utility to move the cursor around or select items displayed on the right side to scroll a window up or down on the screen with all that is required to the touchpad's surface. Because the touchpad is pressure sensitive and contains no moving parts;
User Manual
Page 39
.... This is too long, the operation will change color. The following illustrations produce the same results. Lightly strike the touchpad twice, sliding finger on the screen you select. Move the cursor over the item you wish to the desired location, then release the button. You can move the cursor over the...
.... This is too long, the operation will change color. The following illustrations produce the same results. Lightly strike the touchpad twice, sliding finger on the screen you select. Move the cursor over the item you wish to the desired location, then release the button. You can move the cursor over the...
User Manual
Page 53
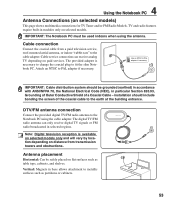
... digital TV signals or FM radio broadcasted in base allows attachment to PAL adapter if necessary� IMPORTANT: Cable distribution system should include bonding the screen of a Coaxial Cable - Vertical: Magnets in selected regions. The digital TV/FM radio antenna can receive analog TV depending on flat surfaces such as partitions...
... digital TV signals or FM radio broadcasted in base allows attachment to PAL adapter if necessary� IMPORTANT: Cable distribution system should include bonding the screen of a Coaxial Cable - Vertical: Magnets in selected regions. The digital TV/FM radio antenna can receive analog TV depending on flat surfaces such as partitions...
User Manual
Page 54
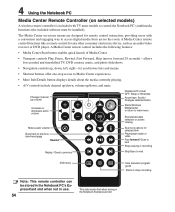
4 Using the Notebook PC Media Center Remote Controller (on -screen menus are designed for remote control interaction, providing users with TV tuner models to Media Center experiences. • More Info/Details button displays details about ...
4 Using the Notebook PC Media Center Remote Controller (on -screen menus are designed for remote control interaction, providing users with TV tuner models to Media Center experiences. • More Info/Details button displays details about ...

User Manual
Page 60
.... 3b. The bottom sensor should glow red. • Push the "RESET" button on the bottom of the Bluetooth mouse. Or Launch Bluetooth Devices from this screen. 4. OFF ON ESET R 3c. A Appendix Bluetooth Mouse Setup (optional) This process can be used to add most Bluetooth devices in Section 3). 2. If launched from the...
.... 3b. The bottom sensor should glow red. • Push the "RESET" button on the bottom of the Bluetooth mouse. Or Launch Bluetooth Devices from this screen. 4. OFF ON ESET R 3c. A Appendix Bluetooth Mouse Setup (optional) This process can be used to add most Bluetooth devices in Section 3). 2. If launched from the...
User Manual
Page 63
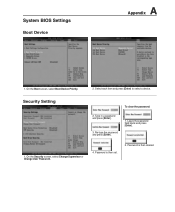
To clear the password: 2. Re-type the password and press [Enter]. 1. Password is then cleared. On the Security screen, select Change Supervisor or Change User Password. Leave the password field blank and press [Enter]. 4. Type in a password and press [Enter]. 3. Select each item and press [Enter] to select a device. Password is then set. 2. System BIOS Settings Boot Device A Appendix 1. On the Boot screen, select Boot Device Priority. 2. Security Setting 1.
To clear the password: 2. Re-type the password and press [Enter]. 1. Password is then cleared. On the Security screen, select Change Supervisor or Change User Password. Leave the password field blank and press [Enter]. 4. Type in a password and press [Enter]. 3. Select each item and press [Enter] to select a device. Password is then set. 2. System BIOS Settings Boot Device A Appendix 1. On the Boot screen, select Boot Device Priority. 2. Security Setting 1.
User Manual
Page 67
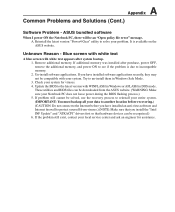
...still cannot be recognized.) 6. Update the BIOS to reinstall your entire system. (IMPORTANT: You must backup all your problem. Blue screen with white text A blue screen with your local service center and ask an engineer for viruses. 4. Try to incompatible memory. 2. If you install the "...be downloaded from viruses.) (NOTE: Make sure that you have installed an anti-virus software and Internet firewall to protect yourself from the ASUS website. (WARNING: Make sure your system for assistance. A Appendix Common Problems and Solutions (Cont.) Software Problem - Unknown Reason - ...
...still cannot be recognized.) 6. Update the BIOS to reinstall your entire system. (IMPORTANT: You must backup all your problem. Blue screen with white text A blue screen with your local service center and ask an engineer for viruses. 4. Try to incompatible memory. 2. If you install the "...be downloaded from viruses.) (NOTE: Make sure that you have installed an anti-virus software and Internet firewall to protect yourself from the ASUS website. (WARNING: Make sure your system for assistance. A Appendix Common Problems and Solutions (Cont.) Software Problem - Unknown Reason - ...
User Manual
Page 71
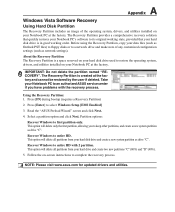
IMPORTANT: Do not delete the partition named "RECOVERY". Press [F9] during bootup (requires a Recovery Partition) 2. Read the "ASUS Preload Wizard" screen and click Next. 4. Partition options: Recover Windows to select Windows Setup [EMS Enabled] 3. The Recovery Partition is created at the... PST files) to floppy disks or to a network drive and make note of the operating system, drivers, and utilities installed on -screen instructions to restore the operating system, drivers, and utilities installed on your Notebook PC at the factory. This option will delete all partitions...
IMPORTANT: Do not delete the partition named "RECOVERY". Press [F9] during bootup (requires a Recovery Partition) 2. Read the "ASUS Preload Wizard" screen and click Next. 4. Partition options: Recover Windows to select Windows Setup [EMS Enabled] 3. The Recovery Partition is created at the... PST files) to floppy disks or to a network drive and make note of the operating system, drivers, and utilities installed on -screen instructions to restore the operating system, drivers, and utilities installed on your Notebook PC at the factory. This option will delete all partitions...
User Manual
Page 72
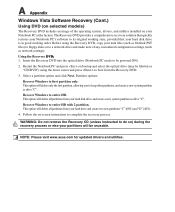
... the first partition, allowing you to complete the recovery process. Using the Recovery D�V��D��: 1. Restart the Notebook PC and press on -screen instructions to keep other partitions, and create a new system partition as "CD/DVD") using the Recovery DVD, copy your Notebook PC at the factory. This... HD. Recover Windows to be labeled as drive "C". Follow the on bootup and select the optical drive (may be powered ON). 2. NOTE: Please visit www.asus.com for updated drivers and utilities.
... the first partition, allowing you to complete the recovery process. Using the Recovery D�V��D��: 1. Restart the Notebook PC and press on -screen instructions to keep other partitions, and create a new system partition as "CD/DVD") using the Recovery DVD, copy your Notebook PC at the factory. This... HD. Recover Windows to be labeled as drive "C". Follow the on bootup and select the optical drive (may be powered ON). 2. NOTE: Please visit www.asus.com for updated drivers and utilities.


