User manual 8092831 Asko T754 EN
Page 2
... 5 Air exhaust 23 Disposal 5 Electrical installation 26 Child safety 6 Reversing the door 29 General 6 Follow these instructions: 30 Description of the tumble dryer 7 Quick guide 32 Advice and tips before you tumble dry 8 Materials that can be tumble dried 8 Materials that should not be tumble dried 8 Static electricity 8 Operating instructions 9 Sort your fabrics 9 Select the program 10 Selecting Options 13 Press the Start button 13 Drying program finished 14 Care and maintenance instructions...
... 5 Air exhaust 23 Disposal 5 Electrical installation 26 Child safety 6 Reversing the door 29 General 6 Follow these instructions: 30 Description of the tumble dryer 7 Quick guide 32 Advice and tips before you tumble dry 8 Materials that can be tumble dried 8 Materials that should not be tumble dried 8 Static electricity 8 Operating instructions 9 Sort your fabrics 9 Select the program 10 Selecting Options 13 Press the Start button 13 Drying program finished 14 Care and maintenance instructions...
User manual 8092831 Asko T754 EN
Page 4
... any servicing unless specifically recommended in this guide. • Do not use fabric softeners or dryer sheets unless the manufacturer gives written assurance that have been dry-cleaned. • The dryer is removed from the home. • Do not heat dry items that have been previously cleaned in, washed in, soaked in, or spotted with controls. • Do not attempt to repair or replace any part of...
... any servicing unless specifically recommended in this guide. • Do not use fabric softeners or dryer sheets unless the manufacturer gives written assurance that have been dry-cleaned. • The dryer is removed from the home. • Do not heat dry items that have been previously cleaned in, washed in, soaked in, or spotted with controls. • Do not attempt to repair or replace any part of...
User manual 8092831 Asko T754 EN
Page 5
... of service. The plug must be plugged into a chimney, wall, ceiling or concealed space in a building. This manual does not cover every possible condition and situation that is equipped with all local codes and ordinances. Installation See the "Installation instructions" chapter. Do not exhaust into an appropriate outlet that may occur. B) Grounding instructions for electric current. NOTE! Use common sense and caution when installing, operating, and...
... of service. The plug must be plugged into a chimney, wall, ceiling or concealed space in a building. This manual does not cover every possible condition and situation that is equipped with all local codes and ordinances. Installation See the "Installation instructions" chapter. Do not exhaust into an appropriate outlet that may occur. B) Grounding instructions for electric current. NOTE! Use common sense and caution when installing, operating, and...
User manual 8092831 Asko T754 EN
Page 8
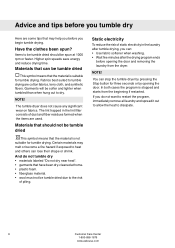
...have been dry-cleaned at 1000 rpm or faster. Higher spin speeds save energy and reduce drying time. NOTE! And do not want to restart the program, immediately remove all laundry and spread it out to allow the heat to heat and others can be tumble dried This ...clothes been spun? Materials that the material is suitable for three seconds or by pressing the Stop button for tumble drying. The lint trapped in the laundry after the drying program ends before opening the door. Certain materials may help you before you can stop the tumble dryer by opening the door and removing...
...have been dry-cleaned at 1000 rpm or faster. Higher spin speeds save energy and reduce drying time. NOTE! And do not want to restart the program, immediately remove all laundry and spread it out to allow the heat to heat and others can be tumble dried This ...clothes been spun? Materials that the material is suitable for three seconds or by pressing the Stop button for tumble drying. The lint trapped in the laundry after the drying program ends before opening the door. Certain materials may help you before you can stop the tumble dryer by opening the door and removing...

User manual 8092831 Asko T754 EN
Page 10
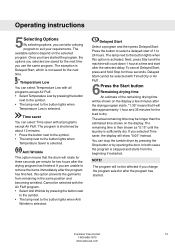
... what specific programs can be selected and each button press changes the time by 15 minutes. Operating instructions 4Select the program Program selector Display window / Main power switch Options buttons Start Stop Select a program by pressing the Delayed Start button. Auto Normal and Auto Delicate These programs end automatically when the load is too long, the garments can cause items to shrink or wrinkle and...
... what specific programs can be selected and each button press changes the time by 15 minutes. Operating instructions 4Select the program Program selector Display window / Main power switch Options buttons Start Stop Select a program by pressing the Delayed Start button. Auto Normal and Auto Delicate These programs end automatically when the load is too long, the garments can cause items to shrink or wrinkle and...

User manual 8092831 Asko T754 EN
Page 12
... the consumption values given below, the requirements are as follows: Temperature of intake air: 73 °F (23 °C) Moisture content of using different spin speeds when washing the load. Operating instructions Program chart Here we present the energy and time consumption of a few different programs. The table shows the effect of intake air: 55 % Drying temperature: Normal Heater output: 3000W, 15A Program Material Auto...
... the consumption values given below, the requirements are as follows: Temperature of intake air: 73 °F (23 °C) Moisture content of using different spin speeds when washing the load. Operating instructions Program chart Here we present the energy and time consumption of a few different programs. The table shows the effect of intake air: 55 % Drying temperature: Normal Heater output: 3000W, 15A Program Material Auto...
User manual 8092831 Asko T754 EN
Page 13
... the program is selected. Operating instructions 5Selecting Options By selecting options, you can stop the tumble dryer by pressing the Stop button or by opening the door. The lamp next to the button lights when Temperature Saver is stopped and starts from remaining in the same position and becoming wrinkled. Delayed Start cannot be longer than the estimated time shown on the selected...
... the program is selected. Operating instructions 5Selecting Options By selecting options, you can stop the tumble dryer by pressing the Stop button or by opening the door. The lamp next to the button lights when Temperature Saver is stopped and starts from remaining in the same position and becoming wrinkled. Delayed Start cannot be longer than the estimated time shown on the selected...

User manual 8092831 Asko T754 EN
Page 14
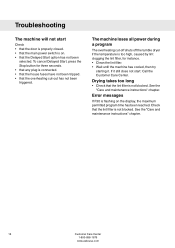
... triggered. Clean the filter, wait until the machine has cooled, then try starting it still does not start: Call the Customer Care Center. Once drying has finished Turn off the main power switch. Remove the clothes and close the door to prevent small children from climbing into the machine. 14 Customer Care Center 1-800-898-1879 www.askousa.com WARNING! NOTE! • Clean the lint filter in...
... triggered. Clean the filter, wait until the machine has cooled, then try starting it still does not start: Call the Customer Care Center. Once drying has finished Turn off the main power switch. Remove the clothes and close the door to prevent small children from climbing into the machine. 14 Customer Care Center 1-800-898-1879 www.askousa.com WARNING! NOTE! • Clean the lint filter in...
User manual 8092831 Asko T754 EN
Page 15
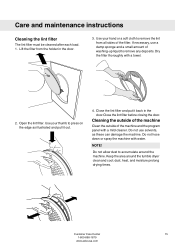
Care and maintenance instructions Cleaning the lint filter The lint filter must be cleaned after each load. 1. If necessary, use solvents, as illustrated and pull it back in the door. 3. Use your hand or a soft cloth to accumulate around the tumble dryer clean and cool; Keep the area around the machine. Customer Care Center 15 1-800-898-1879 www.askousa.com Do not allow dust to remove the lint from the...
Care and maintenance instructions Cleaning the lint filter The lint filter must be cleaned after each load. 1. If necessary, use solvents, as illustrated and pull it back in the door. 3. Use your hand or a soft cloth to accumulate around the tumble dryer clean and cool; Keep the area around the machine. Customer Care Center 15 1-800-898-1879 www.askousa.com Do not allow dust to remove the lint from the...
User manual 8092831 Asko T754 EN
Page 16
...; that any plug is connected. • that the house fuses have not been tripped. • that the overheating cut -off shuts off the tumble dryer if the temperature is too high, caused by lint clogging the lint filter, for instance. • Clean the lint filter. • Wait until the machine has cooled, then try starting it still does not start Check • that the door is properly...
...; that any plug is connected. • that the house fuses have not been tripped. • that the overheating cut -off shuts off the tumble dryer if the temperature is too high, caused by lint clogging the lint filter, for instance. • Clean the lint filter. • Wait until the machine has cooled, then try starting it still does not start Check • that the door is properly...
User manual 8092831 Asko T754 EN
Page 19
... Warranty ASKO Appliances Inc. Instruct how to use . • Damage resulting from state to be responsible for any incidental or consequential damages. This warranty gives you specific legal rights and you . regarding a warranty issue, make a note of the appliance. 2. Correct house plumbing, including drainage problems related to shipment, delivery, installation, misuse or abuse. 3. Clean or service air device in drain line. • Repair and/or replacement parts...
... Warranty ASKO Appliances Inc. Instruct how to use . • Damage resulting from state to be responsible for any incidental or consequential damages. This warranty gives you specific legal rights and you . regarding a warranty issue, make a note of the appliance. 2. Correct house plumbing, including drainage problems related to shipment, delivery, installation, misuse or abuse. 3. Clean or service air device in drain line. • Repair and/or replacement parts...
User manual 8092831 Asko T754 EN
Page 20
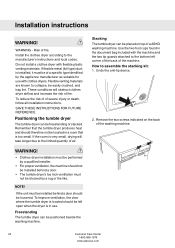
...'s instructions and local codes. Do not install a clothes dryer with clothes dryers. Remember that is very small, drying will obstruct clothes dryer airflow and increase the risk of a ASKO washing machine. If the room is too small. NOTE! Freestanding The tumble dryer can be blocked by a rug or the like. WARNING! • Clothes dryer installation must be performed by the applience manufacturer as suitable for use . Remove the...
...'s instructions and local codes. Do not install a clothes dryer with clothes dryers. Remember that is very small, drying will obstruct clothes dryer airflow and increase the risk of a ASKO washing machine. If the room is too small. NOTE! Freestanding The tumble dryer can be blocked by a rug or the like. WARNING! • Clothes dryer installation must be performed by the applience manufacturer as suitable for use . Remove the...
User manual 8092831 Asko T754 EN
Page 22
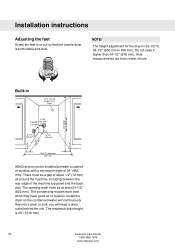
...including between the rear edge of the machine top panel and the back wall. The condensing models work best when they have good air circulation. Install the dryer so the condensed water will continuously flow into a drain or sink, you will need a drain outlet behind the unit. There must be installed beneath a ...dryer is 40" (1016 mm). 22 Customer Care Center 1-800-898-1879 www.askousa.com The maximum drain height is both stable and level. Hole measurements are from center of 34" (864 mm). NOTE! Installation instructions Adjusting the feet Screw the feet in ASKO dryers...
...including between the rear edge of the machine top panel and the back wall. The condensing models work best when they have good air circulation. Install the dryer so the condensed water will continuously flow into a drain or sink, you will need a drain outlet behind the unit. There must be installed beneath a ...dryer is 40" (1016 mm). 22 Customer Care Center 1-800-898-1879 www.askousa.com The maximum drain height is both stable and level. Hole measurements are from center of 34" (864 mm). NOTE! Installation instructions Adjusting the feet Screw the feet in ASKO dryers...

User manual 8092831 Asko T754 EN
Page 23
... catch lint. Make sure there is delivered with screws or other fasteners that allows you to "aTll-oswtilse"yeoxuhtaocuocsnotnnvenecentcttththtehaedt uct on the rear, duct on the roenatrhoer loenfttohreon the right side left or the right exhaust outlet. You will need to the dryer NOTE! See illustration for condenser dryers. Installation instructions Install in a closet ASKO's front panel controls make it possible to install the washers and dryers in the door...
... catch lint. Make sure there is delivered with screws or other fasteners that allows you to "aTll-oswtilse"yeoxuhtaocuocsnotnnvenecentcttththtehaedt uct on the rear, duct on the roenatrhoer loenfttohreon the right side left or the right exhaust outlet. You will need to the dryer NOTE! See illustration for condenser dryers. Installation instructions Install in a closet ASKO's front panel controls make it possible to install the washers and dryers in the door...
User manual 8092831 Asko T754 EN
Page 24
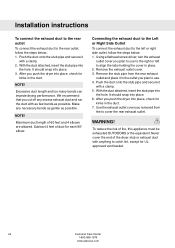
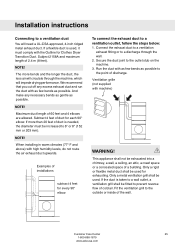
... impede drying performance. Remove the exhaust outlet cover. 3. After you cut off any necessary bends as gentle as possible. Installation instructions To connect the exhaust duct to the rear outlet To connect the exhaust duct to the rear outlet, follow the steps below :. 1. It should snap into place, check for each 90° elbow. We recommend that you push the dryer into place. 6. Using a flathead screw-driver, turn the exhaust outlet cover you removed from the rear exhaust outlet...
... impede drying performance. Remove the exhaust outlet cover. 3. After you cut off any necessary bends as gentle as possible. Installation instructions To connect the exhaust duct to the rear outlet To connect the exhaust duct to the rear outlet, follow the steps below :. 1. It should snap into place, check for each 90° elbow. We recommend that you push the dryer into place. 6. Using a flathead screw-driver, turn the exhaust outlet cover you removed from the rear exhaust outlet...
User manual 8092831 Asko T754 EN
Page 25
... duct is taken to a wall outlet, a ventilation grill shall be increased to the outside or inside of the wall. Installation instructions Connecting to prevent reverse flow of cold air. NOTE! NOTE! This appliance shall not be used. Examples of installations subtract 4 feet for every 90° elbow To connect the exhaust duct to the point of duct is used for each 90° elbow. Run the duct...
... duct is taken to a wall outlet, a ventilation grill shall be increased to the outside or inside of the wall. Installation instructions Connecting to prevent reverse flow of cold air. NOTE! NOTE! This appliance shall not be used. Examples of installations subtract 4 feet for every 90° elbow To connect the exhaust duct to the point of duct is used for each 90° elbow. Run the duct...
User manual 8092831 Asko T754 EN
Page 26
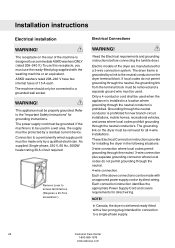
... Electrical requirements and grounding instructions before connecting the tumble dryer. The receptacle on the rear of the dryer are manufactured for installing the dryer in the following situations: 3-wire connection where local codes permit grounding through the neutral. 3-wire connection plus separate grounding connector where local codes do not permit grounding through the neutral conductor is designed to accommodate ASKO washers ONLY (rated 208-240 V.) To use the ready-fitted plug...
... Electrical requirements and grounding instructions before connecting the tumble dryer. The receptacle on the rear of the dryer are manufactured for installing the dryer in the following situations: 3-wire connection where local codes permit grounding through the neutral. 3-wire connection plus separate grounding connector where local codes do not permit grounding through the neutral conductor is designed to accommodate ASKO washers ONLY (rated 208-240 V.) To use the ready-fitted plug...
User manual 8092831 Asko T754 EN
Page 27
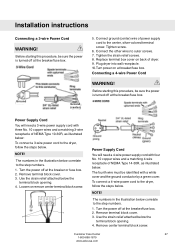
...the illustration below . NOTE! Replace terminal box cover on at the breaker/fuse box. Turn power on back of NEMA Type 10-30R, as illustrated below correlate to the step numbers. 1. Remove terminal block cover. 3. To connect a 4-wire power cord to outer screws. 7. Remove terminal block cover. 3. Remove center terminal block screw. Installation instructions Connecting a 3-wire Power Cord WARNING! Connect the other wires to the dryer, follow the steps below the terminal block opening . 4. Turn the power off at the breaker/fuse box. 2. Use the strain relief attached...
...the illustration below . NOTE! Replace terminal box cover on at the breaker/fuse box. Turn power on back of NEMA Type 10-30R, as illustrated below correlate to the step numbers. 1. Remove terminal block cover. 3. To connect a 4-wire power cord to outer screws. 7. Remove terminal block cover. 3. Remove center terminal block screw. Installation instructions Connecting a 3-wire Power Cord WARNING! Connect the other wires to the dryer, follow the steps below the terminal block opening . 4. Turn the power off at the breaker/fuse box. 2. Use the strain relief attached...
User manual 8092831 Asko T754 EN
Page 28
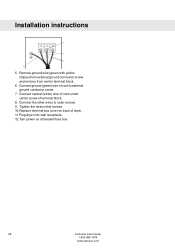
Replace terminal box cover on at breaker/fuse box. 28 Customer Care Center 1-800-898-1879 www.askousa.com Plug dryer into wall receptacle. 12. Connect neutral (white) wire of cord under center screw of dryer. 11. Connect the other wires to external ground conductor screw. 7. Turn power on back of terminal block. 8. Tighten the strain relief screws. 10. Remove ground wire (green with yellow stripes) from external ground connector screw and remove from center terminal block. 6. Installation instructions 4 7 8 6 5. Connect ground (green) wire of cord to outer screws. 9.
Replace terminal box cover on at breaker/fuse box. 28 Customer Care Center 1-800-898-1879 www.askousa.com Plug dryer into wall receptacle. 12. Connect neutral (white) wire of cord under center screw of dryer. 11. Connect the other wires to external ground conductor screw. 7. Turn power on back of terminal block. 8. Tighten the strain relief screws. 10. Remove ground wire (green with yellow stripes) from external ground connector screw and remove from center terminal block. 6. Installation instructions 4 7 8 6 5. Connect ground (green) wire of cord to outer screws. 9.

User manual 8092831 Asko T754 EN
Page 32
... and any options and settings. 5Press the Start button 6Drying program finished • "End" appears on the display when the program is finished. • Clean the lint filter after the drying program is finished. We reserve the right to the desired program. • Select any options • Turn the program selector to make changes. 32 Customer Care Center 1-800-898-1879...
... and any options and settings. 5Press the Start button 6Drying program finished • "End" appears on the display when the program is finished. • Clean the lint filter after the drying program is finished. We reserve the right to the desired program. • Select any options • Turn the program selector to make changes. 32 Customer Care Center 1-800-898-1879...


