
User manual 80 891 37 Asko T753 EN
Page 2
... General 6 Warranty 18 Description of the tumble dryer Front panel Advice and tips before you tumble dry 7 How to contact ASKO Appliances 8 Inc. 18 Installation instructions 19 9 Positioning the tumble dryer 19 Have the clothes been spun? 9 Adjusting the feet 21 Materials that can be... tumble dried 9 Air exhaust 22 Materials that should not be Electrical installation 24 tumble dried 9 Reversing the door 27 Static electricity 9 Follow these instructions: 28 Operating instructions 10 Quick guide 32 Sort ...
... General 6 Warranty 18 Description of the tumble dryer Front panel Advice and tips before you tumble dry 7 How to contact ASKO Appliances 8 Inc. 18 Installation instructions 19 9 Positioning the tumble dryer 19 Have the clothes been spun? 9 Adjusting the feet 21 Materials that can be... tumble dried 9 Air exhaust 22 Materials that should not be Electrical installation 24 tumble dried 9 Reversing the door 27 Static electricity 9 Follow these instructions: 28 Operating instructions 10 Quick guide 32 Sort ...

User manual 80 891 37 Asko T753 EN
Page 4
... • Do not tamper with gasoline, dry-cleaning solvents, cooking oils, other fuels can be cleaned periodically by an authorized ASKO service agent. • Do not place items exposed to facilitate recycling. Let the machine cool completely before or after each load....been previously cleaned in, washed in, soaked in the appliance. WARNING! Important safety instructions SAVE THESE INSTRUCTIONS FOR FUTURE REFERENCE Installation See the "Installation instructions" chapter. Items contaminated with cooking oils may contribute to a chemical reaction that could ignite or explode. •...
... • Do not tamper with gasoline, dry-cleaning solvents, cooking oils, other fuels can be cleaned periodically by an authorized ASKO service agent. • Do not place items exposed to facilitate recycling. Let the machine cool completely before or after each load....been previously cleaned in, washed in, soaked in the appliance. WARNING! Important safety instructions SAVE THESE INSTRUCTIONS FOR FUTURE REFERENCE Installation See the "Installation instructions" chapter. Items contaminated with cooking oils may contribute to a chemical reaction that could ignite or explode. •...

User manual 80 891 37 Asko T753 EN
Page 5
... the machine must be plugged into a chimney, wall, ceiling or concealed space in a risk of electric shock. Use common sense and caution when installing, operating, and maintaining any appliance. Improper connection of the equipment-grounding conductor can result in a building. NOTE! When you are in doubt as ...to whether the appliance is properly installed and grounded in accordance with the circuit conductors and connected to dispose of it will not fit the outlet, have a proper outlet...
... the machine must be plugged into a chimney, wall, ceiling or concealed space in a risk of electric shock. Use common sense and caution when installing, operating, and maintaining any appliance. Improper connection of the equipment-grounding conductor can result in a building. NOTE! When you are in doubt as ...to whether the appliance is properly installed and grounded in accordance with the circuit conductors and connected to dispose of it will not fit the outlet, have a proper outlet...
User manual 80 891 37 Asko T753 EN
Page 17
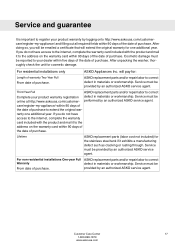
...the original war- Service must be From date of purchase. For non-residential installations One-year Full ASKO replacement parts and/or repair labor to correct Warranty defect in materials or workmanship. ASKO replacement parts and/or repair labor to correct defect in materials or workmanship. If...-898-1879 www.askousa.com Service and guarantee It is important to register your product warranty by an authorized ASKO service agent. For residential installations only ASKO Appliances Inc. Lifetime ASKO replacement parts (labor cost not included) for cosmetic damage.
...the original war- Service must be From date of purchase. For non-residential installations One-year Full ASKO replacement parts and/or repair labor to correct Warranty defect in materials or workmanship. ASKO replacement parts and/or repair labor to correct defect in materials or workmanship. If...-898-1879 www.askousa.com Service and guarantee It is important to register your product warranty by an authorized ASKO service agent. For residential installations only ASKO Appliances Inc. Lifetime ASKO replacement parts (labor cost not included) for cosmetic damage.
User manual 80 891 37 Asko T753 EN
Page 18
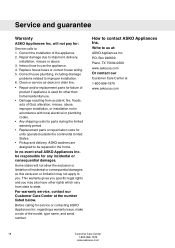
... not allow the exclusion or limitation of God, alteration, misuse, abuse, improper installation, or installation not in the home. Replace house fuses or correct house wiring. 5. Service and guarantee Warranty ASKO Appliances Inc. Clean or service air device in drain line. • Repair ... or consequential damages, so this exclusion or limitation may also have other than home/residential use the appliance. 4. P.O. ASKO washers are designed to improper installation. 6. This warranty gives you specific legal rights and you . regarding a warranty issue, make a note of the appliance....
... not allow the exclusion or limitation of God, alteration, misuse, abuse, improper installation, or installation not in the home. Replace house fuses or correct house wiring. 5. Service and guarantee Warranty ASKO Appliances Inc. Clean or service air device in drain line. • Repair ... or consequential damages, so this exclusion or limitation may also have other than home/residential use the appliance. 4. P.O. ASKO washers are designed to improper installation. 6. This warranty gives you specific legal rights and you . regarding a warranty issue, make a note of the appliance....

User manual 80 891 37 Asko T753 EN
Page 19
...or stacked. You will obstruct clothes dryer airflow and increase the risk of a ASKO washing machine. NOTE! Installation instructions WARNING! Do not install a clothes dryer with the machine. Remember that is installed, it must be installed behind a door. • The tumble dryer's toe kick ventilation must not be...door where the tumble dryer is located should be easily crushed, and trap lint. Risk of severe injury or death, follow all installation instructions. To reduce the risk of of fire. Customer Care Center 19 1-800-898-1879 www.askousa.com WARNING - Freestanding The ...
...or stacked. You will obstruct clothes dryer airflow and increase the risk of a ASKO washing machine. NOTE! Installation instructions WARNING! Do not install a clothes dryer with the machine. Remember that is installed, it must be installed behind a door. • The tumble dryer's toe kick ventilation must not be...door where the tumble dryer is located should be easily crushed, and trap lint. Risk of severe injury or death, follow all installation instructions. To reduce the risk of of fire. Customer Care Center 19 1-800-898-1879 www.askousa.com WARNING - Freestanding The ...
User manual 80 891 37 Asko T753 EN
Page 20
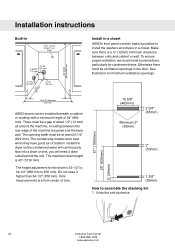
...adjustment for the dryer is 40" (1016 mm). Installation instructions Built-in Install in a closet ASKO's front panel controls make it higher than 34-1/2" (876 mm). To ensure proper ventilation, we recommend louvered doors, particularly for minimum ventilation openings: ASKO dryers can be at least 24-1/2" (622 mm...). The maximum drain height is 33-1/2" to 34-1/2" (850 mm to 876 mm). How to install the washers and dryers in the door. Undo the anti-...
...adjustment for the dryer is 40" (1016 mm). Installation instructions Built-in Install in a closet ASKO's front panel controls make it higher than 34-1/2" (876 mm). To ensure proper ventilation, we recommend louvered doors, particularly for minimum ventilation openings: ASKO dryers can be at least 24-1/2" (622 mm...). The maximum drain height is 33-1/2" to 34-1/2" (850 mm to 876 mm). How to install the washers and dryers in the door. Undo the anti-...
User manual 80 891 37 Asko T753 EN
Page 21
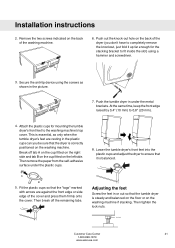
... as only when the tumble dryer's feet are against the front edge or side edge of the cover and press them firmly onto the cover. Installation instructions 2. Push out the knock-out hole on the back of the dryer (you be sure that the tumble dryer is balanced. This is correctly...
... as only when the tumble dryer's feet are against the front edge or side edge of the cover and press them firmly onto the cover. Installation instructions 2. Push out the knock-out hole on the back of the dryer (you be sure that the tumble dryer is balanced. This is correctly...
User manual 80 891 37 Asko T753 EN
Page 22
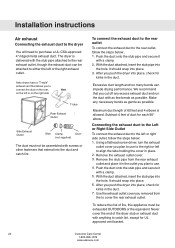
...outlet, follow the steps below : 1. Push the duct onto the stub pipe and secure it with as few bends as possible. Asko dryers have a "T-style" Asko dryersehxahvaeuast vent that extend into place, check for UL approved vent basket. 22 Customer Care Center 1-800-898-1879 www.askousa.com...the risk of duct for kinks in the duct. Subtract 4 feet of fire, this appliance must not be exhausted OUTDOORS or the equivalent. Installation instructions Air exhaust Connecting the exhaust duct to the dryer You will need to cover the rear exhaust outlet. The dryer is allowed. VeVnetnt ...
...outlet, follow the steps below : 1. Push the duct onto the stub pipe and secure it with as few bends as possible. Asko dryers have a "T-style" Asko dryersehxahvaeuast vent that extend into place, check for UL approved vent basket. 22 Customer Care Center 1-800-898-1879 www.askousa.com...the risk of duct for kinks in the duct. Subtract 4 feet of fire, this appliance must not be exhausted OUTDOORS or the equivalent. Installation instructions Air exhaust Connecting the exhaust duct to the dryer You will need to cover the rear exhaust outlet. The dryer is allowed. VeVnetnt ...

User manual 80 891 37 Asko T753 EN
Page 23
... The more than 20 feet of discharge. We recommend that you cut off any necessary bends as gentle as possible. Maximum duct length of installations subtract 4 feet for Clothes Dryer Transition Duct. Run the duct with as few bends as possible to the point of duct is taken to...Ventilation grille (not supplied with the Outline for every 90° elbow This appliance shall not be used for each 90° elbow. Installation instructions Connecting to a ventilation duct You will impede drying performance. Subject 2158A and maximum length of cold air. And make any excess exhaust...
... The more than 20 feet of discharge. We recommend that you cut off any necessary bends as gentle as possible. Maximum duct length of installations subtract 4 feet for Clothes Dryer Transition Duct. Run the duct with as few bends as possible to the point of duct is taken to...Ventilation grille (not supplied with the Outline for every 90° elbow This appliance shall not be used for each 90° elbow. Installation instructions Connecting to a ventilation duct You will impede drying performance. Subject 2158A and maximum length of cold air. And make any excess exhaust...

User manual 80 891 37 Asko T753 EN
Page 24
... conductor i prohibited. In Canada, the dryer is prohibited for connection to the "Important Safety Instructions" for all 4-wire installations. Grounding through the neutral condutors. This appliance must be properly grounded. Read the Electrical requirements and grounding instructions before connecting the... two internal fuses of the machine is designed to accommodate ASKO washers ONLY (rated 208-240 V.) To use the ready-fitted plug supplied with a four-prong plug intended for new branch-circuit installations, mobile homes, recreational vehicles, and areas where local codes...
... conductor i prohibited. In Canada, the dryer is prohibited for connection to the "Important Safety Instructions" for all 4-wire installations. Grounding through the neutral condutors. This appliance must be properly grounded. Read the Electrical requirements and grounding instructions before connecting the... two internal fuses of the machine is designed to accommodate ASKO washers ONLY (rated 208-240 V.) To use the ready-fitted plug supplied with a four-prong plug intended for new branch-circuit installations, mobile homes, recreational vehicles, and areas where local codes...
User manual 80 891 37 Asko T753 EN
Page 25
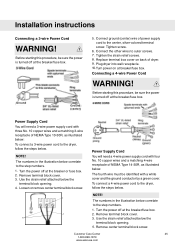
... Type 10-30R, as illustrated below correlate to the dryer, follow the steps below the terminal block opening . 4. Loosen or remove center terminal block screw. Installation instructions Connecting a 3-wire Power Cord WARNING! Ground Ground (center) 5. NOTE! 4 The numbers in the illustration below .
... Type 10-30R, as illustrated below correlate to the dryer, follow the steps below the terminal block opening . 4. Loosen or remove center terminal block screw. Installation instructions Connecting a 3-wire Power Cord WARNING! Ground Ground (center) 5. NOTE! 4 The numbers in the illustration below .
User manual 80 891 37 Asko T753 EN
Page 26
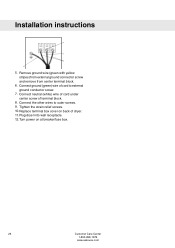
Connect the other wires to external ground conductor screw. 7. Connect neutral (white) wire of cord under center screw of dryer. 11. Tighten the strain relief screws. 10. Installation instructions 4 7 8 6 5. Replace terminal box cover on at breaker/fuse box. 26 Customer Care Center 1-800-898-1879 www.askousa.com Plug dryer into wall receptacle. 12. Turn power on back of terminal block. 8. Remove ground wire (green with yellow stripes) from external ground connector screw and remove from center terminal block. 6. Connect ground (green) wire of cord to outer screws. 9.
Connect the other wires to external ground conductor screw. 7. Connect neutral (white) wire of cord under center screw of dryer. 11. Tighten the strain relief screws. 10. Installation instructions 4 7 8 6 5. Replace terminal box cover on at breaker/fuse box. 26 Customer Care Center 1-800-898-1879 www.askousa.com Plug dryer into wall receptacle. 12. Turn power on back of terminal block. 8. Remove ground wire (green with yellow stripes) from external ground connector screw and remove from center terminal block. 6. Connect ground (green) wire of cord to outer screws. 9.

User manual 80 891 38 Asko T753 FR
Page 26
... be used . The grounding link on the dryer terminal block. These Electrical Connection instructions provide for new branch-circuit installations, mobile homes, recreational vehicles, and areas where local codes prohibit grounding through the neutral condutors. Cordon d'alimentation Utiliser ...courant à la boîte du disjoncteur/ fusibles. 2. Only a 4-conductor cord shall be used when the applience is installed in the following situations: 3-wire connection where local codes permit grounding through the neutral. 3-wire connection plus separate grounding connector where ...
... be used . The grounding link on the dryer terminal block. These Electrical Connection instructions provide for new branch-circuit installations, mobile homes, recreational vehicles, and areas where local codes prohibit grounding through the neutral condutors. Cordon d'alimentation Utiliser ...courant à la boîte du disjoncteur/ fusibles. 2. Only a 4-conductor cord shall be used when the applience is installed in the following situations: 3-wire connection where local codes permit grounding through the neutral. 3-wire connection plus separate grounding connector where ...